> ## Documentation Index
> Fetch the complete documentation index at: https://docs.orq.ai/llms.txt
> Use this file to discover all available pages before exploring further.
# Enterprise SSO authentication
> Configure enterprise Single Sign-On for Orq.ai using any OIDC or SAML provider, and provision members and teams from the provider with SCIM.
Feature available with the [Enterprise Plan](https://orq.ai/solutions/enterprise)
Connect an identity provider to **Orq.ai** to allow the team to sign in using their existing credentials. Any identity provider that supports OIDC or SAML 2.0 is compatible.
To have the provider create members, teams, and removals automatically instead of inviting people by hand, see [SCIM provisioning](#scim-provisioning). SCIM requires a **SAML** connection, so configure SAML rather than OIDC if provisioning is needed.
## Choose a Protocol
Two protocols are available:
* **OIDC**: Modern, lightweight protocol based on OAuth 2.0. Recommended for most organizations for its quick setup and JSON-based authentication.
* **SAML**: XML-based protocol recommended for enterprise environments requiring fine-grained control over security attributes and assertions.
## Configure SSO in Orq.ai
### Navigate to Auth settings
1. Log in to the **Orq.ai** account
2. Click **AI Studio** in the upper left
3. Click **Settings** in the sidebar
4. Click **Organization**
5. Click **Auth** from the sidebar
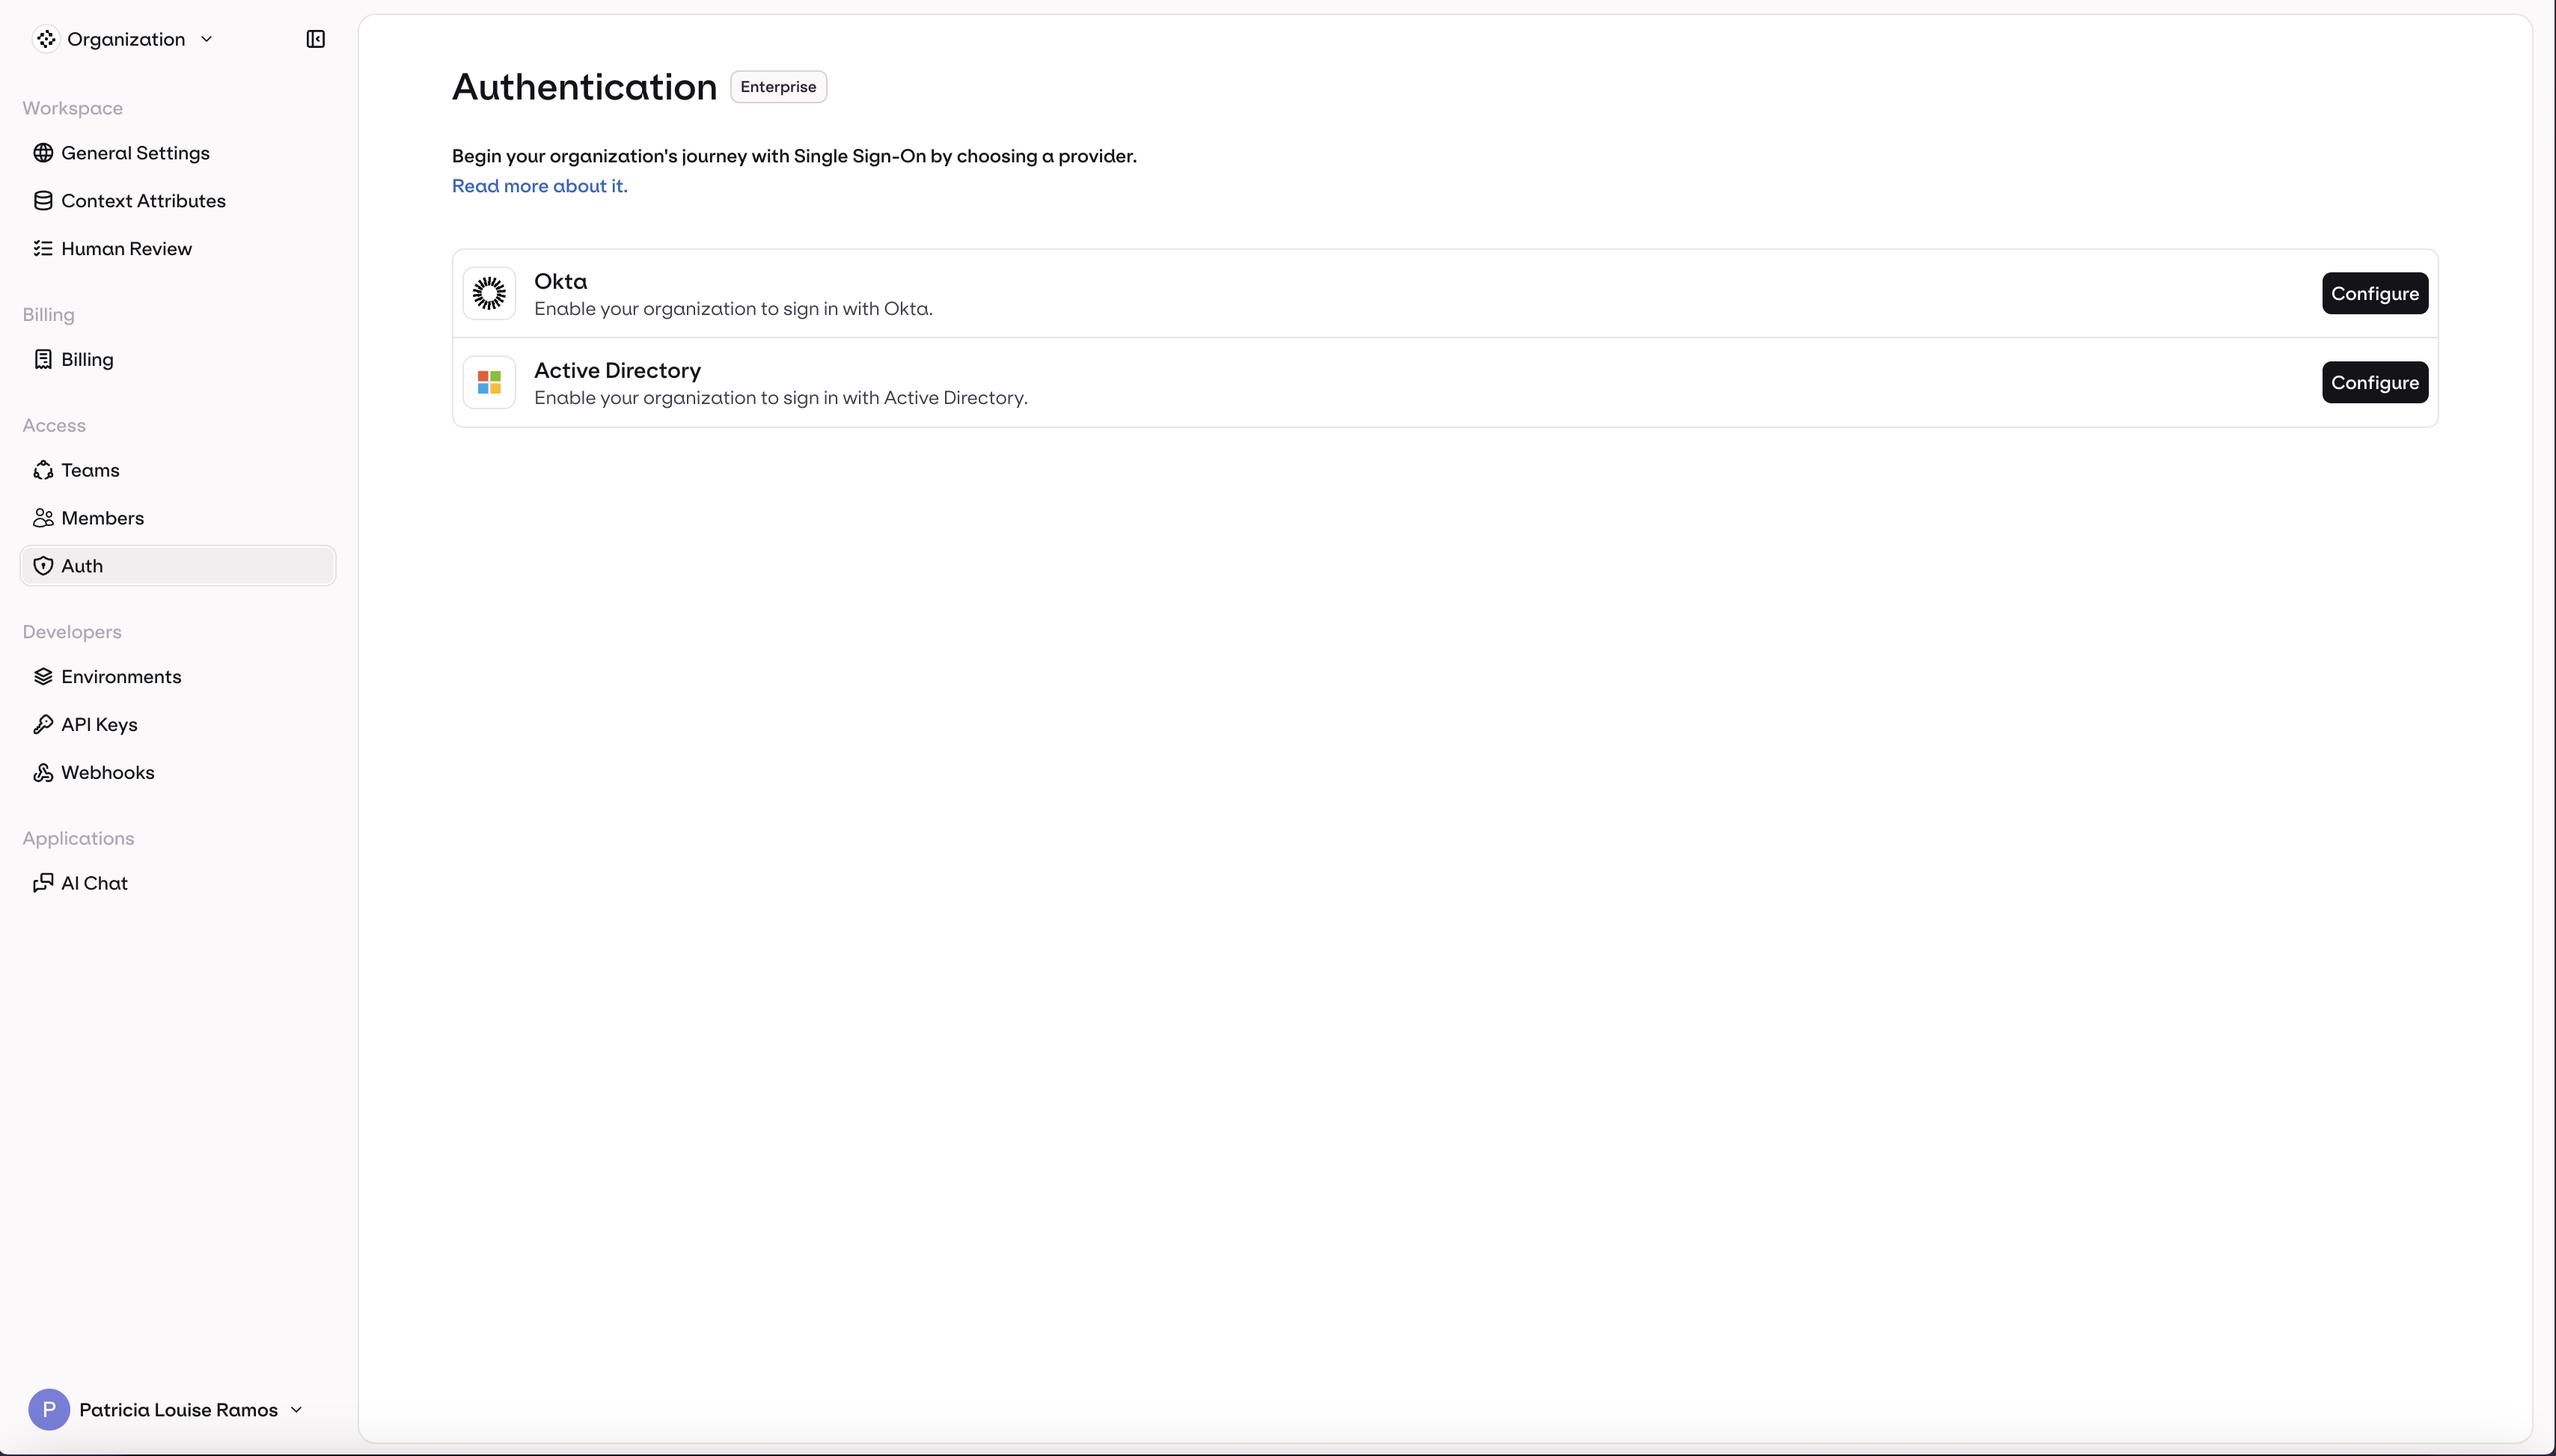 Only one SSO connection can be active at a time. To switch providers, disconnect the current connection first.
### Connect a provider
Click **Add SSO Connection**, select the protocol, and follow the guide for the identity provider:
Sign in to the **Okta Admin Console** and navigate to **Applications → Applications**.
Only one SSO connection can be active at a time. To switch providers, disconnect the current connection first.
### Connect a provider
Click **Add SSO Connection**, select the protocol, and follow the guide for the identity provider:
Sign in to the **Okta Admin Console** and navigate to **Applications → Applications**.
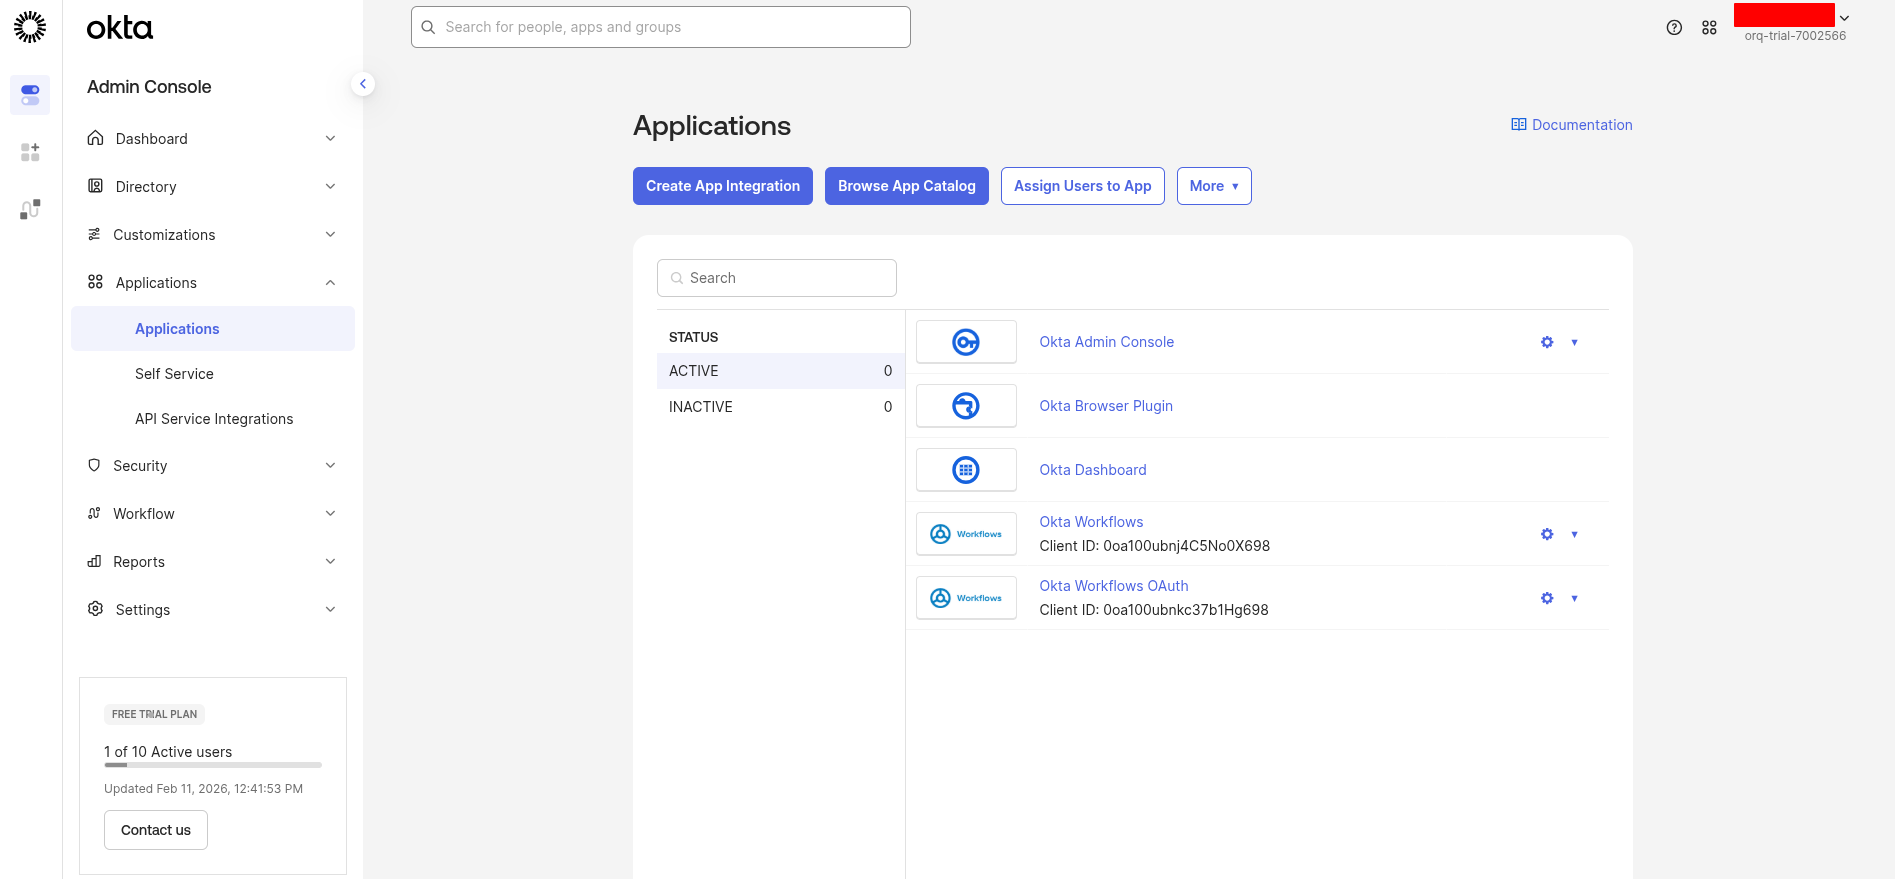 Click **Create App Integration**, then select **OIDC - OpenID Connect** and **Web Application**, and click **Next**.
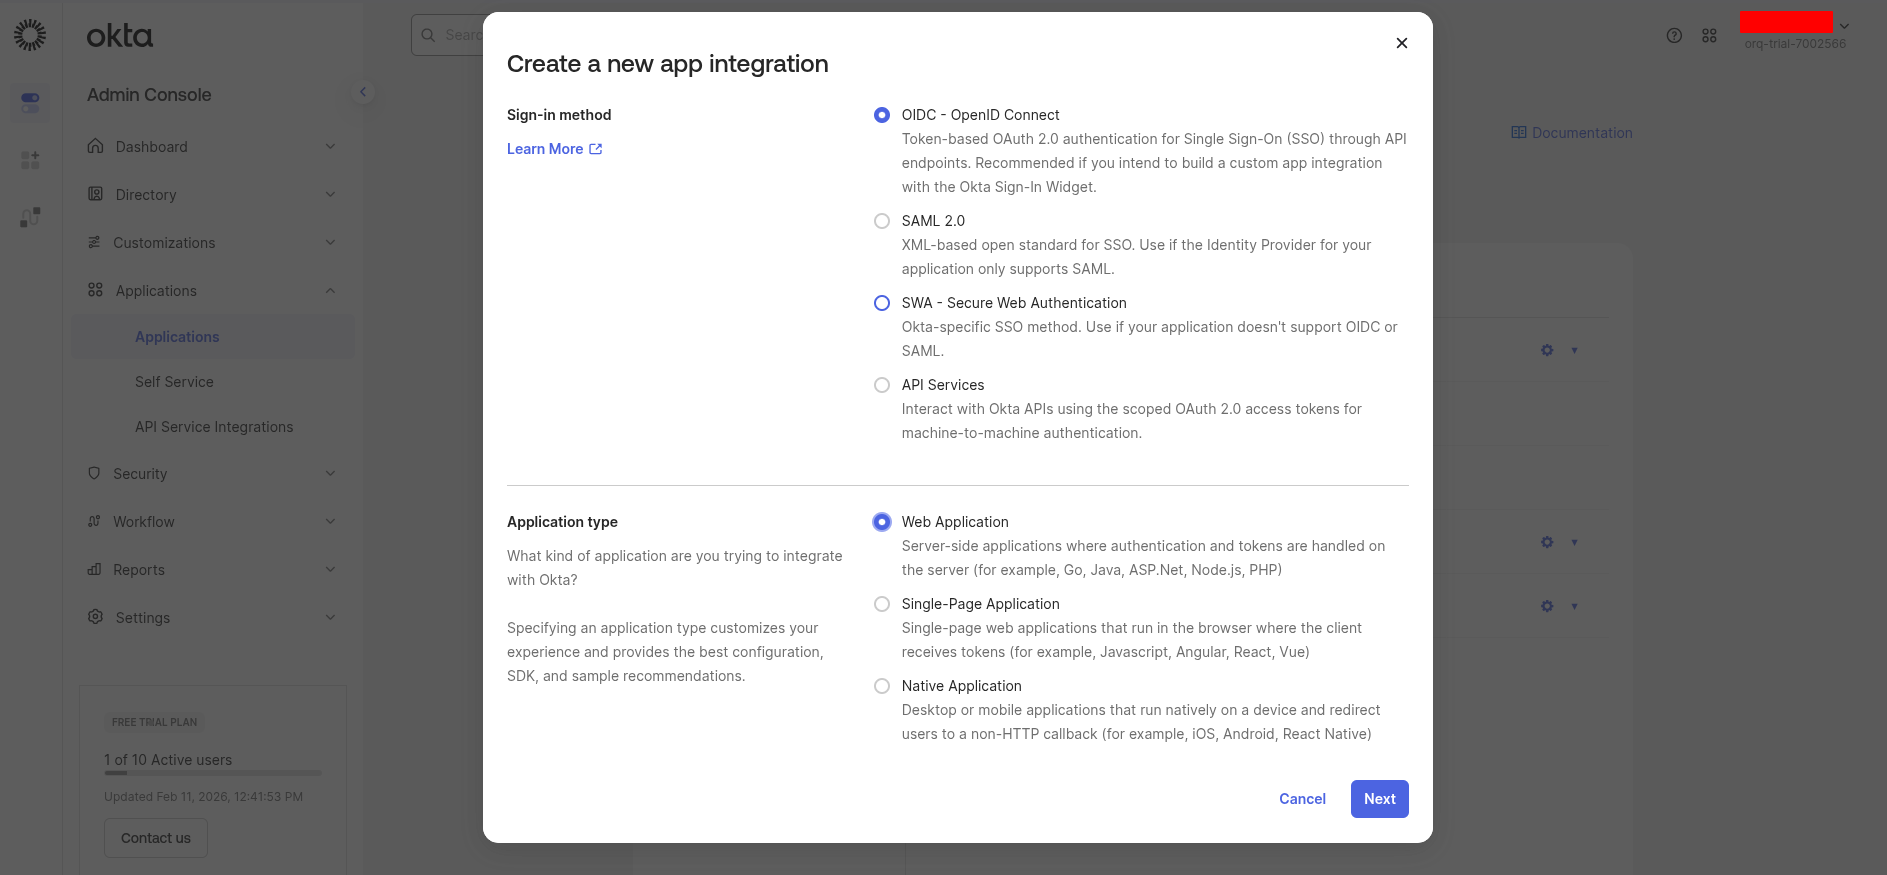 **Configure the application:**
* **App integration name**: `Orq.ai` (or preferred name)
* **Grant type**: Ensure **Authorization Code** is selected
* **Sign-in redirect URIs**:
```
https://my.orq.ai/v2/auth/sso/oidc/callback
```
* **Sign-out redirect URIs** (optional):
```
https://my.orq.ai
```
**Configure the application:**
* **App integration name**: `Orq.ai` (or preferred name)
* **Grant type**: Ensure **Authorization Code** is selected
* **Sign-in redirect URIs**:
```
https://my.orq.ai/v2/auth/sso/oidc/callback
```
* **Sign-out redirect URIs** (optional):
```
https://my.orq.ai
```
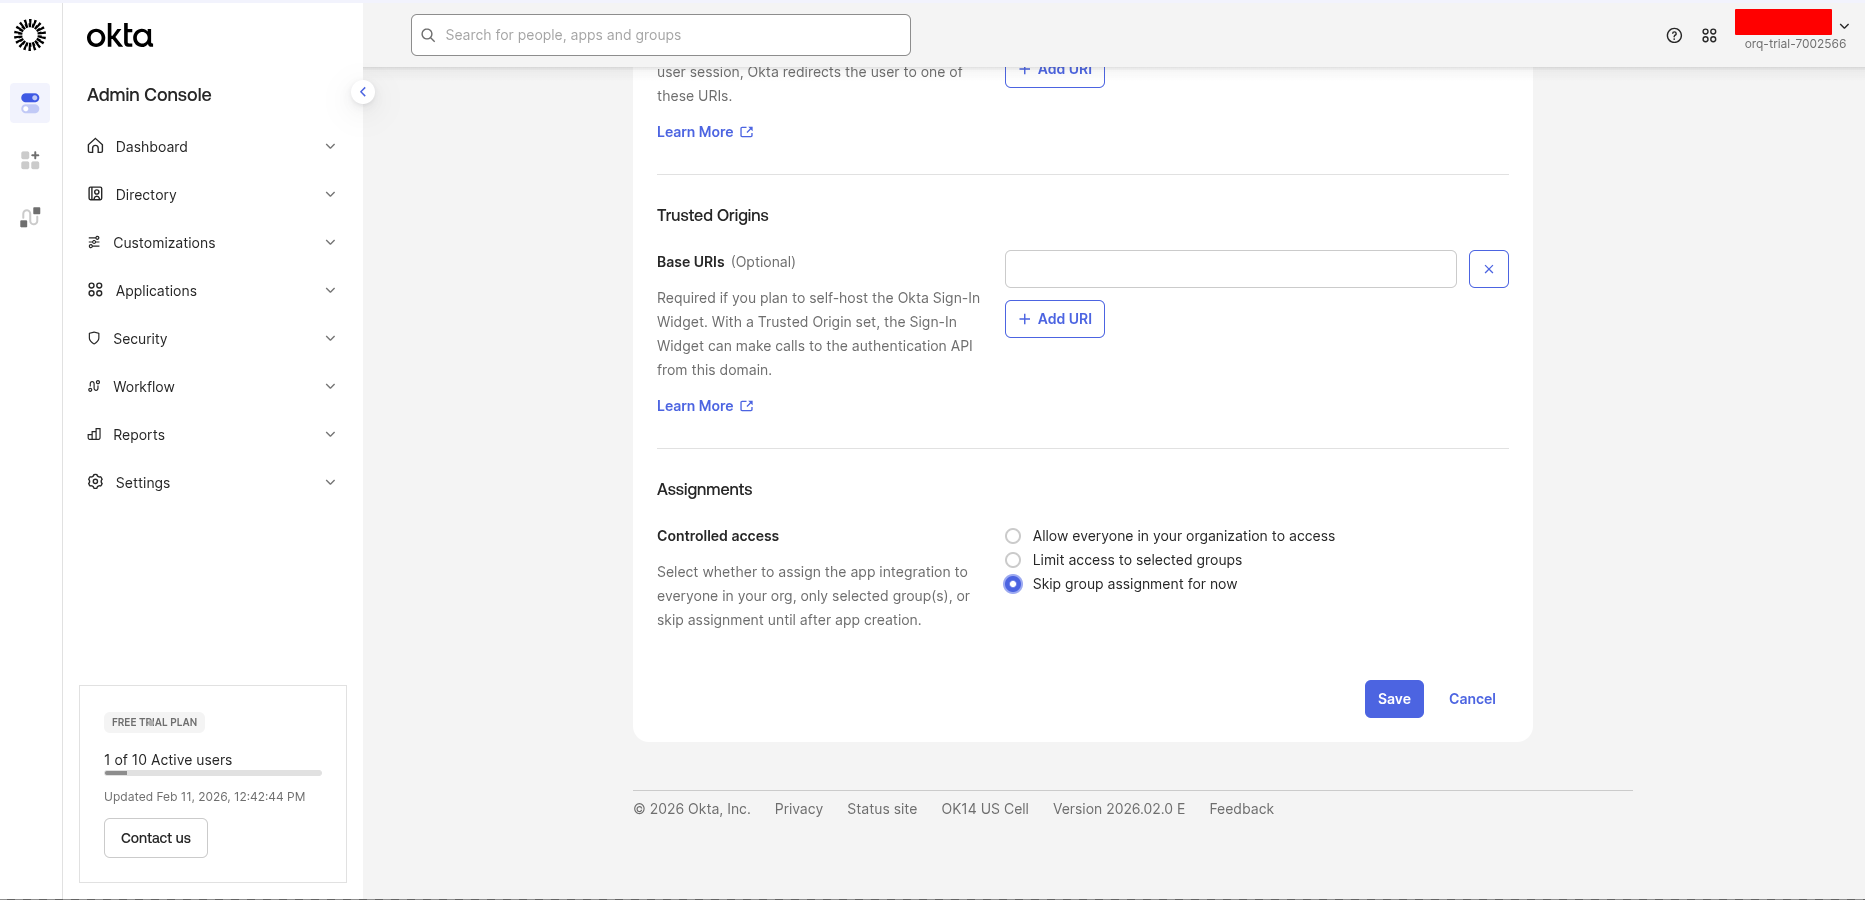 Go to the **Assignments** tab and click Assign → Assign to People or Assign to Groups.
Select the users or groups that should have access to **Orq.ai**, then click Done.
Go to the **Assignments** tab and click Assign → Assign to People or Assign to Groups.
Select the users or groups that should have access to **Orq.ai**, then click Done.
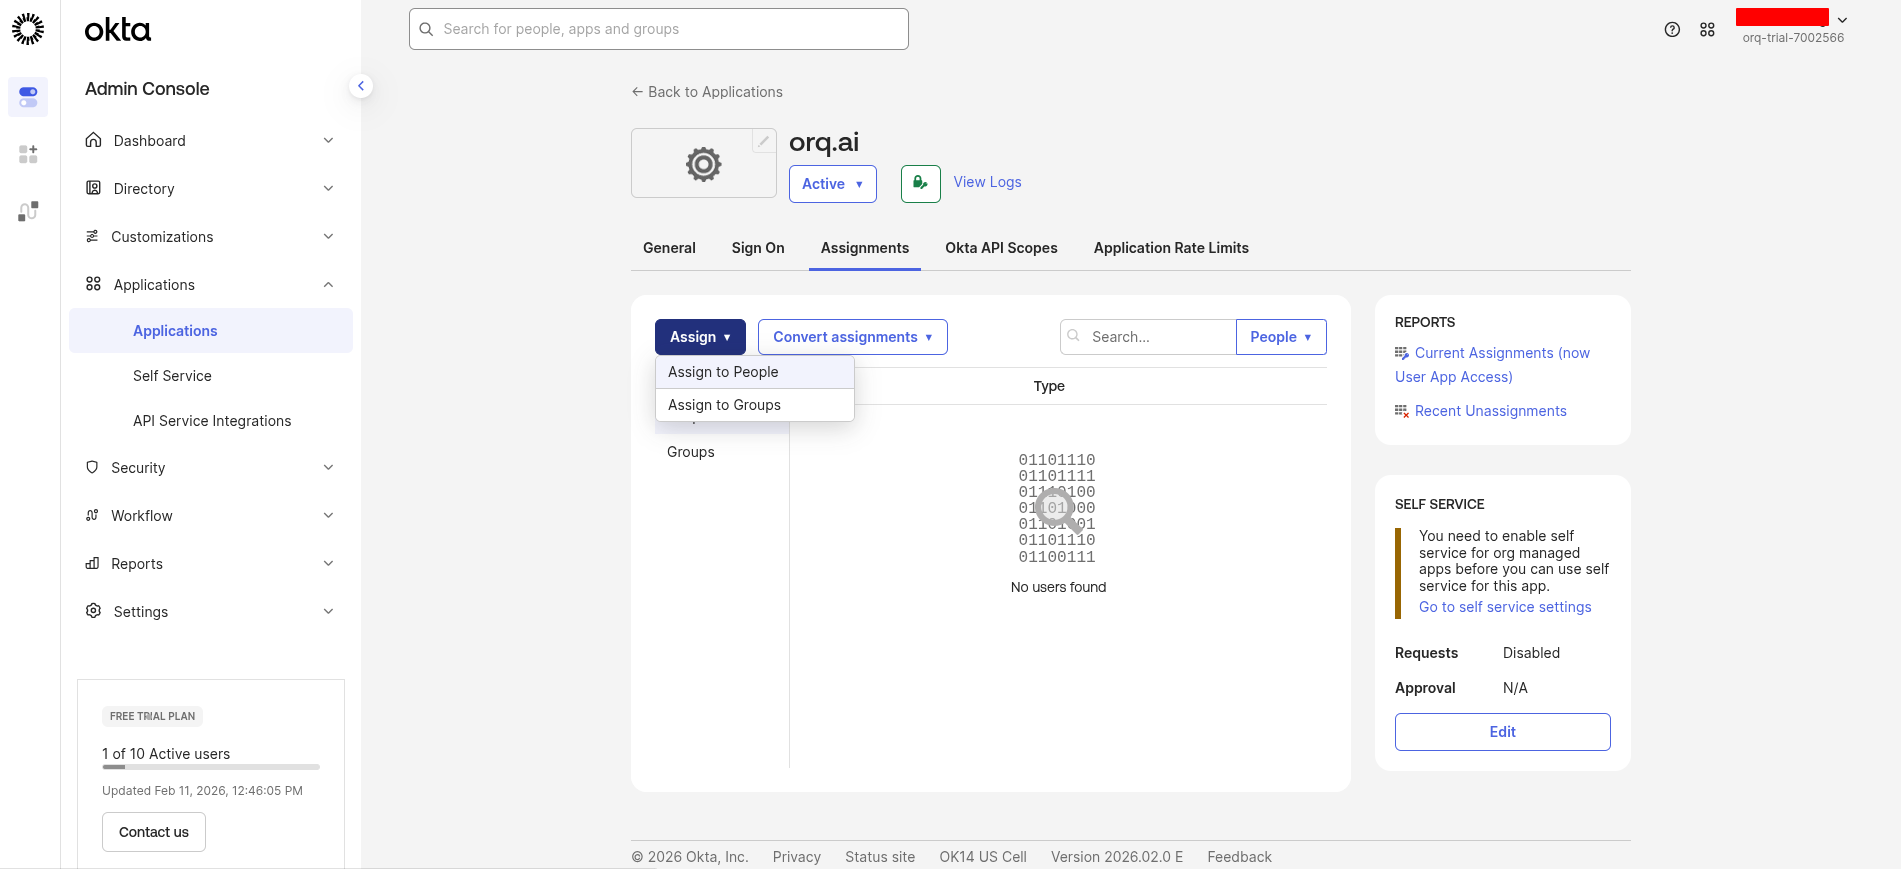 By default, no users are assigned to a new Okta app.
From the application's **General** tab, scroll down to the **Client Credentials** section.
Copy these values:
* **Client ID**: use as the **Client ID** in **Orq.ai**
* **Client secret**: click **Copy to clipboard** and use as the **Client Secret** in **Orq.ai**
By default, no users are assigned to a new Okta app.
From the application's **General** tab, scroll down to the **Client Credentials** section.
Copy these values:
* **Client ID**: use as the **Client ID** in **Orq.ai**
* **Client secret**: click **Copy to clipboard** and use as the **Client Secret** in **Orq.ai**
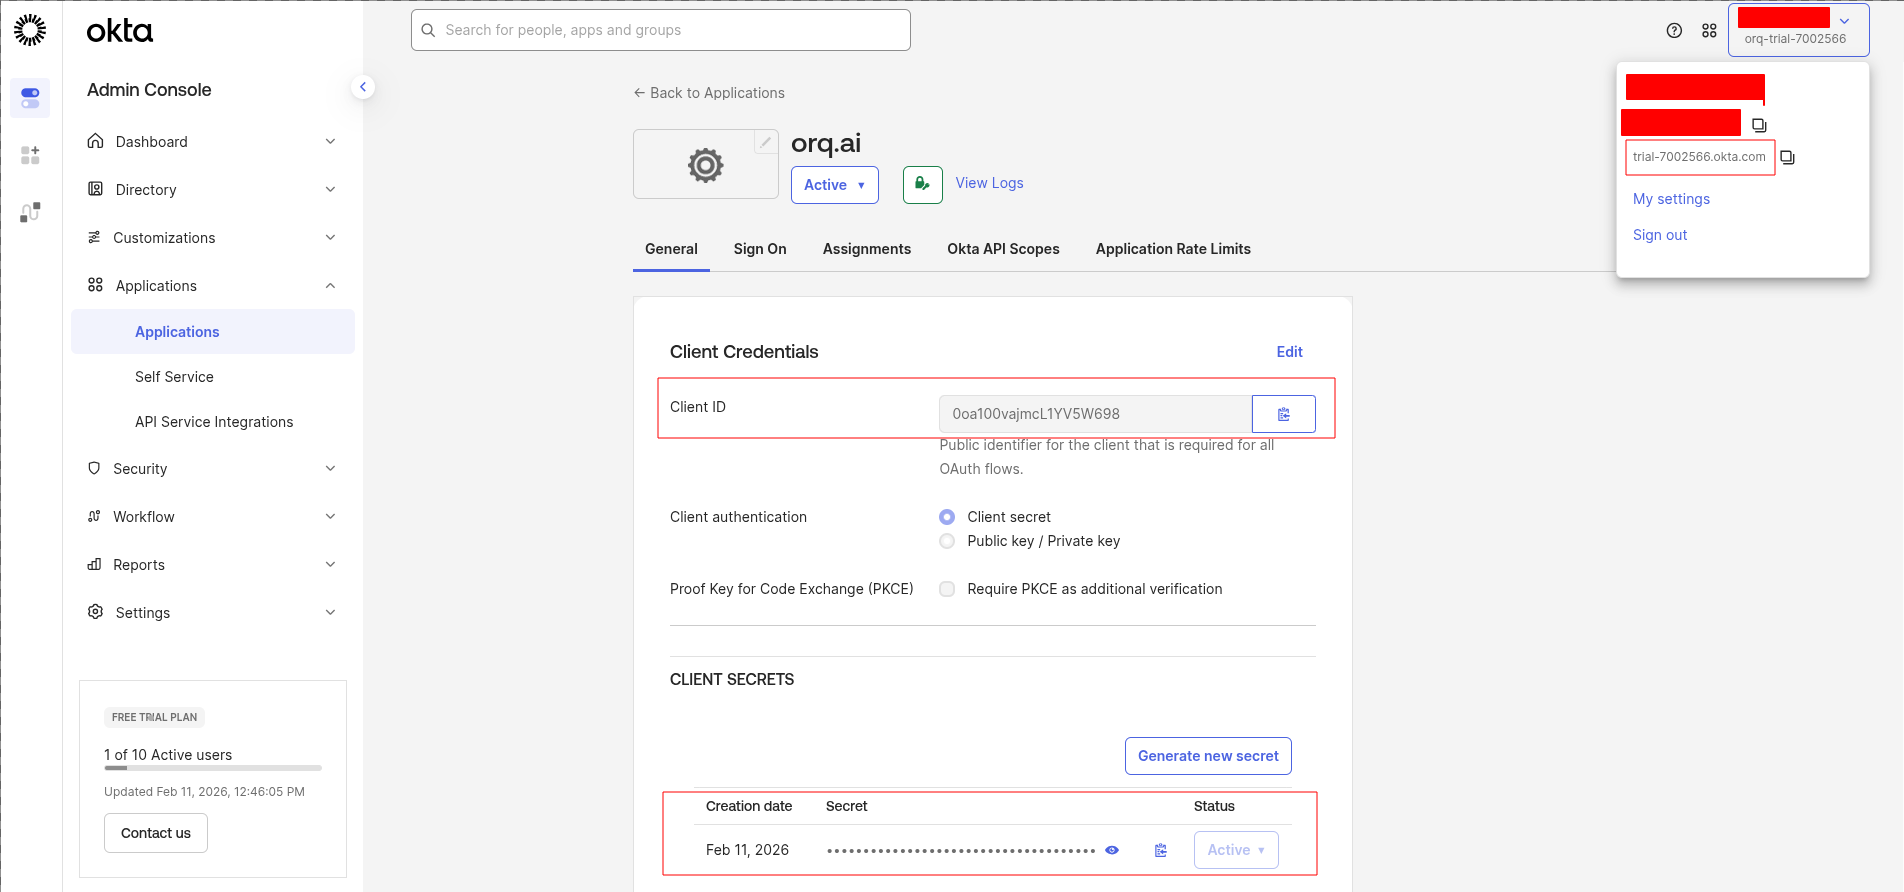 The Provider URL is the Okta domain's authorization server issuer URL:
```
https://{yourOktaDomain}
```
Find the Okta domain in the top-right corner of the **Okta Admin Console** (e.g. `acme.okta.com`).
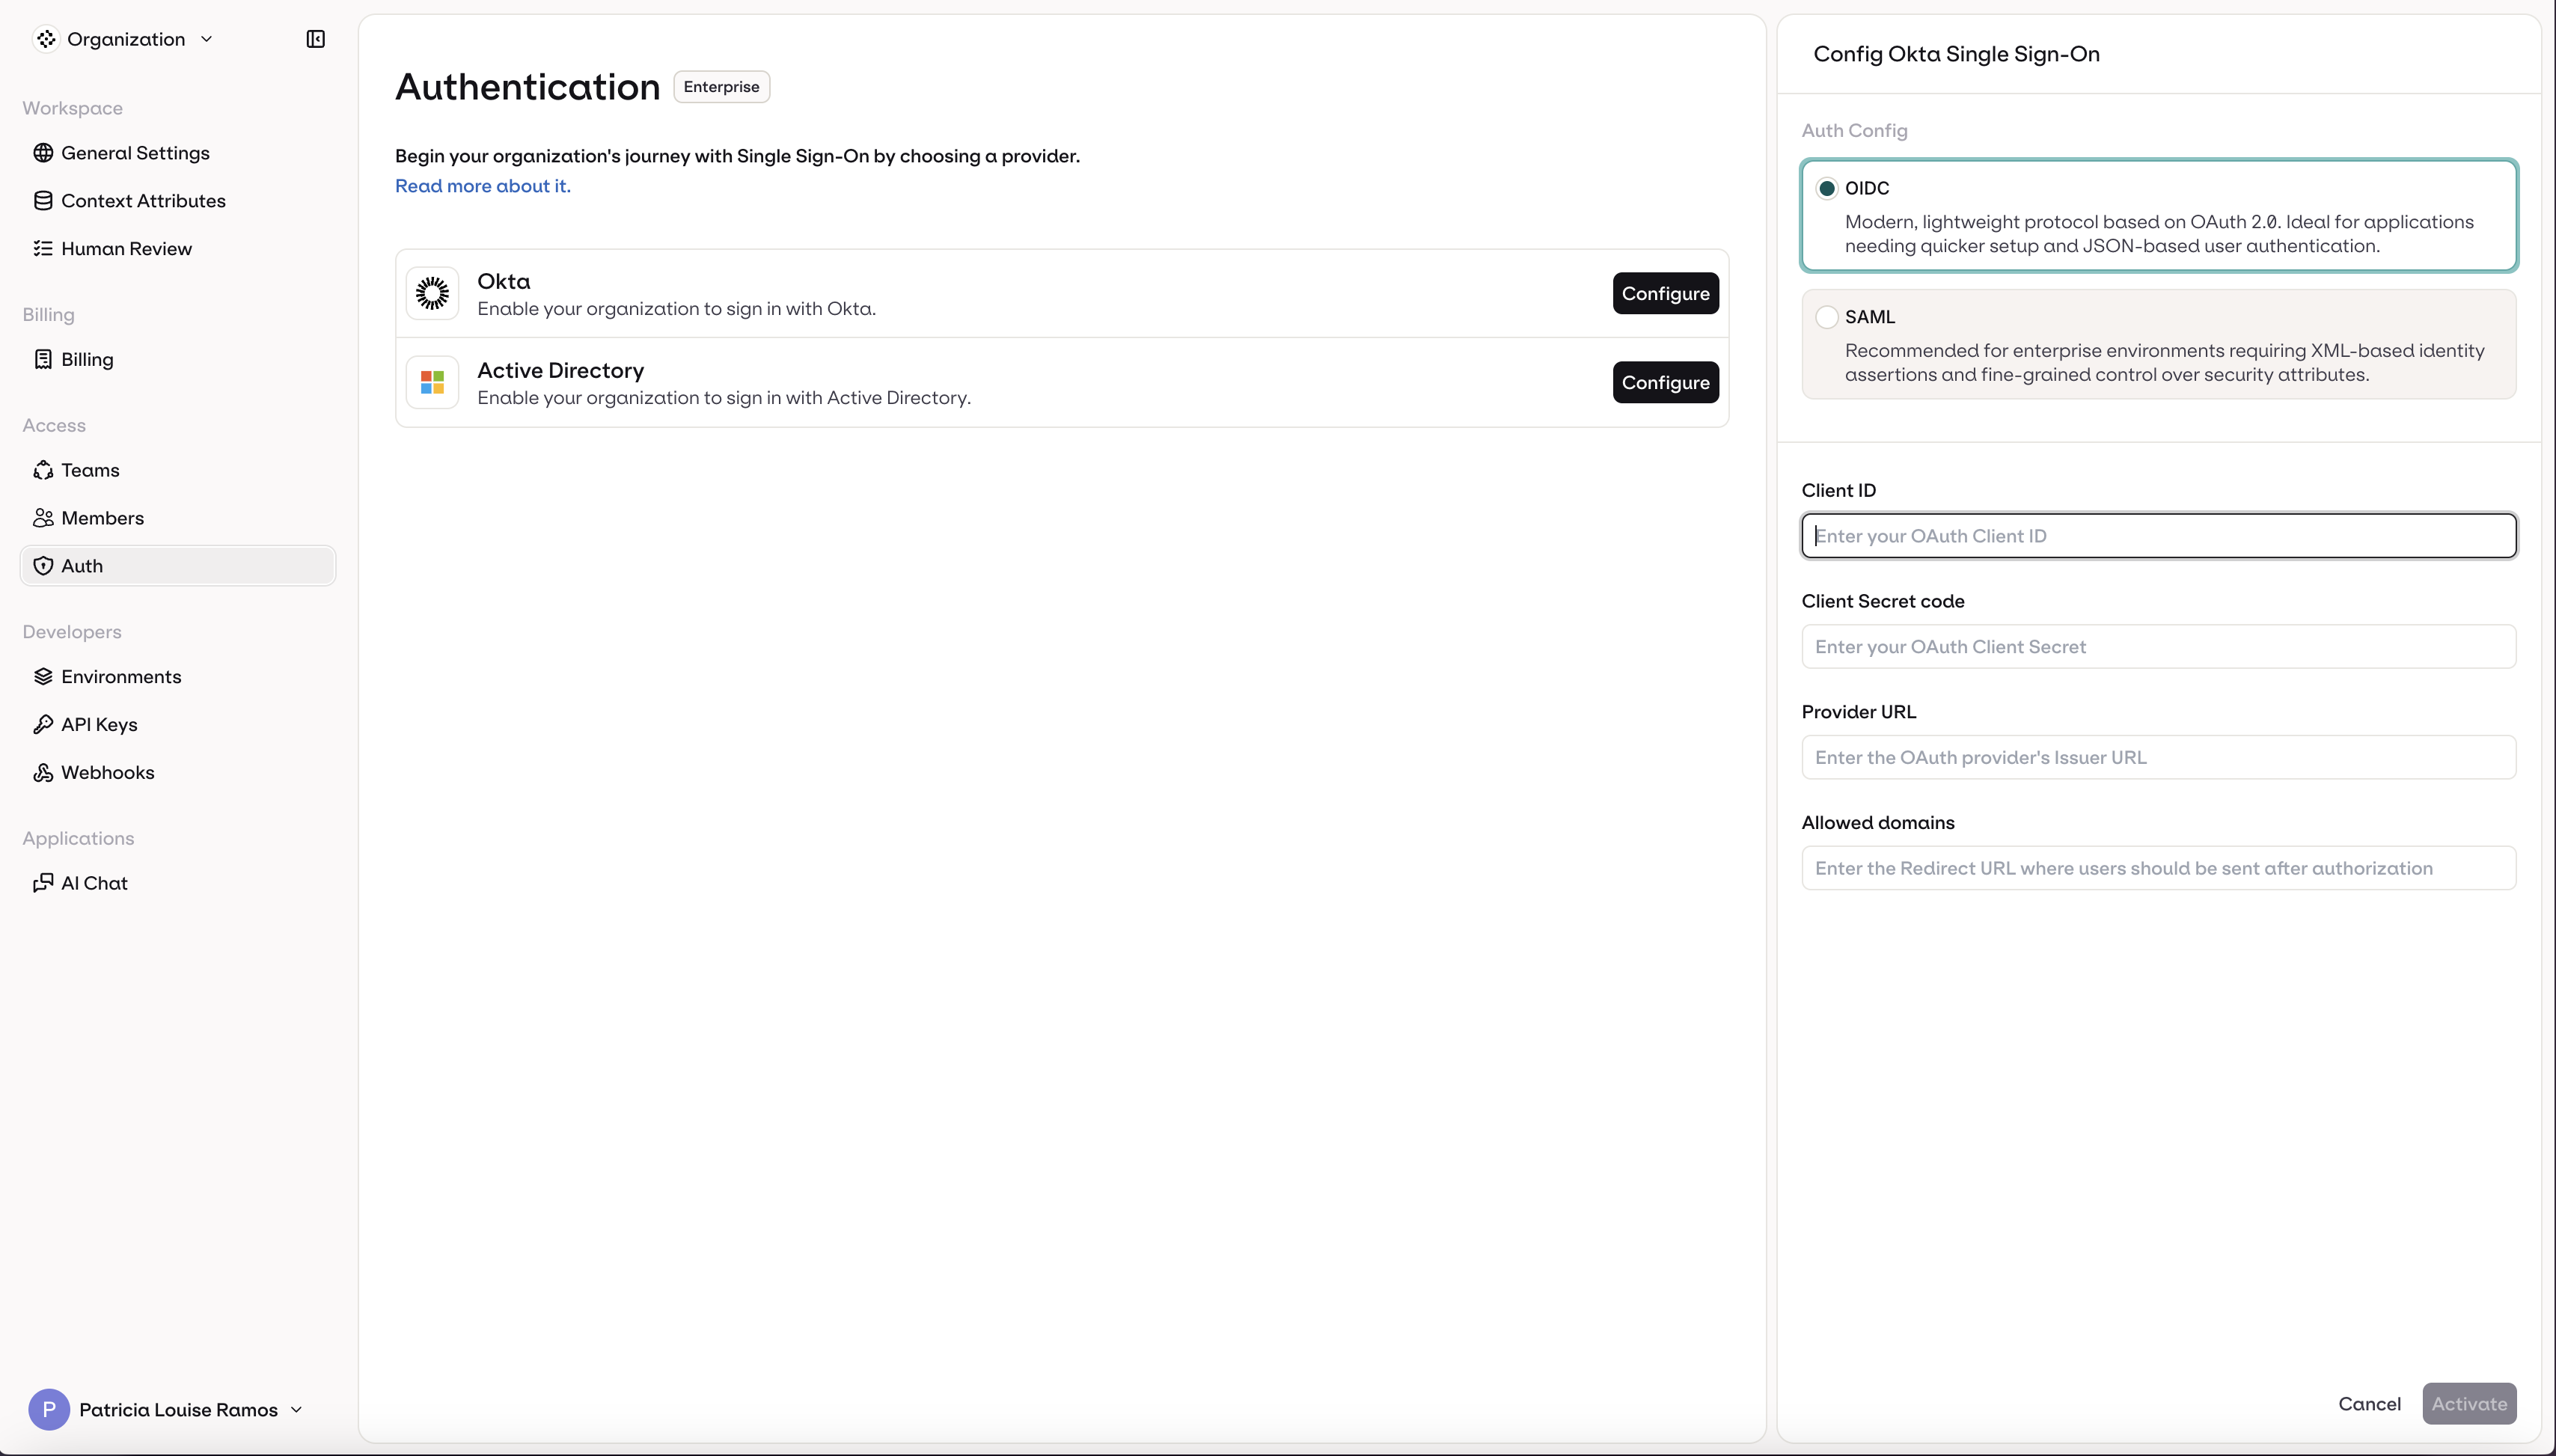
Navigate to **AI Studio** → **Settings** → **Organization** → **Auth**.
Enter the credentials collected from Okta:
1. Select **OIDC** (selected by default)
2. Enter the **Client ID**
3. Enter the **Client Secret**
4. Enter the **Provider URL**
5. Enter the organization's email domain(s) in **Allowed domains** (e.g., `orq.ai`)
6. Click **Activate**
The Provider URL is the Okta domain's authorization server issuer URL:
```
https://{yourOktaDomain}
```
Find the Okta domain in the top-right corner of the **Okta Admin Console** (e.g. `acme.okta.com`).
Navigate to **AI Studio** → **Settings** → **Organization** → **Auth**.
Enter the credentials collected from Okta:
1. Select **OIDC** (selected by default)
2. Enter the **Client ID**
3. Enter the **Client Secret**
4. Enter the **Provider URL**
5. Enter the organization's email domain(s) in **Allowed domains** (e.g., `orq.ai`)
6. Click **Activate**
 SSO is now configured. Users can sign in at:
```
https://my.orq.ai/{your-workspace-key}/login
```
SSO is now configured. Users can sign in at:
```
https://my.orq.ai/{your-workspace-key}/login
```
 Choose a unique identifier for the Service Provider Entity ID. We recommend:
```
urn:orq.ai:{your-workspace-key}
```
For example, if the workspace key is `acme-corp`, use `urn:orq.ai:acme-corp`.
The SP Entity ID must match exactly in both Okta and **Orq.ai**. Write it down; it is needed in multiple steps.
In the **Okta Admin Console**, go to **Applications → Applications**.
Choose a unique identifier for the Service Provider Entity ID. We recommend:
```
urn:orq.ai:{your-workspace-key}
```
For example, if the workspace key is `acme-corp`, use `urn:orq.ai:acme-corp`.
The SP Entity ID must match exactly in both Okta and **Orq.ai**. Write it down; it is needed in multiple steps.
In the **Okta Admin Console**, go to **Applications → Applications**.
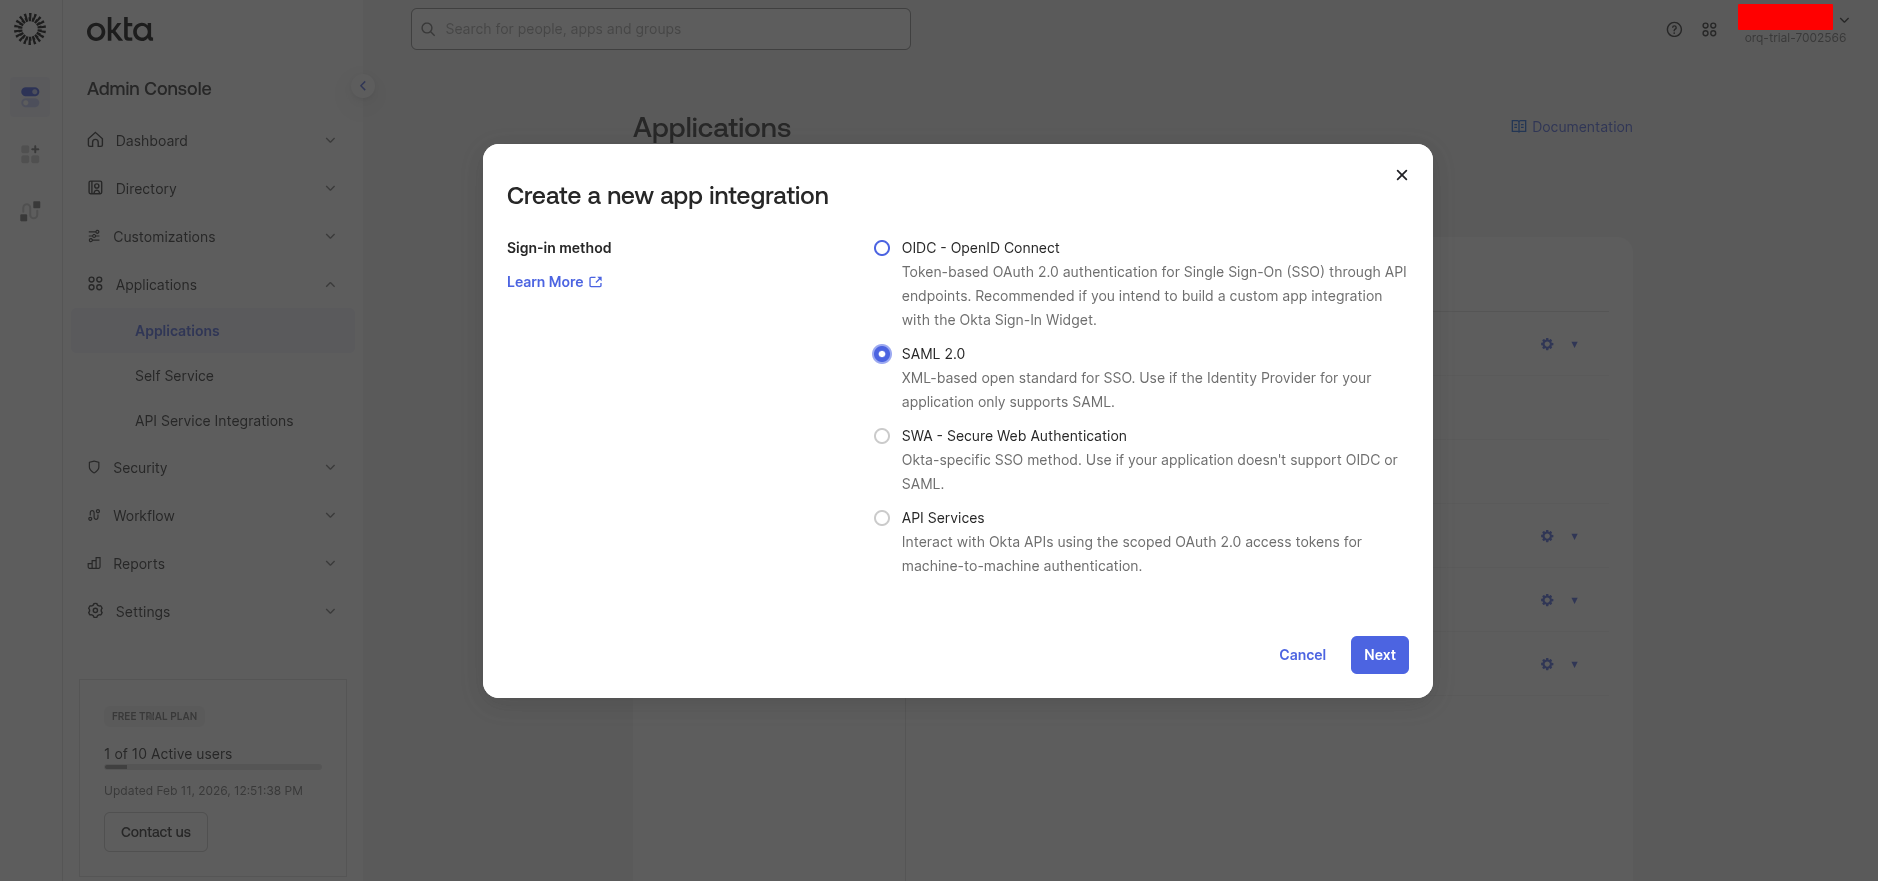
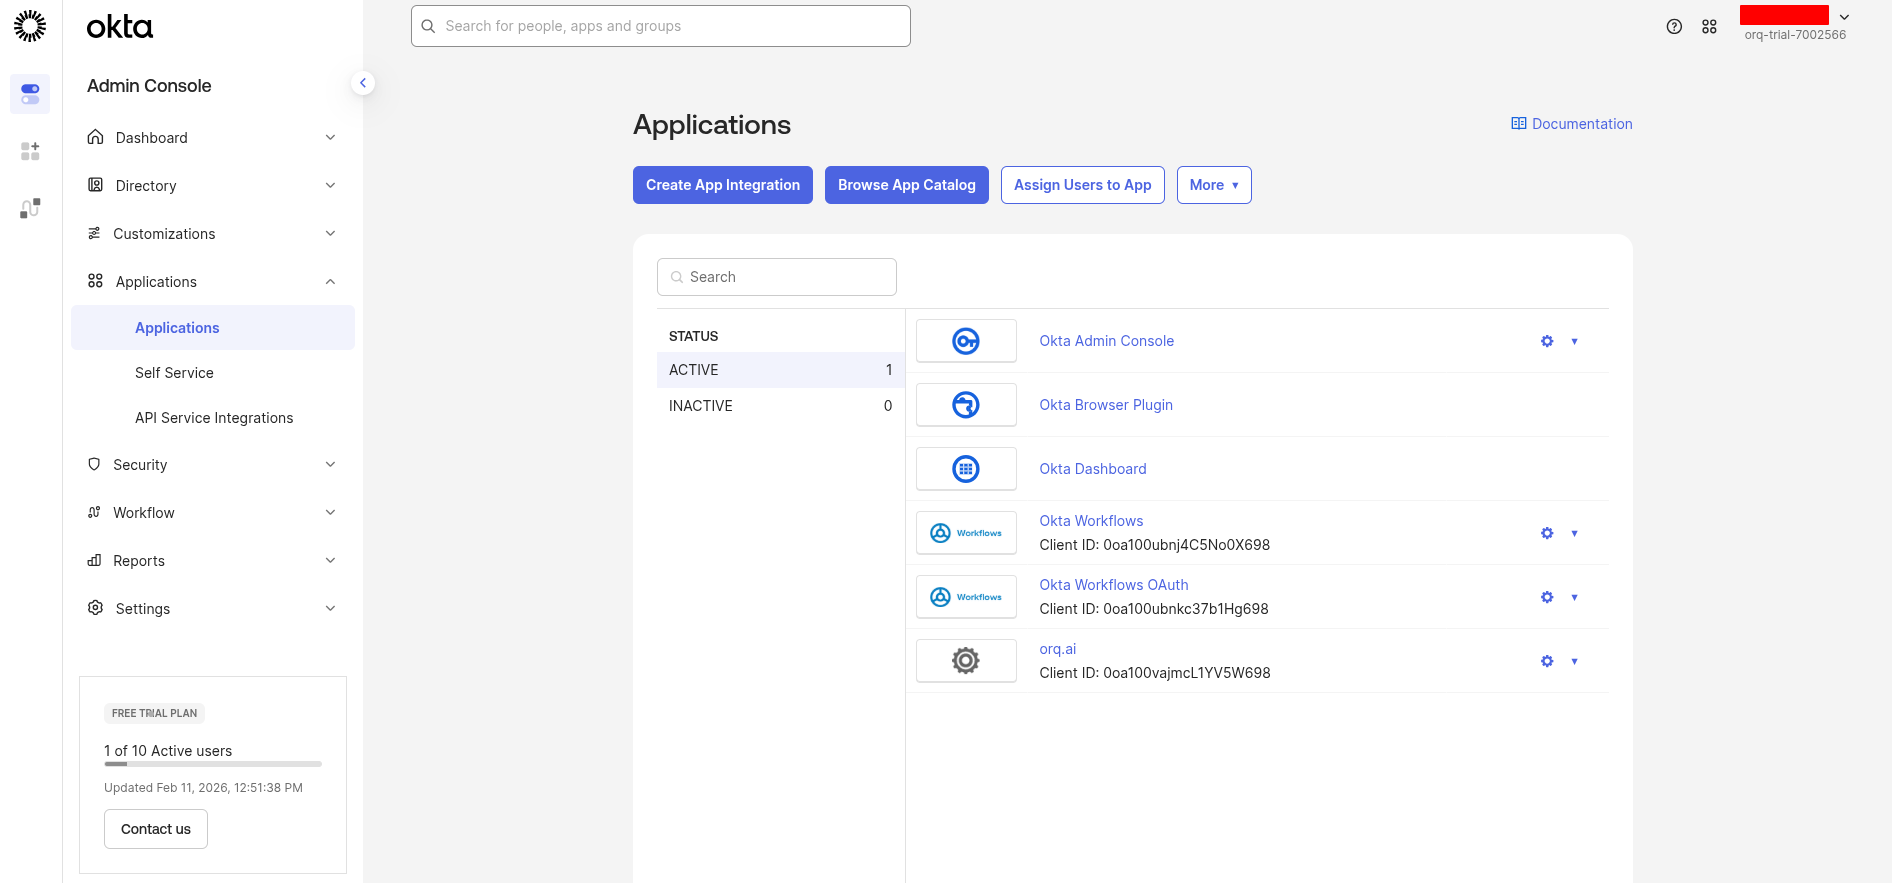 Click **Create App Integration**, select **SAML 2.0**, and click **Next**.
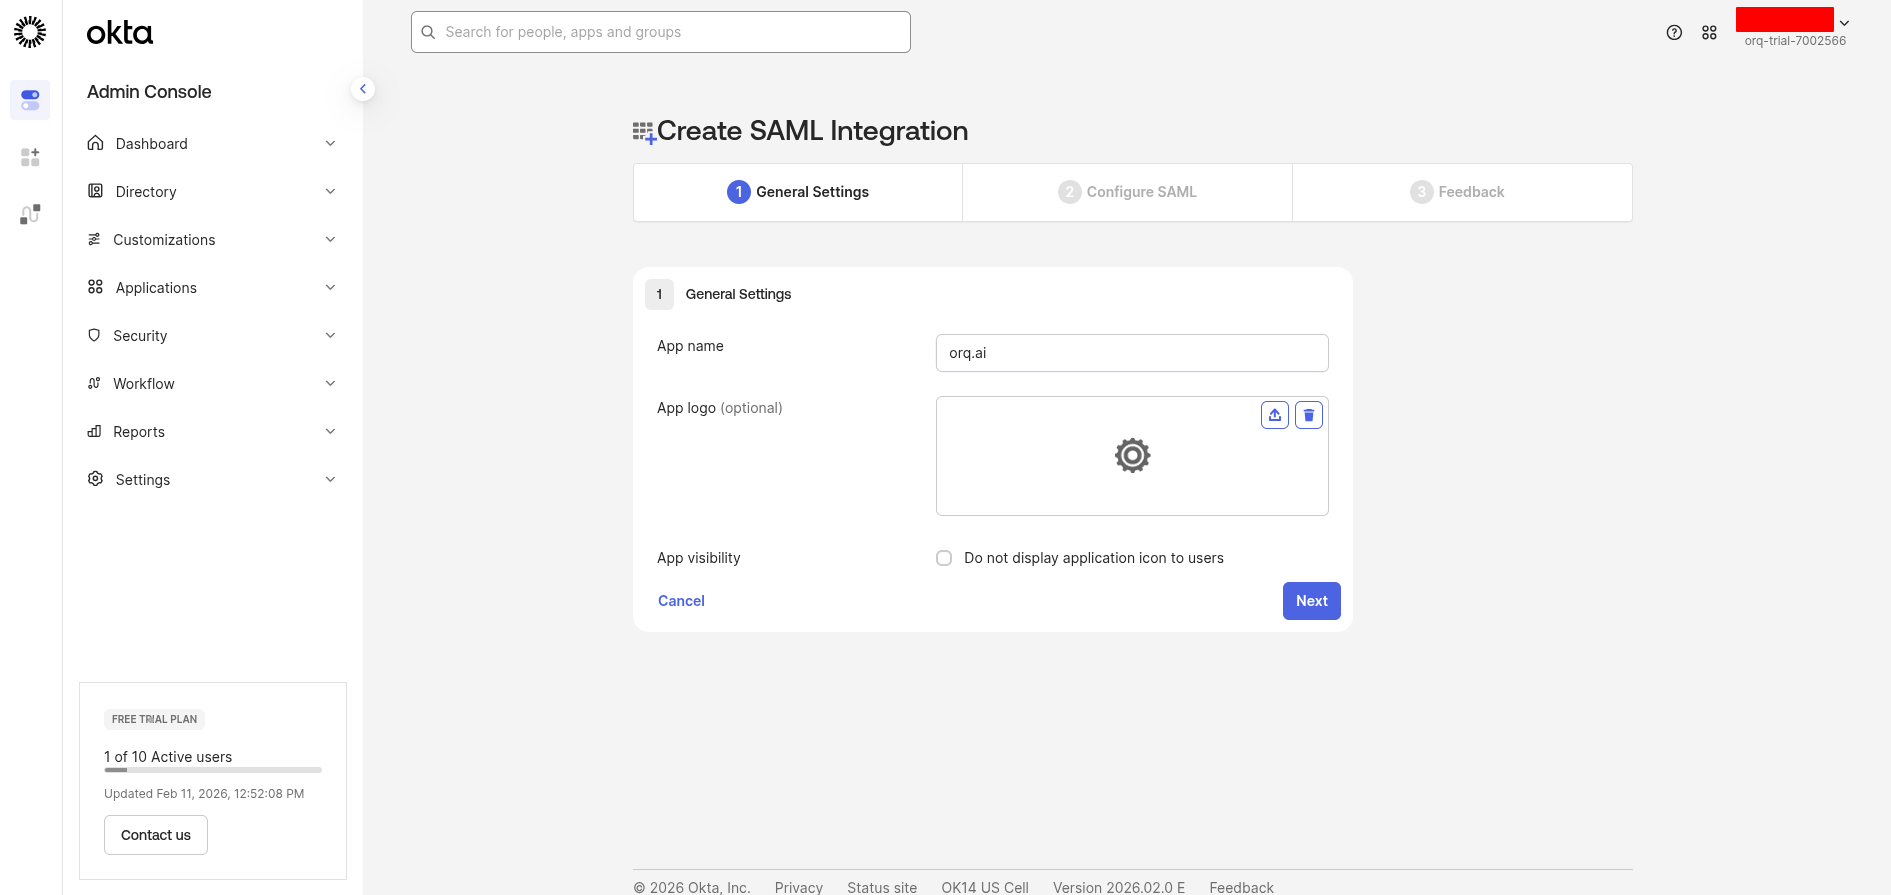
 Enter a name (e.g. `Orq.ai SSO`) and click **Next**.
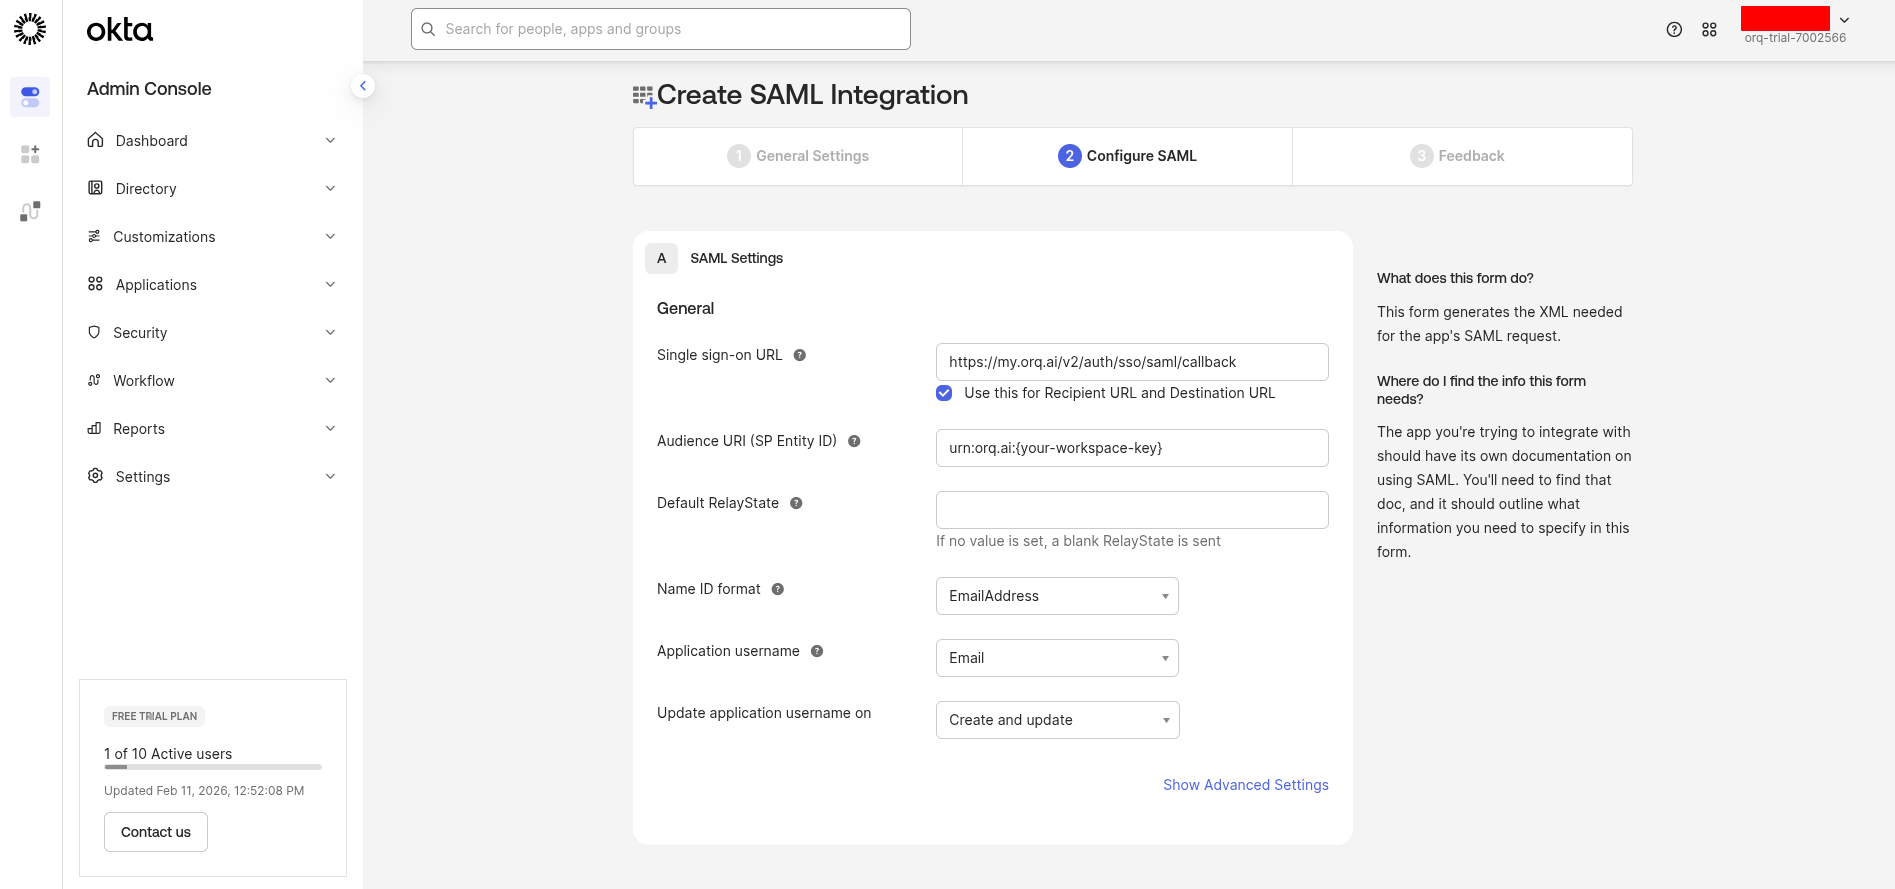
 Under **SAML Settings**, enter:
* **Single sign-on URL**:
```
https://my.orq.ai/v2/auth/sso/saml/callback
```
* **Audience URI (SP Entity ID)**: the SP Entity ID defined in Step 1
* **Name ID format**: `EmailAddress`
* **Application username**: `Email`
Under **SAML Settings**, enter:
* **Single sign-on URL**:
```
https://my.orq.ai/v2/auth/sso/saml/callback
```
* **Audience URI (SP Entity ID)**: the SP Entity ID defined in Step 1
* **Name ID format**: `EmailAddress`
* **Application username**: `Email`
 Click **Next**, then **Finish**.
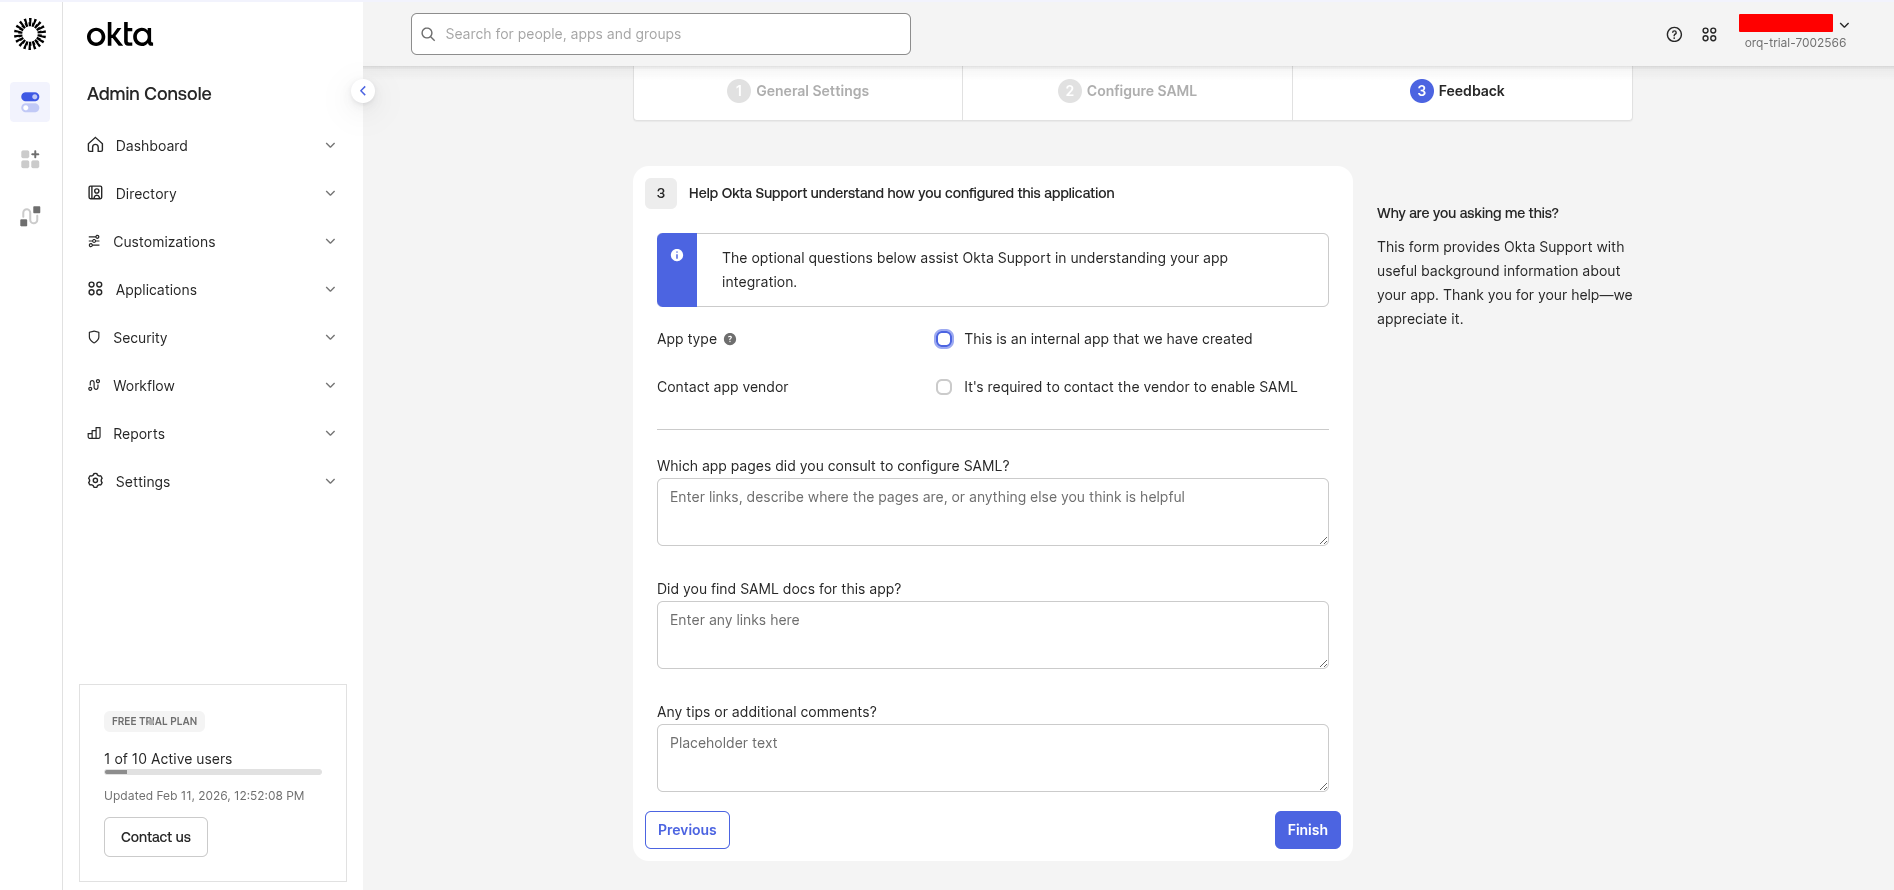 Go to the **Sign On** tab and click **Edit** in the Settings section.
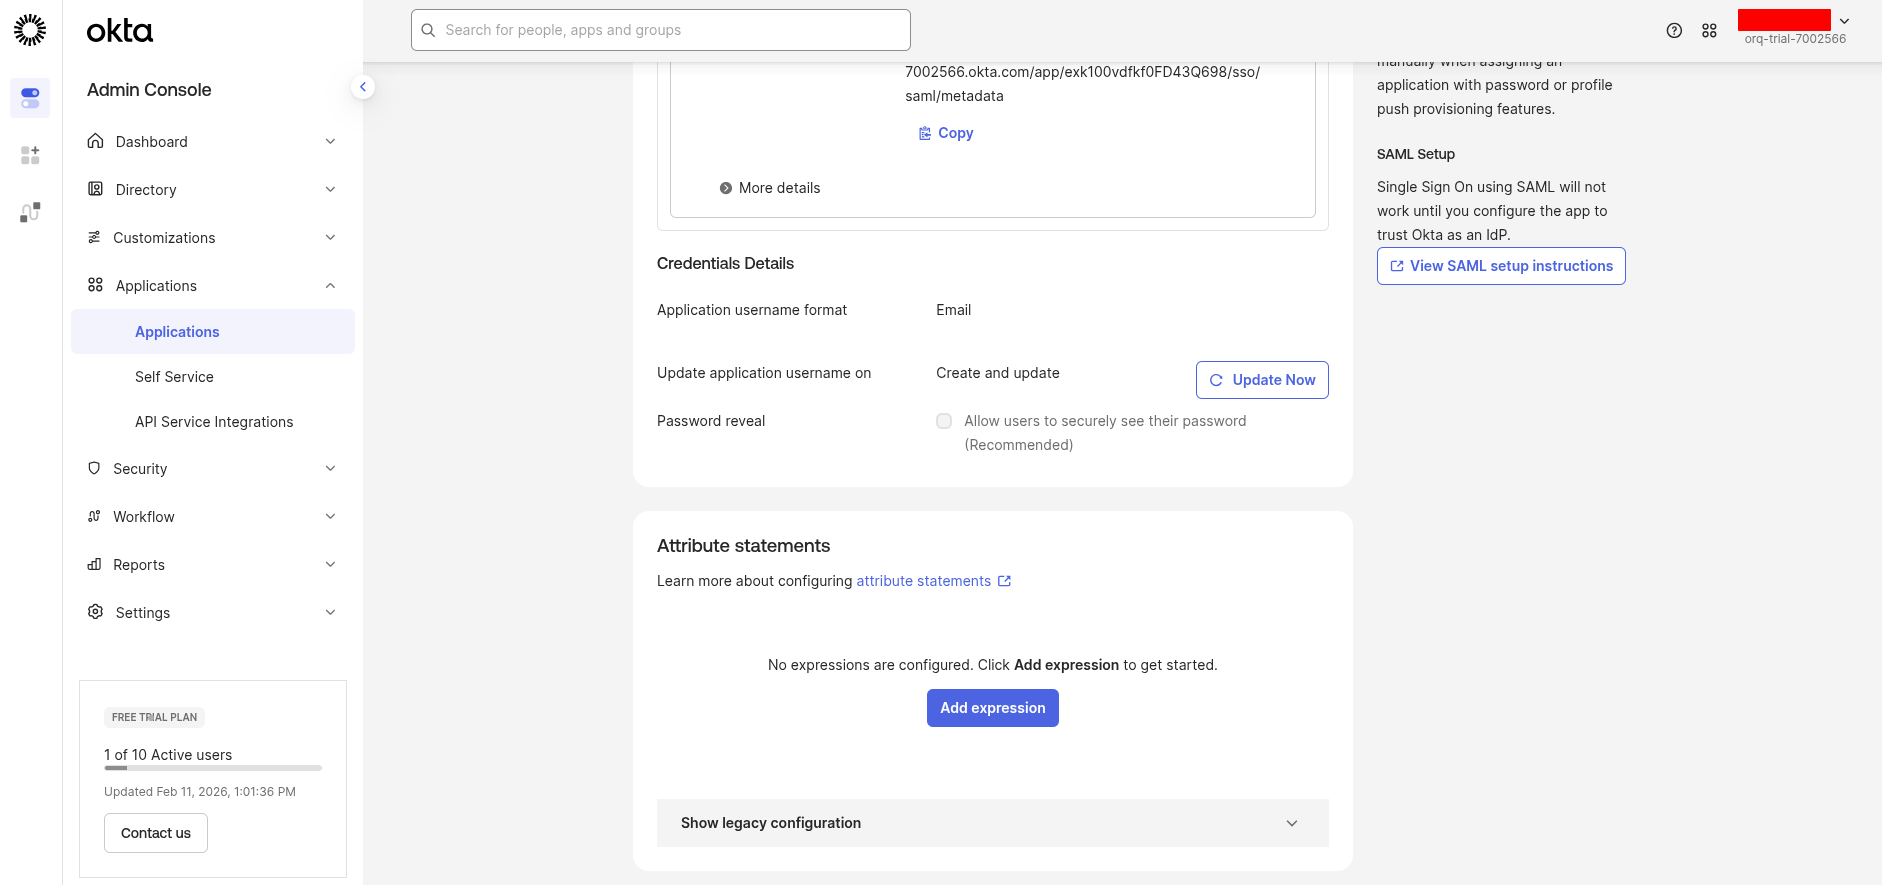 Under **Attribute Statements**, add these mappings:
| Name | Expression |
| ----------- | ---------------- |
| `email` | `user.email` |
| `firstName` | `user.firstName` |
| `lastName` | `user.lastName` |
If a **Show legacy configuration** link appears, click it and use the classic format with Name, Name format (Basic), and Value columns.
Under **Attribute Statements**, add these mappings:
| Name | Expression |
| ----------- | ---------------- |
| `email` | `user.email` |
| `firstName` | `user.firstName` |
| `lastName` | `user.lastName` |
If a **Show legacy configuration** link appears, click it and use the classic format with Name, Name format (Basic), and Value columns.
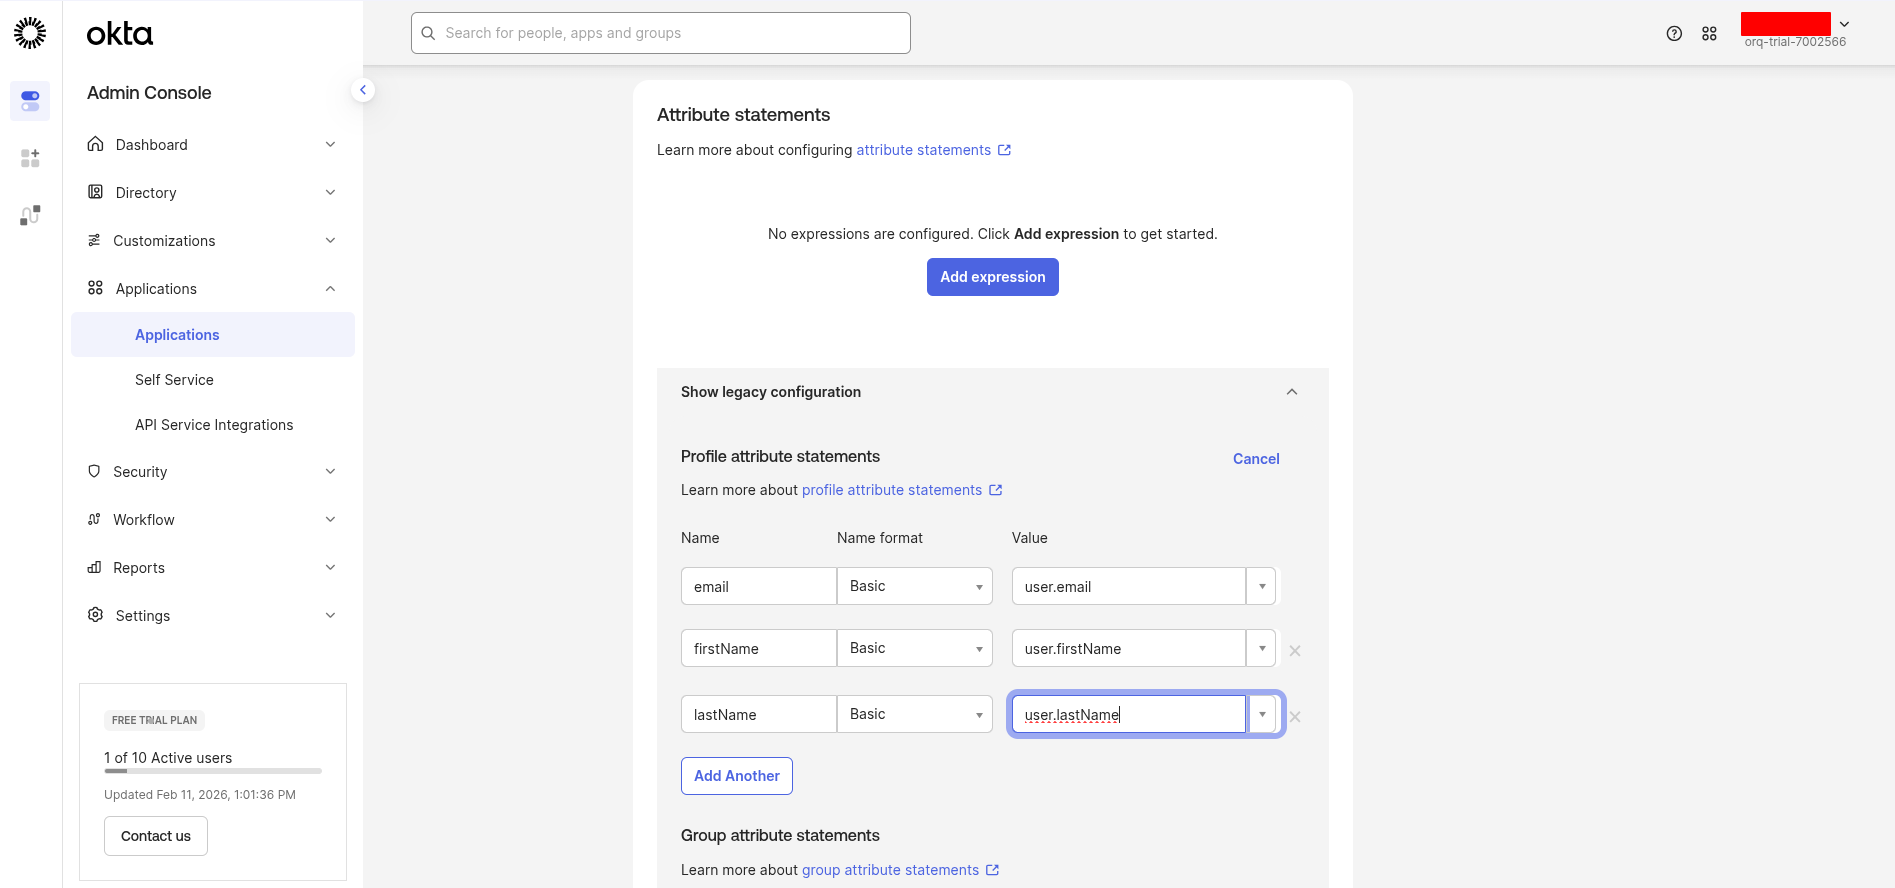 Click **Save**.
These attribute mappings are required for SAML to work correctly with **Orq.ai**.
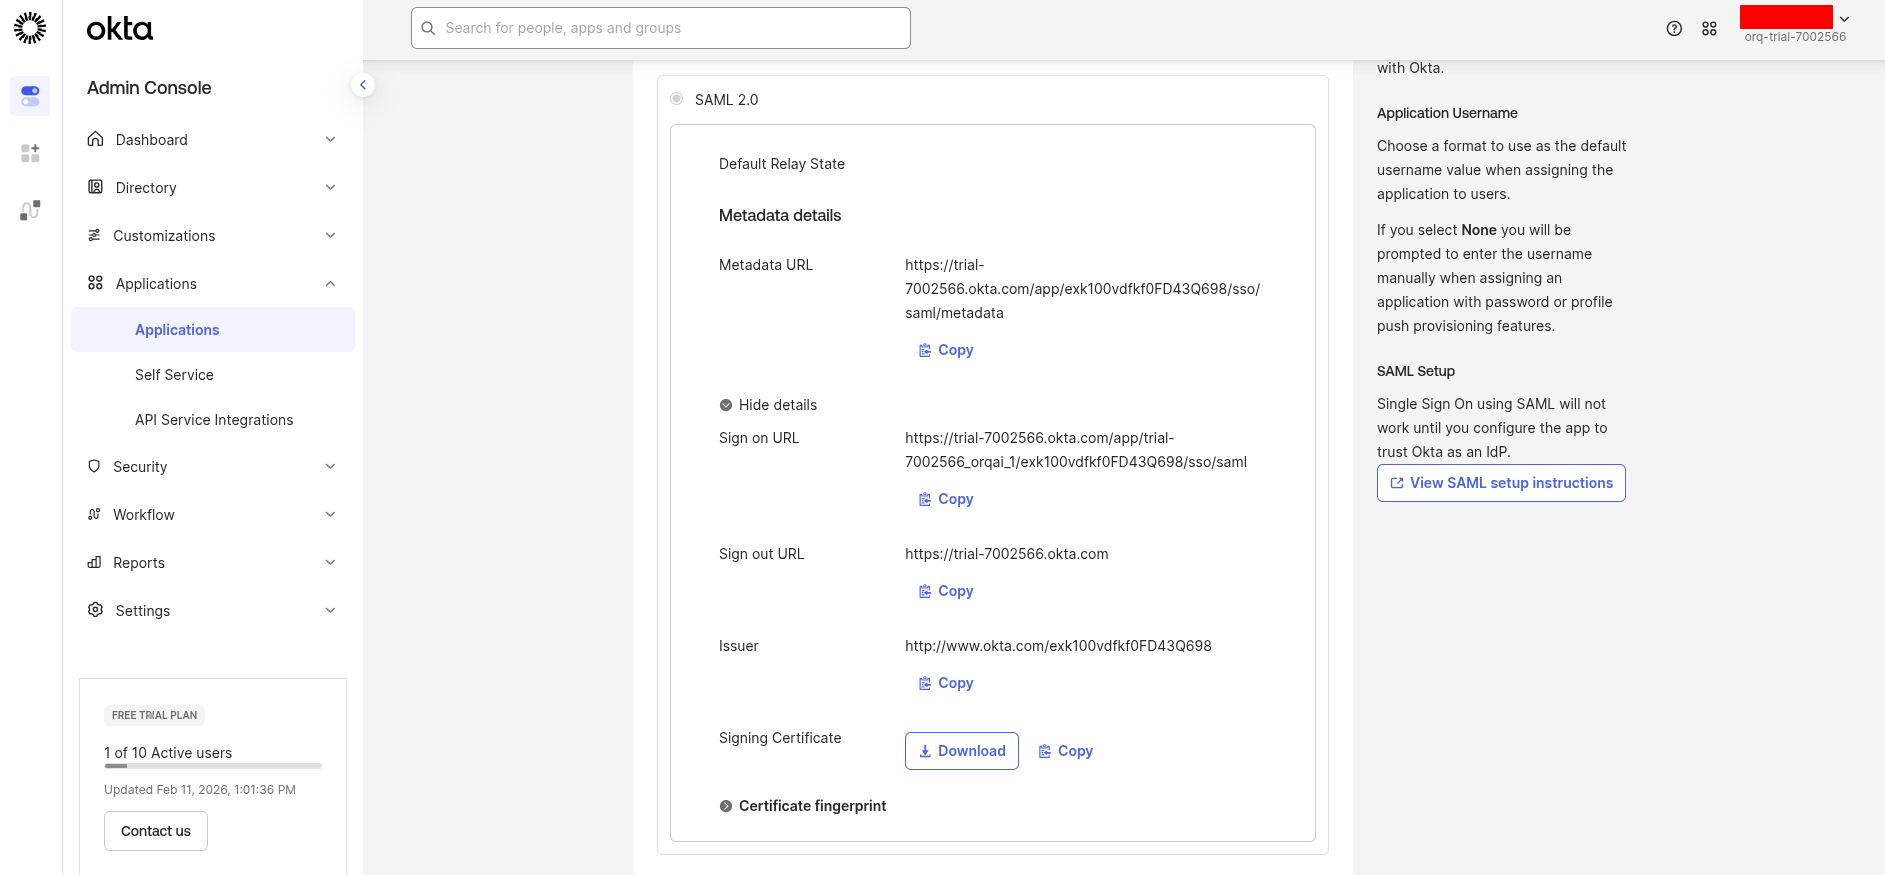
In the **Sign On** tab, under **Settings**, click **Edit** to reveal the **Metadata details**.
Collect these values:
| Okta Field | Use in Orq.ai as |
| ------------------------------- | -------------------------------- |
| **Sign on URL** | **Single Sign-On URL** |
| **Issuer** | **Identity Provider Entity ID** |
| **Signing Certificate (X.509)** | **X.509 Certificate** (download) |
Click **Save**.
These attribute mappings are required for SAML to work correctly with **Orq.ai**.
In the **Sign On** tab, under **Settings**, click **Edit** to reveal the **Metadata details**.
Collect these values:
| Okta Field | Use in Orq.ai as |
| ------------------------------- | -------------------------------- |
| **Sign on URL** | **Single Sign-On URL** |
| **Issuer** | **Identity Provider Entity ID** |
| **Signing Certificate (X.509)** | **X.509 Certificate** (download) |
 Go to the **Assignments** tab and click Assign → Assign to People or Assign to Groups.
Select the users or groups that should have access, then click Done.
Go to the **Assignments** tab and click Assign → Assign to People or Assign to Groups.
Select the users or groups that should have access, then click Done.
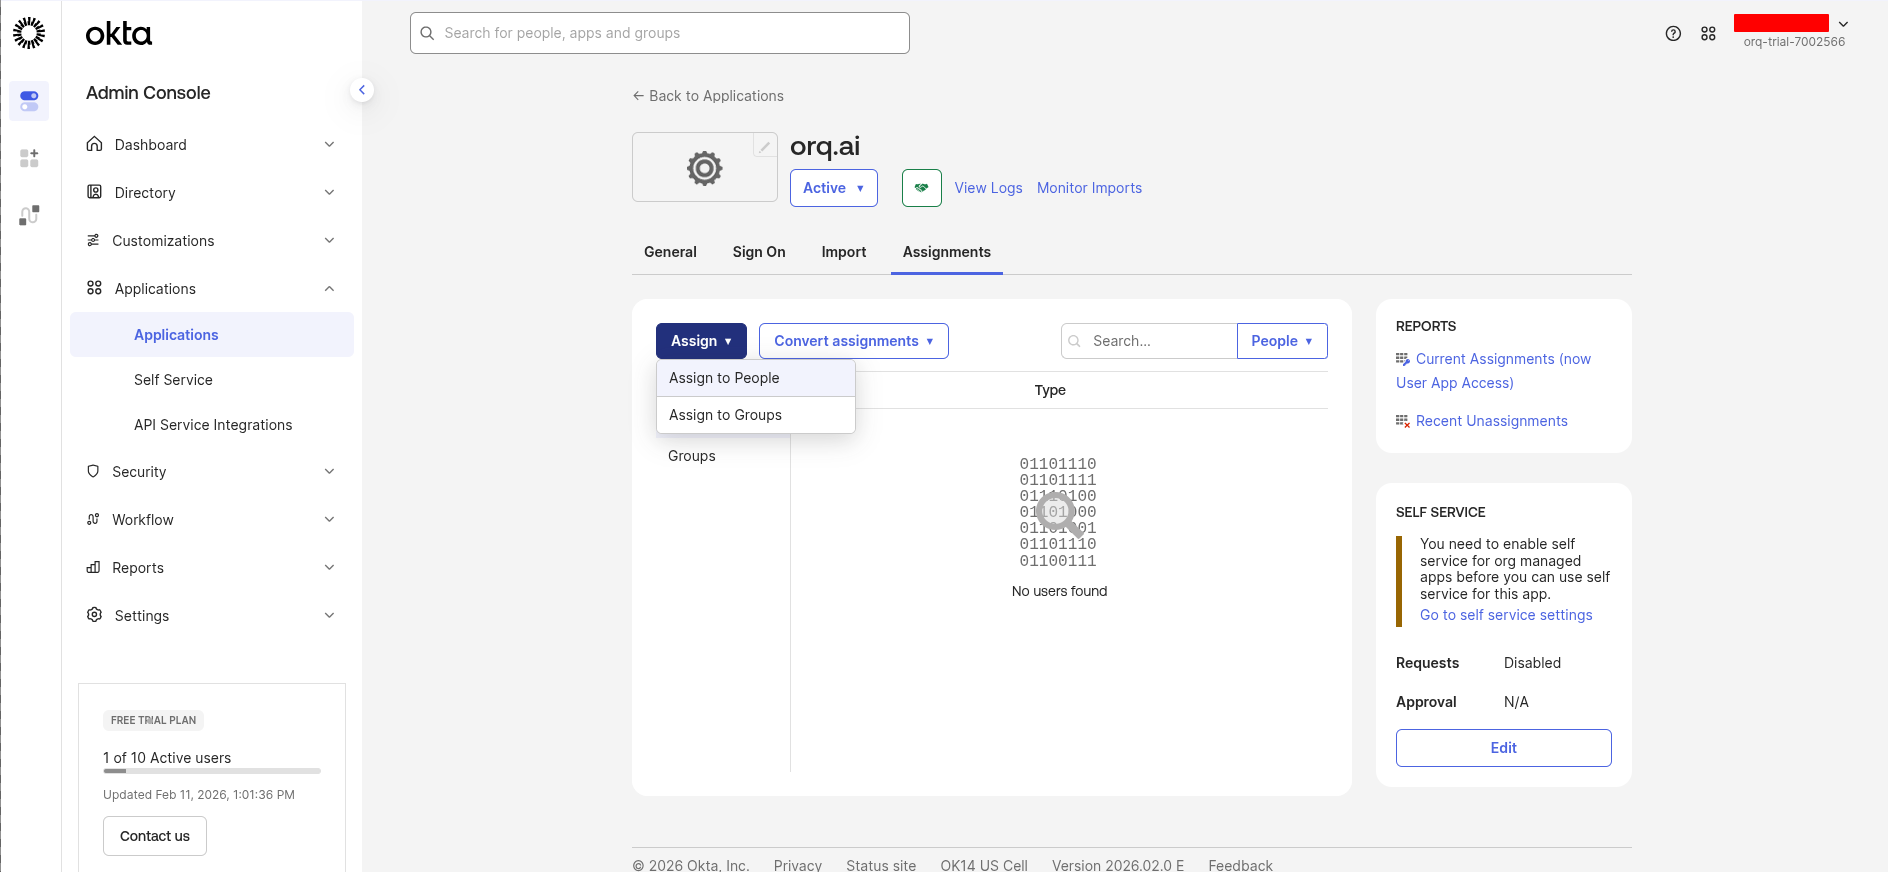 By default, no users are assigned to a new Okta app.
Navigate to **AI Studio** → **Settings** → **Organization** → **Auth**.
Enter the credentials collected from Okta:
1. Select **SAML**
2. Enter the **Service Provider Entity ID** (from Step 1)
3. Enter the **Identity Provider Entity ID** (Issuer from Okta)
4. Enter the **Single Sign-On URL** (Sign on URL from Okta)
5. For **X.509 Certificate**: open the downloaded certificate file in a text editor, copy all content including the `-----BEGIN CERTIFICATE-----` and `-----END CERTIFICATE-----` lines, and paste it here
6. Enter the organization's email domain(s) in **Allowed domains** (e.g., `orq.ai`)
7. Click **Activate**
By default, no users are assigned to a new Okta app.
Navigate to **AI Studio** → **Settings** → **Organization** → **Auth**.
Enter the credentials collected from Okta:
1. Select **SAML**
2. Enter the **Service Provider Entity ID** (from Step 1)
3. Enter the **Identity Provider Entity ID** (Issuer from Okta)
4. Enter the **Single Sign-On URL** (Sign on URL from Okta)
5. For **X.509 Certificate**: open the downloaded certificate file in a text editor, copy all content including the `-----BEGIN CERTIFICATE-----` and `-----END CERTIFICATE-----` lines, and paste it here
6. Enter the organization's email domain(s) in **Allowed domains** (e.g., `orq.ai`)
7. Click **Activate**
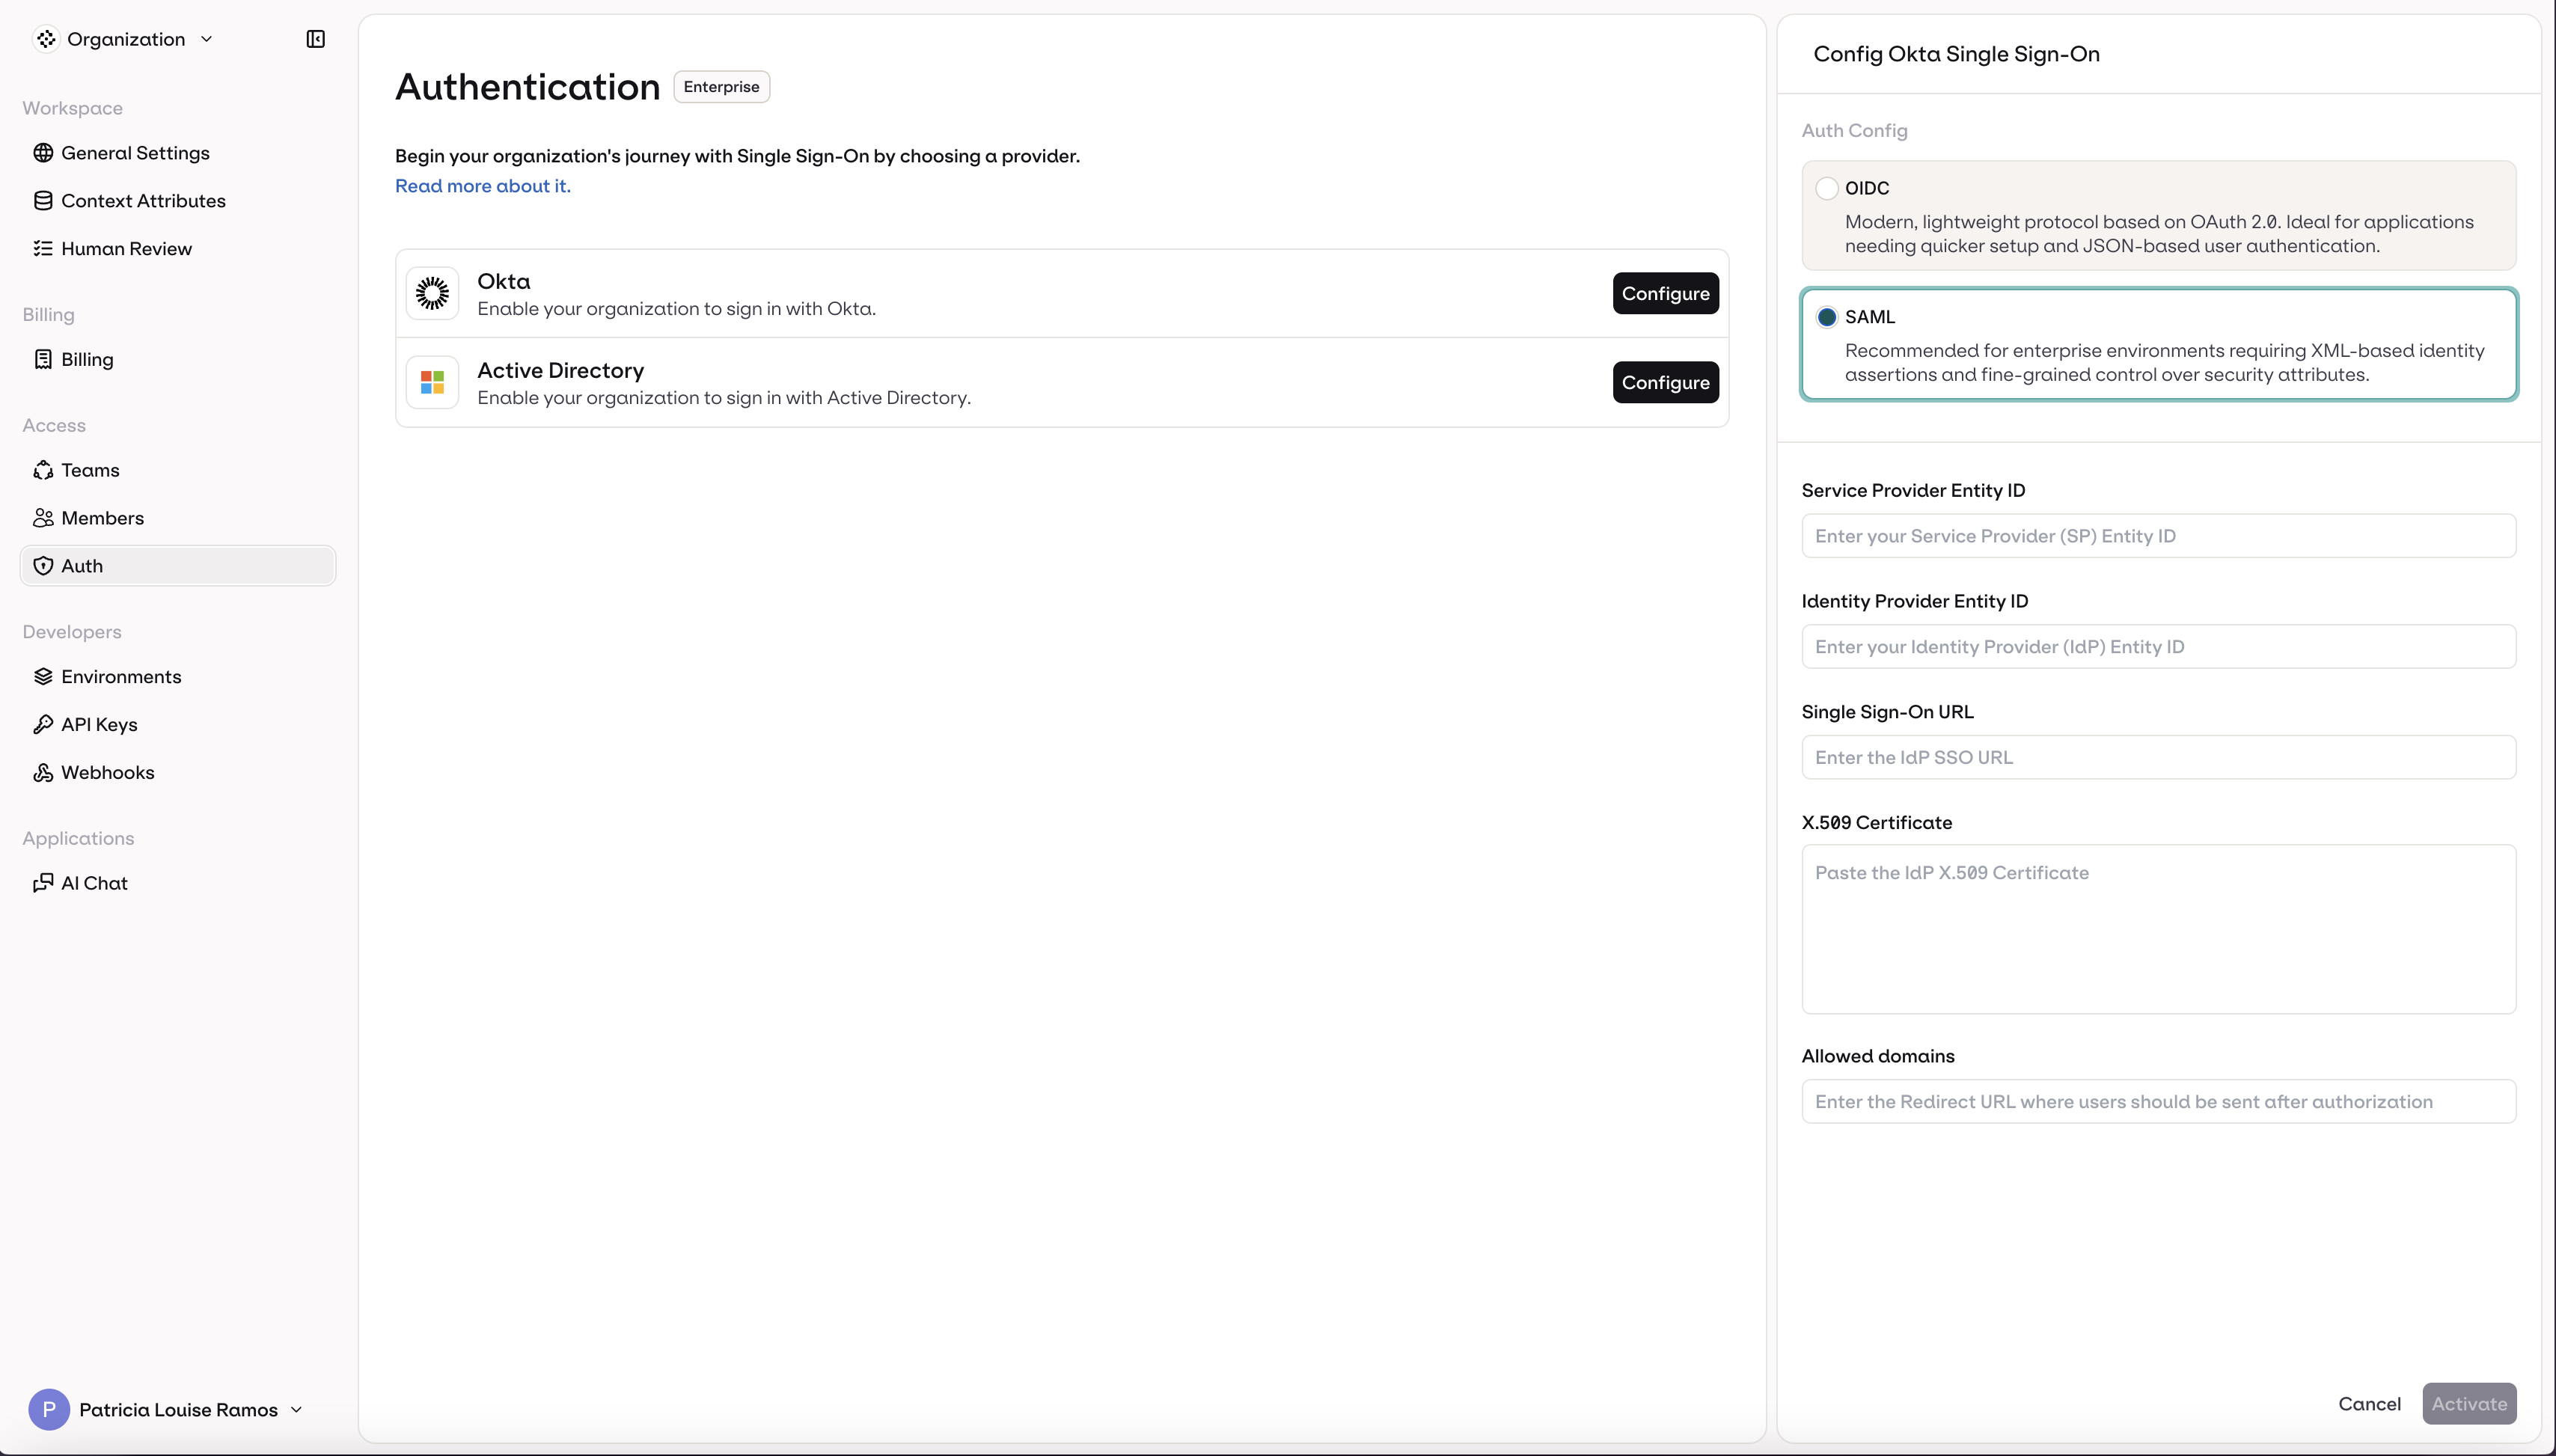 SSO is now configured. Users can sign in at:
```
https://my.orq.ai/{your-workspace-key}/login
```
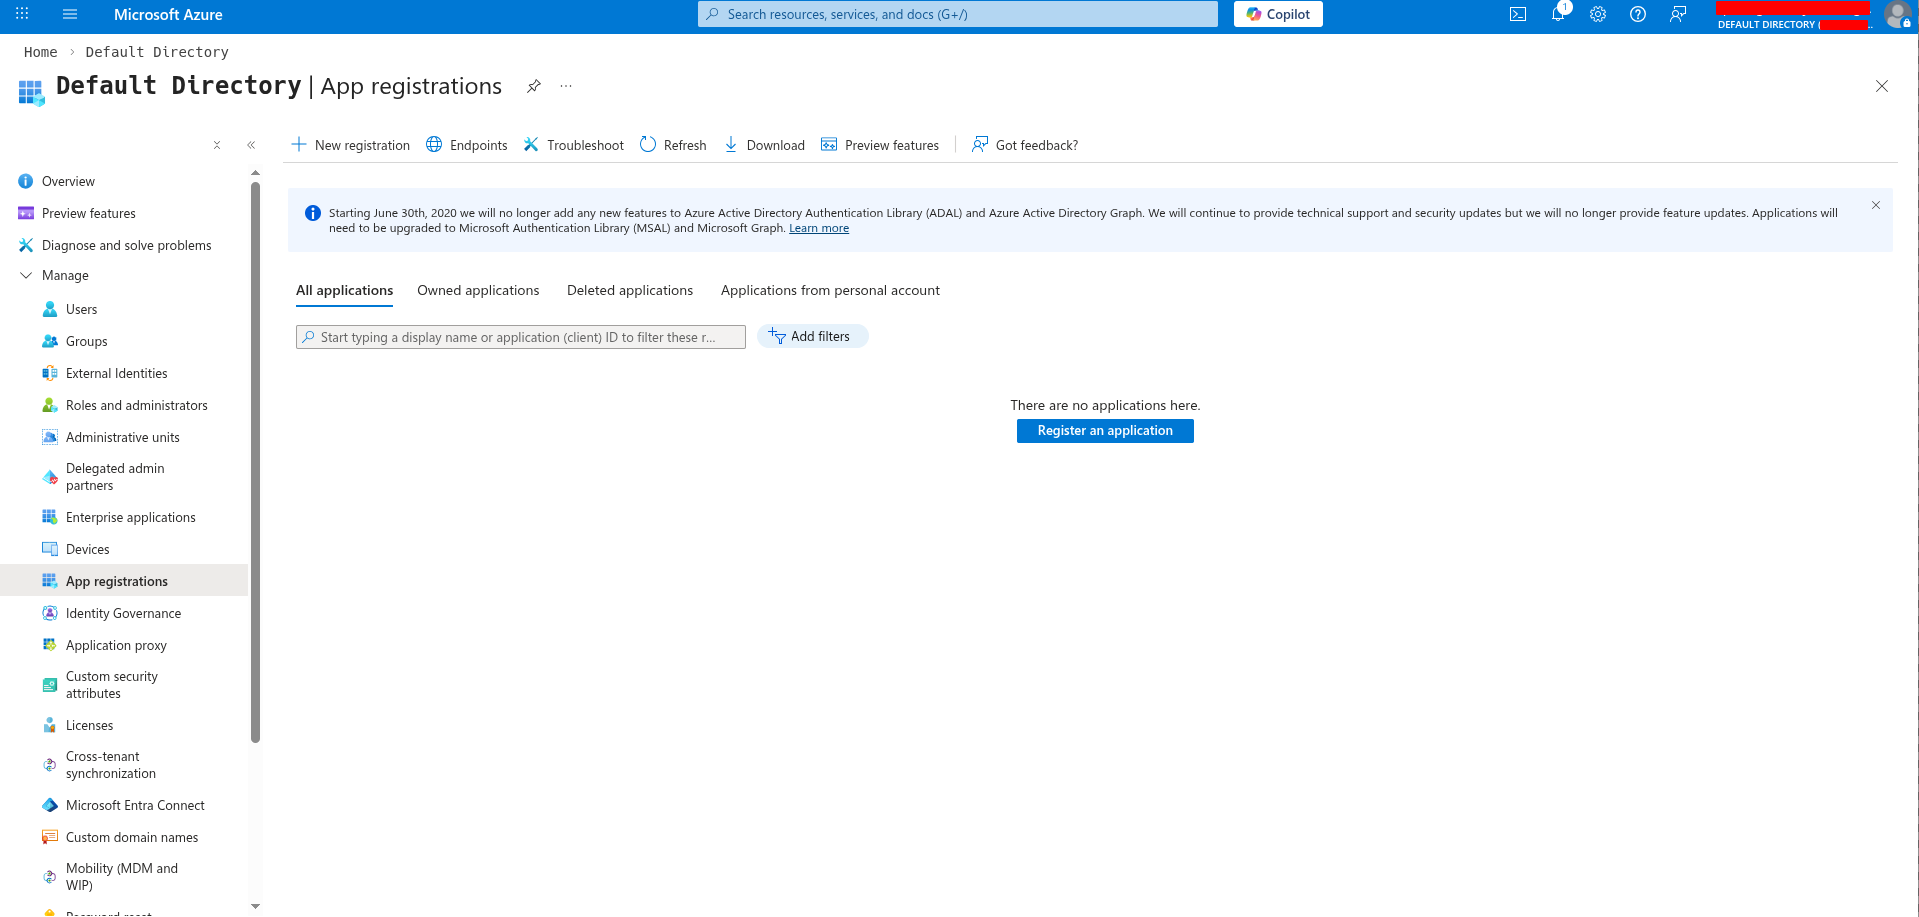
Sign in to the [Azure portal](https://entra.microsoft.com) and navigate to **Microsoft Entra ID → App registrations**.
SSO is now configured. Users can sign in at:
```
https://my.orq.ai/{your-workspace-key}/login
```
Sign in to the [Azure portal](https://entra.microsoft.com) and navigate to **Microsoft Entra ID → App registrations**.
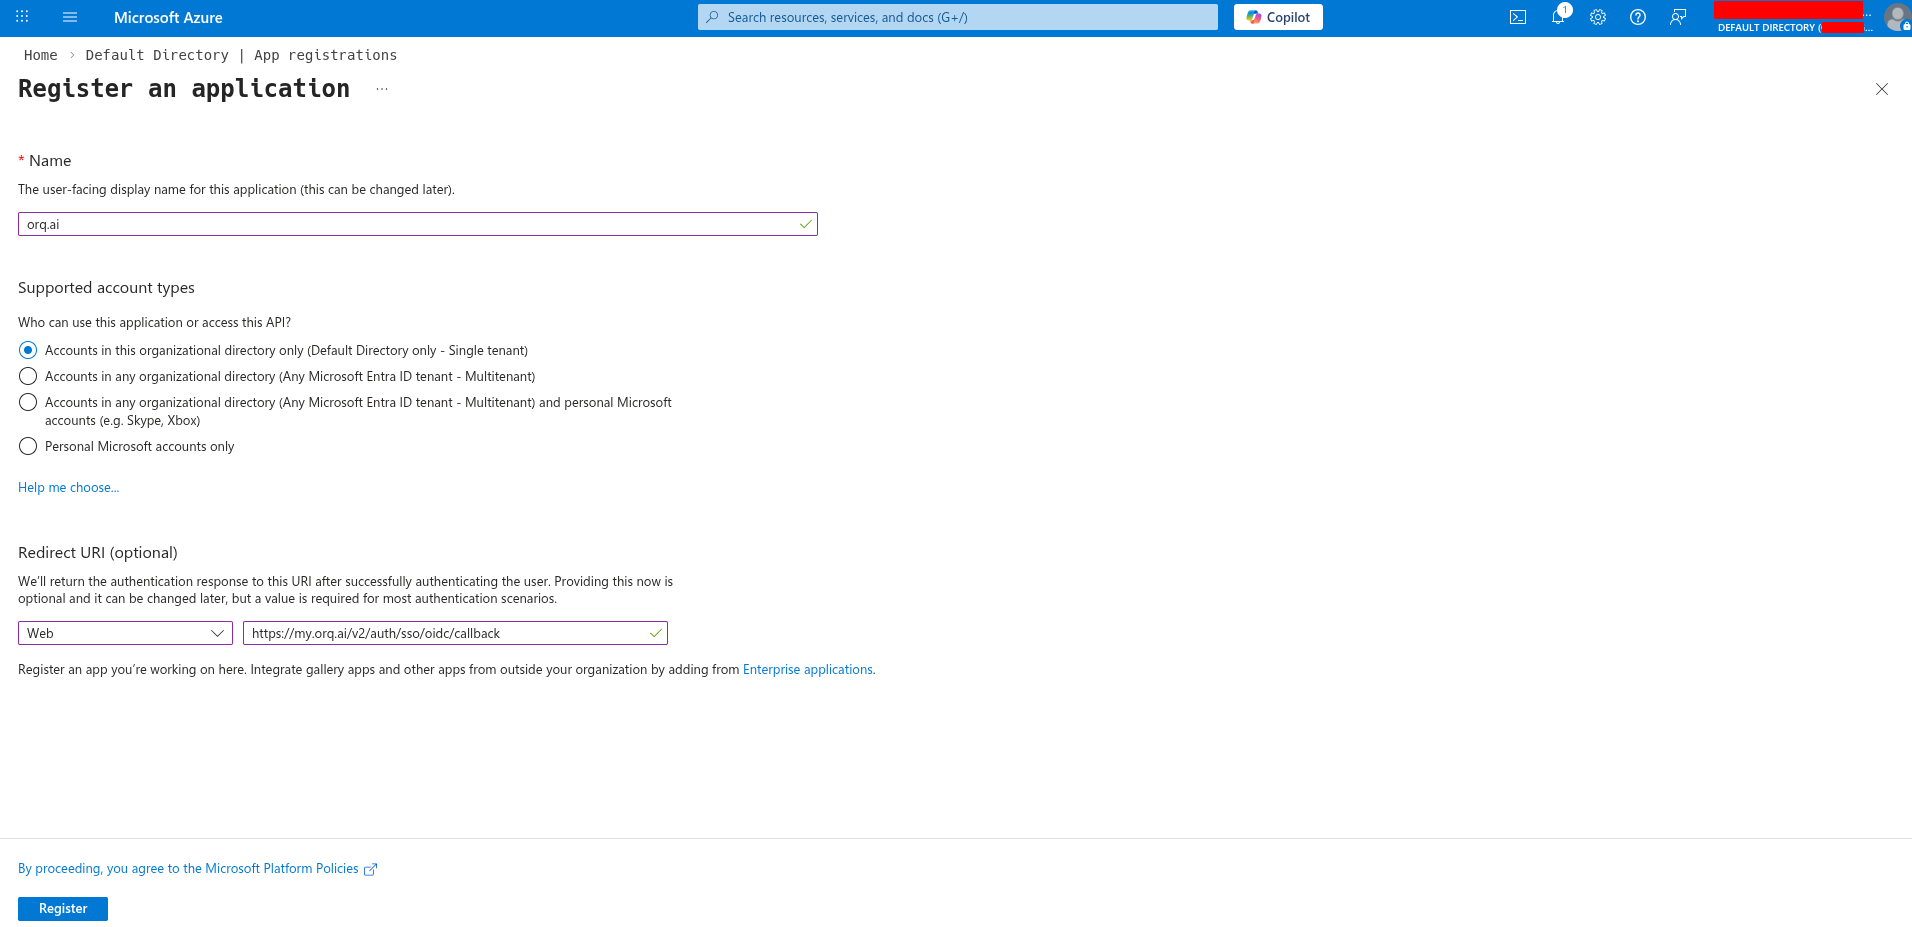
 Configure the registration:
* **Name**: `Orq.ai` (or preferred name)
* **Supported account types**: select based on the organization's needs
* **Redirect URI**: select **Web** and enter:
```
https://my.orq.ai/v2/auth/sso/oidc/callback
```
Click **Register**.
Configure the registration:
* **Name**: `Orq.ai` (or preferred name)
* **Supported account types**: select based on the organization's needs
* **Redirect URI**: select **Web** and enter:
```
https://my.orq.ai/v2/auth/sso/oidc/callback
```
Click **Register**.
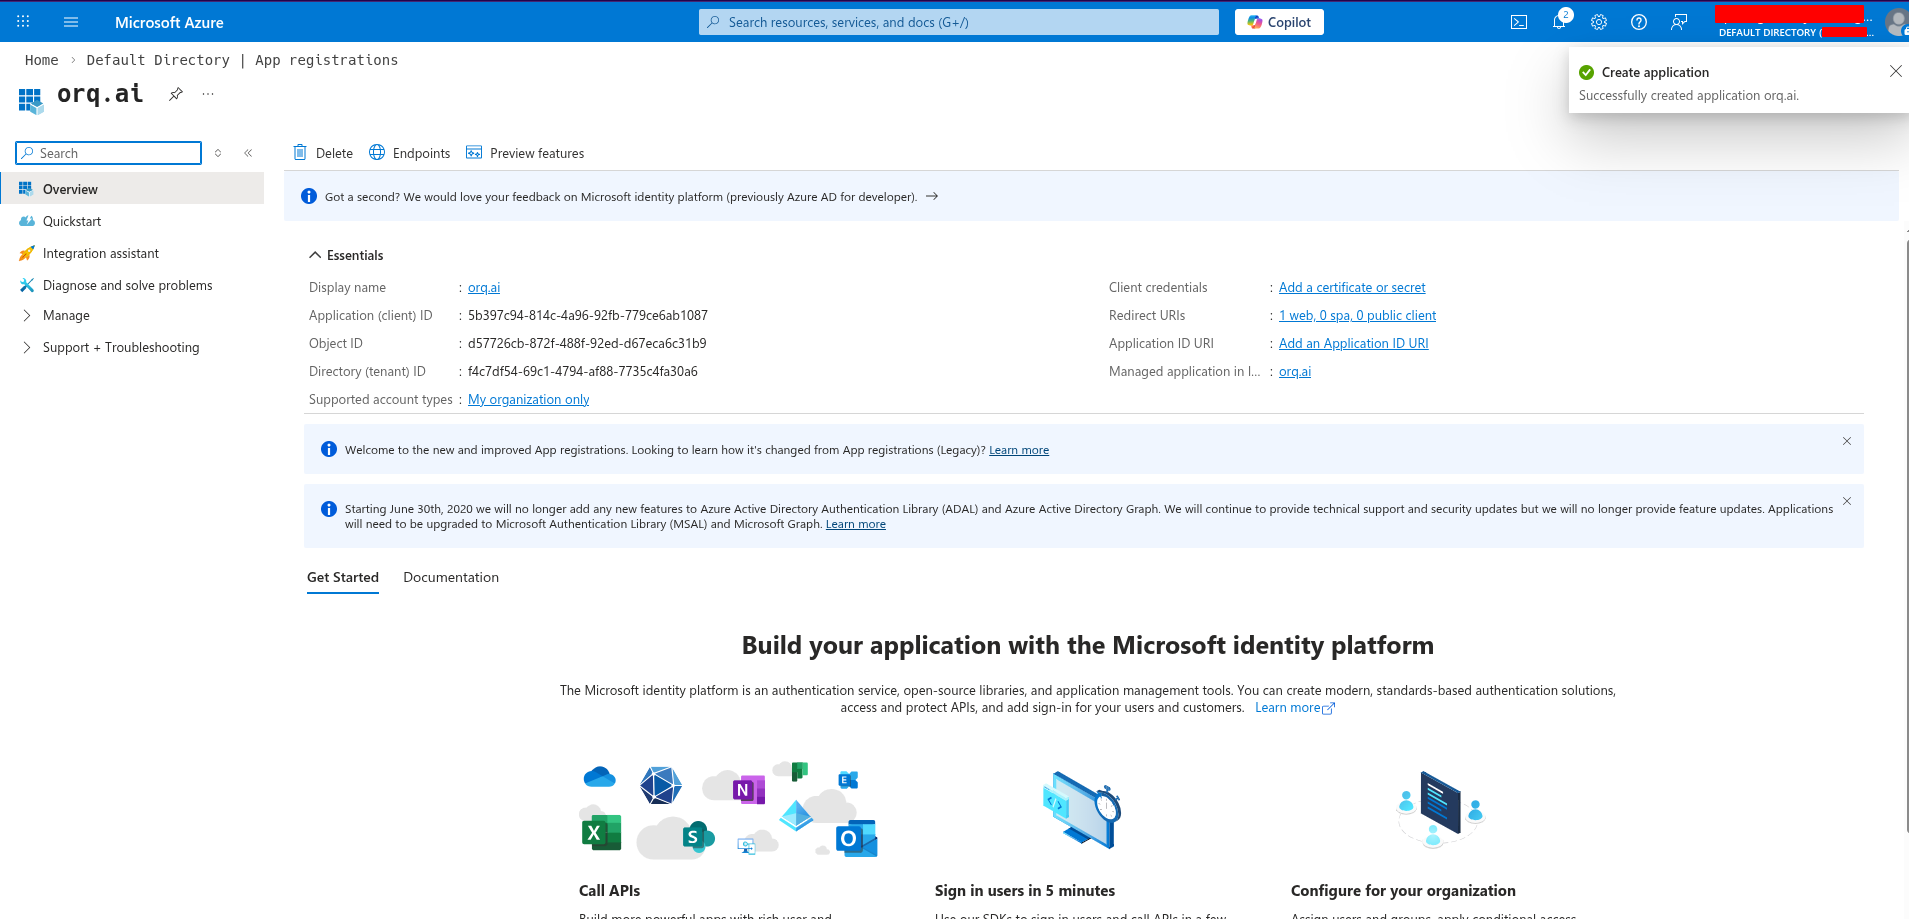
 **Get the Client ID:**
From the app registration **Overview** page, copy the **Application (client) ID**: this is the **Client ID** for **Orq.ai**.
**Get the Client ID:**
From the app registration **Overview** page, copy the **Application (client) ID**: this is the **Client ID** for **Orq.ai**.
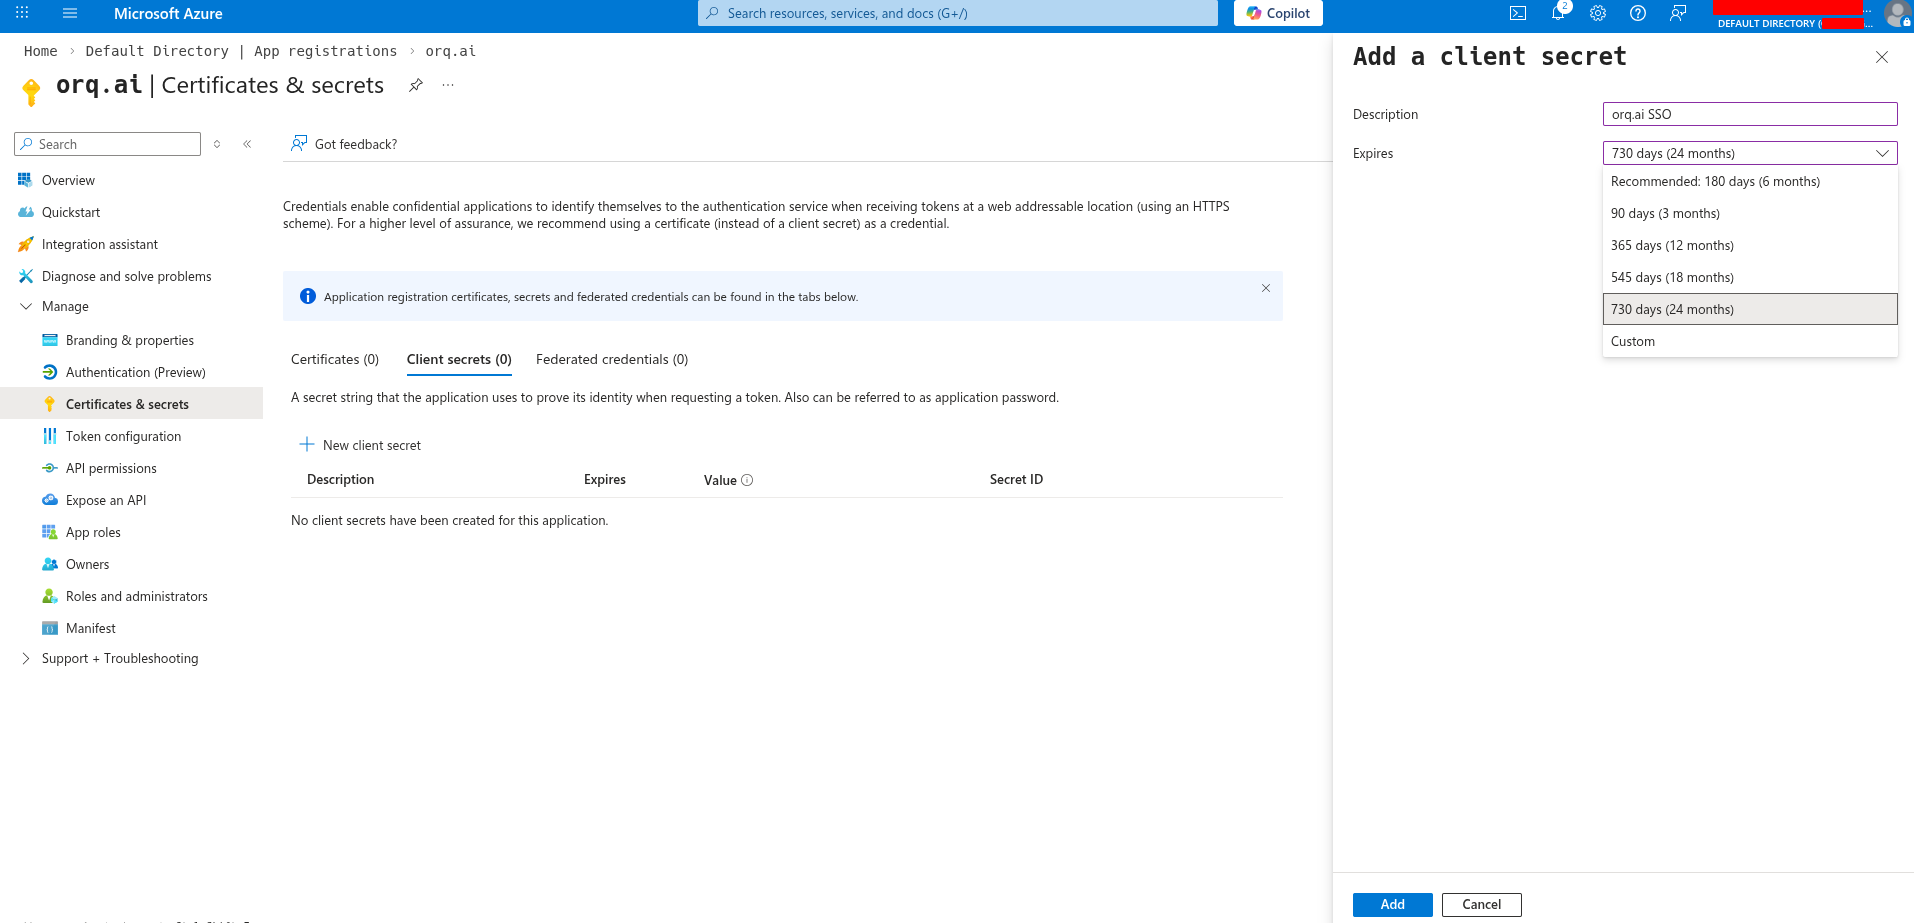
 **Create a Client Secret:**
Go to **Certificates & secrets → Client secrets → New client secret**.
Add a description (e.g., `Orq.ai SSO`), select an expiration period, and click **Add**.
**Create a Client Secret:**
Go to **Certificates & secrets → Client secrets → New client secret**.
Add a description (e.g., `Orq.ai SSO`), select an expiration period, and click **Add**.
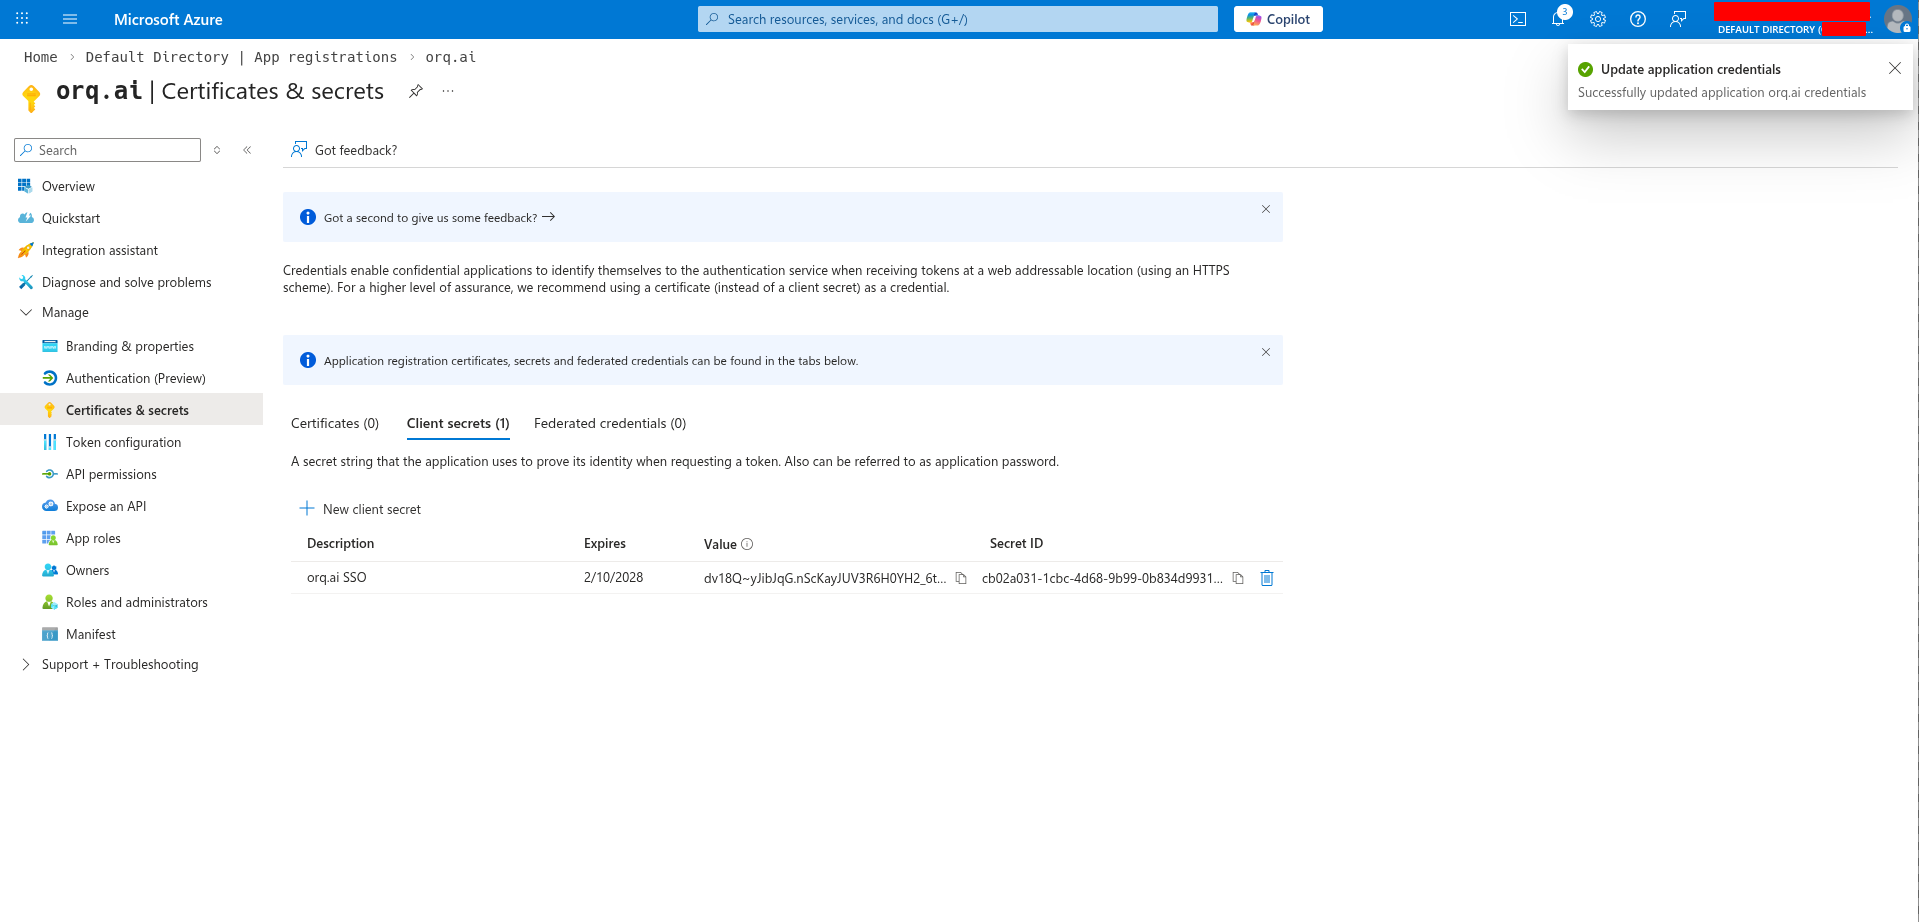
 **Copy the secret value immediately.** Azure only displays it once. If lost, generate a new secret.
Copy the **Value** field: this is the **Client Secret** for **Orq.ai**.
**Copy the secret value immediately.** Azure only displays it once. If lost, generate a new secret.
Copy the **Value** field: this is the **Client Secret** for **Orq.ai**.
 The Provider URL is the tenant's issuer URL:
```
https://login.microsoftonline.com/{tenant-id}/v2.0
```
Replace `{tenant-id}` with the **Directory (tenant) ID**, found on the app registration overview page.
Go to **API permissions** and ensure these Microsoft Graph permissions are granted:
* `openid`
* `email`
* `profile`
The Provider URL is the tenant's issuer URL:
```
https://login.microsoftonline.com/{tenant-id}/v2.0
```
Replace `{tenant-id}` with the **Directory (tenant) ID**, found on the app registration overview page.
Go to **API permissions** and ensure these Microsoft Graph permissions are granted:
* `openid`
* `email`
* `profile`
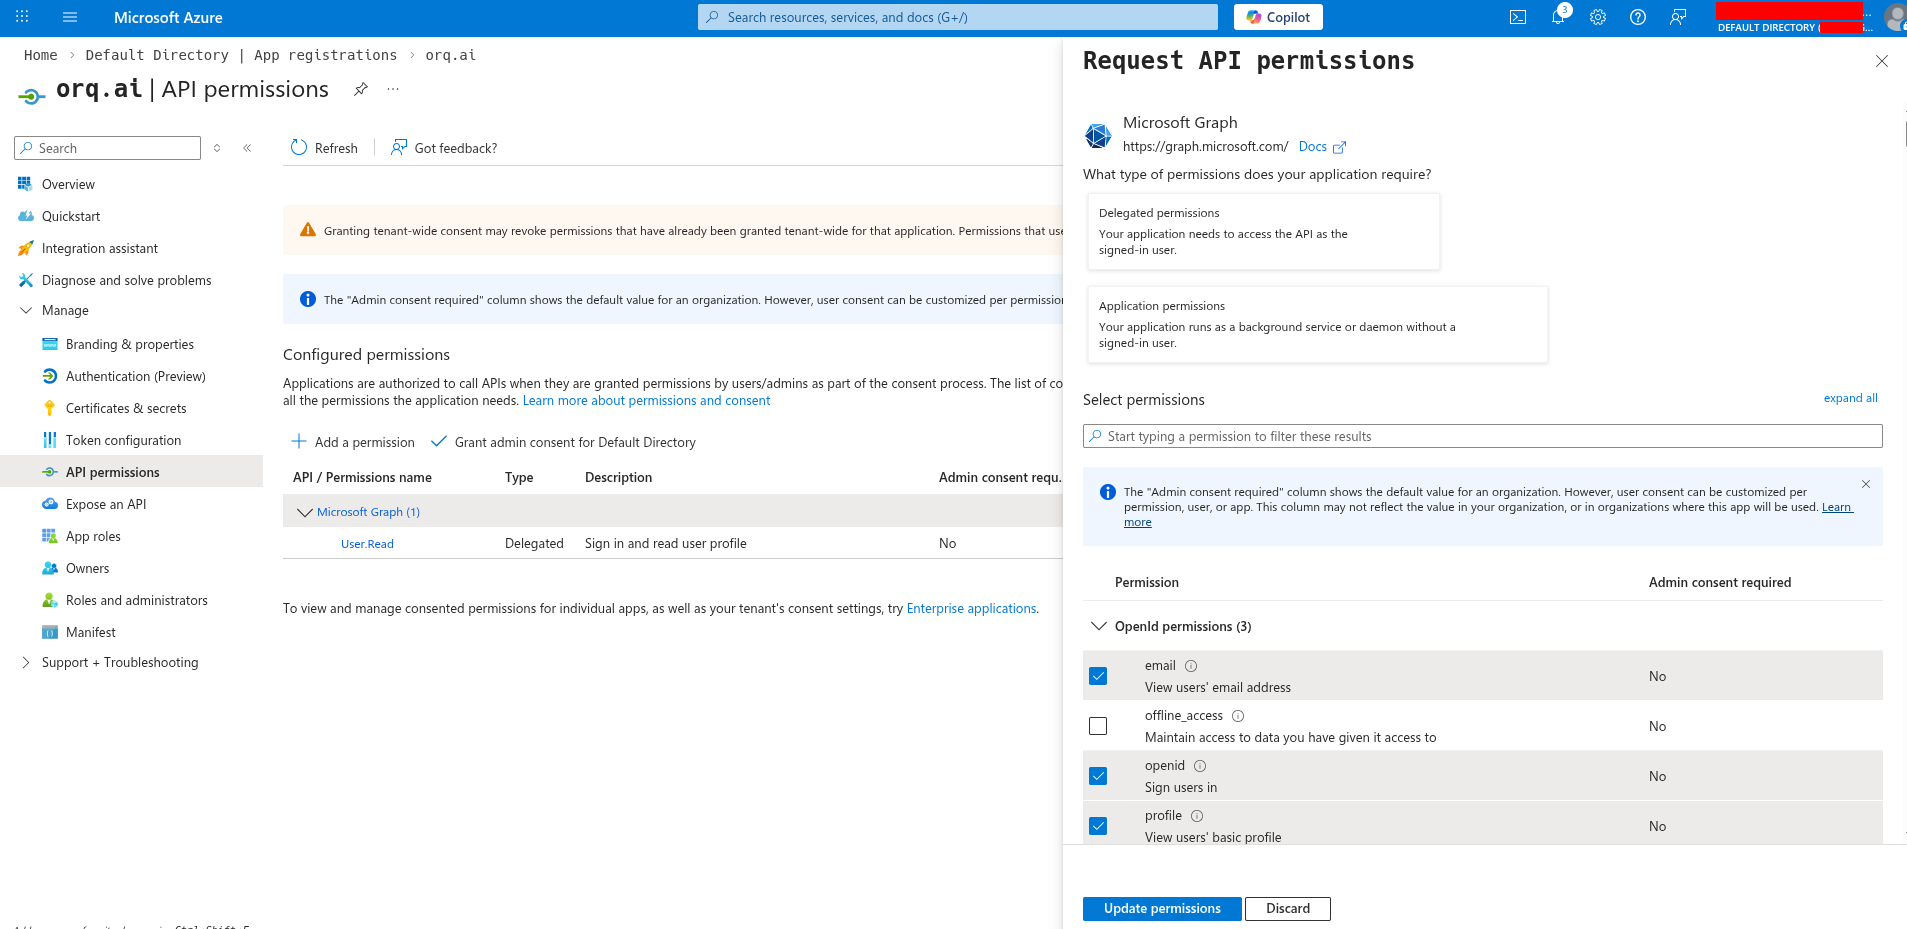 Click **Grant admin consent** if required by the organization.
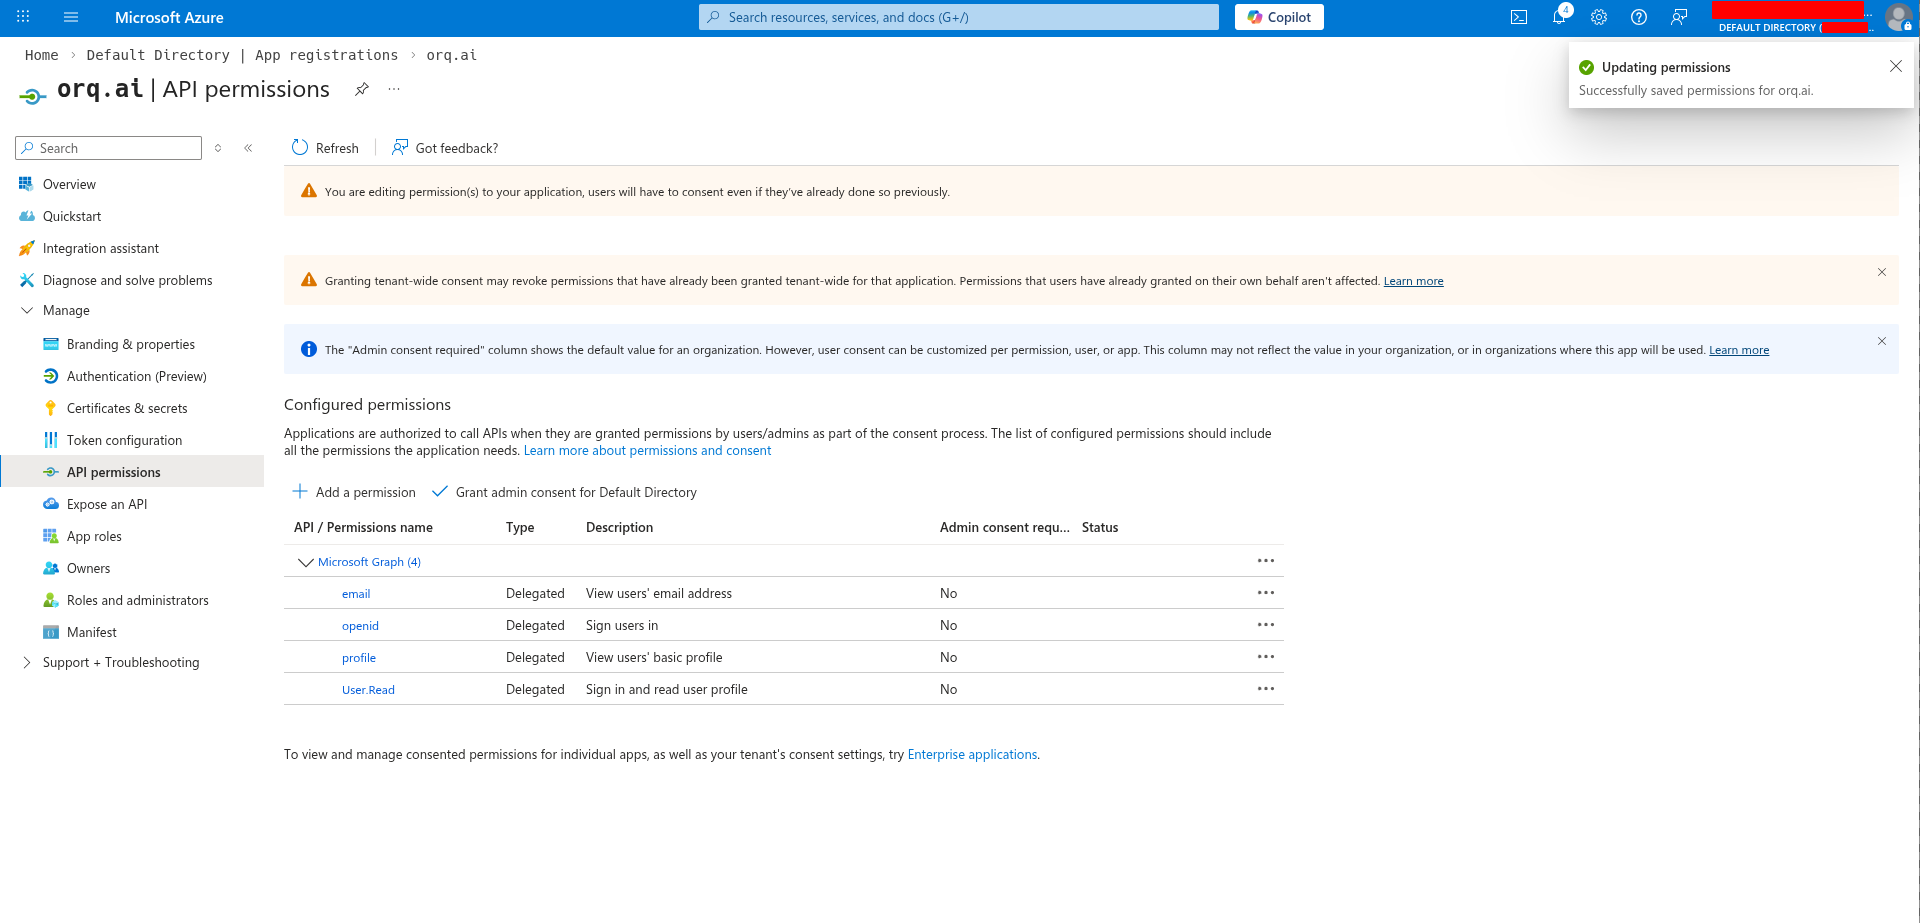 **Orq.ai** automatically requests the `User.Read` scope to retrieve user email addresses when the standard OIDC `email` claim is not available.
Navigate to **AI Studio** → **Settings** → **Organization** → **Auth**.
Enter the credentials collected from Azure:
1. Select **OIDC** (selected by default)
2. Enter the **Client ID**
3. Enter the **Client Secret**
4. Enter the **Provider URL**
5. Enter the organization's email domain(s) in **Allowed domains** (e.g., `acme.com`)
6. Click **Activate**
SSO is now configured. Users can sign in at:
```
https://my.orq.ai/{your-workspace-key}/login
```
Choose a unique identifier for the Service Provider Entity ID. We recommend:
```
urn:orq.ai:{your-workspace-key}
```
For example, if the workspace key is `acme-corp`, use `urn:orq.ai:acme-corp`.
The SP Entity ID must match exactly in both Azure and **Orq.ai**. Write it down; it is needed in multiple steps.
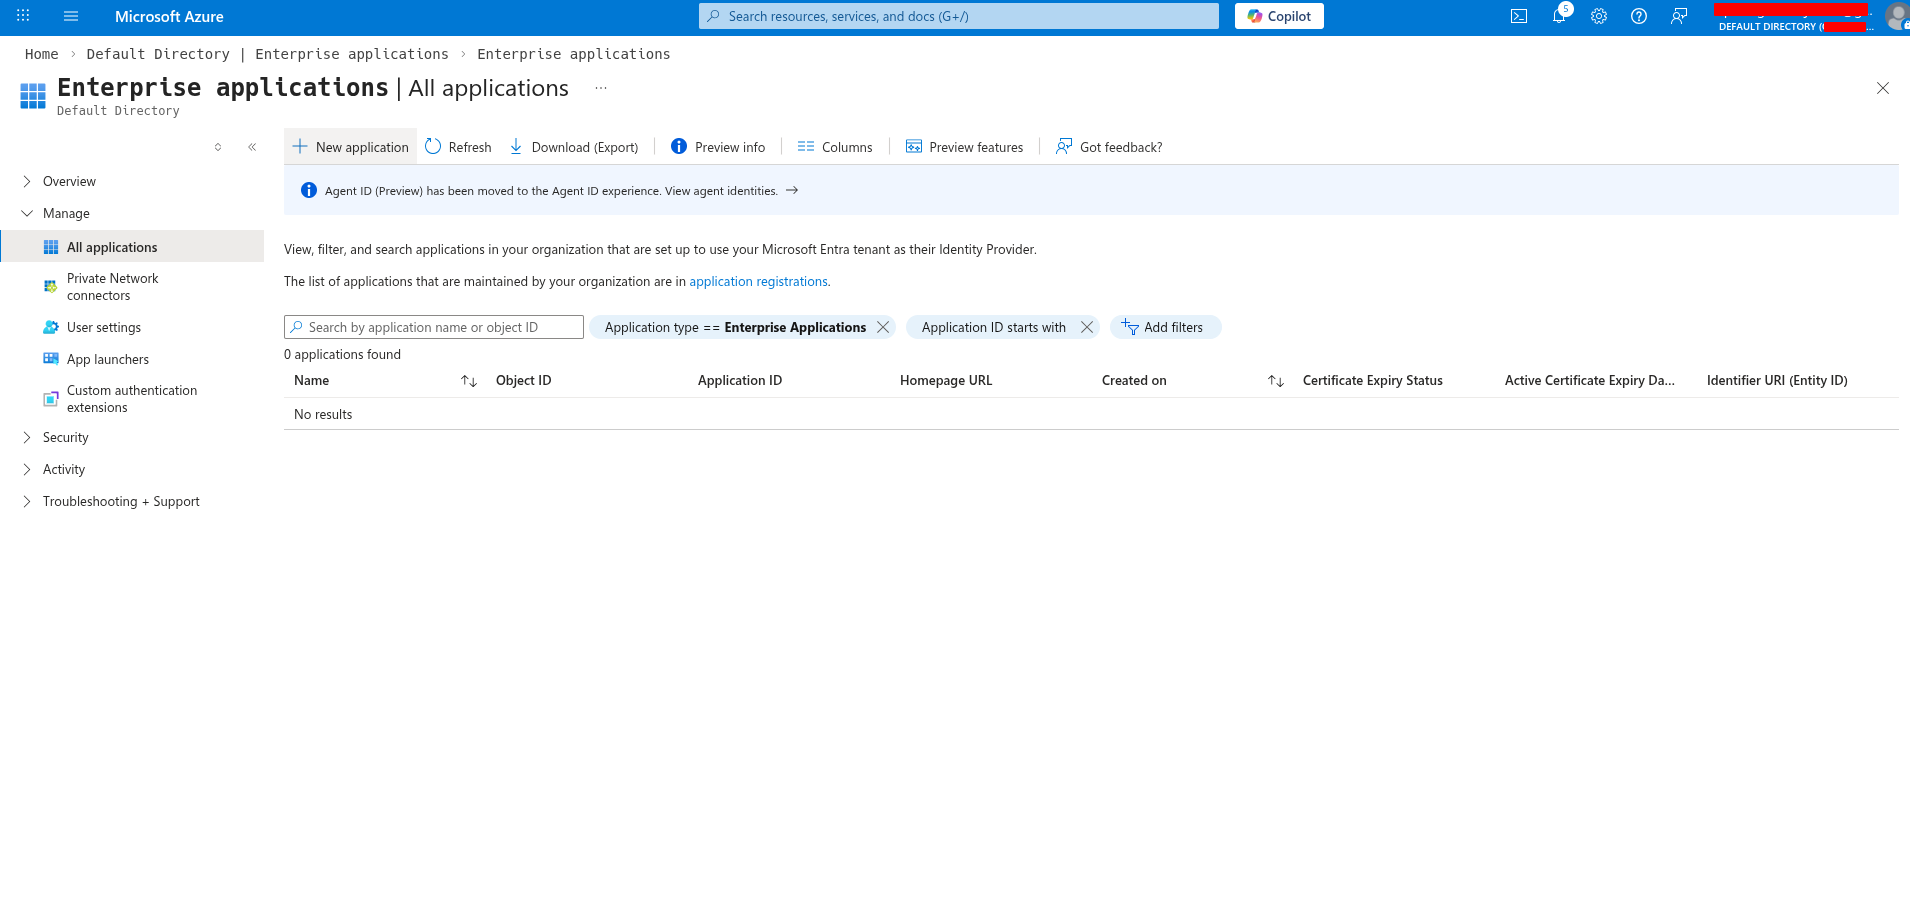
In the [Azure portal](https://entra.microsoft.com), go to **Microsoft Entra ID → Enterprise applications → New application**.
**Orq.ai** automatically requests the `User.Read` scope to retrieve user email addresses when the standard OIDC `email` claim is not available.
Navigate to **AI Studio** → **Settings** → **Organization** → **Auth**.
Enter the credentials collected from Azure:
1. Select **OIDC** (selected by default)
2. Enter the **Client ID**
3. Enter the **Client Secret**
4. Enter the **Provider URL**
5. Enter the organization's email domain(s) in **Allowed domains** (e.g., `acme.com`)
6. Click **Activate**
SSO is now configured. Users can sign in at:
```
https://my.orq.ai/{your-workspace-key}/login
```
Choose a unique identifier for the Service Provider Entity ID. We recommend:
```
urn:orq.ai:{your-workspace-key}
```
For example, if the workspace key is `acme-corp`, use `urn:orq.ai:acme-corp`.
The SP Entity ID must match exactly in both Azure and **Orq.ai**. Write it down; it is needed in multiple steps.
In the [Azure portal](https://entra.microsoft.com), go to **Microsoft Entra ID → Enterprise applications → New application**.
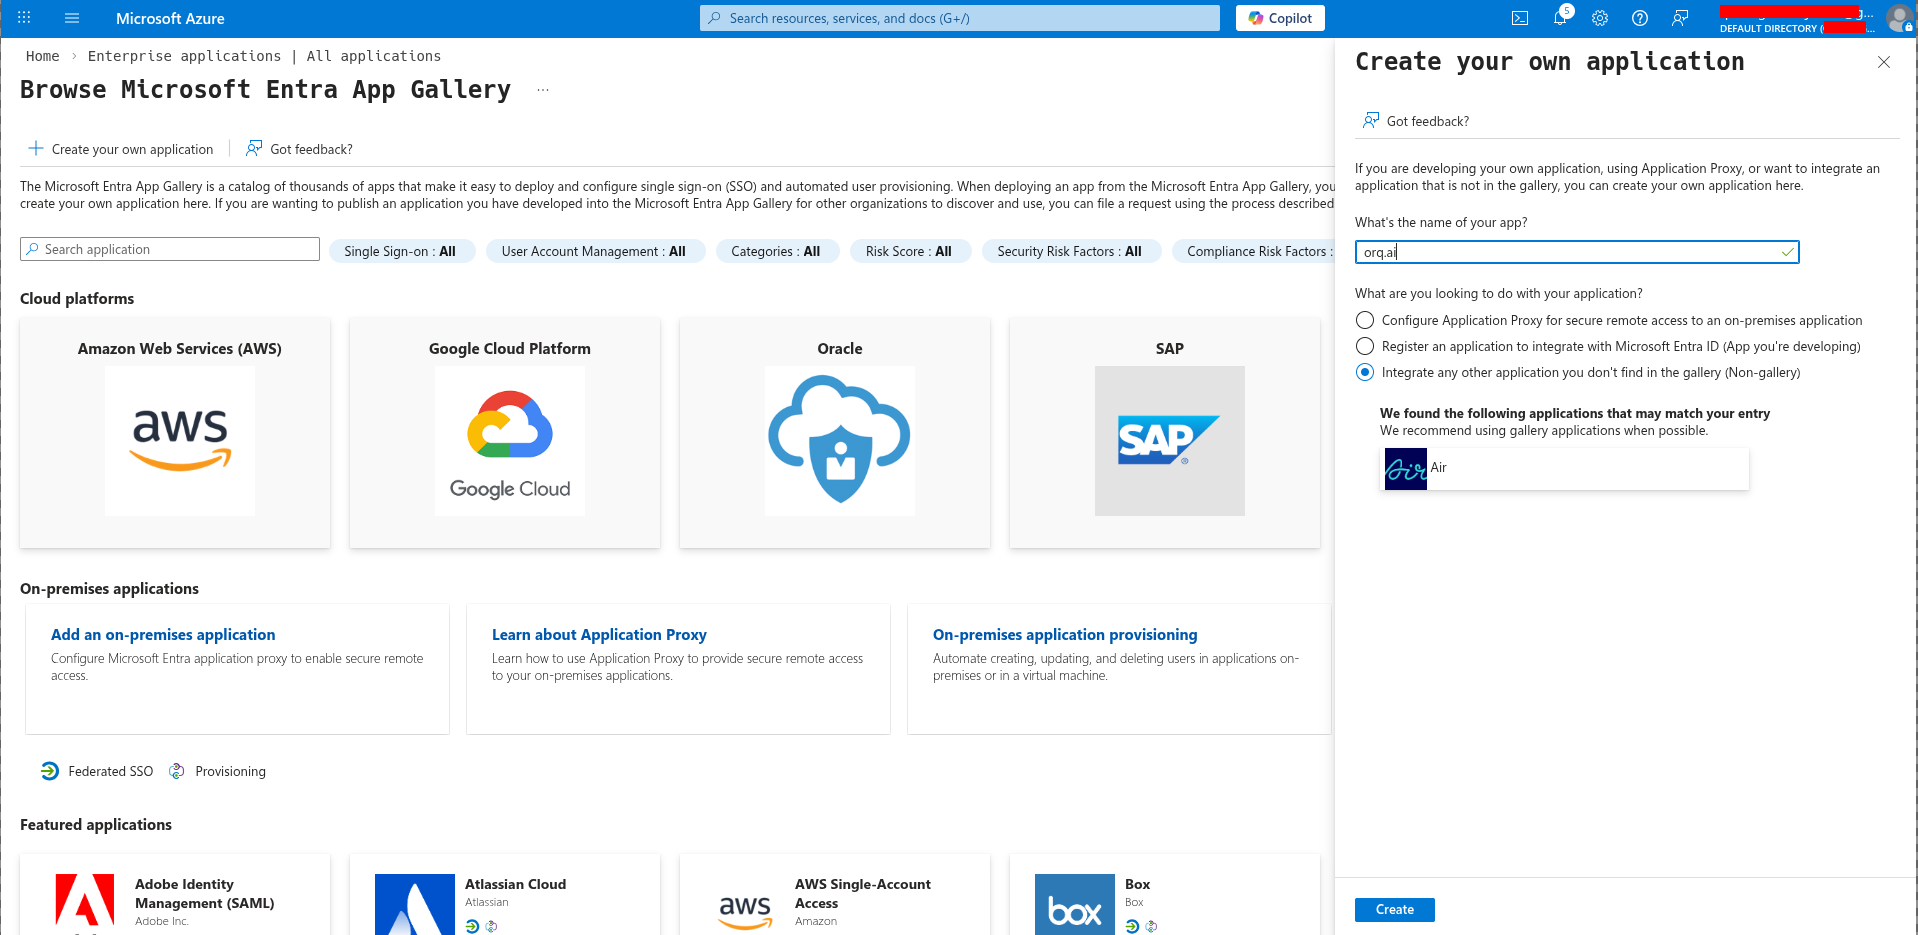
 Click Create your own application, name it (e.g. `Orq.ai SSO`), select **Integrate any other application you don't find in the gallery (Non-gallery)**, and click Create.
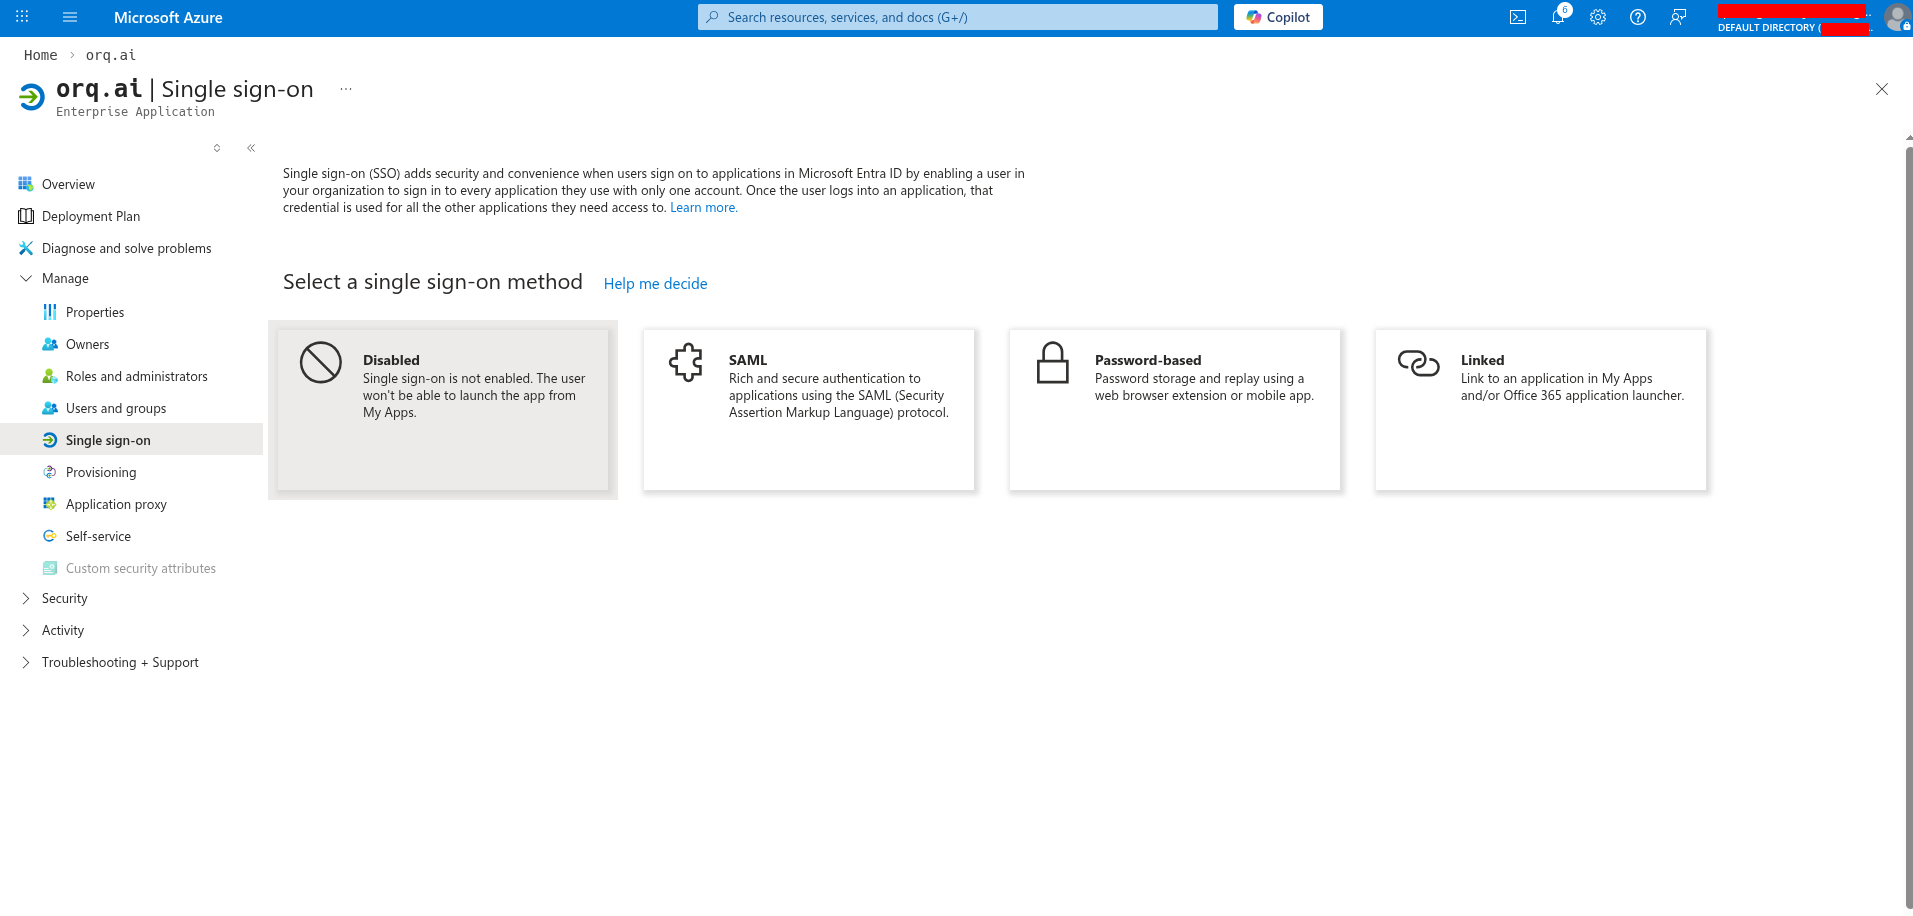
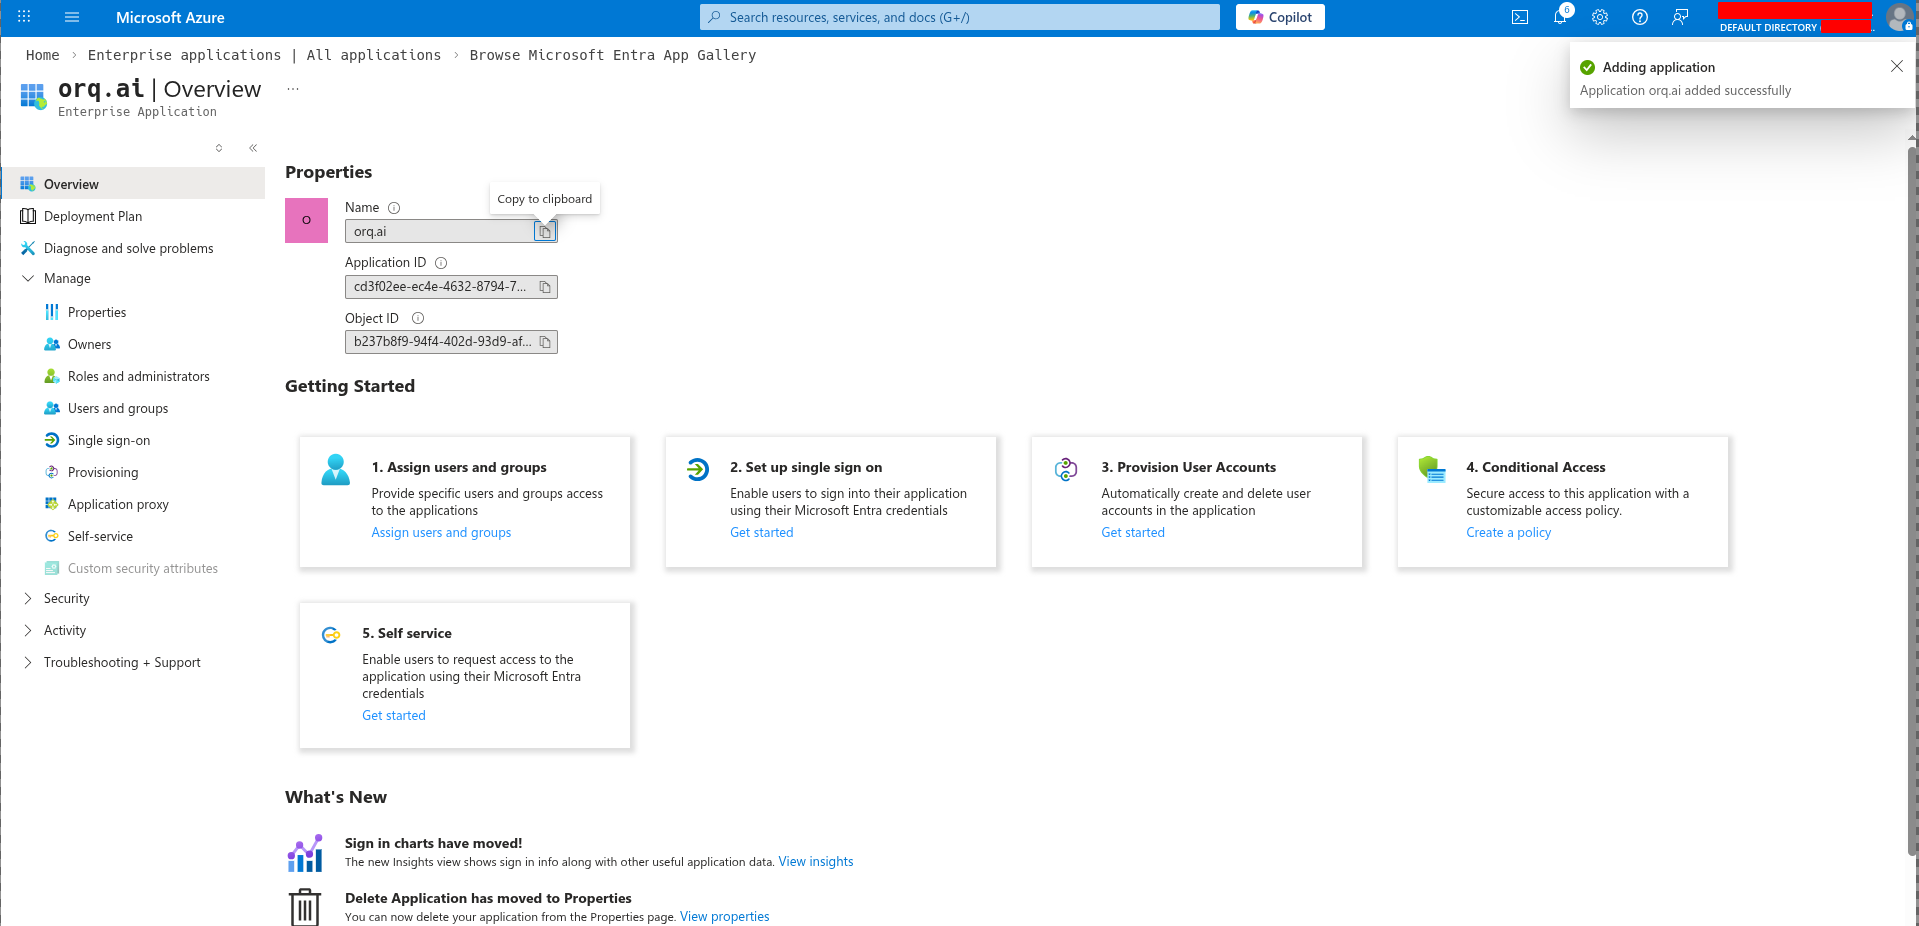 In the application, go to **Single sign-on** and select **SAML**.
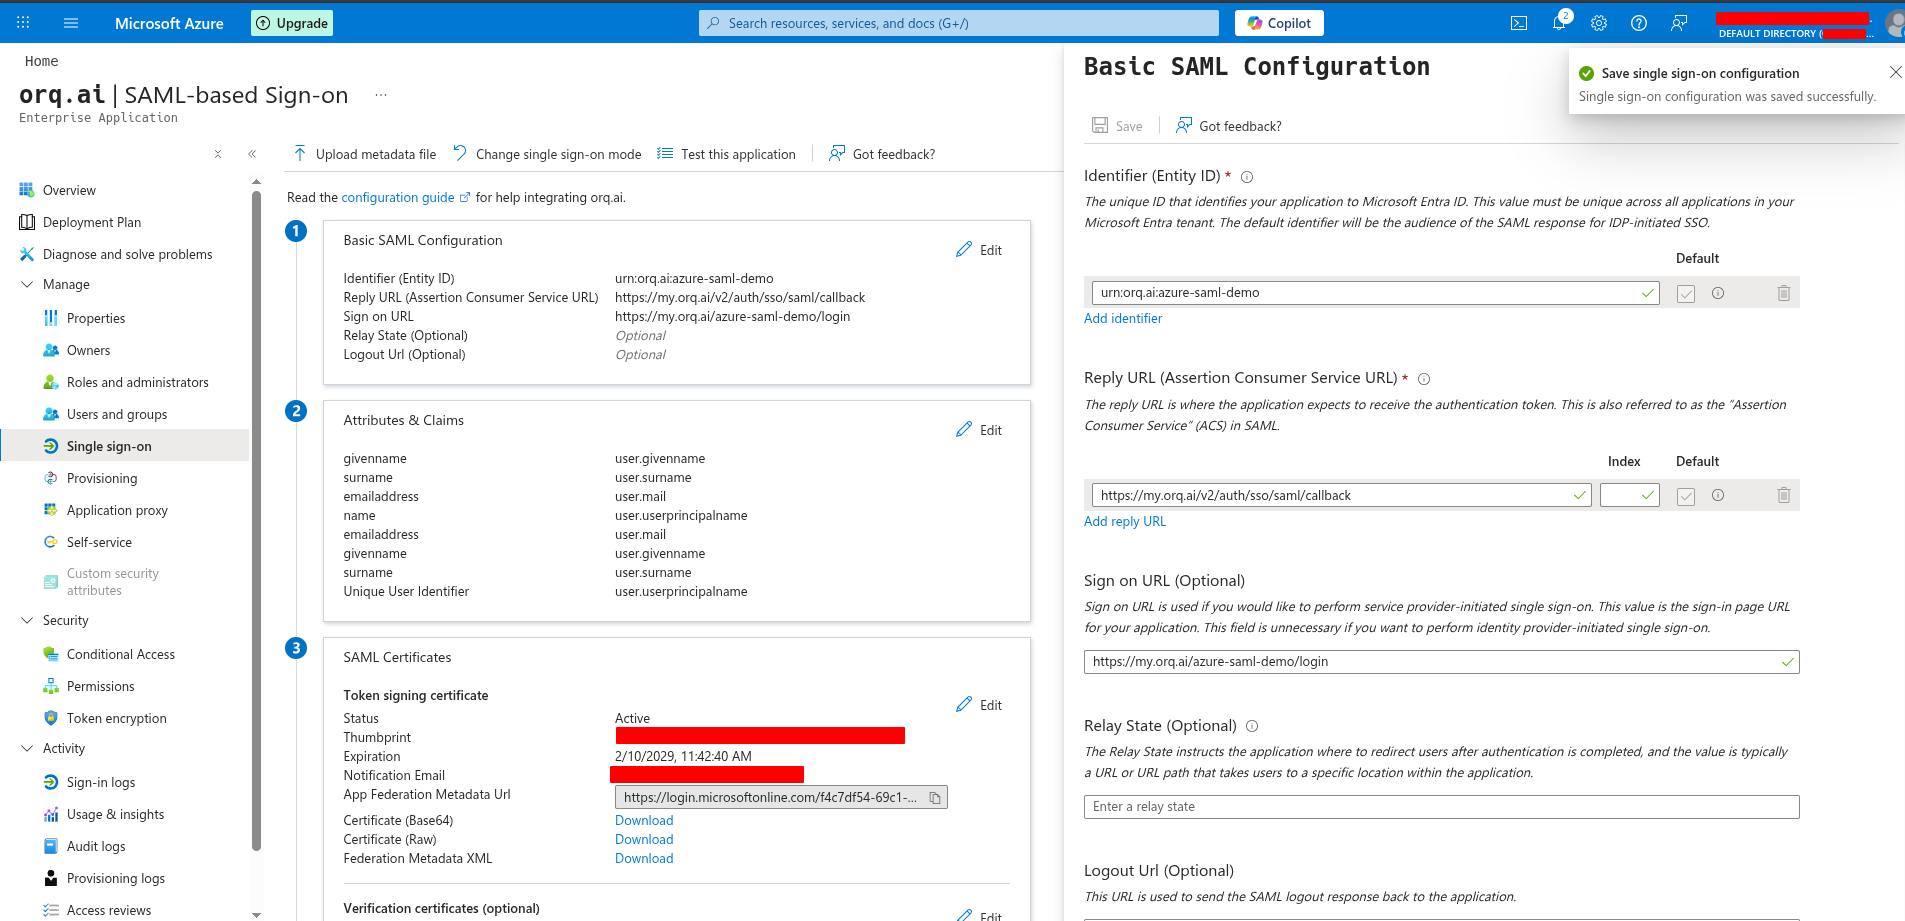
 Under **Basic SAML Configuration**, click **Edit** and set:
* **Identifier (Entity ID)**: the SP Entity ID defined in Step 1
* **Reply URL (ACS URL)**:
```
https://my.orq.ai/v2/auth/sso/saml/callback
```
* **Sign on URL**:
```
https://my.orq.ai/{your-workspace-key}/login
```
Click **Save**.
Under **Basic SAML Configuration**, click **Edit** and set:
* **Identifier (Entity ID)**: the SP Entity ID defined in Step 1
* **Reply URL (ACS URL)**:
```
https://my.orq.ai/v2/auth/sso/saml/callback
```
* **Sign on URL**:
```
https://my.orq.ai/{your-workspace-key}/login
```
Click **Save**.
 Click **Edit** on **Attributes & Claims**.
Verify or add these claim mappings:
| Short name | Full claim URI | Source attribute |
| -------------- | -------------------------------------------------------------------- | ---------------- |
| `emailaddress` | `http://schemas.xmlsoap.org/ws/2005/05/identity/claims/emailaddress` | `user.mail` |
| `givenname` | `http://schemas.xmlsoap.org/ws/2005/05/identity/claims/givenname` | `user.givenname` |
| `surname` | `http://schemas.xmlsoap.org/ws/2005/05/identity/claims/surname` | `user.surname` |
Click **Edit** on **Attributes & Claims**.
Verify or add these claim mappings:
| Short name | Full claim URI | Source attribute |
| -------------- | -------------------------------------------------------------------- | ---------------- |
| `emailaddress` | `http://schemas.xmlsoap.org/ws/2005/05/identity/claims/emailaddress` | `user.mail` |
| `givenname` | `http://schemas.xmlsoap.org/ws/2005/05/identity/claims/givenname` | `user.givenname` |
| `surname` | `http://schemas.xmlsoap.org/ws/2005/05/identity/claims/surname` | `user.surname` |
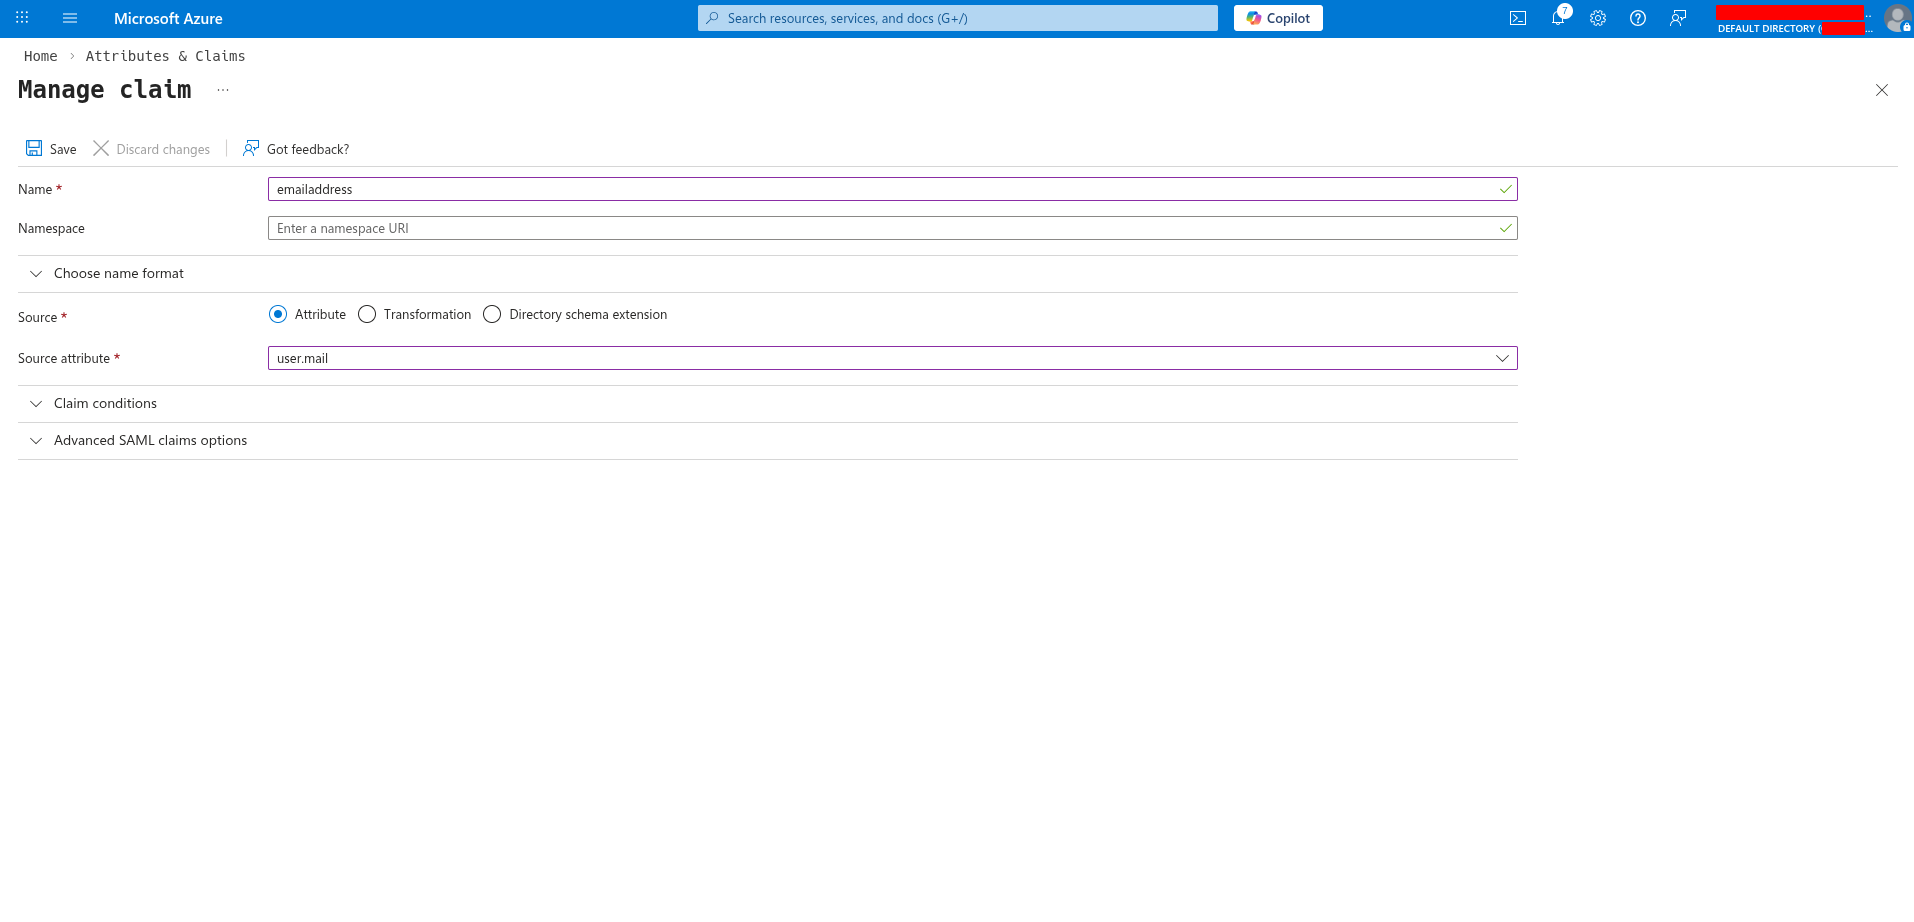
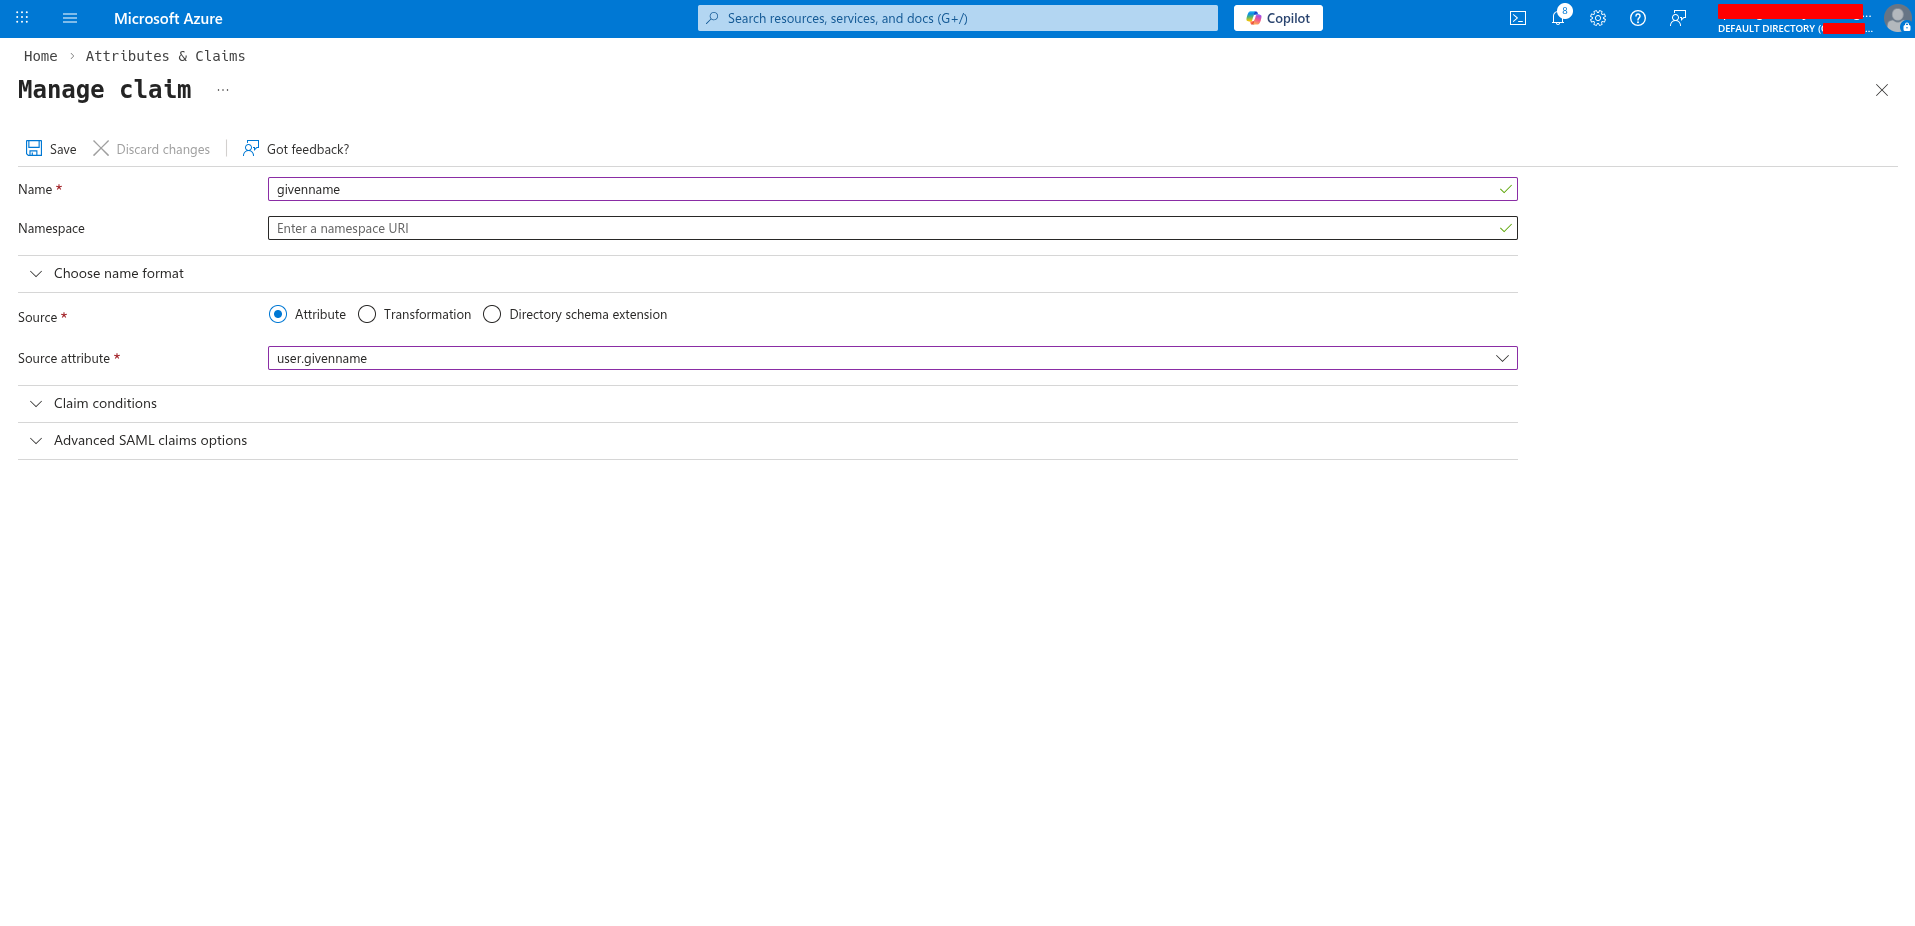
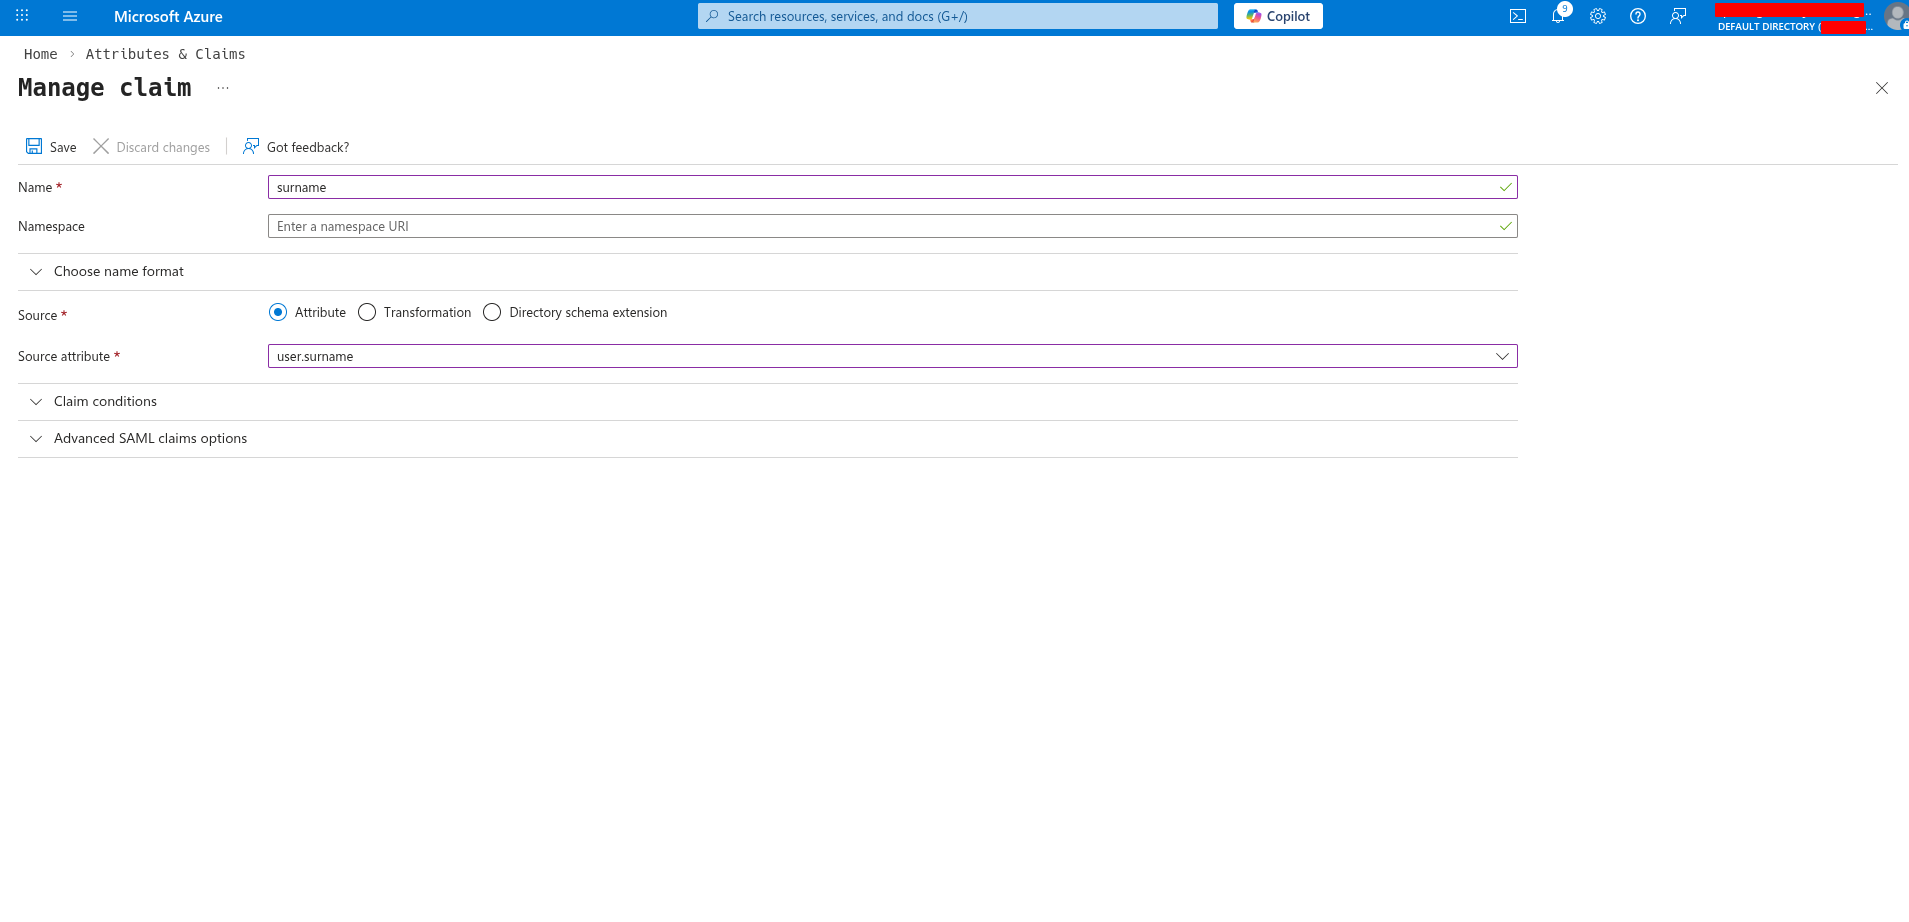
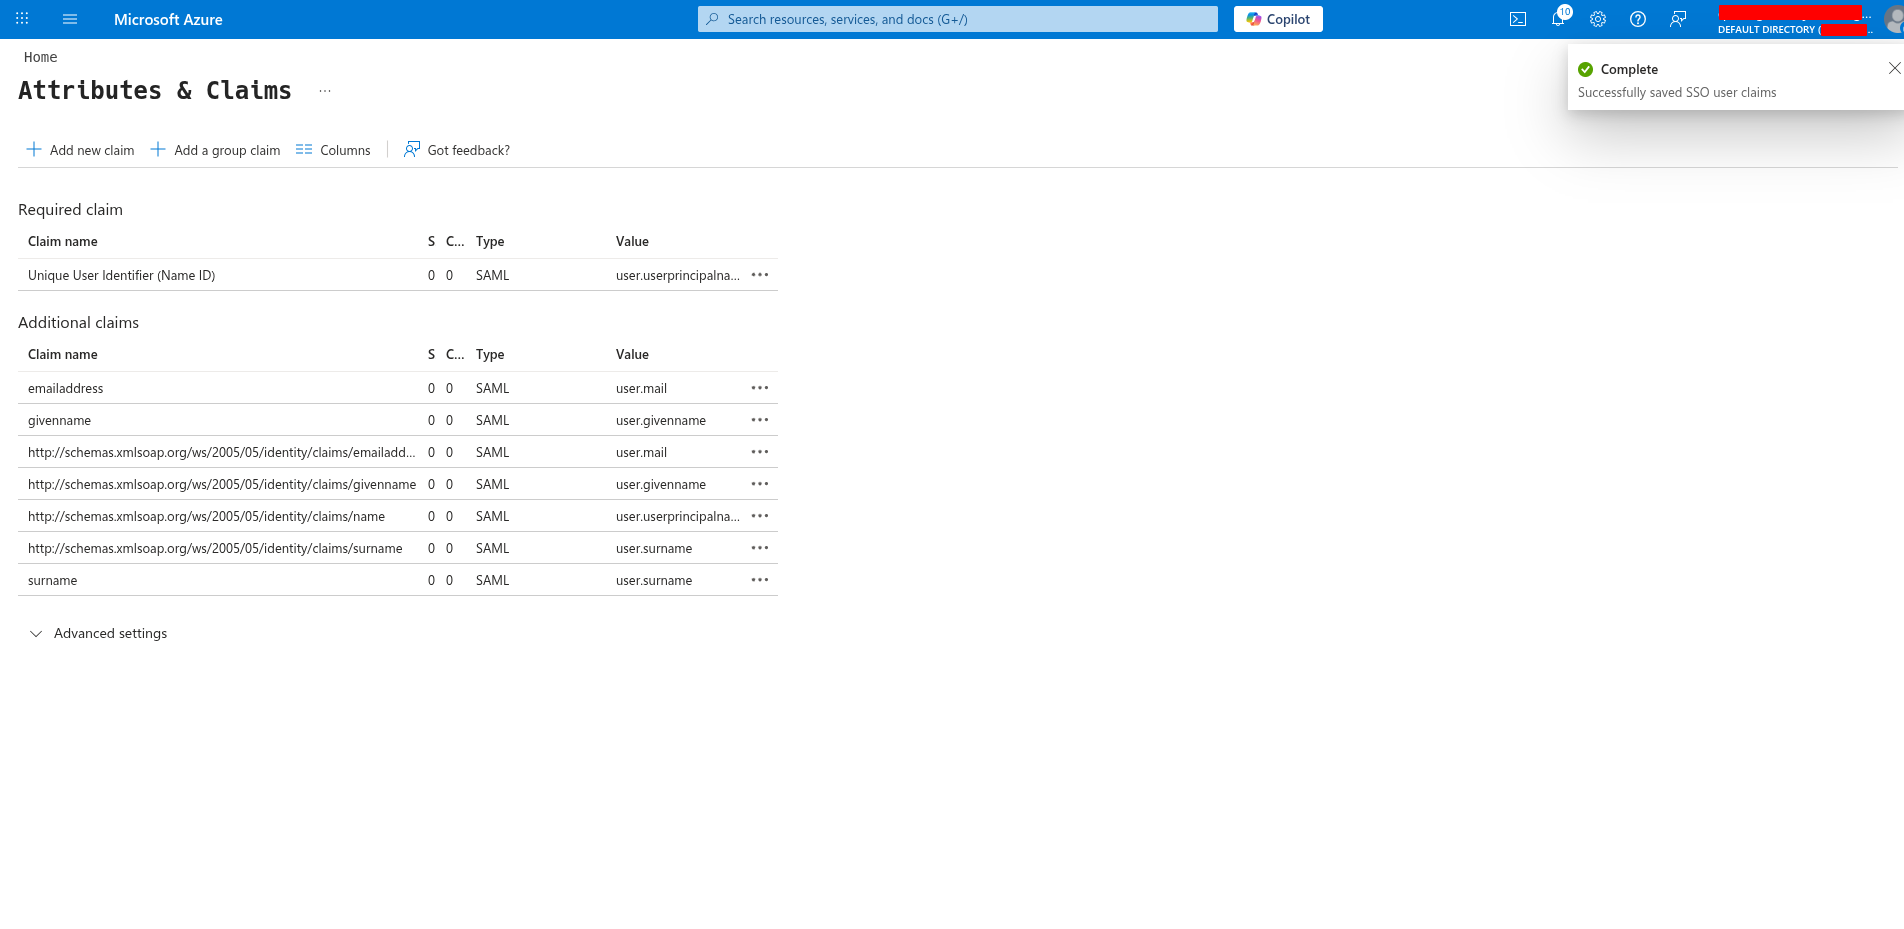 **Orq.ai** supports both standard attribute names and full Microsoft Entra ID claim URIs (e.g., `http://schemas.xmlsoap.org/ws/2005/05/identity/claims/emailaddress`). The default Entra ID claim mappings work out of the box.
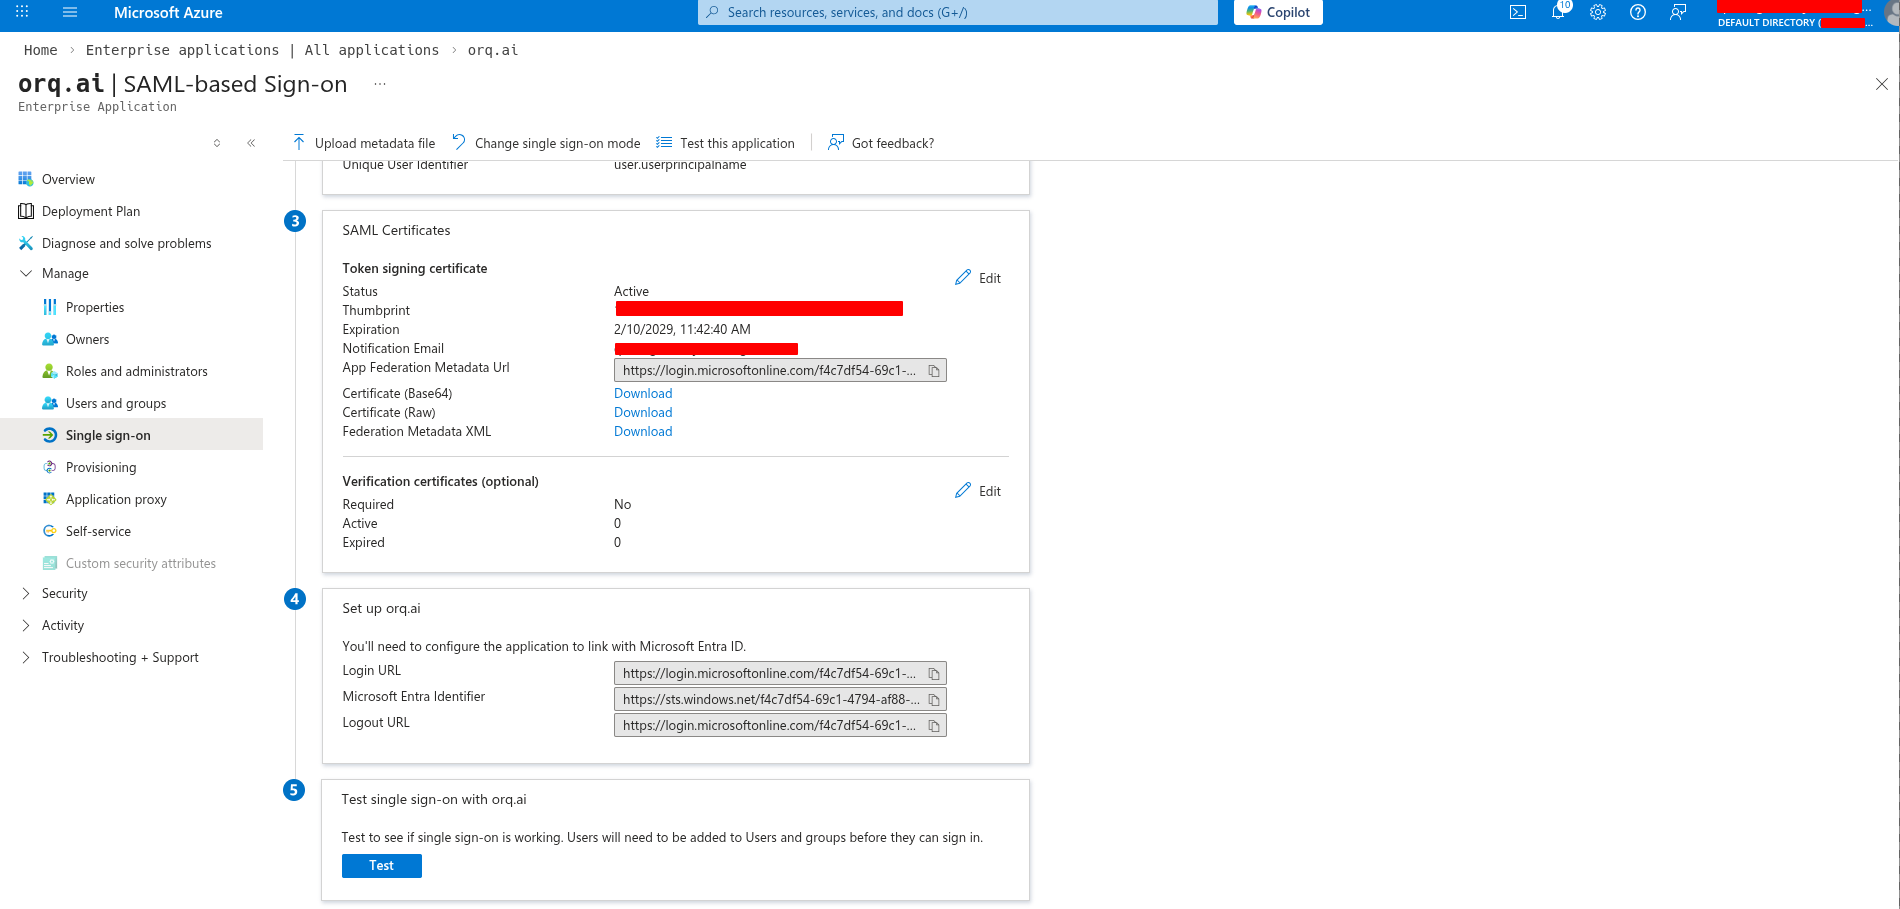
On the SAML configuration page, collect these values:
**From the "Set up" section:**
* **Login URL**: use as the **Single Sign-On URL** in **Orq.ai**
* **Microsoft Entra Identifier**: use as the **Identity Provider Entity ID** in **Orq.ai**
**From the "SAML Certificates" section:**
* Click **Download** next to **Certificate (Base64)** and save the file
**Orq.ai** supports both standard attribute names and full Microsoft Entra ID claim URIs (e.g., `http://schemas.xmlsoap.org/ws/2005/05/identity/claims/emailaddress`). The default Entra ID claim mappings work out of the box.
On the SAML configuration page, collect these values:
**From the "Set up" section:**
* **Login URL**: use as the **Single Sign-On URL** in **Orq.ai**
* **Microsoft Entra Identifier**: use as the **Identity Provider Entity ID** in **Orq.ai**
**From the "SAML Certificates" section:**
* Click **Download** next to **Certificate (Base64)** and save the file
 Go to **Users and groups** (left menu) and click **Add user/group**.
Select the users or groups that should have access to **Orq.ai**, then click Assign.
Go to **Users and groups** (left menu) and click **Add user/group**.
Select the users or groups that should have access to **Orq.ai**, then click Assign.
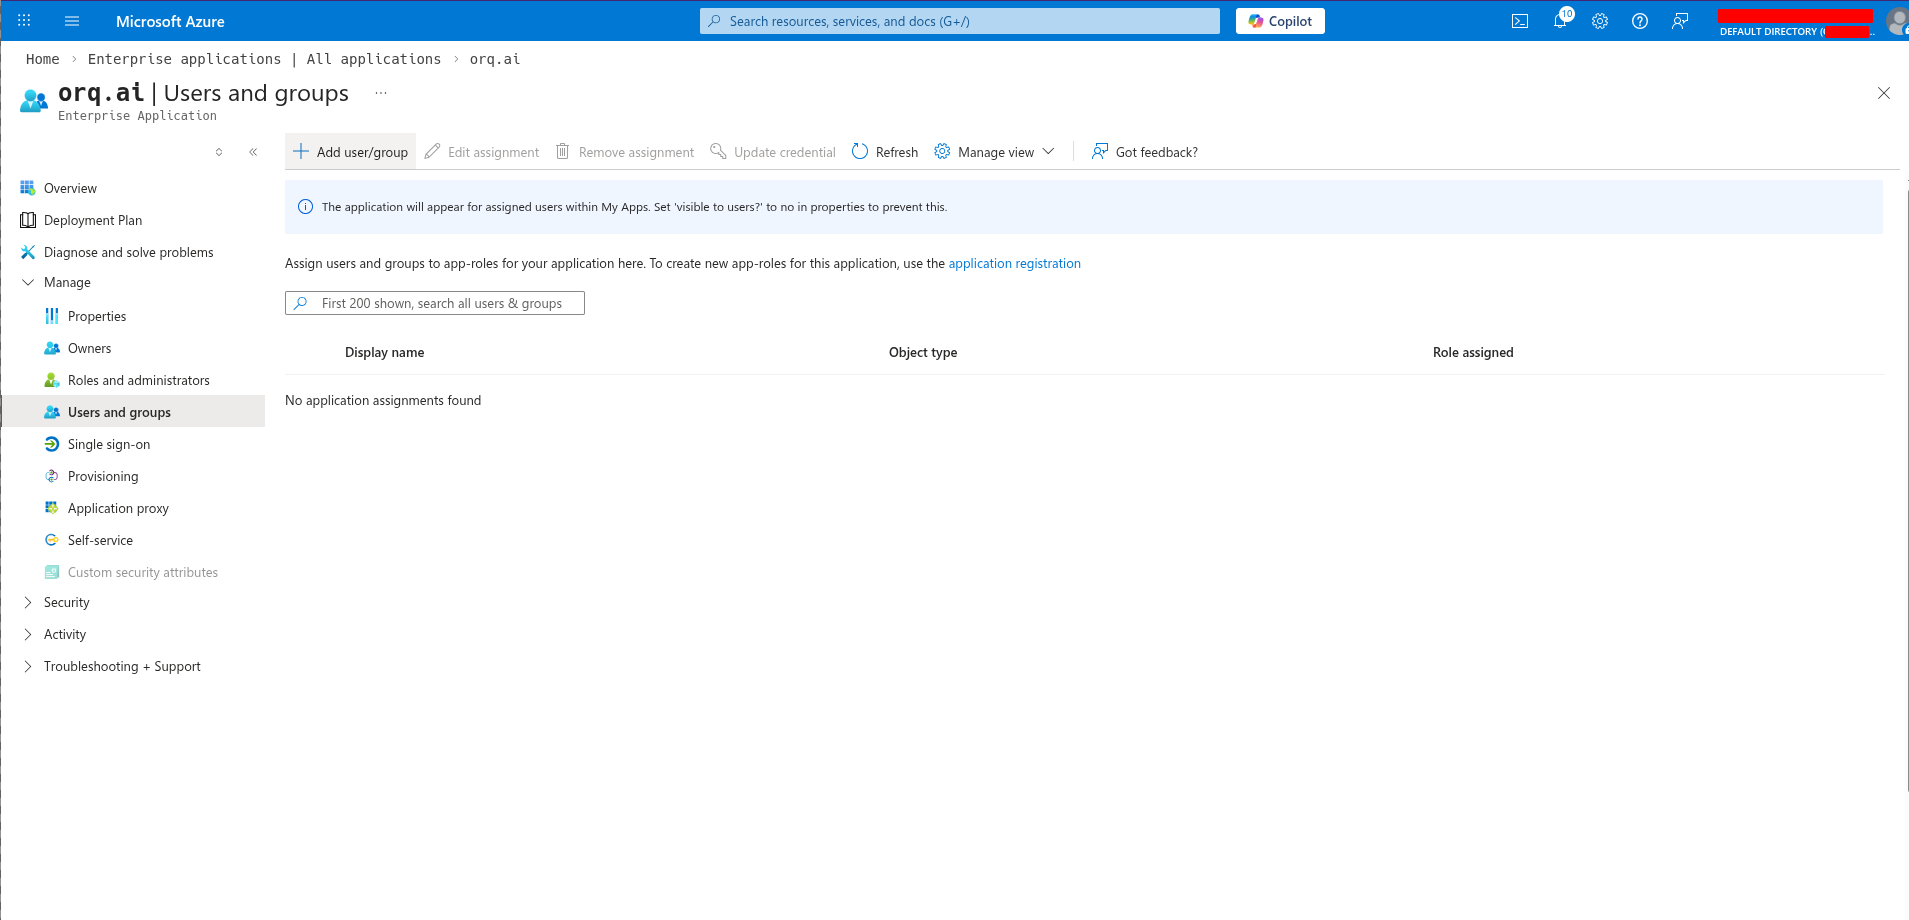 By default, any user in the directory can authenticate. Assigning specific users or groups restricts access.
Navigate to **AI Studio** → **Settings** → **Organization** → **Auth**.
Enter the credentials collected from Azure:
1. Select **SAML**
2. Enter the **Service Provider Entity ID** (from Step 1)
3. Enter the **Identity Provider Entity ID** (Microsoft Entra Identifier from Azure)
4. Enter the **Single Sign-On URL** (Login URL from Azure)
5. For **X.509 Certificate**: open the downloaded certificate file in a text editor, copy all content including the `-----BEGIN CERTIFICATE-----` and `-----END CERTIFICATE-----` lines, and paste it here
6. Enter the organization's email domain(s) in **Allowed domains** (e.g., `orq.ai`)
7. Click **Activate**
SSO is now configured. Users can sign in at:
```
https://my.orq.ai/{your-workspace-key}/login
```
Log in to the **Keycloak admin console**. From the realm dropdown (top-left), select an existing realm or click **Create realm**. Note the realm name; it is needed for the Provider URL.
Keycloak may update their admin console interface over time. Refer to [Keycloak's official documentation](https://www.keycloak.org/documentation) if any steps differ.
In the chosen realm, navigate to **Clients** and click **Create client**.
By default, any user in the directory can authenticate. Assigning specific users or groups restricts access.
Navigate to **AI Studio** → **Settings** → **Organization** → **Auth**.
Enter the credentials collected from Azure:
1. Select **SAML**
2. Enter the **Service Provider Entity ID** (from Step 1)
3. Enter the **Identity Provider Entity ID** (Microsoft Entra Identifier from Azure)
4. Enter the **Single Sign-On URL** (Login URL from Azure)
5. For **X.509 Certificate**: open the downloaded certificate file in a text editor, copy all content including the `-----BEGIN CERTIFICATE-----` and `-----END CERTIFICATE-----` lines, and paste it here
6. Enter the organization's email domain(s) in **Allowed domains** (e.g., `orq.ai`)
7. Click **Activate**
SSO is now configured. Users can sign in at:
```
https://my.orq.ai/{your-workspace-key}/login
```
Log in to the **Keycloak admin console**. From the realm dropdown (top-left), select an existing realm or click **Create realm**. Note the realm name; it is needed for the Provider URL.
Keycloak may update their admin console interface over time. Refer to [Keycloak's official documentation](https://www.keycloak.org/documentation) if any steps differ.
In the chosen realm, navigate to **Clients** and click **Create client**.
 Configure the General Settings:
| Field | Value |
| --------------- | ---------------------------------- |
| **Client type** | `OpenID Connect` |
| **Client ID** | `orq-ai` (or preferred identifier) |
| **Name** | `orq.ai` (optional display name) |
Click **Next**.
Configure the General Settings:
| Field | Value |
| --------------- | ---------------------------------- |
| **Client type** | `OpenID Connect` |
| **Client ID** | `orq-ai` (or preferred identifier) |
| **Name** | `orq.ai` (optional display name) |
Click **Next**.
 Enable the following:
| Field | Value |
| ------------------------- | ----- |
| **Client authentication** | `On` |
| **Standard flow** | `On` |
Leave **Direct access grants**, **Implicit flow**, and **Service accounts roles** off unless the organization requires them. Click **Next**.
Enable the following:
| Field | Value |
| ------------------------- | ----- |
| **Client authentication** | `On` |
| **Standard flow** | `On` |
Leave **Direct access grants**, **Implicit flow**, and **Service accounts roles** off unless the organization requires them. Click **Next**.
 Enter the following:
| Field | Value |
| ----------------------- | --------------------------------------------- |
| **Valid redirect URIs** | `https://my.orq.ai/v2/auth/sso/oidc/callback` |
| **Web origins** | `https://my.orq.ai` |
Click **Save**.
Enter the following:
| Field | Value |
| ----------------------- | --------------------------------------------- |
| **Valid redirect URIs** | `https://my.orq.ai/v2/auth/sso/oidc/callback` |
| **Web origins** | `https://my.orq.ai` |
Click **Save**.
 Open the client just created, go to the **Credentials** tab, and copy the **Client Secret**.
 The OIDC Issuer URL follows this pattern:
```
https://{your-keycloak-domain}/realms/{realm-name}
```
For example, with Keycloak at `https://auth.example.com` and realm `orq-prod`:
```
https://auth.example.com/realms/orq-prod
```
Verify the Provider URL by visiting `{issuer-url}/.well-known/openid-configuration` in a browser; it should return a JSON discovery document.
| Field | Where to Find |
| ----------------- | ---------------------------------------------------- |
| **Client ID** | The Client ID entered in Step 2 |
| **Client Secret** | Copied from the **Credentials** tab |
| **Provider URL** | `https://{your-keycloak-domain}/realms/{realm-name}` |
Any user in the realm can sign in by default. To restrict access, configure client-level roles and assign them:
1. Open the client → **Roles** tab → create roles as needed
2. Open **Users** → select user → **Role mappings** → assign the client roles
The OIDC Issuer URL follows this pattern:
```
https://{your-keycloak-domain}/realms/{realm-name}
```
For example, with Keycloak at `https://auth.example.com` and realm `orq-prod`:
```
https://auth.example.com/realms/orq-prod
```
Verify the Provider URL by visiting `{issuer-url}/.well-known/openid-configuration` in a browser; it should return a JSON discovery document.
| Field | Where to Find |
| ----------------- | ---------------------------------------------------- |
| **Client ID** | The Client ID entered in Step 2 |
| **Client Secret** | Copied from the **Credentials** tab |
| **Provider URL** | `https://{your-keycloak-domain}/realms/{realm-name}` |
Any user in the realm can sign in by default. To restrict access, configure client-level roles and assign them:
1. Open the client → **Roles** tab → create roles as needed
2. Open **Users** → select user → **Role mappings** → assign the client roles
 Navigate to **AI Studio** → **Settings** → **Organization** → **Auth**.
1. Select **OIDC**
2. Enter the **Client ID**
3. Enter the **Client Secret**
4. Enter the **Provider URL** (the Issuer URL from Keycloak)
5. Enter the organization's email domain(s) in **Allowed domains**
6. Click **Activate**
SSO is now configured. Users can sign in at:
```
https://my.orq.ai/{your-workspace-key}/login
```
Choose a unique identifier for the SP Entity ID. It must match exactly in both **Keycloak** and **Orq.ai**. We recommend:
```
urn:orq.ai:{your-workspace-key}
```
For example: `urn:orq.ai:example-corp`.
Write it down; it is needed in multiple steps.
Log in to the **Keycloak admin console**. From the realm dropdown (top-left), select an existing realm or click **Create realm**. Note the realm name.
Keycloak may update their admin console interface over time. Refer to [Keycloak's official documentation](https://www.keycloak.org/documentation) if any steps differ.
In the chosen realm, navigate to **Clients** and click **Create client**.
Configure the General Settings:
| Field | Value |
| --------------- | -------------------------------------------------------------- |
| **Client type** | `SAML` |
| **Client ID** | The SP Entity ID from Step 1 (e.g., `urn:orq.ai:example-corp`) |
| **Name** | `orq.ai` (optional display name) |
Click **Next**.
Navigate to **AI Studio** → **Settings** → **Organization** → **Auth**.
1. Select **OIDC**
2. Enter the **Client ID**
3. Enter the **Client Secret**
4. Enter the **Provider URL** (the Issuer URL from Keycloak)
5. Enter the organization's email domain(s) in **Allowed domains**
6. Click **Activate**
SSO is now configured. Users can sign in at:
```
https://my.orq.ai/{your-workspace-key}/login
```
Choose a unique identifier for the SP Entity ID. It must match exactly in both **Keycloak** and **Orq.ai**. We recommend:
```
urn:orq.ai:{your-workspace-key}
```
For example: `urn:orq.ai:example-corp`.
Write it down; it is needed in multiple steps.
Log in to the **Keycloak admin console**. From the realm dropdown (top-left), select an existing realm or click **Create realm**. Note the realm name.
Keycloak may update their admin console interface over time. Refer to [Keycloak's official documentation](https://www.keycloak.org/documentation) if any steps differ.
In the chosen realm, navigate to **Clients** and click **Create client**.
Configure the General Settings:
| Field | Value |
| --------------- | -------------------------------------------------------------- |
| **Client type** | `SAML` |
| **Client ID** | The SP Entity ID from Step 1 (e.g., `urn:orq.ai:example-corp`) |
| **Name** | `orq.ai` (optional display name) |
Click **Next**.
 Enter the following:
| Field | Value |
| ------------------------------ | --------------------------------------------- |
| **Valid redirect URIs** | `https://my.orq.ai/v2/auth/sso/saml/callback` |
| **Master SAML Processing URL** | `https://my.orq.ai/v2/auth/sso/saml/callback` |
Click **Save**.
Enter the following:
| Field | Value |
| ------------------------------ | --------------------------------------------- |
| **Valid redirect URIs** | `https://my.orq.ai/v2/auth/sso/saml/callback` |
| **Master SAML Processing URL** | `https://my.orq.ai/v2/auth/sso/saml/callback` |
Click **Save**.
 Open the client → **Settings** tab. Scroll to **SAML capabilities** and **Signature and Encryption** sections.
Set the following:
| Field | Value |
| ------------------- | ------- |
| **Sign assertions** | `On` |
| **Sign documents** | `On` |
| **Name ID format** | `email` |
Click **Save**.
Open the client → **Settings** tab. Scroll to **SAML capabilities** and **Signature and Encryption** sections.
Set the following:
| Field | Value |
| ------------------- | ------- |
| **Sign assertions** | `On` |
| **Sign documents** | `On` |
| **Name ID format** | `email` |
Click **Save**.

 Open the client → **Keys** tab.
Under **Signing keys config**, set:
| Field | Value |
| ----------------------------- | ----- |
| **Client signature required** | `Off` |
Under **Encryption keys config**, confirm:
| Field | Value |
| ---------------------- | ----- |
| **Encrypt assertions** | `Off` |
Open the client → **Keys** tab.
Under **Signing keys config**, set:
| Field | Value |
| ----------------------------- | ----- |
| **Client signature required** | `Off` |
Under **Encryption keys config**, confirm:
| Field | Value |
| ---------------------- | ----- |
| **Encrypt assertions** | `Off` |
 `Client signature required` defaults to **On** in Keycloak: turn it **Off**. **Orq.ai** does not sign outbound SAML AuthnRequests, so leaving this on causes Keycloak to reject every login attempt.
`Encrypt assertions` must remain **Off**. **Orq.ai** does not decrypt assertions.
A new Keycloak SAML client only sends the NameID and role list by default, not email, first name, or last name. Add mappers so **Orq.ai** can populate the user profile.
1. Open the client → **Client scopes** tab
2. Click the dedicated scope row (named `{client-id}-dedicated`)
3. Open the **Mappers** tab inside that scope
**Option A (recommended): Add predefined X500 mappers**
1. Click **Add predefined mapper**
2. Select these three rows:
* `X500 email`
* `X500 givenName`
* `X500 surname`
3. Click **Add**
`Client signature required` defaults to **On** in Keycloak: turn it **Off**. **Orq.ai** does not sign outbound SAML AuthnRequests, so leaving this on causes Keycloak to reject every login attempt.
`Encrypt assertions` must remain **Off**. **Orq.ai** does not decrypt assertions.
A new Keycloak SAML client only sends the NameID and role list by default, not email, first name, or last name. Add mappers so **Orq.ai** can populate the user profile.
1. Open the client → **Client scopes** tab
2. Click the dedicated scope row (named `{client-id}-dedicated`)
3. Open the **Mappers** tab inside that scope
**Option A (recommended): Add predefined X500 mappers**
1. Click **Add predefined mapper**
2. Select these three rows:
* `X500 email`
* `X500 givenName`
* `X500 surname`
3. Click **Add**

 **Option B: Configure custom mappers with simple names**
Click **Configure a new mapper**, select **User Property**, and create three mappers:
| Mapper | Property | SAML Attribute Name | NameFormat |
| ----------- | ----------- | ------------------- | ---------- |
| `email` | `email` | `email` | `Basic` |
| `firstName` | `firstName` | `firstName` | `Basic` |
| `lastName` | `lastName` | `lastName` | `Basic` |
1. In the left navigation, click **Realm settings**
2. Open the **Keys** tab → **Keys list** sub-tab
3. Find the row where **Algorithm = `RS256`**, **Type = `RSA`**, **Use = `SIG`**
4. In the **Public keys** column, click **Certificate**
5. Copy the entire base64 value from the modal
**Option B: Configure custom mappers with simple names**
Click **Configure a new mapper**, select **User Property**, and create three mappers:
| Mapper | Property | SAML Attribute Name | NameFormat |
| ----------- | ----------- | ------------------- | ---------- |
| `email` | `email` | `email` | `Basic` |
| `firstName` | `firstName` | `firstName` | `Basic` |
| `lastName` | `lastName` | `lastName` | `Basic` |
1. In the left navigation, click **Realm settings**
2. Open the **Keys** tab → **Keys list** sub-tab
3. Find the row where **Algorithm = `RS256`**, **Type = `RSA`**, **Use = `SIG`**
4. In the **Public keys** column, click **Certificate**
5. Copy the entire base64 value from the modal
 **Orq.ai** accepts the certificate as raw base64 or PEM-wrapped with `-----BEGIN CERTIFICATE-----` / `-----END CERTIFICATE-----` markers. Pasting raw base64 directly works.
The SAML endpoints follow these patterns:
| Field | Pattern |
| ------------------------------- | ------------------------------------------------------------------ |
| **Identity Provider Entity ID** | `https://{your-keycloak-domain}/realms/{realm-name}` |
| **Single Sign-On URL** | `https://{your-keycloak-domain}/realms/{realm-name}/protocol/saml` |
For example with Keycloak at `https://auth.example.com` and realm `orq-prod`:
* IdP Entity ID: `https://auth.example.com/realms/orq-prod`
* SSO URL: `https://auth.example.com/realms/orq-prod/protocol/saml`
Navigate to **AI Studio** → **Settings** → **Organization** → **Auth**.
1. Select **SAML**
2. Enter the **Service Provider Entity ID** (from Step 1)
3. Enter the **Identity Provider Entity ID**
4. Enter the **Single Sign-On URL**
5. Paste the **X.509 Certificate** copied from Realm settings
6. Enter the organization's email domain(s) in **Allowed domains**
7. Click **Activate**
SSO is now configured. Users can sign in at:
```
https://my.orq.ai/{your-workspace-key}/login
```
Log in to the **Authentik admin interface** and navigate to **Applications → Providers**.
**Orq.ai** accepts the certificate as raw base64 or PEM-wrapped with `-----BEGIN CERTIFICATE-----` / `-----END CERTIFICATE-----` markers. Pasting raw base64 directly works.
The SAML endpoints follow these patterns:
| Field | Pattern |
| ------------------------------- | ------------------------------------------------------------------ |
| **Identity Provider Entity ID** | `https://{your-keycloak-domain}/realms/{realm-name}` |
| **Single Sign-On URL** | `https://{your-keycloak-domain}/realms/{realm-name}/protocol/saml` |
For example with Keycloak at `https://auth.example.com` and realm `orq-prod`:
* IdP Entity ID: `https://auth.example.com/realms/orq-prod`
* SSO URL: `https://auth.example.com/realms/orq-prod/protocol/saml`
Navigate to **AI Studio** → **Settings** → **Organization** → **Auth**.
1. Select **SAML**
2. Enter the **Service Provider Entity ID** (from Step 1)
3. Enter the **Identity Provider Entity ID**
4. Enter the **Single Sign-On URL**
5. Paste the **X.509 Certificate** copied from Realm settings
6. Enter the organization's email domain(s) in **Allowed domains**
7. Click **Activate**
SSO is now configured. Users can sign in at:
```
https://my.orq.ai/{your-workspace-key}/login
```
Log in to the **Authentik admin interface** and navigate to **Applications → Providers**.
 Click **Create**, select **OAuth2/OpenID Provider**, and click **Next**.
 Authentik may update their admin interface over time. Refer to [Authentik's official documentation](https://docs.goauthentik.io/) if any steps differ.
Enter the following values:
| Field | Value |
| --------------------------- | ----------------------------------------------------------- |
| **Name** | `orq.ai` (or preferred name) |
| **Authorization flow** | `default-provider-authorization-implicit-consent` |
| **Client type** | `Confidential` |
| **Redirect URIs / Origins** | `https://my.orq.ai/v2/auth/sso/oidc/callback` (Strict mode) |
Authentik pre-generates the **Client ID** and **Client Secret** inside this form. Copy both values now; they are needed to configure **Orq.ai** in the final step.
Authentik may update their admin interface over time. Refer to [Authentik's official documentation](https://docs.goauthentik.io/) if any steps differ.
Enter the following values:
| Field | Value |
| --------------------------- | ----------------------------------------------------------- |
| **Name** | `orq.ai` (or preferred name) |
| **Authorization flow** | `default-provider-authorization-implicit-consent` |
| **Client type** | `Confidential` |
| **Redirect URIs / Origins** | `https://my.orq.ai/v2/auth/sso/oidc/callback` (Strict mode) |
Authentik pre-generates the **Client ID** and **Client Secret** inside this form. Copy both values now; they are needed to configure **Orq.ai** in the final step.
 Click **Finish**.
Navigate to **Applications → Applications** and click **Create**.
Click **Finish**.
Navigate to **Applications → Applications** and click **Create**.
 Enter the following:
| Field | Value |
| ------------ | -------------------------------------------- |
| **Name** | `orq.ai` |
| **Slug** | `orq-ai` (becomes part of the Issuer URL) |
| **Provider** | The OAuth2/OpenID provider created in Step 1 |
Click **Create**.
Enter the following:
| Field | Value |
| ------------ | -------------------------------------------- |
| **Name** | `orq.ai` |
| **Slug** | `orq-ai` (becomes part of the Issuer URL) |
| **Provider** | The OAuth2/OpenID provider created in Step 1 |
Click **Create**.
 The OIDC Issuer URL follows this pattern:
```
https://{your-authentik-domain}/application/o/{application-slug}/
```
For example, with Authentik at `https://auth.example.com` and slug `orq-ai`:
```
https://auth.example.com/application/o/orq-ai/
```
The trailing slash on the Issuer URL is required. Authentik's discovery endpoint fails without it.
Open the application, go to the **Policy / Group / User Bindings** tab, and add a binding for the users or groups that should have access.
The OIDC Issuer URL follows this pattern:
```
https://{your-authentik-domain}/application/o/{application-slug}/
```
For example, with Authentik at `https://auth.example.com` and slug `orq-ai`:
```
https://auth.example.com/application/o/orq-ai/
```
The trailing slash on the Issuer URL is required. Authentik's discovery endpoint fails without it.
Open the application, go to the **Policy / Group / User Bindings** tab, and add a binding for the users or groups that should have access.
 If no bindings are configured, every authenticated Authentik user can access the application. If a binding excludes the user, Authentik shows `Request has been denied. Unknown error` on sign-in.
Navigate to **AI Studio** → **Settings** → **Organization** → **Auth**.
1. Select **OIDC**
2. Enter the **Client ID** (copied in Step 2)
3. Enter the **Client Secret** (copied in Step 2)
4. Enter the **Provider URL** (the Issuer URL from Authentik, with trailing slash)
5. Enter the organization's email domain(s) in **Allowed domains**
6. Click **Activate**
SSO is now configured. Users can sign in at:
```
https://my.orq.ai/{your-workspace-key}/login
```
Choose a unique identifier for the SP Entity ID. It must match exactly in both **Authentik** and **Orq.ai**. Recommended format:
```
urn:orq.ai:{your-workspace-key}
```
For example: `urn:orq.ai:example-corp`.
Write it down; it is needed in multiple steps.
Log in to the **Authentik admin interface** and navigate to **Applications → Providers**.
Click **Create**, select **SAML Provider**, and click **Next**.
If no bindings are configured, every authenticated Authentik user can access the application. If a binding excludes the user, Authentik shows `Request has been denied. Unknown error` on sign-in.
Navigate to **AI Studio** → **Settings** → **Organization** → **Auth**.
1. Select **OIDC**
2. Enter the **Client ID** (copied in Step 2)
3. Enter the **Client Secret** (copied in Step 2)
4. Enter the **Provider URL** (the Issuer URL from Authentik, with trailing slash)
5. Enter the organization's email domain(s) in **Allowed domains**
6. Click **Activate**
SSO is now configured. Users can sign in at:
```
https://my.orq.ai/{your-workspace-key}/login
```
Choose a unique identifier for the SP Entity ID. It must match exactly in both **Authentik** and **Orq.ai**. Recommended format:
```
urn:orq.ai:{your-workspace-key}
```
For example: `urn:orq.ai:example-corp`.
Write it down; it is needed in multiple steps.
Log in to the **Authentik admin interface** and navigate to **Applications → Providers**.
Click **Create**, select **SAML Provider**, and click **Next**.
 Authentik may update their admin interface over time. Refer to [Authentik's official documentation](https://docs.goauthentik.io/) if any steps differ.
Fill in the main form fields:
| Field | Value |
| ---------------------------- | -------------------------------------------------------------- |
| **Name** | `orq.ai` (or preferred name) |
| **Authorization flow** | `default-provider-authorization-implicit-consent` |
| **ACS URL** | `https://my.orq.ai/v2/auth/sso/saml/callback` |
| **Issuer** | `authentik` (default) or a descriptive identifier |
| **Service Provider Binding** | `Post` |
| **Audience** | The SP Entity ID from Step 1 (e.g., `urn:orq.ai:example-corp`) |
Expand **Advanced protocol settings** and configure:
| Field | Value |
| ---------------------------- | ----------------------------------- |
| **Signing Certificate** | `authentik Self-signed Certificate` |
| **Sign assertions** | `On` |
| **Sign responses** | `On` |
| **Verification Certificate** | Leave empty |
| **Encryption Certificate** | Leave empty |
**Sign assertions** must be `On`. Even with the Signing Certificate pre-populated, Authentik will not sign assertions (and omits `` from metadata) unless this toggle is enabled. **Orq.ai** rejects unsigned assertions.
Authentik may update their admin interface over time. Refer to [Authentik's official documentation](https://docs.goauthentik.io/) if any steps differ.
Fill in the main form fields:
| Field | Value |
| ---------------------------- | -------------------------------------------------------------- |
| **Name** | `orq.ai` (or preferred name) |
| **Authorization flow** | `default-provider-authorization-implicit-consent` |
| **ACS URL** | `https://my.orq.ai/v2/auth/sso/saml/callback` |
| **Issuer** | `authentik` (default) or a descriptive identifier |
| **Service Provider Binding** | `Post` |
| **Audience** | The SP Entity ID from Step 1 (e.g., `urn:orq.ai:example-corp`) |
Expand **Advanced protocol settings** and configure:
| Field | Value |
| ---------------------------- | ----------------------------------- |
| **Signing Certificate** | `authentik Self-signed Certificate` |
| **Sign assertions** | `On` |
| **Sign responses** | `On` |
| **Verification Certificate** | Leave empty |
| **Encryption Certificate** | Leave empty |
**Sign assertions** must be `On`. Even with the Signing Certificate pre-populated, Authentik will not sign assertions (and omits `` from metadata) unless this toggle is enabled. **Orq.ai** rejects unsigned assertions.
 Click **Finish**.
Navigate to **Applications → Applications** and click **Create**.
Enter the following:
| Field | Value |
| ------------ | ------------------------------------------- |
| **Name** | `orq.ai` |
| **Slug** | `orq-ai-saml` (becomes part of the SSO URL) |
| **Provider** | The SAML provider created in Step 2 |
Click **Create**.
Click **Finish**.
Navigate to **Applications → Applications** and click **Create**.
Enter the following:
| Field | Value |
| ------------ | ------------------------------------------- |
| **Name** | `orq.ai` |
| **Slug** | `orq-ai-saml` (becomes part of the SSO URL) |
| **Provider** | The SAML provider created in Step 2 |
Click **Create**.
 Open **Applications → Providers** and click the SAML provider. In the **SAML Configuration** section:
* Copy the **EntityID/Issuer**: this is the Identity Provider Entity ID
* Copy the **SSO URL (Redirect)**: use the **Redirect** binding URL, not the Post one
The Redirect SSO URL follows this pattern:
```
https://{your-authentik-domain}/application/saml/{application-slug}/sso/binding/redirect/
```
**Orq.ai** issues the SAML AuthnRequest via HTTP-Redirect binding. Using the `/binding/post/` endpoint results in `Bad Request: The SAML request payload is missing`. Always use the Redirect URL.
In the **Related objects** section, click **Download signing certificate** to save the PEM file.
Open **Applications → Providers** and click the SAML provider. In the **SAML Configuration** section:
* Copy the **EntityID/Issuer**: this is the Identity Provider Entity ID
* Copy the **SSO URL (Redirect)**: use the **Redirect** binding URL, not the Post one
The Redirect SSO URL follows this pattern:
```
https://{your-authentik-domain}/application/saml/{application-slug}/sso/binding/redirect/
```
**Orq.ai** issues the SAML AuthnRequest via HTTP-Redirect binding. Using the `/binding/post/` endpoint results in `Bad Request: The SAML request payload is missing`. Always use the Redirect URL.
In the **Related objects** section, click **Download signing certificate** to save the PEM file.
 The **Download signing certificate** button only appears after selecting a Signing Certificate and enabling Sign assertions in Step 3. If not visible, edit the provider and complete the Advanced protocol settings first.
Open the application, go to the **Policy / Group / User Bindings** tab, and add a binding for the users or groups that should have access.
Navigate to **AI Studio** → **Settings** → **Organization** → **Auth**.
1. Select **SAML**
2. Enter the **Service Provider Entity ID** (from Step 1)
3. Enter the **Identity Provider Entity ID** (the Issuer value from Authentik)
4. Enter the **Single Sign-On URL** (the Redirect-binding SSO URL)
5. Paste the certificate downloaded from Authentik
6. Enter the organization's email domain(s) in **Allowed domains**
7. Click **Activate**
SSO is now configured. Users can sign in at:
```
https://my.orq.ai/{your-workspace-key}/login
```
**Orq.ai** works with any standards-compliant OIDC 1.0 identity provider (Auth0, Google Workspace, JumpCloud, OneLogin, Ping Identity, Duo, Rippling, Authelia, Zitadel, and others).
**What Orq.ai requires from the IdP**
**Orq.ai** acts as an OIDC Relying Party using the Authorization Code flow:
| Requirement | Value |
| ------------------------------ | ------------------------------------------------------------- |
| **Flow** | Authorization Code (with or without PKCE) |
| **Application type** | Web application / Confidential client |
| **Grant type** | `authorization_code` |
| **Token endpoint auth method** | `client_secret_post` or `client_secret_basic` |
| **Discovery** | `{issuer}/.well-known/openid-configuration` must be reachable |
In the IdP's admin interface, register a new web application with:
| Field | Value |
| --------------------------------------- | --------------------------------------------- |
| **Application type** | Web application (confidential client) |
| **Grant type / Flow** | Authorization Code |
| **Redirect URI** | `https://my.orq.ai/v2/auth/sso/oidc/callback` |
| **Post-logout redirect URI** (optional) | `https://my.orq.ai` |
| **Allowed scopes** | `openid`, `email`, `profile` |
Grant the IdP's equivalent of admin consent if required.
**Orq.ai** expects the ID token or `/userinfo` endpoint to return:
| Claim | Required? | Description |
| ---------------- | ----------- | --------------------------- |
| `sub` | Required | Stable user identifier |
| `email` | Required | User's email address |
| `email_verified` | Recommended | Marks the email as verified |
| `given_name` | Recommended | First name |
| `family_name` | Recommended | Last name |
| `name` | Recommended | Full display name |
Most IdPs return these automatically when the `profile` and `email` scopes are granted. If the IdP requires manual claim mapping, map user-directory fields to the names above.
| Field | Where to Find |
| ----------------- | --------------------------------------------------------------------------------- |
| **Client ID** | Provided by the IdP after registration |
| **Client Secret** | Generated by the IdP; copy immediately |
| **Provider URL** | Base URL whose `/.well-known/openid-configuration` returns the discovery document |
Verify the Provider URL by visiting `{issuer-url}/.well-known/openid-configuration` in a browser. It must return a JSON document containing `authorization_endpoint`, `token_endpoint`, `jwks_uri`, and `issuer`. The `issuer` field in that JSON must match exactly the URL entered in **Orq.ai**.
Use the IdP's standard user/group assignment to grant access to the **Orq.ai** application.
Navigate to **AI Studio** → **Settings** → **Organization** → **Auth**:
1. Select **OIDC**
2. Enter the **Client ID**
3. Enter the **Client Secret**
4. Enter the **Provider URL** (the Issuer URL from the IdP)
5. Enter the organization's email domain(s) in **Allowed domains**
6. Click **Activate**
Open a private browser window and navigate to `https://my.orq.ai`. The SSO login button will appear automatically.
**Orq.ai** works with any standards-compliant SAML 2.0 identity provider.
**What Orq.ai requires from the IdP**
| Requirement | Value |
| ----------------------------------- | -------------------------------------------------------- |
| **SP-initiated SSO** | Required |
| **AuthnRequest binding (SP → IdP)** | HTTP-Redirect |
| **Response binding (IdP → SP)** | HTTP-POST to the ACS URL |
| **NameID format** | `urn:oasis:names:tc:SAML:1.1:nameid-format:emailAddress` |
| **Assertion signing** | Required: RSA-SHA256 |
| **AuthnRequest signing** | Not required |
| **Assertion encryption** | Not supported; leave disabled |
Choose a unique identifier that must match exactly in both the IdP and **Orq.ai**. We recommend:
```
urn:orq.ai:{your-workspace-key}
```
In the IdP's admin interface, create a SAML 2.0 application with:
| IdP Field (common names) | Value |
| --------------------------- | --------------------------------------------- |
| **Audience / SP Entity ID** | The SP Entity ID from Step 1 |
| **ACS URL / Reply URL** | `https://my.orq.ai/v2/auth/sso/saml/callback` |
| **NameID format** | `EmailAddress` |
| **NameID source attribute** | The user's email address |
| Setting | Value |
| ------------------------------- | ------------- |
| **Sign assertion** | On (required) |
| **Signature algorithm** | `RSA-SHA256` |
| **Require signed AuthnRequest** | Off |
| **Encrypt assertion** | Off |
**Orq.ai** accepts a wide range of attribute name variants:
| Canonical | Also accepted |
| ----------- | --------------------------------------------------------------------------------------------------------------------------------- |
| `email` | `emailAddress`, `mail`, `http://schemas.xmlsoap.org/ws/2005/05/identity/claims/emailaddress`, `urn:oid:0.9.2342.19200300.100.1.3` |
| `firstName` | `givenName`, `http://schemas.xmlsoap.org/ws/2005/05/identity/claims/givenname`, `urn:oid:2.5.4.42` |
| `lastName` | `familyName`, `surname`, `http://schemas.xmlsoap.org/ws/2005/05/identity/claims/surname`, `urn:oid:2.5.4.4` |
Many IdPs do not send name and email attributes by default. After registering the application, explicitly add attribute mappers / claim rules / attribute statements in the IdP before the assertion will contain anything **Orq.ai** can read.
| Orq.ai Field | Common IdP Label(s) |
| ------------------------------- | -------------------------------------------------------------------------- |
| **Identity Provider Entity ID** | `Issuer`, `IdP Entity ID`, `Microsoft Entra Identifier`, `entityID` |
| **Single Sign-On URL** | `SSO URL`, `Sign-on URL`, `Login URL`, `SingleSignOnService Location` |
| **X.509 Certificate** | `Signing Certificate`, `Token Signing Certificate`, `Certificate (Base64)` |
If the IdP provides a SAML metadata XML file or URL, the IdP Entity ID, SSO URL, and certificate are all embedded inside. Use the `HTTP-Redirect` binding URL for the SSO URL.
Navigate to **AI Studio** → **Settings** → **Organization** → **Auth**:
1. Select **SAML**
2. Enter the **Service Provider Entity ID**
3. Enter the **Identity Provider Entity ID**
4. Enter the **Single Sign-On URL** (HTTP-Redirect endpoint)
5. Paste the **X.509 Certificate**
6. Enter the organization's email domain(s) in **Allowed domains**
7. Click **Activate**
Open a private browser window and navigate to `https://my.orq.ai`. The SSO login button will appear automatically.
### Edit a connection
1. Click the menu on the active SSO connection
2. Click **Edit**
3. Update the desired fields
4. Click **Save Changes**
The **Download signing certificate** button only appears after selecting a Signing Certificate and enabling Sign assertions in Step 3. If not visible, edit the provider and complete the Advanced protocol settings first.
Open the application, go to the **Policy / Group / User Bindings** tab, and add a binding for the users or groups that should have access.
Navigate to **AI Studio** → **Settings** → **Organization** → **Auth**.
1. Select **SAML**
2. Enter the **Service Provider Entity ID** (from Step 1)
3. Enter the **Identity Provider Entity ID** (the Issuer value from Authentik)
4. Enter the **Single Sign-On URL** (the Redirect-binding SSO URL)
5. Paste the certificate downloaded from Authentik
6. Enter the organization's email domain(s) in **Allowed domains**
7. Click **Activate**
SSO is now configured. Users can sign in at:
```
https://my.orq.ai/{your-workspace-key}/login
```
**Orq.ai** works with any standards-compliant OIDC 1.0 identity provider (Auth0, Google Workspace, JumpCloud, OneLogin, Ping Identity, Duo, Rippling, Authelia, Zitadel, and others).
**What Orq.ai requires from the IdP**
**Orq.ai** acts as an OIDC Relying Party using the Authorization Code flow:
| Requirement | Value |
| ------------------------------ | ------------------------------------------------------------- |
| **Flow** | Authorization Code (with or without PKCE) |
| **Application type** | Web application / Confidential client |
| **Grant type** | `authorization_code` |
| **Token endpoint auth method** | `client_secret_post` or `client_secret_basic` |
| **Discovery** | `{issuer}/.well-known/openid-configuration` must be reachable |
In the IdP's admin interface, register a new web application with:
| Field | Value |
| --------------------------------------- | --------------------------------------------- |
| **Application type** | Web application (confidential client) |
| **Grant type / Flow** | Authorization Code |
| **Redirect URI** | `https://my.orq.ai/v2/auth/sso/oidc/callback` |
| **Post-logout redirect URI** (optional) | `https://my.orq.ai` |
| **Allowed scopes** | `openid`, `email`, `profile` |
Grant the IdP's equivalent of admin consent if required.
**Orq.ai** expects the ID token or `/userinfo` endpoint to return:
| Claim | Required? | Description |
| ---------------- | ----------- | --------------------------- |
| `sub` | Required | Stable user identifier |
| `email` | Required | User's email address |
| `email_verified` | Recommended | Marks the email as verified |
| `given_name` | Recommended | First name |
| `family_name` | Recommended | Last name |
| `name` | Recommended | Full display name |
Most IdPs return these automatically when the `profile` and `email` scopes are granted. If the IdP requires manual claim mapping, map user-directory fields to the names above.
| Field | Where to Find |
| ----------------- | --------------------------------------------------------------------------------- |
| **Client ID** | Provided by the IdP after registration |
| **Client Secret** | Generated by the IdP; copy immediately |
| **Provider URL** | Base URL whose `/.well-known/openid-configuration` returns the discovery document |
Verify the Provider URL by visiting `{issuer-url}/.well-known/openid-configuration` in a browser. It must return a JSON document containing `authorization_endpoint`, `token_endpoint`, `jwks_uri`, and `issuer`. The `issuer` field in that JSON must match exactly the URL entered in **Orq.ai**.
Use the IdP's standard user/group assignment to grant access to the **Orq.ai** application.
Navigate to **AI Studio** → **Settings** → **Organization** → **Auth**:
1. Select **OIDC**
2. Enter the **Client ID**
3. Enter the **Client Secret**
4. Enter the **Provider URL** (the Issuer URL from the IdP)
5. Enter the organization's email domain(s) in **Allowed domains**
6. Click **Activate**
Open a private browser window and navigate to `https://my.orq.ai`. The SSO login button will appear automatically.
**Orq.ai** works with any standards-compliant SAML 2.0 identity provider.
**What Orq.ai requires from the IdP**
| Requirement | Value |
| ----------------------------------- | -------------------------------------------------------- |
| **SP-initiated SSO** | Required |
| **AuthnRequest binding (SP → IdP)** | HTTP-Redirect |
| **Response binding (IdP → SP)** | HTTP-POST to the ACS URL |
| **NameID format** | `urn:oasis:names:tc:SAML:1.1:nameid-format:emailAddress` |
| **Assertion signing** | Required: RSA-SHA256 |
| **AuthnRequest signing** | Not required |
| **Assertion encryption** | Not supported; leave disabled |
Choose a unique identifier that must match exactly in both the IdP and **Orq.ai**. We recommend:
```
urn:orq.ai:{your-workspace-key}
```
In the IdP's admin interface, create a SAML 2.0 application with:
| IdP Field (common names) | Value |
| --------------------------- | --------------------------------------------- |
| **Audience / SP Entity ID** | The SP Entity ID from Step 1 |
| **ACS URL / Reply URL** | `https://my.orq.ai/v2/auth/sso/saml/callback` |
| **NameID format** | `EmailAddress` |
| **NameID source attribute** | The user's email address |
| Setting | Value |
| ------------------------------- | ------------- |
| **Sign assertion** | On (required) |
| **Signature algorithm** | `RSA-SHA256` |
| **Require signed AuthnRequest** | Off |
| **Encrypt assertion** | Off |
**Orq.ai** accepts a wide range of attribute name variants:
| Canonical | Also accepted |
| ----------- | --------------------------------------------------------------------------------------------------------------------------------- |
| `email` | `emailAddress`, `mail`, `http://schemas.xmlsoap.org/ws/2005/05/identity/claims/emailaddress`, `urn:oid:0.9.2342.19200300.100.1.3` |
| `firstName` | `givenName`, `http://schemas.xmlsoap.org/ws/2005/05/identity/claims/givenname`, `urn:oid:2.5.4.42` |
| `lastName` | `familyName`, `surname`, `http://schemas.xmlsoap.org/ws/2005/05/identity/claims/surname`, `urn:oid:2.5.4.4` |
Many IdPs do not send name and email attributes by default. After registering the application, explicitly add attribute mappers / claim rules / attribute statements in the IdP before the assertion will contain anything **Orq.ai** can read.
| Orq.ai Field | Common IdP Label(s) |
| ------------------------------- | -------------------------------------------------------------------------- |
| **Identity Provider Entity ID** | `Issuer`, `IdP Entity ID`, `Microsoft Entra Identifier`, `entityID` |
| **Single Sign-On URL** | `SSO URL`, `Sign-on URL`, `Login URL`, `SingleSignOnService Location` |
| **X.509 Certificate** | `Signing Certificate`, `Token Signing Certificate`, `Certificate (Base64)` |
If the IdP provides a SAML metadata XML file or URL, the IdP Entity ID, SSO URL, and certificate are all embedded inside. Use the `HTTP-Redirect` binding URL for the SSO URL.
Navigate to **AI Studio** → **Settings** → **Organization** → **Auth**:
1. Select **SAML**
2. Enter the **Service Provider Entity ID**
3. Enter the **Identity Provider Entity ID**
4. Enter the **Single Sign-On URL** (HTTP-Redirect endpoint)
5. Paste the **X.509 Certificate**
6. Enter the organization's email domain(s) in **Allowed domains**
7. Click **Activate**
Open a private browser window and navigate to `https://my.orq.ai`. The SSO login button will appear automatically.
### Edit a connection
1. Click the menu on the active SSO connection
2. Click **Edit**
3. Update the desired fields
4. Click **Save Changes**
 To switch protocols (OIDC to SAML or vice versa), **Orq.ai** confirms the switch and presents an empty form; the two configurations differ entirely. The active connection remains unchanged until **Save Changes** is clicked. Cancel to preserve the current configuration.
 The **Certificate** and **Client Secret** fields are blank in the edit form; they update only when a new value is provided and **Save Changes** is clicked.
## SCIM Provisioning
**SCIM** 2.0 lets the identity provider push members, groups, and removals into **Orq.ai** instead of inviting people by hand and removing them one at a time. It complements SSO rather than replacing it: SSO signs a person in, SCIM keeps their access current between sign-ins. SSO creates a member the first time they sign in; SCIM creates them before their first sign-in and removes them when the provider does.
SCIM is served only while an enabled **SAML** connection exists in the workspace. A workspace configured with OIDC alone receives `401` from every SCIM request.
### Endpoint and Token
Point the identity provider's provisioning client at the SCIM base URL:
```bash theme={"theme":{"light":"github-light","dark":"github-dark"}}
https://my.orq.ai/v2/auth/scim
```
Mint a bearer token for it as a workspace **Admin**, or with an API key granted the **SCIM** permission. The token is scoped to one SSO configuration and is returned once, in `scim_` form. Read the `sso-config-id` from `GET /v2/auth/sso`.
```bash cURL theme={"theme":{"light":"github-light","dark":"github-dark"}}
curl -X POST https://my.orq.ai/v2/auth/sso//scim/token \
-H "Authorization: Bearer $ORQ_API_KEY"
```
| Operation | Request |
| ------------------- | ------------------------------------------------ |
| Create a token | `POST /v2/auth/sso/{sso-config-id}/scim/token` |
| Read token metadata | `GET /v2/auth/sso/{sso-config-id}/scim/token` |
| Revoke the token | `DELETE /v2/auth/sso/{sso-config-id}/scim/token` |
### What SCIM Changes
| SCIM request | Effect in Orq.ai |
| ----------------------------------- | ---------------------------------------------------------------------------------------------------------------------------------------------------------------------------------------------------- |
| Create a user | Adds the member to the workspace, creating the account when the email is new. The member gets the **Developer** role and the workspace's default projects, and no invitation email is sent. |
| Update a user | Updates the email, name, `externalId`, or active state. |
| Deactivate a user (`active: false`) | Deactivates the membership and records `deprovisioned` in [Audit Logs](/ai-studio/organization/audit-logs). |
| Delete a user | Removes the workspace membership, deletes the account when no other workspace uses it, revokes the user's API keys, and records `deprovisioned` in [Audit Logs](/ai-studio/organization/audit-logs). |
| Create a group | Creates a **Team** named after the group's `displayName`, with the users in `members` as its members. |
| Update a group | Renames the team and replaces its members with the group's `members`. |
See [Members and teams](/ai-studio/organization/members-teams) for roles, teams, and project access.
### Attribute Mapping
| SCIM user attribute | Orq.ai |
| ----------------------------------- | ------------------------------------------------------------ |
| `userName` (required) | The member's email, and their sign-in identity |
| `name.givenName`, `name.familyName` | First and last name |
| `active` | Whether the membership is active |
| `externalId` | Stored as the provider's own identifier for the member |
| `emails` | Not read on write; responses carry the email from `userName` |
A SCIM **Group** is an **Orq.ai** **Team**. The group's `displayName` becomes the team's name, and the users listed in `members` become that team's members. The team then appears under **Settings → Organization → Teams**.
| SCIM group attribute | Orq.ai |
| ------------------------ | ----------------------------------------------------------------------------------------------------------------------------------------------------------- |
| `displayName` (required) | The name of the **Team** the group creates |
| `members` | The team's members. Each entry is `{ "value": "" }`, where `` is the SCIM `id` of a workspace member, the same value returned by `/Users` |
| `externalId` | Stored as the provider's own identifier for the team |
For example, when a group named **Engineering** with two members is created in the provider, the provider sends this `POST /Groups` request and **Orq.ai** creates a team named **Engineering** with those two members:
```json theme={"theme":{"light":"github-light","dark":"github-dark"}}
{
"schemas": ["urn:ietf:params:scim:schemas:core:2.0:Group"],
"displayName": "Engineering",
"externalId": "00g1abc2def3",
"members": [
{ "value": "6f3d2e1a-4b5c-4d6e-8f90-1a2b3c4d5e6f" },
{ "value": "9c8b7a65-4d3e-4f2a-9b1c-0d9e8f7a6b5c" }
]
}
```
Only each entry's `value` is read; any `display` the provider sends is ignored. The same mapping applies on `PUT /Groups/{id}`, where the group's `members` replace the team's members.
### Supported Operations
| Feature | Support |
| ------------------------------------------------------------------------------------------------------------------------------------------- | ------- |
| List, create, read, update, and delete Users and Groups | Yes |
| `PATCH` on `active`, `userName`, `externalId`, `name.givenName`, `name.familyName` for users, and on `displayName` and `members` for groups | Yes |
| Filter on `userName`, `email`, and `active` with `eq`, `sw`, `co`, up to 100 results | Yes |
| Bulk operations | No |
| Sorting and ETags | No |
| Change password | No |
Requests are limited to 500 per minute per workspace, and failed authentications to 10 per minute per IP address.
## Testing
Before rolling out to the entire organization:
1. Test the configuration with a single user
2. Verify the user is created automatically in **Orq.ai** (if auto-provisioning is enabled)
3. Confirm the user's profile information (name, email) is correct
Users sign in at:
```
https://my.orq.ai/{your-workspace-key}/login
```
## Troubleshooting
**Error:** "redirect\_uri\_mismatch" or "Invalid redirect URI"
**Solution:** Verify the callback URL in the IdP exactly matches:
* **OIDC:** `https://my.orq.ai/v2/auth/sso/oidc/callback`
* **SAML:** `https://my.orq.ai/v2/auth/sso/saml/callback`
Common mistakes: extra slash at end, `http://` instead of `https://`, typo in URL.
**Error:** "Audience restriction" or "Invalid audience"
**Solution:** Verify the SP Entity ID matches exactly in both the IdP and **Orq.ai** configuration. It is case-sensitive.
**Error:** "invalid\_client" or "unauthorized\_client"
**Solution:** Regenerate the client secret in the IdP and update it in **Orq.ai**. Copy the secret immediately after creation.
**Symptom:** User cannot see the app or gets "access denied"
**Solution:**
* **Okta:** Go to application → Assignments and assign the user or their group
* **Azure:** Go to Enterprise application → Users and groups → Add user/group
* **Keycloak:** Open the client → Roles tab, create roles, and assign them to the user under Role mappings
* **Authentik:** Open the application → Policy / Group / User Bindings and add a binding
**Symptom:** SAML authentication suddenly stops working
**Solution:**
1. Download a new certificate from the IdP
2. Update the certificate in **Orq.ai** (AI Studio → Settings → Organization → Auth → Edit)
3. Click **Save Changes**
**Error:** "Email domain not allowed"
**Solution:** Add the user's email domain to **Allowed domains** in the **Orq.ai** SSO configuration. Separate multiple domains with commas (e.g., `acme.com, acme.io`).
**Symptom:** Authentication succeeds but user has no email
**Solution:** **Orq.ai** automatically requests the `User.Read` Microsoft Graph scope. Verify this permission is granted:
1. Go to API permissions in the app registration
2. Verify `User.Read` is present
3. Click "Grant admin consent" if needed
**Error:** "Invalid signature on document" or login redirects back to Keycloak
**Solution:** The SAML client's **Client signature required** (Keys tab) is `On`. Turn it `Off`; **Orq.ai** does not sign outbound AuthnRequests.
**Symptom:** User signs in but first name, last name, or email are missing in **Orq.ai**
**Solution:** The SAML client has no attribute mappers. For **Keycloak**, add X500 predefined mappers to the dedicated client scope. For **Authentik**, ensure Sign assertions is `On` in the provider's Advanced protocol settings.
**Error:** "Bad Request: The SAML request payload is missing"
**Solution:** The SSO URL points at `/binding/post/`. Switch to the `/binding/redirect/` URL; **Orq.ai** sends AuthnRequests via HTTP-Redirect.
**Error:** Issuer URL rejected
**Solution:** **Orq.ai** rejects `http://` issuers in production. The identity provider must be served over HTTPS.
### Need Help?
Contact [support@orq.ai](mailto:support@orq.ai) with:
* Workspace key
* Identity provider and protocol (e.g., "Keycloak SAML")
* Error message or screenshot
The **Certificate** and **Client Secret** fields are blank in the edit form; they update only when a new value is provided and **Save Changes** is clicked.
## SCIM Provisioning
**SCIM** 2.0 lets the identity provider push members, groups, and removals into **Orq.ai** instead of inviting people by hand and removing them one at a time. It complements SSO rather than replacing it: SSO signs a person in, SCIM keeps their access current between sign-ins. SSO creates a member the first time they sign in; SCIM creates them before their first sign-in and removes them when the provider does.
SCIM is served only while an enabled **SAML** connection exists in the workspace. A workspace configured with OIDC alone receives `401` from every SCIM request.
### Endpoint and Token
Point the identity provider's provisioning client at the SCIM base URL:
```bash theme={"theme":{"light":"github-light","dark":"github-dark"}}
https://my.orq.ai/v2/auth/scim
```
Mint a bearer token for it as a workspace **Admin**, or with an API key granted the **SCIM** permission. The token is scoped to one SSO configuration and is returned once, in `scim_` form. Read the `sso-config-id` from `GET /v2/auth/sso`.
```bash cURL theme={"theme":{"light":"github-light","dark":"github-dark"}}
curl -X POST https://my.orq.ai/v2/auth/sso//scim/token \
-H "Authorization: Bearer $ORQ_API_KEY"
```
| Operation | Request |
| ------------------- | ------------------------------------------------ |
| Create a token | `POST /v2/auth/sso/{sso-config-id}/scim/token` |
| Read token metadata | `GET /v2/auth/sso/{sso-config-id}/scim/token` |
| Revoke the token | `DELETE /v2/auth/sso/{sso-config-id}/scim/token` |
### What SCIM Changes
| SCIM request | Effect in Orq.ai |
| ----------------------------------- | ---------------------------------------------------------------------------------------------------------------------------------------------------------------------------------------------------- |
| Create a user | Adds the member to the workspace, creating the account when the email is new. The member gets the **Developer** role and the workspace's default projects, and no invitation email is sent. |
| Update a user | Updates the email, name, `externalId`, or active state. |
| Deactivate a user (`active: false`) | Deactivates the membership and records `deprovisioned` in [Audit Logs](/ai-studio/organization/audit-logs). |
| Delete a user | Removes the workspace membership, deletes the account when no other workspace uses it, revokes the user's API keys, and records `deprovisioned` in [Audit Logs](/ai-studio/organization/audit-logs). |
| Create a group | Creates a **Team** named after the group's `displayName`, with the users in `members` as its members. |
| Update a group | Renames the team and replaces its members with the group's `members`. |
See [Members and teams](/ai-studio/organization/members-teams) for roles, teams, and project access.
### Attribute Mapping
| SCIM user attribute | Orq.ai |
| ----------------------------------- | ------------------------------------------------------------ |
| `userName` (required) | The member's email, and their sign-in identity |
| `name.givenName`, `name.familyName` | First and last name |
| `active` | Whether the membership is active |
| `externalId` | Stored as the provider's own identifier for the member |
| `emails` | Not read on write; responses carry the email from `userName` |
A SCIM **Group** is an **Orq.ai** **Team**. The group's `displayName` becomes the team's name, and the users listed in `members` become that team's members. The team then appears under **Settings → Organization → Teams**.
| SCIM group attribute | Orq.ai |
| ------------------------ | ----------------------------------------------------------------------------------------------------------------------------------------------------------- |
| `displayName` (required) | The name of the **Team** the group creates |
| `members` | The team's members. Each entry is `{ "value": "" }`, where `` is the SCIM `id` of a workspace member, the same value returned by `/Users` |
| `externalId` | Stored as the provider's own identifier for the team |
For example, when a group named **Engineering** with two members is created in the provider, the provider sends this `POST /Groups` request and **Orq.ai** creates a team named **Engineering** with those two members:
```json theme={"theme":{"light":"github-light","dark":"github-dark"}}
{
"schemas": ["urn:ietf:params:scim:schemas:core:2.0:Group"],
"displayName": "Engineering",
"externalId": "00g1abc2def3",
"members": [
{ "value": "6f3d2e1a-4b5c-4d6e-8f90-1a2b3c4d5e6f" },
{ "value": "9c8b7a65-4d3e-4f2a-9b1c-0d9e8f7a6b5c" }
]
}
```
Only each entry's `value` is read; any `display` the provider sends is ignored. The same mapping applies on `PUT /Groups/{id}`, where the group's `members` replace the team's members.
### Supported Operations
| Feature | Support |
| ------------------------------------------------------------------------------------------------------------------------------------------- | ------- |
| List, create, read, update, and delete Users and Groups | Yes |
| `PATCH` on `active`, `userName`, `externalId`, `name.givenName`, `name.familyName` for users, and on `displayName` and `members` for groups | Yes |
| Filter on `userName`, `email`, and `active` with `eq`, `sw`, `co`, up to 100 results | Yes |
| Bulk operations | No |
| Sorting and ETags | No |
| Change password | No |
Requests are limited to 500 per minute per workspace, and failed authentications to 10 per minute per IP address.
## Testing
Before rolling out to the entire organization:
1. Test the configuration with a single user
2. Verify the user is created automatically in **Orq.ai** (if auto-provisioning is enabled)
3. Confirm the user's profile information (name, email) is correct
Users sign in at:
```
https://my.orq.ai/{your-workspace-key}/login
```
## Troubleshooting
**Error:** "redirect\_uri\_mismatch" or "Invalid redirect URI"
**Solution:** Verify the callback URL in the IdP exactly matches:
* **OIDC:** `https://my.orq.ai/v2/auth/sso/oidc/callback`
* **SAML:** `https://my.orq.ai/v2/auth/sso/saml/callback`
Common mistakes: extra slash at end, `http://` instead of `https://`, typo in URL.
**Error:** "Audience restriction" or "Invalid audience"
**Solution:** Verify the SP Entity ID matches exactly in both the IdP and **Orq.ai** configuration. It is case-sensitive.
**Error:** "invalid\_client" or "unauthorized\_client"
**Solution:** Regenerate the client secret in the IdP and update it in **Orq.ai**. Copy the secret immediately after creation.
**Symptom:** User cannot see the app or gets "access denied"
**Solution:**
* **Okta:** Go to application → Assignments and assign the user or their group
* **Azure:** Go to Enterprise application → Users and groups → Add user/group
* **Keycloak:** Open the client → Roles tab, create roles, and assign them to the user under Role mappings
* **Authentik:** Open the application → Policy / Group / User Bindings and add a binding
**Symptom:** SAML authentication suddenly stops working
**Solution:**
1. Download a new certificate from the IdP
2. Update the certificate in **Orq.ai** (AI Studio → Settings → Organization → Auth → Edit)
3. Click **Save Changes**
**Error:** "Email domain not allowed"
**Solution:** Add the user's email domain to **Allowed domains** in the **Orq.ai** SSO configuration. Separate multiple domains with commas (e.g., `acme.com, acme.io`).
**Symptom:** Authentication succeeds but user has no email
**Solution:** **Orq.ai** automatically requests the `User.Read` Microsoft Graph scope. Verify this permission is granted:
1. Go to API permissions in the app registration
2. Verify `User.Read` is present
3. Click "Grant admin consent" if needed
**Error:** "Invalid signature on document" or login redirects back to Keycloak
**Solution:** The SAML client's **Client signature required** (Keys tab) is `On`. Turn it `Off`; **Orq.ai** does not sign outbound AuthnRequests.
**Symptom:** User signs in but first name, last name, or email are missing in **Orq.ai**
**Solution:** The SAML client has no attribute mappers. For **Keycloak**, add X500 predefined mappers to the dedicated client scope. For **Authentik**, ensure Sign assertions is `On` in the provider's Advanced protocol settings.
**Error:** "Bad Request: The SAML request payload is missing"
**Solution:** The SSO URL points at `/binding/post/`. Switch to the `/binding/redirect/` URL; **Orq.ai** sends AuthnRequests via HTTP-Redirect.
**Error:** Issuer URL rejected
**Solution:** **Orq.ai** rejects `http://` issuers in production. The identity provider must be served over HTTPS.
### Need Help?
Contact [support@orq.ai](mailto:support@orq.ai) with:
* Workspace key
* Identity provider and protocol (e.g., "Keycloak SAML")
* Error message or screenshot