> ## Documentation Index
> Fetch the complete documentation index at: https://docs.orq.ai/llms.txt
> Use this file to discover all available pages before exploring further.
# MCP Servers
> Connect upstream MCP servers to Orq.ai. Discover tools automatically and expose them to Agents and Gateways.
Connect upstream [Model Context Protocol](https://modelcontextprotocol.io) servers to **Orq.ai**. Once connected, tool discovery happens automatically and the tools become available to **Agents** and **Gateways**.
Navigate to **AI Gateway > MCP Portal** in the sidebar. The **Servers** tab lists all registered MCP servers. Click **Create MCP Server** to add one.
## Use Cases
* Connecting third-party SaaS tools (Slack, Linear, Figma, etc.) to agents without writing custom integrations.
* Exposing internal APIs as callable tools for agents.
* Centralizing MCP server management instead of configuring connections per tool or per agent.
* Sharing a single MCP server across multiple agents and [gateways](/docs/ai-gateway/mcp-portal/mcp-gateways) with controlled tool exposure.
## How It Works
Each MCP Server registers an upstream endpoint. **Orq.ai** connects to it, discovers the available tools, and tracks the sync state. Tools can be exposed to all agents, filtered by an allow-list, or hidden entirely.
When a server is linked to a [gateway](/docs/ai-gateway/mcp-portal/mcp-gateways), the gateway handles tool routing and authentication so clients only need the gateway URL.
## Set Up an MCP Server
1. Click Create MCP Server.
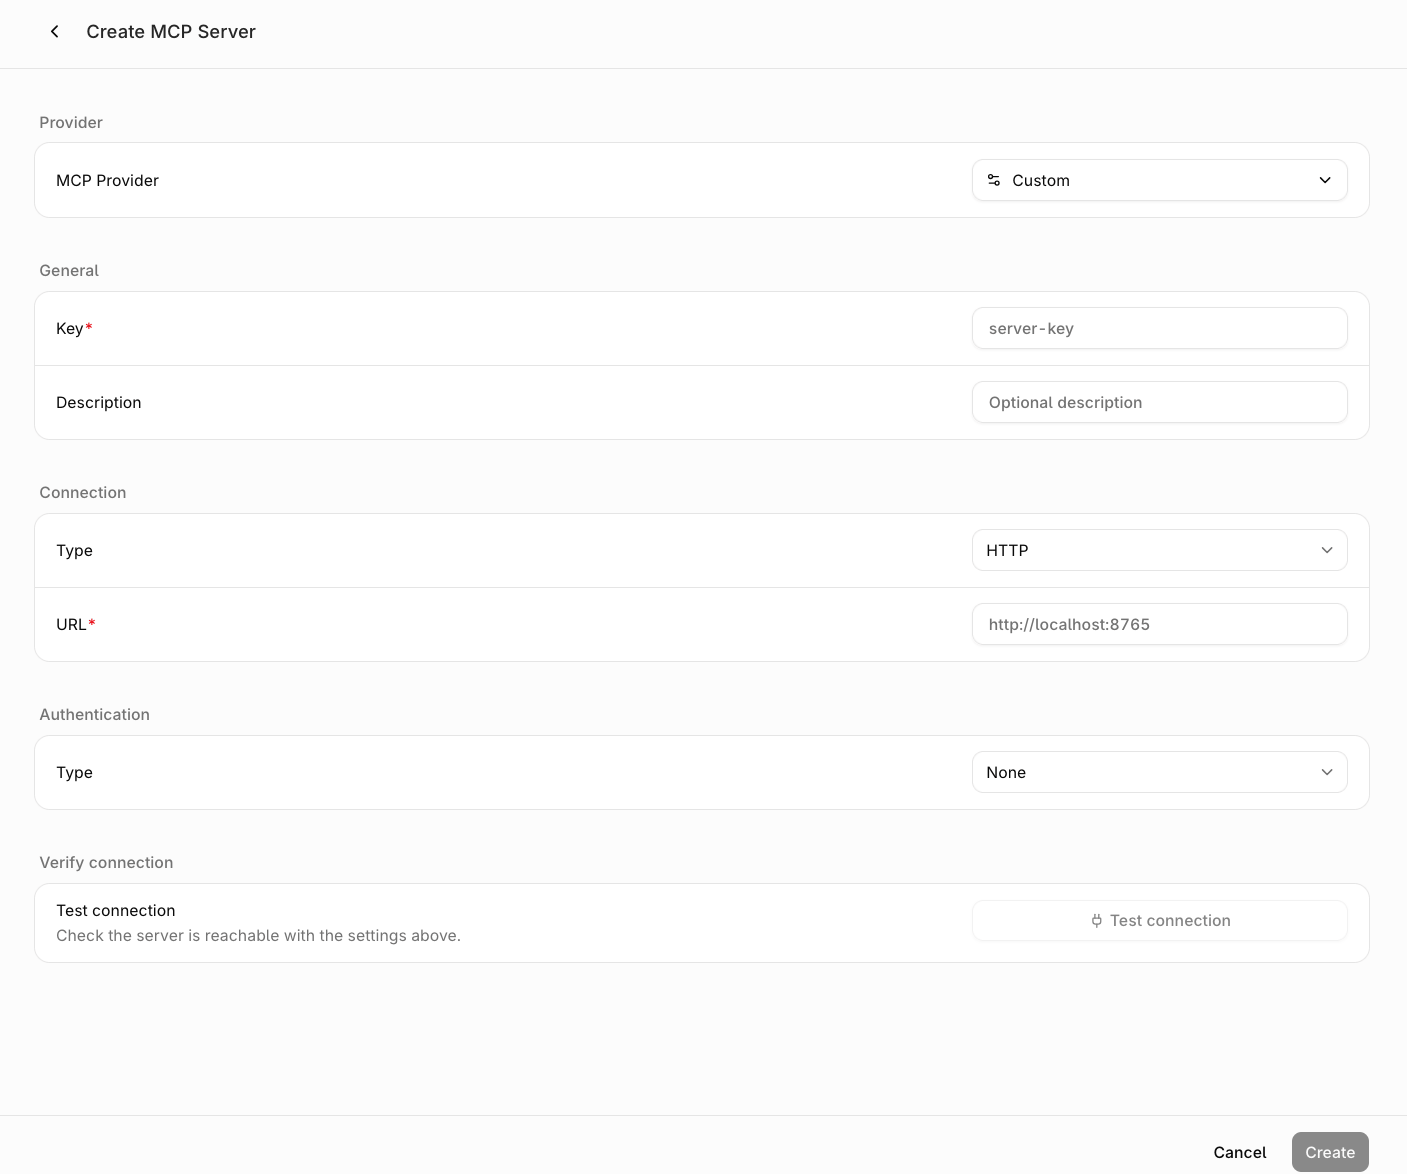 2. **Pick a provider or enter a custom URL.** The **MCP Provider** dropdown lists pre-configured providers (Airtable, Slack, Linear, and more). Selecting one pre-fills the connection details and authentication headers. Choose **Custom** to enter a server URL manually.
3. **Fill in the general details.**
* **Key** (required): a unique identifier for this server. Used in tool name prefixes when linked to a [gateway](/docs/ai-gateway/mcp-portal/mcp-gateways).
* **Description** (optional): a note about what this server provides.
4. **Set the connection.**
* **Type**: **HTTP** (default) or **SSE** for streaming-capable servers.
* **URL** (required): the endpoint of the upstream MCP server.
5. **Configure authentication.**
* **None** (default): for public servers that require no credentials.
* **Static Headers**: send fixed headers with every request. Use `{{variable}}` syntax for sensitive values like API keys. The actual values are stored securely and used at runtime when executing tools through agents or gateways.
OAuth authentication is coming soon.
6. **Test the connection.** Click **Test connection** to probe the server before saving. This validates the URL and authentication, and returns the list of discovered tools.
7. Click Create.
## After Creation
Once saved, **Orq.ai** syncs with the upstream server and discovers its tools. The server detail page shows discovered tools on the left and tool details on the right.
2. **Pick a provider or enter a custom URL.** The **MCP Provider** dropdown lists pre-configured providers (Airtable, Slack, Linear, and more). Selecting one pre-fills the connection details and authentication headers. Choose **Custom** to enter a server URL manually.
3. **Fill in the general details.**
* **Key** (required): a unique identifier for this server. Used in tool name prefixes when linked to a [gateway](/docs/ai-gateway/mcp-portal/mcp-gateways).
* **Description** (optional): a note about what this server provides.
4. **Set the connection.**
* **Type**: **HTTP** (default) or **SSE** for streaming-capable servers.
* **URL** (required): the endpoint of the upstream MCP server.
5. **Configure authentication.**
* **None** (default): for public servers that require no credentials.
* **Static Headers**: send fixed headers with every request. Use `{{variable}}` syntax for sensitive values like API keys. The actual values are stored securely and used at runtime when executing tools through agents or gateways.
OAuth authentication is coming soon.
6. **Test the connection.** Click **Test connection** to probe the server before saving. This validates the URL and authentication, and returns the list of discovered tools.
7. Click Create.
## After Creation
Once saved, **Orq.ai** syncs with the upstream server and discovers its tools. The server detail page shows discovered tools on the left and tool details on the right.
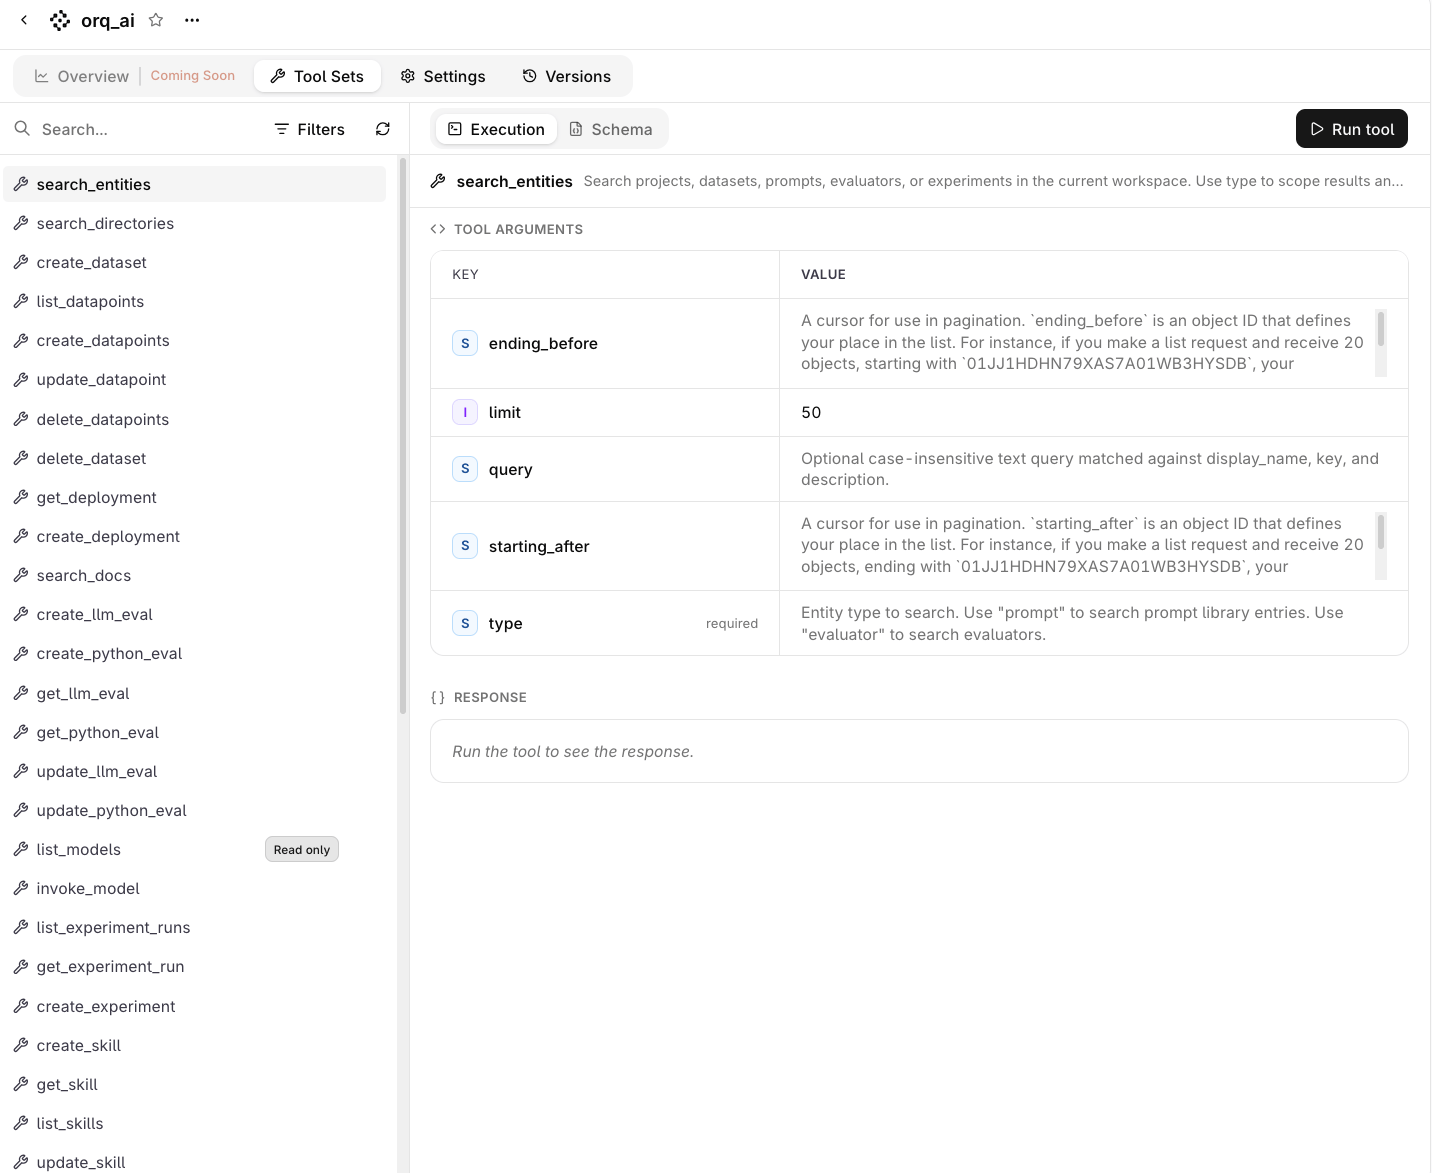 From the server detail page:
* **View discovered tools** in the **Tool Sets** tab. Select a tool to see its description, arguments, and input schema. The sync state shows the total tool count, tools added and removed since the last sync, the last synced timestamp, and any sync errors.
* **Control tool exposure** in the **Settings** tab. Set the mode to **All** (expose every discovered tool), **Selected** (expose only tools in an allow-list), or **None** (hide all tools). Mark individual tools as **read-only** to prevent write operations.
* **Test a tool** by filling in the arguments and clicking **Run tool**. The test invokes the tool on the upstream server and shows the response.
* **Re-sync** to pick up changes from the upstream server. New tools are added, removed tools are dropped.
* **Configure project access** in the **Settings** tab. Servers are scoped to a project. Use sharing settings to control which team members can view or edit the server.
* **View version history** in the **Versions** tab.
* **Duplicate** a server to create a copy with the same connection and tool settings under a new key.
## Monitor Usage
The **Overview** tab reports tool usage for the server, aggregated across every gateway that exposes it. It opens on the last 7 days, and the badge next to the heading carries the sync state, the discovered tool count, and the time of the last sync.
From the server detail page:
* **View discovered tools** in the **Tool Sets** tab. Select a tool to see its description, arguments, and input schema. The sync state shows the total tool count, tools added and removed since the last sync, the last synced timestamp, and any sync errors.
* **Control tool exposure** in the **Settings** tab. Set the mode to **All** (expose every discovered tool), **Selected** (expose only tools in an allow-list), or **None** (hide all tools). Mark individual tools as **read-only** to prevent write operations.
* **Test a tool** by filling in the arguments and clicking **Run tool**. The test invokes the tool on the upstream server and shows the response.
* **Re-sync** to pick up changes from the upstream server. New tools are added, removed tools are dropped.
* **Configure project access** in the **Settings** tab. Servers are scoped to a project. Use sharing settings to control which team members can view or edit the server.
* **View version history** in the **Versions** tab.
* **Duplicate** a server to create a copy with the same connection and tool settings under a new key.
## Monitor Usage
The **Overview** tab reports tool usage for the server, aggregated across every gateway that exposes it. It opens on the last 7 days, and the badge next to the heading carries the sync state, the discovered tool count, and the time of the last sync.
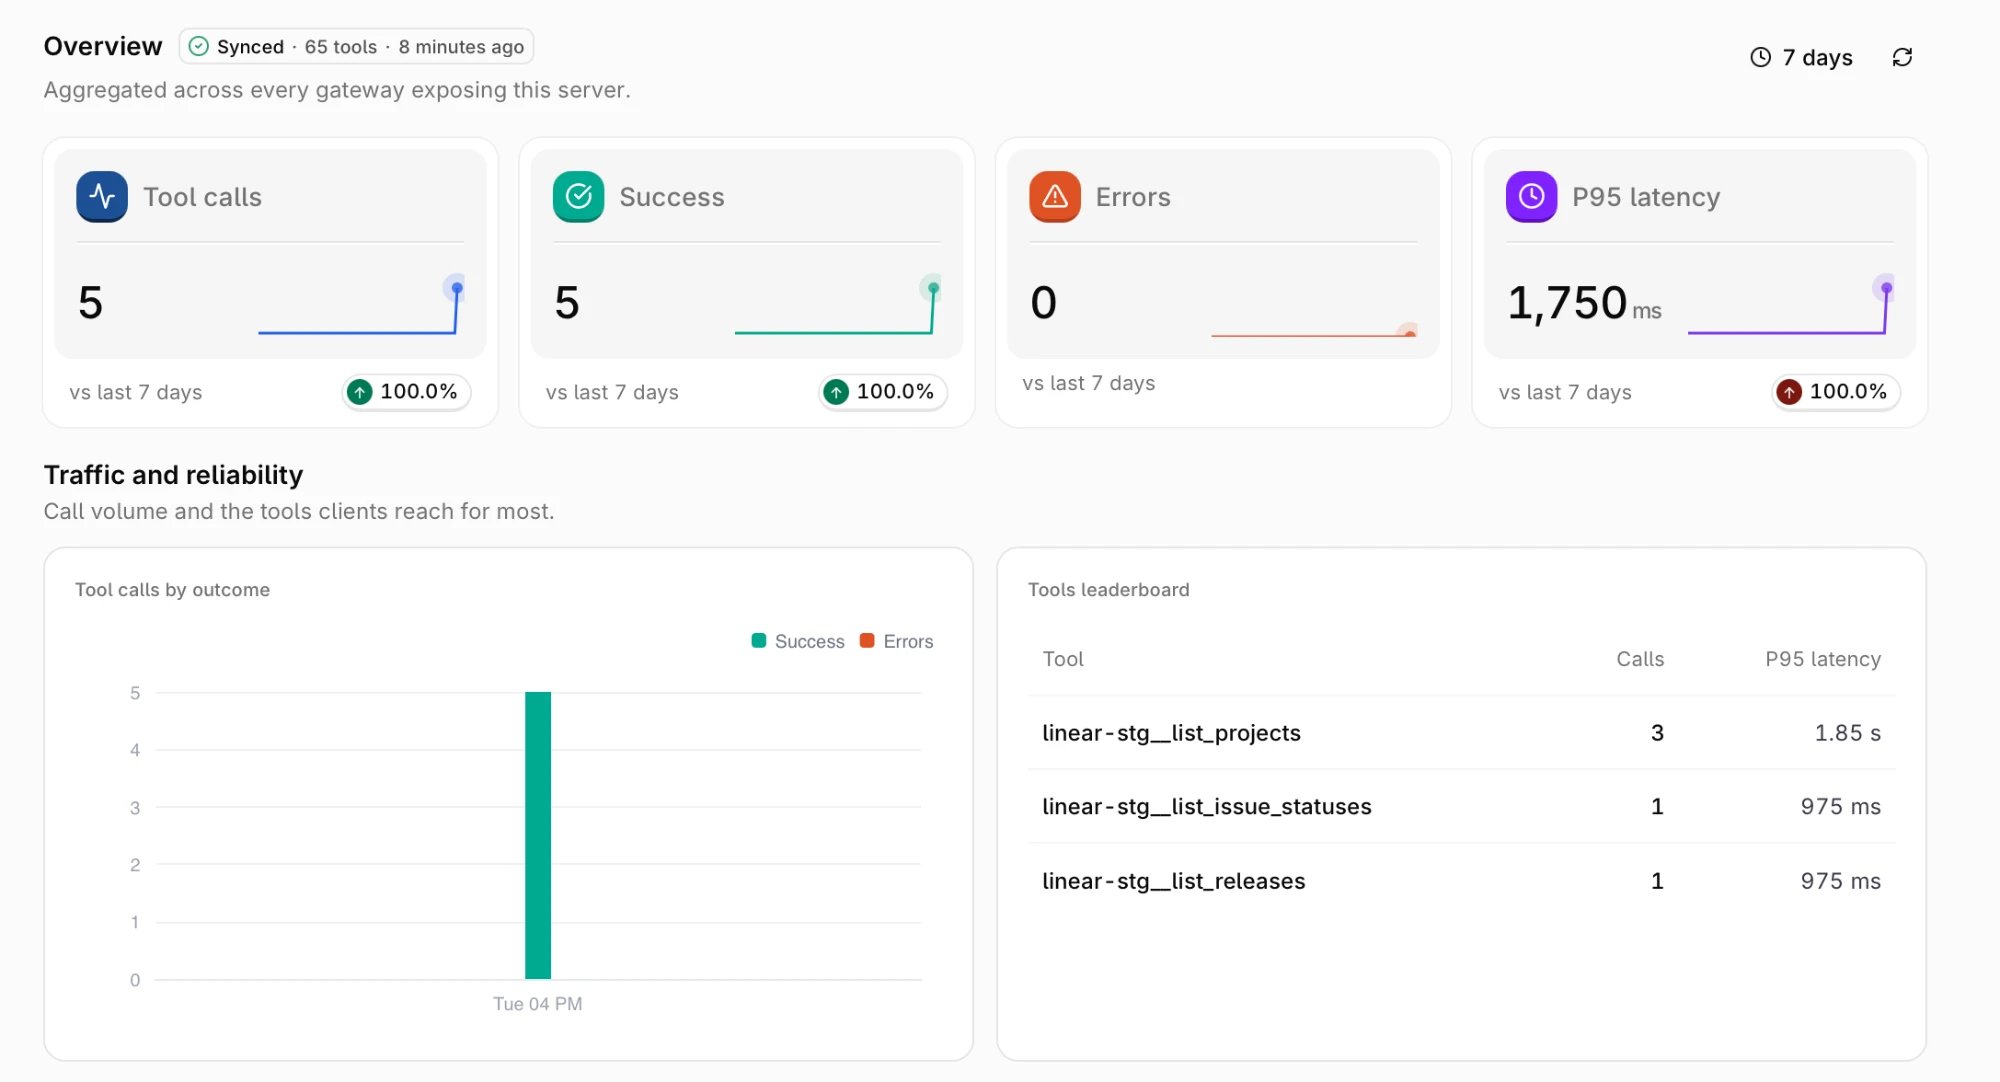 The cards and charts match the ones on the gateway **Overview**. See [Monitor Usage](/docs/ai-gateway/mcp-portal/mcp-gateways#monitor-usage) for what each one measures. The scope differs: these numbers cover the server across every gateway it is linked to, rather than a single gateway.
## Attach to an Agent
Once a server is synced and its tools are exposed, attach it to an **Agent** so the model can call those tools. See [Build Agents](/docs/ai-studio/ai-engineering/build-agents) for the full setup.
## Attach to a Gateway
Link a server to an **MCP Gateway** to bundle it with other servers behind a single client-facing endpoint. See [MCP Gateways](/docs/ai-gateway/mcp-portal/mcp-gateways) for details.
The cards and charts match the ones on the gateway **Overview**. See [Monitor Usage](/docs/ai-gateway/mcp-portal/mcp-gateways#monitor-usage) for what each one measures. The scope differs: these numbers cover the server across every gateway it is linked to, rather than a single gateway.
## Attach to an Agent
Once a server is synced and its tools are exposed, attach it to an **Agent** so the model can call those tools. See [Build Agents](/docs/ai-studio/ai-engineering/build-agents) for the full setup.
## Attach to a Gateway
Link a server to an **MCP Gateway** to bundle it with other servers behind a single client-facing endpoint. See [MCP Gateways](/docs/ai-gateway/mcp-portal/mcp-gateways) for details.