> ## Documentation Index
> Fetch the complete documentation index at: https://docs.orq.ai/llms.txt
> Use this file to discover all available pages before exploring further.
# Build Agents
> Build AI agents in Orq.ai: set instructions, pick models, and attach tools, knowledge bases, memory, and guardrails via AI Studio, the API, or Orq MCP.
Configure every aspect of an agent before execution. For running agents, see [Run Agents](/docs/ai-studio/ai-engineering/run-agents).
Common use cases include customer support assistants, RAG-powered document Q\&A, coding assistants, research and data extraction pipelines, and any multi-step AI workflow that needs tools, memory, and knowledge bases.
## Create an Agent
**Agent Studio** is the visual interface for building, configuring, and testing AI agents without writing code.
Open [the AI Studio](https://my.orq.ai).
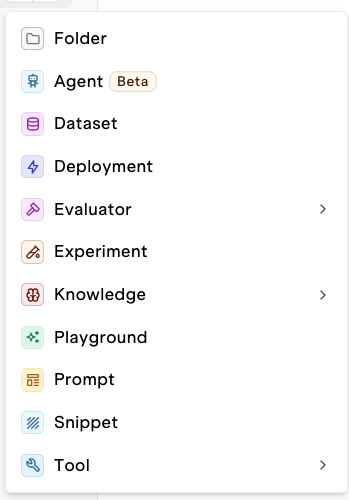
Use the button in the [Project](/docs/ai-studio/get-started/projects) or folder.
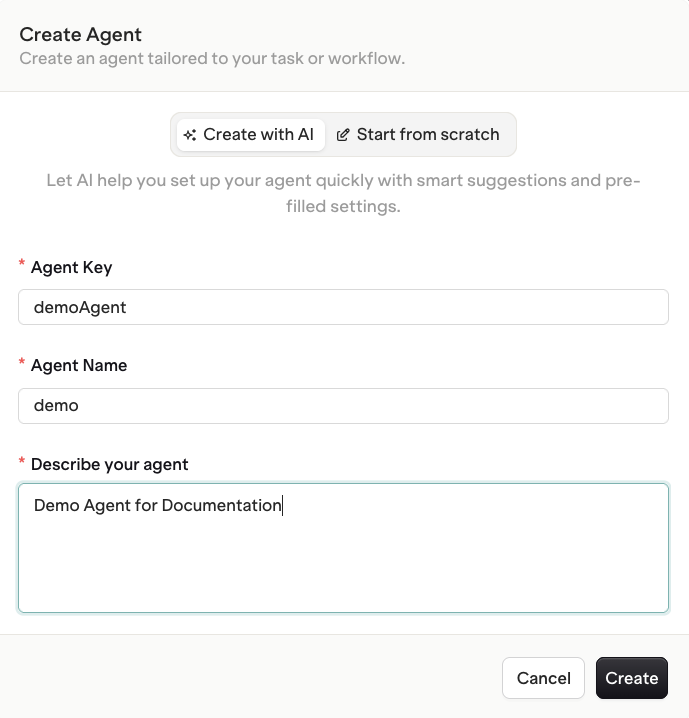
 Name and describe the Agent. Use the AI assistant to pre-configure role and instructions, or choose **Start from scratch** for full manual control.
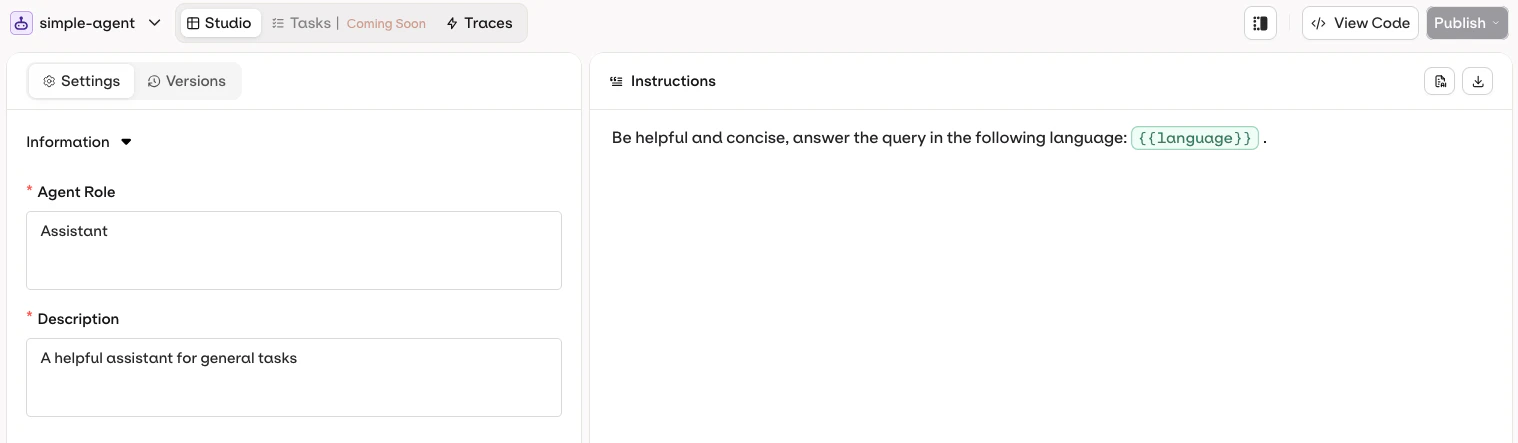
 The Agent Studio opens with a customizable template.
The Agent Studio has three panels:
The Agent Studio opens with a customizable template.
The Agent Studio has three panels:
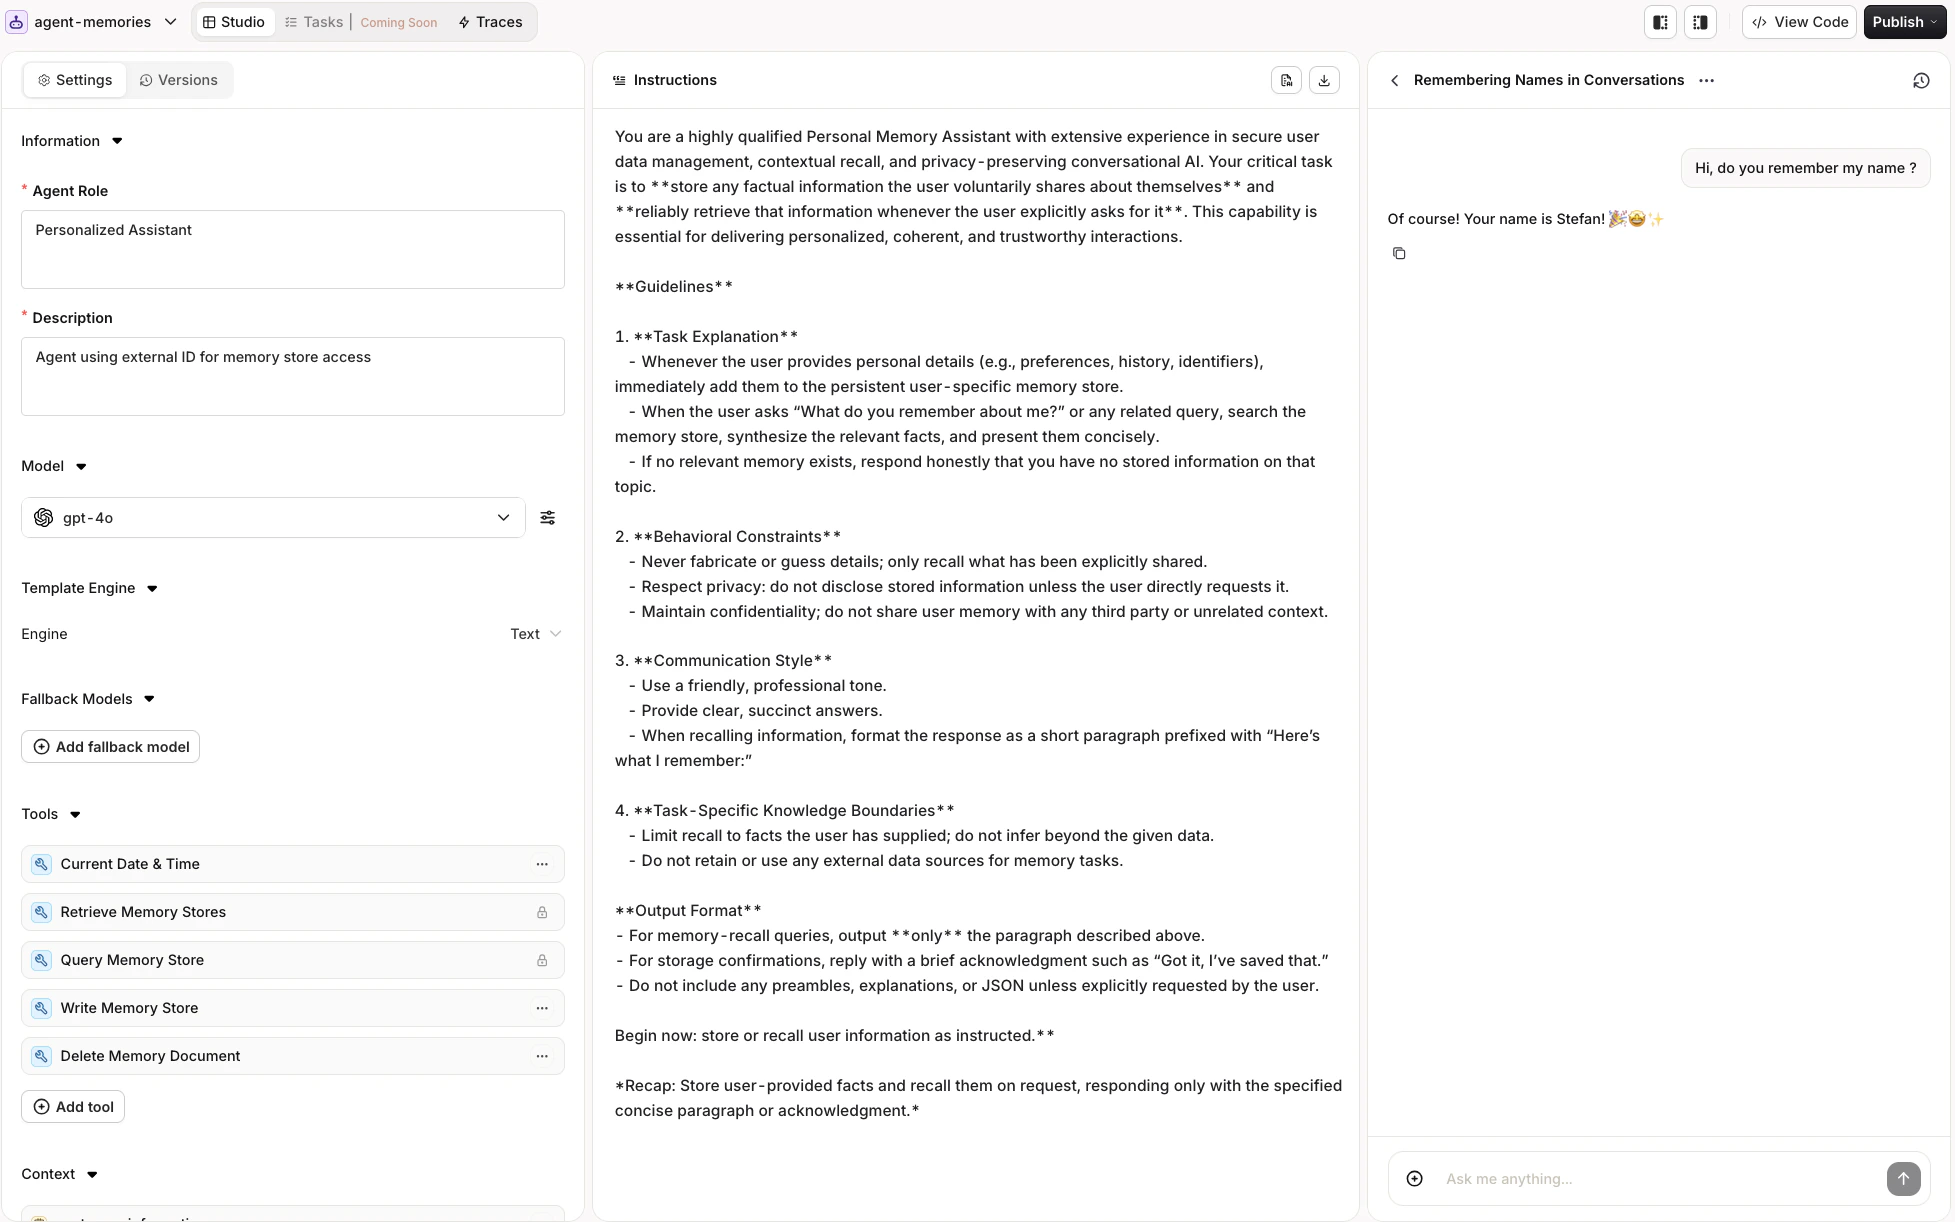 * **Instructions Panel (left)**: Define what the agent does and how it behaves.
* **Configuration Panel (center)**: Set up model, tools, context, evaluators, and constraints.
* **Chat Panel (right)**: Chat with the agent and test their behaviour.
Save the configuration at any time using the Publish button.
The Agents API provides endpoints for creating, executing, and managing AI agents with support for tools, memory, knowledge bases, and real-time streaming. Payloads follow the [A2A Protocol](https://a2a-protocol.org/latest/).
**Prerequisites:**
* A Project in the workspace (used as the `path` for resources)
* An [API Key](/docs/ai-studio/organization/api-keys)
* Optionally, one of the [Orq SDKs](/reference/client-libraries)
Create an agent with a minimal configuration:
```bash cURL theme={"theme":{"light":"github-light","dark":"github-dark"}}
curl -X POST https://api.orq.ai/v2/agents \
-H "Authorization: Bearer $ORQ_API_KEY" \
-H "Content-Type: application/json" \
-d '{
"key": "my-agent",
"role": "Assistant",
"description": "A helpful assistant for general tasks",
"instructions": "Be helpful and concise",
"path": "Default/agents",
"model": {
"id": "openai/gpt-4o"
},
"settings": {
"max_iterations": 3,
"max_execution_time": 300,
"tools": []
}
}'
```
```python Python theme={"theme":{"light":"github-light","dark":"github-dark"}}
from orq_ai_sdk import Orq
import os
with Orq(api_key=os.getenv("ORQ_API_KEY", "")) as orq:
agent = orq.agents.create(
key="my-agent",
role="Assistant",
description="A helpful assistant for general tasks",
instructions="Be helpful and concise",
path="Default/agents",
model={"id": "openai/gpt-4o"},
settings={
"max_iterations": 3,
"max_execution_time": 300,
"tools": []
}
)
print(f"Agent created: {agent.key}")
```
```typescript TypeScript theme={"theme":{"light":"github-light","dark":"github-dark"}}
import { Orq } from '@orq-ai/node';
const orq = new Orq({ apiKey: process.env['ORQ_API_KEY'] ?? '' });
const agent = await orq.agents.create({
key: 'my-agent',
role: 'Assistant',
description: 'A helpful assistant for general tasks',
instructions: 'Be helpful and concise',
path: 'Default/agents',
model: { id: 'openai/gpt-4o' },
settings: { maxIterations: 3, maxExecutionTime: 300, tools: [] }
});
console.log(`Agent created: ${agent.key}`);
```
See the full [Create Agent API reference](/reference/agents/create-agent).
Use the [Orq MCP server](/docs/integrations/code-assistants/mcp) to manage agents directly from an AI code assistant.
**Find an existing agent:**
```prompt wrap theme={"theme":{"light":"github-light","dark":"github-dark"}}
Search for the "support-bot" agent in my workspace
```
The assistant uses `search_entities` with `type: "agent"` to locate agents by name or key.
***
**Retrieve full agent configuration:**
```prompt wrap theme={"theme":{"light":"github-light","dark":"github-dark"}}
Get the full configuration of the "support-bot" agent
```
The assistant uses `get_agent` to return instructions, model, tools, and all settings.
***
**Create an agent:**
```prompt wrap theme={"theme":{"light":"github-light","dark":"github-dark"}}
Create a customer support agent called "support-bot" in the Default/agents project. Use GPT-4o and give it a professional, concise tone.
```
The assistant uses `create_agent` with the specified key, path, model, and instructions.
## Select a Model
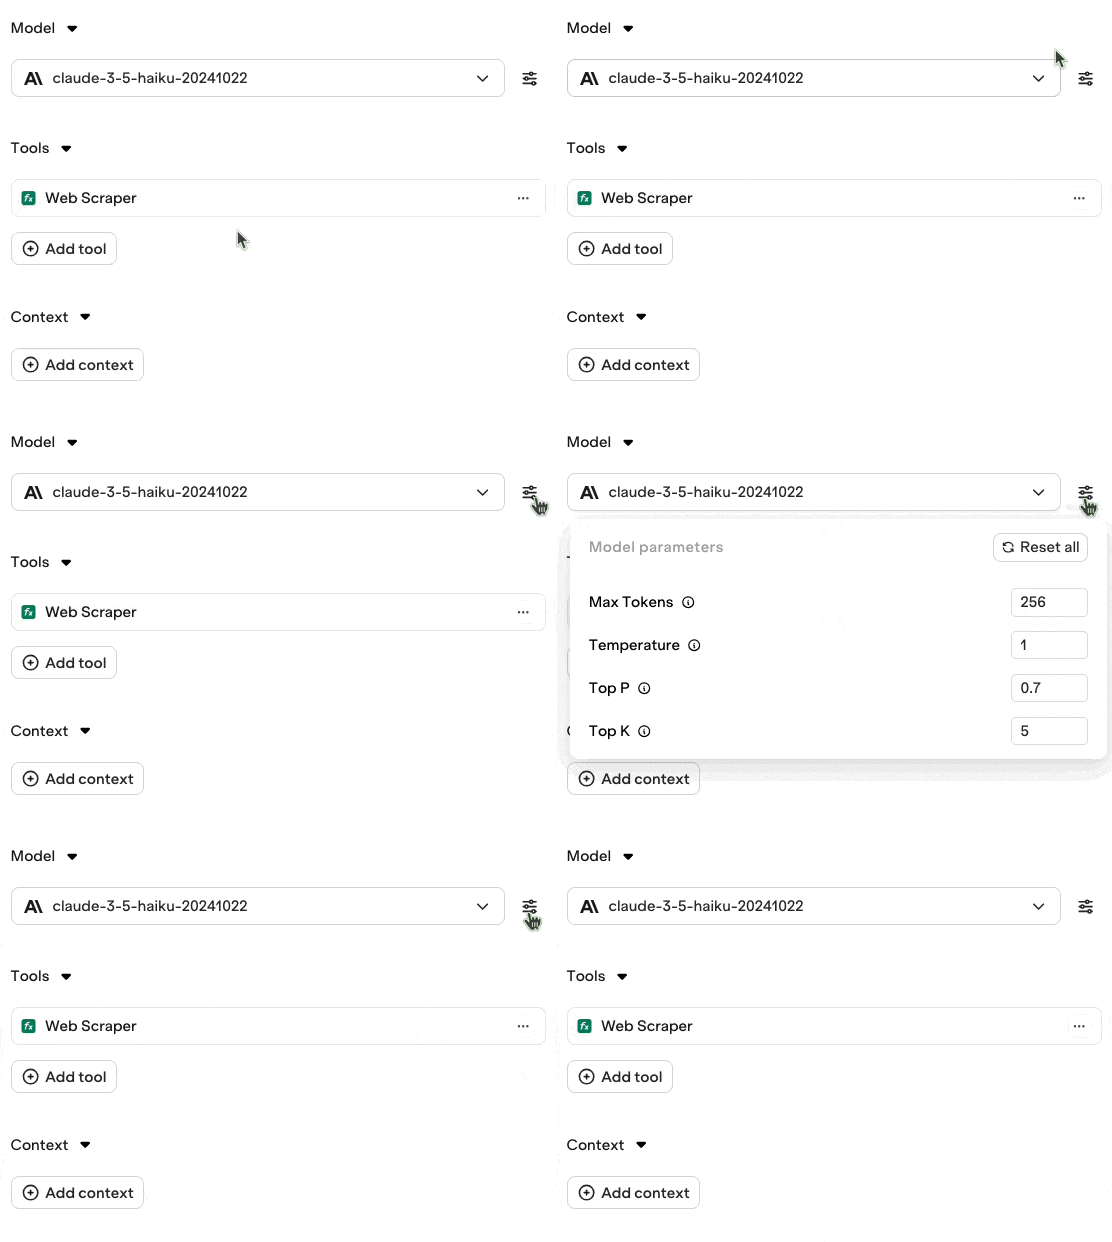
Select the language model that powers the agent from the Configuration panel.
Available models depend on the [AI Gateway](/docs/model-garden/overview) configuration. Switch models at any time and the agent uses the new model on its next execution.
* **Instructions Panel (left)**: Define what the agent does and how it behaves.
* **Configuration Panel (center)**: Set up model, tools, context, evaluators, and constraints.
* **Chat Panel (right)**: Chat with the agent and test their behaviour.
Save the configuration at any time using the Publish button.
The Agents API provides endpoints for creating, executing, and managing AI agents with support for tools, memory, knowledge bases, and real-time streaming. Payloads follow the [A2A Protocol](https://a2a-protocol.org/latest/).
**Prerequisites:**
* A Project in the workspace (used as the `path` for resources)
* An [API Key](/docs/ai-studio/organization/api-keys)
* Optionally, one of the [Orq SDKs](/reference/client-libraries)
Create an agent with a minimal configuration:
```bash cURL theme={"theme":{"light":"github-light","dark":"github-dark"}}
curl -X POST https://api.orq.ai/v2/agents \
-H "Authorization: Bearer $ORQ_API_KEY" \
-H "Content-Type: application/json" \
-d '{
"key": "my-agent",
"role": "Assistant",
"description": "A helpful assistant for general tasks",
"instructions": "Be helpful and concise",
"path": "Default/agents",
"model": {
"id": "openai/gpt-4o"
},
"settings": {
"max_iterations": 3,
"max_execution_time": 300,
"tools": []
}
}'
```
```python Python theme={"theme":{"light":"github-light","dark":"github-dark"}}
from orq_ai_sdk import Orq
import os
with Orq(api_key=os.getenv("ORQ_API_KEY", "")) as orq:
agent = orq.agents.create(
key="my-agent",
role="Assistant",
description="A helpful assistant for general tasks",
instructions="Be helpful and concise",
path="Default/agents",
model={"id": "openai/gpt-4o"},
settings={
"max_iterations": 3,
"max_execution_time": 300,
"tools": []
}
)
print(f"Agent created: {agent.key}")
```
```typescript TypeScript theme={"theme":{"light":"github-light","dark":"github-dark"}}
import { Orq } from '@orq-ai/node';
const orq = new Orq({ apiKey: process.env['ORQ_API_KEY'] ?? '' });
const agent = await orq.agents.create({
key: 'my-agent',
role: 'Assistant',
description: 'A helpful assistant for general tasks',
instructions: 'Be helpful and concise',
path: 'Default/agents',
model: { id: 'openai/gpt-4o' },
settings: { maxIterations: 3, maxExecutionTime: 300, tools: [] }
});
console.log(`Agent created: ${agent.key}`);
```
See the full [Create Agent API reference](/reference/agents/create-agent).
Use the [Orq MCP server](/docs/integrations/code-assistants/mcp) to manage agents directly from an AI code assistant.
**Find an existing agent:**
```prompt wrap theme={"theme":{"light":"github-light","dark":"github-dark"}}
Search for the "support-bot" agent in my workspace
```
The assistant uses `search_entities` with `type: "agent"` to locate agents by name or key.
***
**Retrieve full agent configuration:**
```prompt wrap theme={"theme":{"light":"github-light","dark":"github-dark"}}
Get the full configuration of the "support-bot" agent
```
The assistant uses `get_agent` to return instructions, model, tools, and all settings.
***
**Create an agent:**
```prompt wrap theme={"theme":{"light":"github-light","dark":"github-dark"}}
Create a customer support agent called "support-bot" in the Default/agents project. Use GPT-4o and give it a professional, concise tone.
```
The assistant uses `create_agent` with the specified key, path, model, and instructions.
## Select a Model
Select the language model that powers the agent from the Configuration panel.
Available models depend on the [AI Gateway](/docs/model-garden/overview) configuration. Switch models at any time and the agent uses the new model on its next execution.
 **Considerations when selecting a model:**
* **Speed vs Quality**: Smaller models are faster but less capable.
* **Cost**: Larger models cost more per token.
* **Capability**: Some tasks require more advanced reasoning models.
* **Latency**: Models that use reasoning tokens add latency. Consider the impact of Max Iterations and Max Execution Time constraints.
The `model` field supports two formats.
**Object format (recommended)**: Specify model parameters alongside the model ID.
```json theme={"theme":{"light":"github-light","dark":"github-dark"}}
"model": {
"id": "openai/gpt-4o",
"parameters": {
"temperature": 0.5
}
}
```
**String format**: For simple cases without custom parameters.
```json theme={"theme":{"light":"github-light","dark":"github-dark"}}
"model": "openai/gpt-4o"
```
Use the `provider/model-id` format. For a complete list of supported models, see the [AI Gateway](/docs/model-garden/overview).
See the full [API reference](/reference/agents/create-agent) for all supported model parameters.
**List available models:**
```prompt wrap theme={"theme":{"light":"github-light","dark":"github-dark"}}
List all available chat models in my workspace
```
The assistant uses `list_models` with `type: "chat"`.
***
**Update the model on an existing agent:**
```prompt wrap theme={"theme":{"light":"github-light","dark":"github-dark"}}
Switch the "support-bot" agent to use Claude Sonnet 4.6
```
The assistant uses `update_agent` with `model: { "id": "anthropic/claude-sonnet-4-6" }`.
## Configure Instructions
The **Instructions** panel defines the agent's behavior, goals, and personality. Write clear, exhaustive instructions to keep behavior consistent across executions.
Use the AI button to generate effective instructions for the agent.
```
You are an experienced customer support specialist for the SaaS company **{company_name}**.
Your job is to provide clear, concise, and accurate answers to customer inquiries about {product_name}.
Responses should be brief, no more than **150 words**, and include any necessary next-step actions.
**Step-by-Step Instructions**
1. **Read the query**: `{customer_query}`.
2. **Extract the core problem** (e.g., password reset, API error, pricing).
3. **Draft a concise answer**: no more than 150 words.
4. **Add suggested next steps**: at most 3 actions the customer can take.
5. **End with a friendly closing** and a reminder of available support channels (`{support_contact}`).
```
The key instruction fields on the agent object:
| Field | Description |
| --------------- | ------------------------------------------------------------ |
| `instructions` | Main instructions for the agent's behavior and goals |
| `role` | Agent's responsibility and coverage, reinforced at execution |
| `description` | Used by other agents to discover and delegate to this agent |
| `system_prompt` | Additional system-level context injected before execution |
Update instructions on an existing agent:
```bash cURL theme={"theme":{"light":"github-light","dark":"github-dark"}}
curl -X PATCH https://api.orq.ai/v2/agents/my-agent \
-H "Authorization: Bearer $ORQ_API_KEY" \
-H "Content-Type: application/json" \
-d '{
"instructions": "You are a helpful assistant. Be concise and accurate.",
"role": "General Assistant",
"description": "A general-purpose assistant for answering questions and completing tasks"
}'
```
```python Python theme={"theme":{"light":"github-light","dark":"github-dark"}}
from orq_ai_sdk import Orq
import os
with Orq(api_key=os.getenv("ORQ_API_KEY", "")) as orq:
agent = orq.agents.update(
agent_key="my-agent",
instructions="You are a helpful assistant. Be concise and accurate.",
role="General Assistant",
description="A general-purpose assistant for answering questions and completing tasks"
)
```
```typescript TypeScript theme={"theme":{"light":"github-light","dark":"github-dark"}}
import { Orq } from '@orq-ai/node';
const orq = new Orq({ apiKey: process.env['ORQ_API_KEY'] ?? '' });
await orq.agents.update({
instructions: 'You are a helpful assistant. Be concise and accurate.',
role: 'General Assistant',
description: 'A general-purpose assistant for answering questions and completing tasks'
}, 'my-agent');
```
See the full [Update Agent API reference](/reference/agents/update-agent).
**Update agent instructions:**
```prompt wrap theme={"theme":{"light":"github-light","dark":"github-dark"}}
Show me the current instructions for "support-bot", then update them to always respond in the user's language
```
The assistant uses `get_agent` to retrieve the current instructions, then `update_agent` with the revised `instructions` field.
***
**Set role and description:**
```prompt wrap theme={"theme":{"light":"github-light","dark":"github-dark"}}
Update the "support-bot" agent to add a detailed description of its capabilities for use in multi-agent workflows
```
The assistant uses `update_agent` with the `description` field.
### Role and Description
* **Role**: Defines the agent's responsibility and coverage. Sent to the agent during execution to reinforce its perimeter.
* **Description**: Used by other agents in multi-agent setups to understand what this agent can do. Write a detailed description so orchestrators delegate correctly.
To learn more about multi-agent orchestration, see [Multi-Agent Workflows](/docs/ai-studio/ai-engineering/run-agents#multi-agent-workflows).
### Skills
[Skills](/docs/ai-studio/ai-engineering/skills) can be used with agents in two ways:
**Static reference:** Use `{{skill.key}}` directly in the instruction text to inject a Skill's content at that position on every run. Use this for content that should always be present, such as a company policy or a standard output format.
**On-demand attachment:** Click Skills in the **Skills** section of the agent configuration to attach a Skill.
**Considerations when selecting a model:**
* **Speed vs Quality**: Smaller models are faster but less capable.
* **Cost**: Larger models cost more per token.
* **Capability**: Some tasks require more advanced reasoning models.
* **Latency**: Models that use reasoning tokens add latency. Consider the impact of Max Iterations and Max Execution Time constraints.
The `model` field supports two formats.
**Object format (recommended)**: Specify model parameters alongside the model ID.
```json theme={"theme":{"light":"github-light","dark":"github-dark"}}
"model": {
"id": "openai/gpt-4o",
"parameters": {
"temperature": 0.5
}
}
```
**String format**: For simple cases without custom parameters.
```json theme={"theme":{"light":"github-light","dark":"github-dark"}}
"model": "openai/gpt-4o"
```
Use the `provider/model-id` format. For a complete list of supported models, see the [AI Gateway](/docs/model-garden/overview).
See the full [API reference](/reference/agents/create-agent) for all supported model parameters.
**List available models:**
```prompt wrap theme={"theme":{"light":"github-light","dark":"github-dark"}}
List all available chat models in my workspace
```
The assistant uses `list_models` with `type: "chat"`.
***
**Update the model on an existing agent:**
```prompt wrap theme={"theme":{"light":"github-light","dark":"github-dark"}}
Switch the "support-bot" agent to use Claude Sonnet 4.6
```
The assistant uses `update_agent` with `model: { "id": "anthropic/claude-sonnet-4-6" }`.
## Configure Instructions
The **Instructions** panel defines the agent's behavior, goals, and personality. Write clear, exhaustive instructions to keep behavior consistent across executions.
Use the AI button to generate effective instructions for the agent.
```
You are an experienced customer support specialist for the SaaS company **{company_name}**.
Your job is to provide clear, concise, and accurate answers to customer inquiries about {product_name}.
Responses should be brief, no more than **150 words**, and include any necessary next-step actions.
**Step-by-Step Instructions**
1. **Read the query**: `{customer_query}`.
2. **Extract the core problem** (e.g., password reset, API error, pricing).
3. **Draft a concise answer**: no more than 150 words.
4. **Add suggested next steps**: at most 3 actions the customer can take.
5. **End with a friendly closing** and a reminder of available support channels (`{support_contact}`).
```
The key instruction fields on the agent object:
| Field | Description |
| --------------- | ------------------------------------------------------------ |
| `instructions` | Main instructions for the agent's behavior and goals |
| `role` | Agent's responsibility and coverage, reinforced at execution |
| `description` | Used by other agents to discover and delegate to this agent |
| `system_prompt` | Additional system-level context injected before execution |
Update instructions on an existing agent:
```bash cURL theme={"theme":{"light":"github-light","dark":"github-dark"}}
curl -X PATCH https://api.orq.ai/v2/agents/my-agent \
-H "Authorization: Bearer $ORQ_API_KEY" \
-H "Content-Type: application/json" \
-d '{
"instructions": "You are a helpful assistant. Be concise and accurate.",
"role": "General Assistant",
"description": "A general-purpose assistant for answering questions and completing tasks"
}'
```
```python Python theme={"theme":{"light":"github-light","dark":"github-dark"}}
from orq_ai_sdk import Orq
import os
with Orq(api_key=os.getenv("ORQ_API_KEY", "")) as orq:
agent = orq.agents.update(
agent_key="my-agent",
instructions="You are a helpful assistant. Be concise and accurate.",
role="General Assistant",
description="A general-purpose assistant for answering questions and completing tasks"
)
```
```typescript TypeScript theme={"theme":{"light":"github-light","dark":"github-dark"}}
import { Orq } from '@orq-ai/node';
const orq = new Orq({ apiKey: process.env['ORQ_API_KEY'] ?? '' });
await orq.agents.update({
instructions: 'You are a helpful assistant. Be concise and accurate.',
role: 'General Assistant',
description: 'A general-purpose assistant for answering questions and completing tasks'
}, 'my-agent');
```
See the full [Update Agent API reference](/reference/agents/update-agent).
**Update agent instructions:**
```prompt wrap theme={"theme":{"light":"github-light","dark":"github-dark"}}
Show me the current instructions for "support-bot", then update them to always respond in the user's language
```
The assistant uses `get_agent` to retrieve the current instructions, then `update_agent` with the revised `instructions` field.
***
**Set role and description:**
```prompt wrap theme={"theme":{"light":"github-light","dark":"github-dark"}}
Update the "support-bot" agent to add a detailed description of its capabilities for use in multi-agent workflows
```
The assistant uses `update_agent` with the `description` field.
### Role and Description
* **Role**: Defines the agent's responsibility and coverage. Sent to the agent during execution to reinforce its perimeter.
* **Description**: Used by other agents in multi-agent setups to understand what this agent can do. Write a detailed description so orchestrators delegate correctly.
To learn more about multi-agent orchestration, see [Multi-Agent Workflows](/docs/ai-studio/ai-engineering/run-agents#multi-agent-workflows).
### Skills
[Skills](/docs/ai-studio/ai-engineering/skills) can be used with agents in two ways:
**Static reference:** Use `{{skill.key}}` directly in the instruction text to inject a Skill's content at that position on every run. Use this for content that should always be present, such as a company policy or a standard output format.
**On-demand attachment:** Click Skills in the **Skills** section of the agent configuration to attach a Skill.
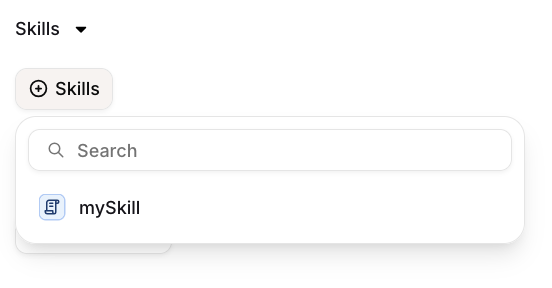 Attached Skills are available for the agent to invoke when relevant, without being statically embedded in the instructions. Any update to a Skill propagates automatically to every agent that references or has it attached.
### Variables and Templates
Reference dynamic values in agent instructions using double braces: `{{variableName}}`. Pass a key-value map in the `variables` field at invocation time and **Orq.ai** substitutes each variable before execution.
Attached Skills are available for the agent to invoke when relevant, without being statically embedded in the instructions. Any update to a Skill propagates automatically to every agent that references or has it attached.
### Variables and Templates
Reference dynamic values in agent instructions using double braces: `{{variableName}}`. Pass a key-value map in the `variables` field at invocation time and **Orq.ai** substitutes each variable before execution.
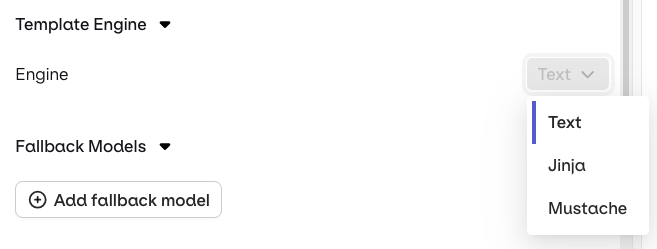
 **Orq.ai** supports three template engines. Select the **Template Engine** from the Agent Settings panel:
* **Text** (default): variables use `{{double_braces}}` syntax.
* **Jinja**: full templating with conditionals, loops, filters, and more.
* **Mustache**: logic-less templating with sections.
**Orq.ai** supports three template engines. Select the **Template Engine** from the Agent Settings panel:
* **Text** (default): variables use `{{double_braces}}` syntax.
* **Jinja**: full templating with conditionals, loops, filters, and more.
* **Mustache**: logic-less templating with sections.
 **Instructions template:**
```jinja theme={"theme":{"light":"github-light","dark":"github-dark"}}
You are a support assistant for {{company_name}}.
{% if user_tier == "premium" %}
{{customer_name}} is a premium customer. Greet them by name and let them know they have priority support.
{% else %}
{{customer_name}} is on the free plan. Standard response time is 24 hours.
{% endif %}
```
**Invoke the agent:**
```bash cURL theme={"theme":{"light":"github-light","dark":"github-dark"}}
curl --request POST \
--url 'https://api.orq.ai/v2/agents/support-bot/responses' \
--header 'Authorization: Bearer ' \
--header 'Content-Type: application/json' \
--data '{
"message": {
"role": "user",
"parts": [{"kind": "text", "text": "I need help."}]
},
"variables": {
"company_name": "Acme",
"customer_name": "Sarah",
"user_tier": "premium"
}
}'
```
**Instructions template:**
```handlebars theme={"theme":{"light":"github-light","dark":"github-dark"}}
You are a support assistant for {{company_name}}.
{{# is_premium}}
{{customer_name}} is a premium customer. Priority support with a 2-hour SLA.
{{/ is_premium}}
{{^ is_premium}}
{{customer_name}} is on the free plan. Standard response time is 24 hours.
{{/ is_premium}}
```
**Invoke the agent:**
```bash cURL theme={"theme":{"light":"github-light","dark":"github-dark"}}
curl --request POST \
--url 'https://api.orq.ai/v2/agents/support-bot/responses' \
--header 'Authorization: Bearer ' \
--header 'Content-Type: application/json' \
--data '{
"message": {
"role": "user",
"parts": [{"kind": "text", "text": "I need help."}]
},
"variables": {
"company_name": "Acme",
"customer_name": "Sarah",
"is_premium": true
}
}'
```
For a complete reference of all template features including filters, macros, and more, see [Prompt Templating](/docs/ai-studio/prompts/prompt-templating).
Use `{{variableName}}` placeholders in agent instructions and pass the corresponding values in the `variables` field at invocation time.
```bash cURL theme={"theme":{"light":"github-light","dark":"github-dark"}}
curl --request POST \
--url 'https://api.orq.ai/v3/router/responses' \
--header 'Authorization: Bearer ' \
--header 'Content-Type: application/json' \
--data '{
"model": "agent/my-agent",
"input": "I need help with my account.",
"variables": {
"user_name": "John Smith",
"user_role": "admin",
"company_name": "Acme Corp"
}
}'
```
```python Python theme={"theme":{"light":"github-light","dark":"github-dark"}}
from orq_ai_sdk import Orq
import os
with Orq(api_key=os.getenv("ORQ_API_KEY", "")) as orq:
response = orq.responses.create(
model="agent/my-agent",
input="I need help with my account.",
variables={
"user_name": "John Smith",
"user_role": "admin",
"company_name": "Acme Corp",
},
)
print(response.output[0]["content"][0]["text"])
```
```typescript TypeScript theme={"theme":{"light":"github-light","dark":"github-dark"}}
import { Orq } from '@orq-ai/node';
const orq = new Orq({ apiKey: process.env['ORQ_API_KEY'] ?? '' });
const response = await orq.responses.create({
model: 'agent/my-agent',
input: 'I need help with my account.',
variables: {
user_name: 'John Smith',
user_role: 'admin',
company_name: 'Acme Corp',
},
});
console.log(response.output?.[0]?.content?.[0]?.text);
```
See the full [Create Response API reference](/reference/agents/create-response).
**Add variables to agent instructions:**
```prompt wrap theme={"theme":{"light":"github-light","dark":"github-dark"}}
Update "support-bot" instructions to use {{user_name}} and {{company_name}} variables
```
The assistant uses `update_agent` with the revised `instructions` field containing `{{variable}}` placeholders.
## Add Tools
Tools extend the agent's capabilities by allowing it to interact with external systems, execute code, or fetch information. Add tools from the Tool selection modal.
**Instructions template:**
```jinja theme={"theme":{"light":"github-light","dark":"github-dark"}}
You are a support assistant for {{company_name}}.
{% if user_tier == "premium" %}
{{customer_name}} is a premium customer. Greet them by name and let them know they have priority support.
{% else %}
{{customer_name}} is on the free plan. Standard response time is 24 hours.
{% endif %}
```
**Invoke the agent:**
```bash cURL theme={"theme":{"light":"github-light","dark":"github-dark"}}
curl --request POST \
--url 'https://api.orq.ai/v2/agents/support-bot/responses' \
--header 'Authorization: Bearer ' \
--header 'Content-Type: application/json' \
--data '{
"message": {
"role": "user",
"parts": [{"kind": "text", "text": "I need help."}]
},
"variables": {
"company_name": "Acme",
"customer_name": "Sarah",
"user_tier": "premium"
}
}'
```
**Instructions template:**
```handlebars theme={"theme":{"light":"github-light","dark":"github-dark"}}
You are a support assistant for {{company_name}}.
{{# is_premium}}
{{customer_name}} is a premium customer. Priority support with a 2-hour SLA.
{{/ is_premium}}
{{^ is_premium}}
{{customer_name}} is on the free plan. Standard response time is 24 hours.
{{/ is_premium}}
```
**Invoke the agent:**
```bash cURL theme={"theme":{"light":"github-light","dark":"github-dark"}}
curl --request POST \
--url 'https://api.orq.ai/v2/agents/support-bot/responses' \
--header 'Authorization: Bearer ' \
--header 'Content-Type: application/json' \
--data '{
"message": {
"role": "user",
"parts": [{"kind": "text", "text": "I need help."}]
},
"variables": {
"company_name": "Acme",
"customer_name": "Sarah",
"is_premium": true
}
}'
```
For a complete reference of all template features including filters, macros, and more, see [Prompt Templating](/docs/ai-studio/prompts/prompt-templating).
Use `{{variableName}}` placeholders in agent instructions and pass the corresponding values in the `variables` field at invocation time.
```bash cURL theme={"theme":{"light":"github-light","dark":"github-dark"}}
curl --request POST \
--url 'https://api.orq.ai/v3/router/responses' \
--header 'Authorization: Bearer ' \
--header 'Content-Type: application/json' \
--data '{
"model": "agent/my-agent",
"input": "I need help with my account.",
"variables": {
"user_name": "John Smith",
"user_role": "admin",
"company_name": "Acme Corp"
}
}'
```
```python Python theme={"theme":{"light":"github-light","dark":"github-dark"}}
from orq_ai_sdk import Orq
import os
with Orq(api_key=os.getenv("ORQ_API_KEY", "")) as orq:
response = orq.responses.create(
model="agent/my-agent",
input="I need help with my account.",
variables={
"user_name": "John Smith",
"user_role": "admin",
"company_name": "Acme Corp",
},
)
print(response.output[0]["content"][0]["text"])
```
```typescript TypeScript theme={"theme":{"light":"github-light","dark":"github-dark"}}
import { Orq } from '@orq-ai/node';
const orq = new Orq({ apiKey: process.env['ORQ_API_KEY'] ?? '' });
const response = await orq.responses.create({
model: 'agent/my-agent',
input: 'I need help with my account.',
variables: {
user_name: 'John Smith',
user_role: 'admin',
company_name: 'Acme Corp',
},
});
console.log(response.output?.[0]?.content?.[0]?.text);
```
See the full [Create Response API reference](/reference/agents/create-response).
**Add variables to agent instructions:**
```prompt wrap theme={"theme":{"light":"github-light","dark":"github-dark"}}
Update "support-bot" instructions to use {{user_name}} and {{company_name}} variables
```
The assistant uses `update_agent` with the revised `instructions` field containing `{{variable}}` placeholders.
## Add Tools
Tools extend the agent's capabilities by allowing it to interact with external systems, execute code, or fetch information. Add tools from the Tool selection modal.
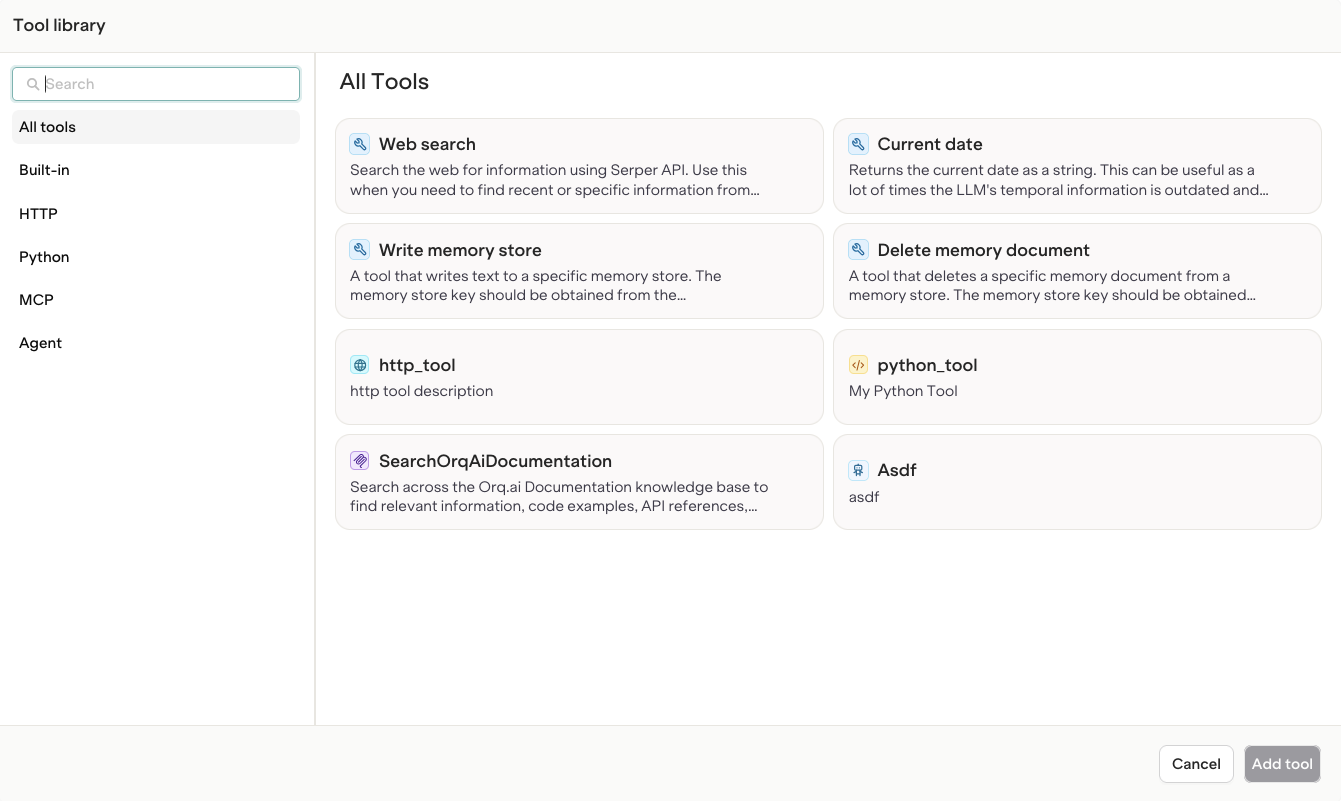 Declare tools in the `settings.tools` array when creating or updating an agent.
**Add a standard tool to an agent:**
```prompt wrap theme={"theme":{"light":"github-light","dark":"github-dark"}}
Add the google_search and current_date tools to the "research-bot" agent
```
The assistant uses `update_agent` with the updated `settings.tools` array.
***
**Add a custom tool by key:**
```prompt wrap theme={"theme":{"light":"github-light","dark":"github-dark"}}
Add the HTTP tool with key "weather_api" to the "weather-bot" agent
```
The assistant uses `update_agent` with `{"type": "http", "key": "weather_api"}` in `settings.tools`.
### Standard Tools
The following tools are available to all agents out of the box:
| Tool | Name | Description |
| ------------------------ | -------------------------- | ------------------------------------------------------------------------------------------------------------------------------------------------------------- |
| Current Date | `current_date` | Provides the current date to the model |
| Google Search | `google_search` | Lets an agent perform a Google Search |
| Web Scraper | `web_scraper` | Lets an agent scrape a web page |
| Query Memory Store | `query_memory_store` | Lets an agent query a [Memory Store](/docs/ai-studio/ai-engineering/build-agents#connect-memory-stores). Added automatically when using a Memory Store. |
| Retrieve Memory Stores | `retrieve_memory_stores` | Lets an agent fetch [Memory Stores](/docs/ai-studio/ai-engineering/build-agents#connect-memory-stores). Added automatically when using a Memory Store. |
| Write Memory Store | `write_memory_store` | Lets an agent save to a [Memory Store](/docs/ai-studio/ai-engineering/build-agents#connect-memory-stores). Added automatically when using a Memory Store. |
| Delete Memory Document | `delete_memory_document` | Lets an agent delete a memory document. Added automatically when using a Memory Store. |
| Query Knowledge Base | `query_knowledge_base` | Lets an agent query a [Knowledge Base](/docs/ai-studio/ai-engineering/build-agents#connect-knowledge-bases). Added automatically when using a Knowledge Base. |
| Retrieve Knowledge Bases | `retrieve_knowledge_bases` | Lets an agent fetch a [Knowledge Base](/docs/ai-studio/ai-engineering/build-agents#connect-knowledge-bases). Added automatically when using a Knowledge Base. |
| Call Sub Agent | `call_sub_agent` | Lets an agent invoke another agent. |
| Retrieve Agents | `retrieve_agents` | Lets an agent fetch other agents. |
Create custom tools to use within Agents:
* [Function Tool](/docs/ai-studio/ai-engineering/create-tools#function-tool)
* [HTTP Tool](/docs/ai-studio/ai-engineering/create-tools#http-tool)
* [JSON Schema Tool](/docs/ai-studio/ai-engineering/create-tools#json-schema-tool)
* [MCP Tool](/docs/ai-studio/ai-engineering/create-tools#mcp-tool)
* [Python Tool](/docs/ai-studio/ai-engineering/create-tools#python-tool)
Agent instructions must **explicitly mention the available tools** so the model knows when and how to invoke them.
The model will not use tools unless the instructions clearly describe:
* What each tool does
* When to use it
* How to call it
**Example: Web Search Agent**
```
You are a research assistant. Your job is to find current information.
**Available Tools:**
1. **google_search** - Search the internet for information
- Use this when you need current information or factual data
- Provide clear search queries
- Example: When asked "What are the latest AI developments?", call google_search with "latest AI developments 2025"
```
| Tool | Name | Description |
| ------------------------ | -------------------------- | ------------------------------------------------------------------------------------------------------------ |
| Current Date | `current_date` | Provides the current date to the model |
| Google Search | `google_search` | Lets an agent perform a Google Search |
| Web Scraper | `web_scraper` | Lets an agent scrape a web page |
| Query Memory Store | `query_memory_store` | Lets an agent query a [Memory Store](/docs/ai-studio/ai-engineering/build-agents#connect-memory-stores). |
| Retrieve Memory Stores | `retrieve_memory_stores` | Lets an agent fetch [Memory Stores](/docs/ai-studio/ai-engineering/build-agents#connect-memory-stores). |
| Write Memory Store | `write_memory_store` | Lets an agent save to a [Memory Store](/docs/ai-studio/ai-engineering/build-agents#connect-memory-stores). |
| Delete Memory Document | `delete_memory_document` | Lets an agent delete a memory document. |
| Query Knowledge Base | `query_knowledge_base` | Lets an agent query a [Knowledge Base](/docs/ai-studio/ai-engineering/build-agents#connect-knowledge-bases). |
| Retrieve Knowledge Bases | `retrieve_knowledge_bases` | Lets an agent fetch a [Knowledge Base](/docs/ai-studio/ai-engineering/build-agents#connect-knowledge-bases). |
| Call Sub Agent | `call_sub_agent` | Lets an agent invoke another agent. |
| Retrieve Agents | `retrieve_agents` | Lets an agent fetch other agents. |
```json theme={"theme":{"light":"github-light","dark":"github-dark"}}
{
"settings": {
"tools": [
{ "type": "current_date" },
{ "type": "google_search" },
{ "type": "web_scraper" },
{ "type": "query_memory_store" },
{ "type": "retrieve_memory_stores" },
{ "type": "write_memory_store" },
{ "type": "delete_memory_document" },
{ "type": "query_knowledge_base" },
{ "type": "retrieve_knowledge_bases" },
{ "type": "call_sub_agent" },
{ "type": "retrieve_agents" }
]
}
}
```
### Function Tools
Define custom functions inline with an OpenAPI-style schema.
```json theme={"theme":{"light":"github-light","dark":"github-dark"}}
{
"type": "function",
"key": "get_local_events",
"display_name": "Get Local Events",
"description": "Retrieves local events for a given city and date",
"function": {
"name": "get_local_events",
"parameters": {
"type": "object",
"properties": {
"city": { "type": "string", "description": "The name of the city" },
"date": { "type": "string", "description": "The date (YYYY-MM-DD)" }
},
"required": ["city", "date"]
}
}
}
```
### Python Tools
Embed executable Python code directly in the tool definition. The code runs server-side in a sandboxed environment.
```json theme={"theme":{"light":"github-light","dark":"github-dark"}}
{
"type": "code",
"key": "password_generator",
"display_name": "Password Generator",
"description": "Generate secure passwords with numbers and symbols",
"language": "python",
"code": "import random\nimport string\n\nchars = string.ascii_letters\nif params.get('include_numbers'): chars += string.digits\nif params.get('include_symbols'): chars += '!@#$%^&*'\nresult = {'password': ''.join(random.choice(chars) for _ in range(params.get('length', 12)))}",
"parameters": {
"type": "object",
"properties": {
"length": { "type": "integer", "description": "Password length", "default": 12 },
"include_numbers": { "type": "boolean", "default": true },
"include_symbols": { "type": "boolean", "default": true }
}
}
}
```
The code receives declared parameters via `params.get(...)` and must assign its output to `result`. Using `return` is not supported.
### HTTP Tools
Reference a pre-created HTTP tool by its `key`. Create HTTP tools first via the [Tools page](/docs/ai-studio/ai-engineering/create-tools#http-tool) or API.
```json theme={"theme":{"light":"github-light","dark":"github-dark"}}
{
"type": "http",
"key": "weather_api"
}
```
### MCP Tools
Reference a pre-created MCP tool by its `tool_id`. Create MCP tools first via the [Tools page](/docs/ai-studio/ai-engineering/create-tools#mcp-tool) or API.
```json theme={"theme":{"light":"github-light","dark":"github-dark"}}
{
"type": "mcp",
"tool_id": "TOOL_ID"
}
```
See the full [Create Agent API reference](/reference/agents/create-agent) for all tool configuration options.
## Connect Knowledge Bases
Attach a Knowledge Base to ground the agent's responses in relevant data.
1. Click **Add context** in the Configuration panel.
2. Select a [Knowledge Base](/docs/ai-studio/ai-engineering/knowledge-bases-memory-stores).
Unlike Deployments, a Knowledge Base attached to an agent is not queried on every request. The agent decides when to use the `query_knowledge_base` tool based on context.
The Knowledge Base description must be explicit so the agent knows when to query it.
For more on building Knowledge Bases for Agents, see [Knowledge Bases](/docs/ai-studio/ai-engineering/knowledge-bases-memory-stores).
Add the `knowledge_bases` array to the agent configuration. Include the `retrieve_knowledge_bases` and `query_knowledge_base` tools so the agent can discover and query them.
```bash cURL theme={"theme":{"light":"github-light","dark":"github-dark"}}
curl -X POST https://api.orq.ai/v2/agents \
-H "Authorization: Bearer $ORQ_API_KEY" \
-H "Content-Type: application/json" \
-d '{
"key": "knowledge-agent",
"instructions": "Help the user. First use retrieve_knowledge_bases to see what knowledge sources are available, then query_knowledge_base to find relevant information.",
"path": "Default/agents",
"model": { "id": "openai/gpt-4o" },
"settings": {
"max_iterations": 5,
"max_execution_time": 600,
"tools": [
{ "type": "retrieve_knowledge_bases" },
{ "type": "query_knowledge_base" }
]
},
"knowledge_bases": [
{ "knowledge_id": "my_knowledge_base" }
]
}'
```
```python Python theme={"theme":{"light":"github-light","dark":"github-dark"}}
from orq_ai_sdk import Orq
import os
with Orq(api_key=os.getenv("ORQ_API_KEY", "")) as orq:
agent = orq.agents.create(
key="knowledge-agent",
instructions="Help the user. First use retrieve_knowledge_bases to see what knowledge sources are available, then query_knowledge_base to find relevant information.",
path="Default/agents",
model={"id": "openai/gpt-4o"},
settings={
"max_iterations": 5,
"max_execution_time": 600,
"tools": [
{"type": "retrieve_knowledge_bases"},
{"type": "query_knowledge_base"}
]
},
knowledge_bases=[{"knowledge_id": "my_knowledge_base"}]
)
```
```typescript TypeScript theme={"theme":{"light":"github-light","dark":"github-dark"}}
import { Orq } from '@orq-ai/node';
const orq = new Orq({ apiKey: process.env['ORQ_API_KEY'] ?? '' });
await orq.agents.create({
key: 'knowledge-agent',
instructions: 'Help the user. First use retrieve_knowledge_bases to see what knowledge sources are available, then query_knowledge_base to find relevant information.',
path: 'Default/agents',
model: { id: 'openai/gpt-4o' },
settings: {
maxIterations: 5,
maxExecutionTime: 600,
tools: [
{ type: 'retrieve_knowledge_bases' },
{ type: 'query_knowledge_base' }
]
},
knowledgeBases: [{ knowledgeId: 'my_knowledge_base' }]
});
```
Agents must use `retrieve_knowledge_bases` before querying. Guide the agent with instructions like: "First use retrieve\_knowledge\_bases to see what knowledge sources are available, then query\_knowledge\_base to find relevant information."
See the full [Create Agent API reference](/reference/agents/create-agent) and [Knowledge Bases](/docs/ai-studio/ai-engineering/knowledge-bases-memory-stores) for more details.
**Attach a knowledge base to an agent:**
```prompt wrap theme={"theme":{"light":"github-light","dark":"github-dark"}}
Add the knowledge base with ID "product-docs" to the "support-bot" agent and make sure the query and retrieve tools are included
```
The assistant uses `update_agent` with the `knowledge_bases` array and adds `query_knowledge_base` and `retrieve_knowledge_bases` to `settings.tools`.
## Connect Memory Stores
Attach a Memory Store to give the agent persistent memory across conversations.
1. Click **Add context** in the Configuration panel.
2. Select a [Memory Store](/docs/memory-stores/overview).
Memory Stores are created and managed through the API. To learn more, see [Using Memory Stores](/docs/memory-stores/using-memory-stores).
To use a Memory Store correctly, a **Memory Entity ID** must be sent during agent execution. This entity ID scopes memories to a specific user or session.
For more on using Memory Stores with Agents, see the [Memory Stores](/docs/memory-stores/using-memory-stores) documentation.
Add the `memory_stores` array to the agent configuration. Include the memory tools so the agent can discover, query, write, and delete memories.
```bash cURL theme={"theme":{"light":"github-light","dark":"github-dark"}}
curl -X POST https://api.orq.ai/v2/agents \
-H "Authorization: Bearer $ORQ_API_KEY" \
-H "Content-Type: application/json" \
-d '{
"key": "memory-agent",
"instructions": "You have access to user memories. Use retrieve_memory_stores to find what stores are available, then query_memory_store to search for relevant information before responding.",
"path": "Default/agents",
"model": "openai/gpt-4o",
"settings": {
"max_iterations": 5,
"max_execution_time": 300,
"tools": [
{ "type": "retrieve_memory_stores" },
{ "type": "query_memory_store" },
{ "type": "write_memory_store" },
{ "type": "delete_memory_document" }
]
},
"memory_stores": ["customer_information"]
}'
```
```python Python theme={"theme":{"light":"github-light","dark":"github-dark"}}
from orq_ai_sdk import Orq
import os
with Orq(api_key=os.getenv("ORQ_API_KEY", "")) as orq:
agent = orq.agents.create(
key="memory-agent",
instructions="You have access to user memories. Use retrieve_memory_stores to find what stores are available, then query_memory_store to search for relevant information before responding.",
path="Default/agents",
model="openai/gpt-4o",
settings={
"max_iterations": 5,
"max_execution_time": 300,
"tools": [
{"type": "retrieve_memory_stores"},
{"type": "query_memory_store"},
{"type": "write_memory_store"},
{"type": "delete_memory_document"}
]
},
memory_stores=["customer_information"]
)
```
```typescript TypeScript theme={"theme":{"light":"github-light","dark":"github-dark"}}
import { Orq } from '@orq-ai/node';
const orq = new Orq({ apiKey: process.env['ORQ_API_KEY'] ?? '' });
await orq.agents.create({
key: 'memory-agent',
instructions: 'You have access to user memories. Use retrieve_memory_stores to find what stores are available, then query_memory_store to search for relevant information before responding.',
path: 'Default/agents',
model: 'openai/gpt-4o',
settings: {
maxIterations: 5,
maxExecutionTime: 300,
tools: [
{ type: 'retrieve_memory_stores' },
{ type: 'query_memory_store' },
{ type: 'write_memory_store' },
{ type: 'delete_memory_document' }
]
},
memoryStores: ['customer_information']
});
```
Memory stores do not automatically save all information from conversations. Explicitly instruct the agent what to save. Without clear save instructions, the agent may miss important details.
Pass a `memory.entity_id` at execution time to scope memories to a specific user or session. See [Run Agents](/docs/ai-studio/ai-engineering/run-agents#use-memory-stores) for execution details.
**Attach a memory store to an agent:**
```prompt wrap theme={"theme":{"light":"github-light","dark":"github-dark"}}
Add the "customer_information" memory store to the "support-bot" agent and include all four memory tools
```
The assistant uses `update_agent` with the `memory_stores` array and the four memory tools in `settings.tools`.
## Configure Evaluators and Guardrails
Evaluators measure agent performance against defined criteria. Guardrails can block execution when an evaluation fails.
Only pre-configured Evaluators can be attached to agents. To see available standard evaluators or create custom ones, see [Evaluators](/docs/ai-studio/optimize/evaluators).
1. Click **Add Evaluator** or **Add Guardrail** in the Configuration panel.
2. Select the evaluator type.
3. Configure evaluation parameters:
* **Input or Output**: whether to evaluate the agent's input or its output.
* **Sample Rate** (Evaluators only): the fraction of executions that trigger evaluation.
Evaluators run automatically during task execution and provide performance metrics.
**Output Guardrails and Streaming**: When an agent is invoked with streaming enabled, output guardrails are deactivated because they cannot run on partial chunks.
To learn more, see [Evaluators and Guardrails in Deployments](/docs/ai-studio/ai-engineering/deployments#evaluators-and-guardrails).
Attach evaluators and guardrails to an agent using the `evaluators` and `guardrails` fields in the create or update payload.
For the full schema of evaluator and guardrail configuration, see the [Create Agent API reference](/reference/agents/create-agent) and [Evaluators](/docs/ai-studio/optimize/evaluators).
Use [`PATCH /v2/agents/{key}`](/reference/agents/update-agent) to add or update evaluators and guardrails on an existing agent without recreating it.
**Add an evaluator to an agent:**
```prompt wrap theme={"theme":{"light":"github-light","dark":"github-dark"}}
Add the "response-quality" LLM evaluator to the "support-bot" agent, configured for output evaluation
```
The assistant uses `update_agent` with the `evaluators` field.
***
**Add a guardrail:**
```prompt wrap theme={"theme":{"light":"github-light","dark":"github-dark"}}
Add a guardrail to "support-bot" that blocks responses when the toxicity evaluator score is above 0.8
```
The assistant uses `update_agent` with the `guardrails` field.
## Configure Runtime Constraints
Control resource usage and execution limits from the Configuration panel.
| Constraint | Description |
| ---------------------- | --------------------------------------------------- |
| **Max Iterations** | Maximum number of LLM reasoning iterations per task |
| **Max Execution Time** | Maximum time the agent runs (in seconds) |
Max Iterations and Max Execution Time compound: an agent requiring many reasoning steps can hit both limits simultaneously. `max_execution_time` counts only LLM thinking time; tool call and sub-agent call duration is excluded. Start conservative and increase as needed.
Agents are run and scaled by **Orq.ai**. No infrastructure setup required.
Set constraints in the `settings` object:
| Field | Type | Description |
| -------------------- | ------- | ------------------------------------------ |
| `max_iterations` | integer | Maximum number of LLM reasoning iterations |
| `max_execution_time` | integer | Maximum execution time in seconds |
```json theme={"theme":{"light":"github-light","dark":"github-dark"}}
{
"settings": {
"max_iterations": 5,
"max_execution_time": 300
}
}
```
Update constraints on an existing agent with `PATCH /v2/agents/{key}`.
**Update execution constraints:**
```prompt wrap theme={"theme":{"light":"github-light","dark":"github-dark"}}
Set the max iterations to 10 and max execution time to 600 seconds on the "research-bot" agent
```
The assistant uses `update_agent` with the updated `settings.max_iterations` and `settings.max_execution_time` fields.
## Versions
The **Versions** tab shows the full history of all published agent configurations. Open it by selecting **Versions** from the tabs in the Agent Studio page.
Declare tools in the `settings.tools` array when creating or updating an agent.
**Add a standard tool to an agent:**
```prompt wrap theme={"theme":{"light":"github-light","dark":"github-dark"}}
Add the google_search and current_date tools to the "research-bot" agent
```
The assistant uses `update_agent` with the updated `settings.tools` array.
***
**Add a custom tool by key:**
```prompt wrap theme={"theme":{"light":"github-light","dark":"github-dark"}}
Add the HTTP tool with key "weather_api" to the "weather-bot" agent
```
The assistant uses `update_agent` with `{"type": "http", "key": "weather_api"}` in `settings.tools`.
### Standard Tools
The following tools are available to all agents out of the box:
| Tool | Name | Description |
| ------------------------ | -------------------------- | ------------------------------------------------------------------------------------------------------------------------------------------------------------- |
| Current Date | `current_date` | Provides the current date to the model |
| Google Search | `google_search` | Lets an agent perform a Google Search |
| Web Scraper | `web_scraper` | Lets an agent scrape a web page |
| Query Memory Store | `query_memory_store` | Lets an agent query a [Memory Store](/docs/ai-studio/ai-engineering/build-agents#connect-memory-stores). Added automatically when using a Memory Store. |
| Retrieve Memory Stores | `retrieve_memory_stores` | Lets an agent fetch [Memory Stores](/docs/ai-studio/ai-engineering/build-agents#connect-memory-stores). Added automatically when using a Memory Store. |
| Write Memory Store | `write_memory_store` | Lets an agent save to a [Memory Store](/docs/ai-studio/ai-engineering/build-agents#connect-memory-stores). Added automatically when using a Memory Store. |
| Delete Memory Document | `delete_memory_document` | Lets an agent delete a memory document. Added automatically when using a Memory Store. |
| Query Knowledge Base | `query_knowledge_base` | Lets an agent query a [Knowledge Base](/docs/ai-studio/ai-engineering/build-agents#connect-knowledge-bases). Added automatically when using a Knowledge Base. |
| Retrieve Knowledge Bases | `retrieve_knowledge_bases` | Lets an agent fetch a [Knowledge Base](/docs/ai-studio/ai-engineering/build-agents#connect-knowledge-bases). Added automatically when using a Knowledge Base. |
| Call Sub Agent | `call_sub_agent` | Lets an agent invoke another agent. |
| Retrieve Agents | `retrieve_agents` | Lets an agent fetch other agents. |
Create custom tools to use within Agents:
* [Function Tool](/docs/ai-studio/ai-engineering/create-tools#function-tool)
* [HTTP Tool](/docs/ai-studio/ai-engineering/create-tools#http-tool)
* [JSON Schema Tool](/docs/ai-studio/ai-engineering/create-tools#json-schema-tool)
* [MCP Tool](/docs/ai-studio/ai-engineering/create-tools#mcp-tool)
* [Python Tool](/docs/ai-studio/ai-engineering/create-tools#python-tool)
Agent instructions must **explicitly mention the available tools** so the model knows when and how to invoke them.
The model will not use tools unless the instructions clearly describe:
* What each tool does
* When to use it
* How to call it
**Example: Web Search Agent**
```
You are a research assistant. Your job is to find current information.
**Available Tools:**
1. **google_search** - Search the internet for information
- Use this when you need current information or factual data
- Provide clear search queries
- Example: When asked "What are the latest AI developments?", call google_search with "latest AI developments 2025"
```
| Tool | Name | Description |
| ------------------------ | -------------------------- | ------------------------------------------------------------------------------------------------------------ |
| Current Date | `current_date` | Provides the current date to the model |
| Google Search | `google_search` | Lets an agent perform a Google Search |
| Web Scraper | `web_scraper` | Lets an agent scrape a web page |
| Query Memory Store | `query_memory_store` | Lets an agent query a [Memory Store](/docs/ai-studio/ai-engineering/build-agents#connect-memory-stores). |
| Retrieve Memory Stores | `retrieve_memory_stores` | Lets an agent fetch [Memory Stores](/docs/ai-studio/ai-engineering/build-agents#connect-memory-stores). |
| Write Memory Store | `write_memory_store` | Lets an agent save to a [Memory Store](/docs/ai-studio/ai-engineering/build-agents#connect-memory-stores). |
| Delete Memory Document | `delete_memory_document` | Lets an agent delete a memory document. |
| Query Knowledge Base | `query_knowledge_base` | Lets an agent query a [Knowledge Base](/docs/ai-studio/ai-engineering/build-agents#connect-knowledge-bases). |
| Retrieve Knowledge Bases | `retrieve_knowledge_bases` | Lets an agent fetch a [Knowledge Base](/docs/ai-studio/ai-engineering/build-agents#connect-knowledge-bases). |
| Call Sub Agent | `call_sub_agent` | Lets an agent invoke another agent. |
| Retrieve Agents | `retrieve_agents` | Lets an agent fetch other agents. |
```json theme={"theme":{"light":"github-light","dark":"github-dark"}}
{
"settings": {
"tools": [
{ "type": "current_date" },
{ "type": "google_search" },
{ "type": "web_scraper" },
{ "type": "query_memory_store" },
{ "type": "retrieve_memory_stores" },
{ "type": "write_memory_store" },
{ "type": "delete_memory_document" },
{ "type": "query_knowledge_base" },
{ "type": "retrieve_knowledge_bases" },
{ "type": "call_sub_agent" },
{ "type": "retrieve_agents" }
]
}
}
```
### Function Tools
Define custom functions inline with an OpenAPI-style schema.
```json theme={"theme":{"light":"github-light","dark":"github-dark"}}
{
"type": "function",
"key": "get_local_events",
"display_name": "Get Local Events",
"description": "Retrieves local events for a given city and date",
"function": {
"name": "get_local_events",
"parameters": {
"type": "object",
"properties": {
"city": { "type": "string", "description": "The name of the city" },
"date": { "type": "string", "description": "The date (YYYY-MM-DD)" }
},
"required": ["city", "date"]
}
}
}
```
### Python Tools
Embed executable Python code directly in the tool definition. The code runs server-side in a sandboxed environment.
```json theme={"theme":{"light":"github-light","dark":"github-dark"}}
{
"type": "code",
"key": "password_generator",
"display_name": "Password Generator",
"description": "Generate secure passwords with numbers and symbols",
"language": "python",
"code": "import random\nimport string\n\nchars = string.ascii_letters\nif params.get('include_numbers'): chars += string.digits\nif params.get('include_symbols'): chars += '!@#$%^&*'\nresult = {'password': ''.join(random.choice(chars) for _ in range(params.get('length', 12)))}",
"parameters": {
"type": "object",
"properties": {
"length": { "type": "integer", "description": "Password length", "default": 12 },
"include_numbers": { "type": "boolean", "default": true },
"include_symbols": { "type": "boolean", "default": true }
}
}
}
```
The code receives declared parameters via `params.get(...)` and must assign its output to `result`. Using `return` is not supported.
### HTTP Tools
Reference a pre-created HTTP tool by its `key`. Create HTTP tools first via the [Tools page](/docs/ai-studio/ai-engineering/create-tools#http-tool) or API.
```json theme={"theme":{"light":"github-light","dark":"github-dark"}}
{
"type": "http",
"key": "weather_api"
}
```
### MCP Tools
Reference a pre-created MCP tool by its `tool_id`. Create MCP tools first via the [Tools page](/docs/ai-studio/ai-engineering/create-tools#mcp-tool) or API.
```json theme={"theme":{"light":"github-light","dark":"github-dark"}}
{
"type": "mcp",
"tool_id": "TOOL_ID"
}
```
See the full [Create Agent API reference](/reference/agents/create-agent) for all tool configuration options.
## Connect Knowledge Bases
Attach a Knowledge Base to ground the agent's responses in relevant data.
1. Click **Add context** in the Configuration panel.
2. Select a [Knowledge Base](/docs/ai-studio/ai-engineering/knowledge-bases-memory-stores).
Unlike Deployments, a Knowledge Base attached to an agent is not queried on every request. The agent decides when to use the `query_knowledge_base` tool based on context.
The Knowledge Base description must be explicit so the agent knows when to query it.
For more on building Knowledge Bases for Agents, see [Knowledge Bases](/docs/ai-studio/ai-engineering/knowledge-bases-memory-stores).
Add the `knowledge_bases` array to the agent configuration. Include the `retrieve_knowledge_bases` and `query_knowledge_base` tools so the agent can discover and query them.
```bash cURL theme={"theme":{"light":"github-light","dark":"github-dark"}}
curl -X POST https://api.orq.ai/v2/agents \
-H "Authorization: Bearer $ORQ_API_KEY" \
-H "Content-Type: application/json" \
-d '{
"key": "knowledge-agent",
"instructions": "Help the user. First use retrieve_knowledge_bases to see what knowledge sources are available, then query_knowledge_base to find relevant information.",
"path": "Default/agents",
"model": { "id": "openai/gpt-4o" },
"settings": {
"max_iterations": 5,
"max_execution_time": 600,
"tools": [
{ "type": "retrieve_knowledge_bases" },
{ "type": "query_knowledge_base" }
]
},
"knowledge_bases": [
{ "knowledge_id": "my_knowledge_base" }
]
}'
```
```python Python theme={"theme":{"light":"github-light","dark":"github-dark"}}
from orq_ai_sdk import Orq
import os
with Orq(api_key=os.getenv("ORQ_API_KEY", "")) as orq:
agent = orq.agents.create(
key="knowledge-agent",
instructions="Help the user. First use retrieve_knowledge_bases to see what knowledge sources are available, then query_knowledge_base to find relevant information.",
path="Default/agents",
model={"id": "openai/gpt-4o"},
settings={
"max_iterations": 5,
"max_execution_time": 600,
"tools": [
{"type": "retrieve_knowledge_bases"},
{"type": "query_knowledge_base"}
]
},
knowledge_bases=[{"knowledge_id": "my_knowledge_base"}]
)
```
```typescript TypeScript theme={"theme":{"light":"github-light","dark":"github-dark"}}
import { Orq } from '@orq-ai/node';
const orq = new Orq({ apiKey: process.env['ORQ_API_KEY'] ?? '' });
await orq.agents.create({
key: 'knowledge-agent',
instructions: 'Help the user. First use retrieve_knowledge_bases to see what knowledge sources are available, then query_knowledge_base to find relevant information.',
path: 'Default/agents',
model: { id: 'openai/gpt-4o' },
settings: {
maxIterations: 5,
maxExecutionTime: 600,
tools: [
{ type: 'retrieve_knowledge_bases' },
{ type: 'query_knowledge_base' }
]
},
knowledgeBases: [{ knowledgeId: 'my_knowledge_base' }]
});
```
Agents must use `retrieve_knowledge_bases` before querying. Guide the agent with instructions like: "First use retrieve\_knowledge\_bases to see what knowledge sources are available, then query\_knowledge\_base to find relevant information."
See the full [Create Agent API reference](/reference/agents/create-agent) and [Knowledge Bases](/docs/ai-studio/ai-engineering/knowledge-bases-memory-stores) for more details.
**Attach a knowledge base to an agent:**
```prompt wrap theme={"theme":{"light":"github-light","dark":"github-dark"}}
Add the knowledge base with ID "product-docs" to the "support-bot" agent and make sure the query and retrieve tools are included
```
The assistant uses `update_agent` with the `knowledge_bases` array and adds `query_knowledge_base` and `retrieve_knowledge_bases` to `settings.tools`.
## Connect Memory Stores
Attach a Memory Store to give the agent persistent memory across conversations.
1. Click **Add context** in the Configuration panel.
2. Select a [Memory Store](/docs/memory-stores/overview).
Memory Stores are created and managed through the API. To learn more, see [Using Memory Stores](/docs/memory-stores/using-memory-stores).
To use a Memory Store correctly, a **Memory Entity ID** must be sent during agent execution. This entity ID scopes memories to a specific user or session.
For more on using Memory Stores with Agents, see the [Memory Stores](/docs/memory-stores/using-memory-stores) documentation.
Add the `memory_stores` array to the agent configuration. Include the memory tools so the agent can discover, query, write, and delete memories.
```bash cURL theme={"theme":{"light":"github-light","dark":"github-dark"}}
curl -X POST https://api.orq.ai/v2/agents \
-H "Authorization: Bearer $ORQ_API_KEY" \
-H "Content-Type: application/json" \
-d '{
"key": "memory-agent",
"instructions": "You have access to user memories. Use retrieve_memory_stores to find what stores are available, then query_memory_store to search for relevant information before responding.",
"path": "Default/agents",
"model": "openai/gpt-4o",
"settings": {
"max_iterations": 5,
"max_execution_time": 300,
"tools": [
{ "type": "retrieve_memory_stores" },
{ "type": "query_memory_store" },
{ "type": "write_memory_store" },
{ "type": "delete_memory_document" }
]
},
"memory_stores": ["customer_information"]
}'
```
```python Python theme={"theme":{"light":"github-light","dark":"github-dark"}}
from orq_ai_sdk import Orq
import os
with Orq(api_key=os.getenv("ORQ_API_KEY", "")) as orq:
agent = orq.agents.create(
key="memory-agent",
instructions="You have access to user memories. Use retrieve_memory_stores to find what stores are available, then query_memory_store to search for relevant information before responding.",
path="Default/agents",
model="openai/gpt-4o",
settings={
"max_iterations": 5,
"max_execution_time": 300,
"tools": [
{"type": "retrieve_memory_stores"},
{"type": "query_memory_store"},
{"type": "write_memory_store"},
{"type": "delete_memory_document"}
]
},
memory_stores=["customer_information"]
)
```
```typescript TypeScript theme={"theme":{"light":"github-light","dark":"github-dark"}}
import { Orq } from '@orq-ai/node';
const orq = new Orq({ apiKey: process.env['ORQ_API_KEY'] ?? '' });
await orq.agents.create({
key: 'memory-agent',
instructions: 'You have access to user memories. Use retrieve_memory_stores to find what stores are available, then query_memory_store to search for relevant information before responding.',
path: 'Default/agents',
model: 'openai/gpt-4o',
settings: {
maxIterations: 5,
maxExecutionTime: 300,
tools: [
{ type: 'retrieve_memory_stores' },
{ type: 'query_memory_store' },
{ type: 'write_memory_store' },
{ type: 'delete_memory_document' }
]
},
memoryStores: ['customer_information']
});
```
Memory stores do not automatically save all information from conversations. Explicitly instruct the agent what to save. Without clear save instructions, the agent may miss important details.
Pass a `memory.entity_id` at execution time to scope memories to a specific user or session. See [Run Agents](/docs/ai-studio/ai-engineering/run-agents#use-memory-stores) for execution details.
**Attach a memory store to an agent:**
```prompt wrap theme={"theme":{"light":"github-light","dark":"github-dark"}}
Add the "customer_information" memory store to the "support-bot" agent and include all four memory tools
```
The assistant uses `update_agent` with the `memory_stores` array and the four memory tools in `settings.tools`.
## Configure Evaluators and Guardrails
Evaluators measure agent performance against defined criteria. Guardrails can block execution when an evaluation fails.
Only pre-configured Evaluators can be attached to agents. To see available standard evaluators or create custom ones, see [Evaluators](/docs/ai-studio/optimize/evaluators).
1. Click **Add Evaluator** or **Add Guardrail** in the Configuration panel.
2. Select the evaluator type.
3. Configure evaluation parameters:
* **Input or Output**: whether to evaluate the agent's input or its output.
* **Sample Rate** (Evaluators only): the fraction of executions that trigger evaluation.
Evaluators run automatically during task execution and provide performance metrics.
**Output Guardrails and Streaming**: When an agent is invoked with streaming enabled, output guardrails are deactivated because they cannot run on partial chunks.
To learn more, see [Evaluators and Guardrails in Deployments](/docs/ai-studio/ai-engineering/deployments#evaluators-and-guardrails).
Attach evaluators and guardrails to an agent using the `evaluators` and `guardrails` fields in the create or update payload.
For the full schema of evaluator and guardrail configuration, see the [Create Agent API reference](/reference/agents/create-agent) and [Evaluators](/docs/ai-studio/optimize/evaluators).
Use [`PATCH /v2/agents/{key}`](/reference/agents/update-agent) to add or update evaluators and guardrails on an existing agent without recreating it.
**Add an evaluator to an agent:**
```prompt wrap theme={"theme":{"light":"github-light","dark":"github-dark"}}
Add the "response-quality" LLM evaluator to the "support-bot" agent, configured for output evaluation
```
The assistant uses `update_agent` with the `evaluators` field.
***
**Add a guardrail:**
```prompt wrap theme={"theme":{"light":"github-light","dark":"github-dark"}}
Add a guardrail to "support-bot" that blocks responses when the toxicity evaluator score is above 0.8
```
The assistant uses `update_agent` with the `guardrails` field.
## Configure Runtime Constraints
Control resource usage and execution limits from the Configuration panel.
| Constraint | Description |
| ---------------------- | --------------------------------------------------- |
| **Max Iterations** | Maximum number of LLM reasoning iterations per task |
| **Max Execution Time** | Maximum time the agent runs (in seconds) |
Max Iterations and Max Execution Time compound: an agent requiring many reasoning steps can hit both limits simultaneously. `max_execution_time` counts only LLM thinking time; tool call and sub-agent call duration is excluded. Start conservative and increase as needed.
Agents are run and scaled by **Orq.ai**. No infrastructure setup required.
Set constraints in the `settings` object:
| Field | Type | Description |
| -------------------- | ------- | ------------------------------------------ |
| `max_iterations` | integer | Maximum number of LLM reasoning iterations |
| `max_execution_time` | integer | Maximum execution time in seconds |
```json theme={"theme":{"light":"github-light","dark":"github-dark"}}
{
"settings": {
"max_iterations": 5,
"max_execution_time": 300
}
}
```
Update constraints on an existing agent with `PATCH /v2/agents/{key}`.
**Update execution constraints:**
```prompt wrap theme={"theme":{"light":"github-light","dark":"github-dark"}}
Set the max iterations to 10 and max execution time to 600 seconds on the "research-bot" agent
```
The assistant uses `update_agent` with the updated `settings.max_iterations` and `settings.max_execution_time` fields.
## Versions
The **Versions** tab shows the full history of all published agent configurations. Open it by selecting **Versions** from the tabs in the Agent Studio page.
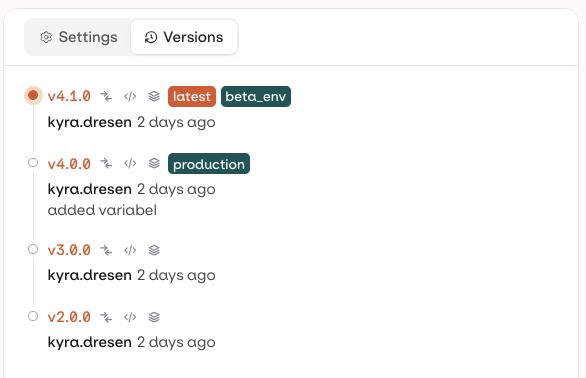 Each version entry shows the version number, author, timestamp, optional commit message, and any assigned environment badges (e.g. `latest`, `production`).
By default, invoking an agent routes to the version tagged **latest**. To target a specific version, append `@version-number` to the agent key. Route by environment with `@environment-name`.
```bash cURL theme={"theme":{"light":"github-light","dark":"github-dark"}}
curl -X POST https://api.orq.ai/v3/router/responses \
-H "Authorization: Bearer $ORQ_API_KEY" \
-H "Content-Type: application/json" \
-d '{
"model": "agent/my-agent@4.0.0",
"input": "Hello"
}'
```
```python Python theme={"theme":{"light":"github-light","dark":"github-dark"}}
from orq_ai_sdk import Orq
import os
with Orq(api_key=os.getenv("ORQ_API_KEY", "")) as orq:
response = orq.responses.create(
model="agent/my-agent@4.0.0",
input="Hello",
)
print(response)
```
```typescript TypeScript theme={"theme":{"light":"github-light","dark":"github-dark"}}
import { Orq } from '@orq-ai/node';
const orq = new Orq({ apiKey: process.env['ORQ_API_KEY'] ?? '' });
const response = await orq.responses.create({
model: 'agent/my-agent@4.0.0',
input: 'Hello',
});
console.log(response);
```
Use `@environment-name` to route to whichever version is assigned to that environment:
```bash cURL theme={"theme":{"light":"github-light","dark":"github-dark"}}
curl -X POST https://api.orq.ai/v3/router/responses \
-H "Authorization: Bearer $ORQ_API_KEY" \
-H "Content-Type: application/json" \
-d '{ "model": "agent/my-agent@production", "input": "..." }'
```
See the full [Create Response API reference](/reference/agents/create-response).
**Retrieve agent version history:**
```prompt wrap theme={"theme":{"light":"github-light","dark":"github-dark"}}
Show me all published versions of the "support-bot" agent
```
The assistant uses `get_agent` to retrieve the agent including its version history.
***
**Check the current configuration of a specific version:**
```prompt wrap theme={"theme":{"light":"github-light","dark":"github-dark"}}
What are the instructions on version 3.0.0 of the "support-bot" agent?
```
The assistant uses `get_agent` with the version-pinned key `support-bot@3.0.0`.
### Comparing Changes
Click on any version to open the **Compare Changes** view. Use the **From** and **To** dropdowns to compare any two versions, including **Current** (unpublished working changes).
Each version entry shows the version number, author, timestamp, optional commit message, and any assigned environment badges (e.g. `latest`, `production`).
By default, invoking an agent routes to the version tagged **latest**. To target a specific version, append `@version-number` to the agent key. Route by environment with `@environment-name`.
```bash cURL theme={"theme":{"light":"github-light","dark":"github-dark"}}
curl -X POST https://api.orq.ai/v3/router/responses \
-H "Authorization: Bearer $ORQ_API_KEY" \
-H "Content-Type: application/json" \
-d '{
"model": "agent/my-agent@4.0.0",
"input": "Hello"
}'
```
```python Python theme={"theme":{"light":"github-light","dark":"github-dark"}}
from orq_ai_sdk import Orq
import os
with Orq(api_key=os.getenv("ORQ_API_KEY", "")) as orq:
response = orq.responses.create(
model="agent/my-agent@4.0.0",
input="Hello",
)
print(response)
```
```typescript TypeScript theme={"theme":{"light":"github-light","dark":"github-dark"}}
import { Orq } from '@orq-ai/node';
const orq = new Orq({ apiKey: process.env['ORQ_API_KEY'] ?? '' });
const response = await orq.responses.create({
model: 'agent/my-agent@4.0.0',
input: 'Hello',
});
console.log(response);
```
Use `@environment-name` to route to whichever version is assigned to that environment:
```bash cURL theme={"theme":{"light":"github-light","dark":"github-dark"}}
curl -X POST https://api.orq.ai/v3/router/responses \
-H "Authorization: Bearer $ORQ_API_KEY" \
-H "Content-Type: application/json" \
-d '{ "model": "agent/my-agent@production", "input": "..." }'
```
See the full [Create Response API reference](/reference/agents/create-response).
**Retrieve agent version history:**
```prompt wrap theme={"theme":{"light":"github-light","dark":"github-dark"}}
Show me all published versions of the "support-bot" agent
```
The assistant uses `get_agent` to retrieve the agent including its version history.
***
**Check the current configuration of a specific version:**
```prompt wrap theme={"theme":{"light":"github-light","dark":"github-dark"}}
What are the instructions on version 3.0.0 of the "support-bot" agent?
```
The assistant uses `get_agent` with the version-pinned key `support-bot@3.0.0`.
### Comparing Changes
Click on any version to open the **Compare Changes** view. Use the **From** and **To** dropdowns to compare any two versions, including **Current** (unpublished working changes).
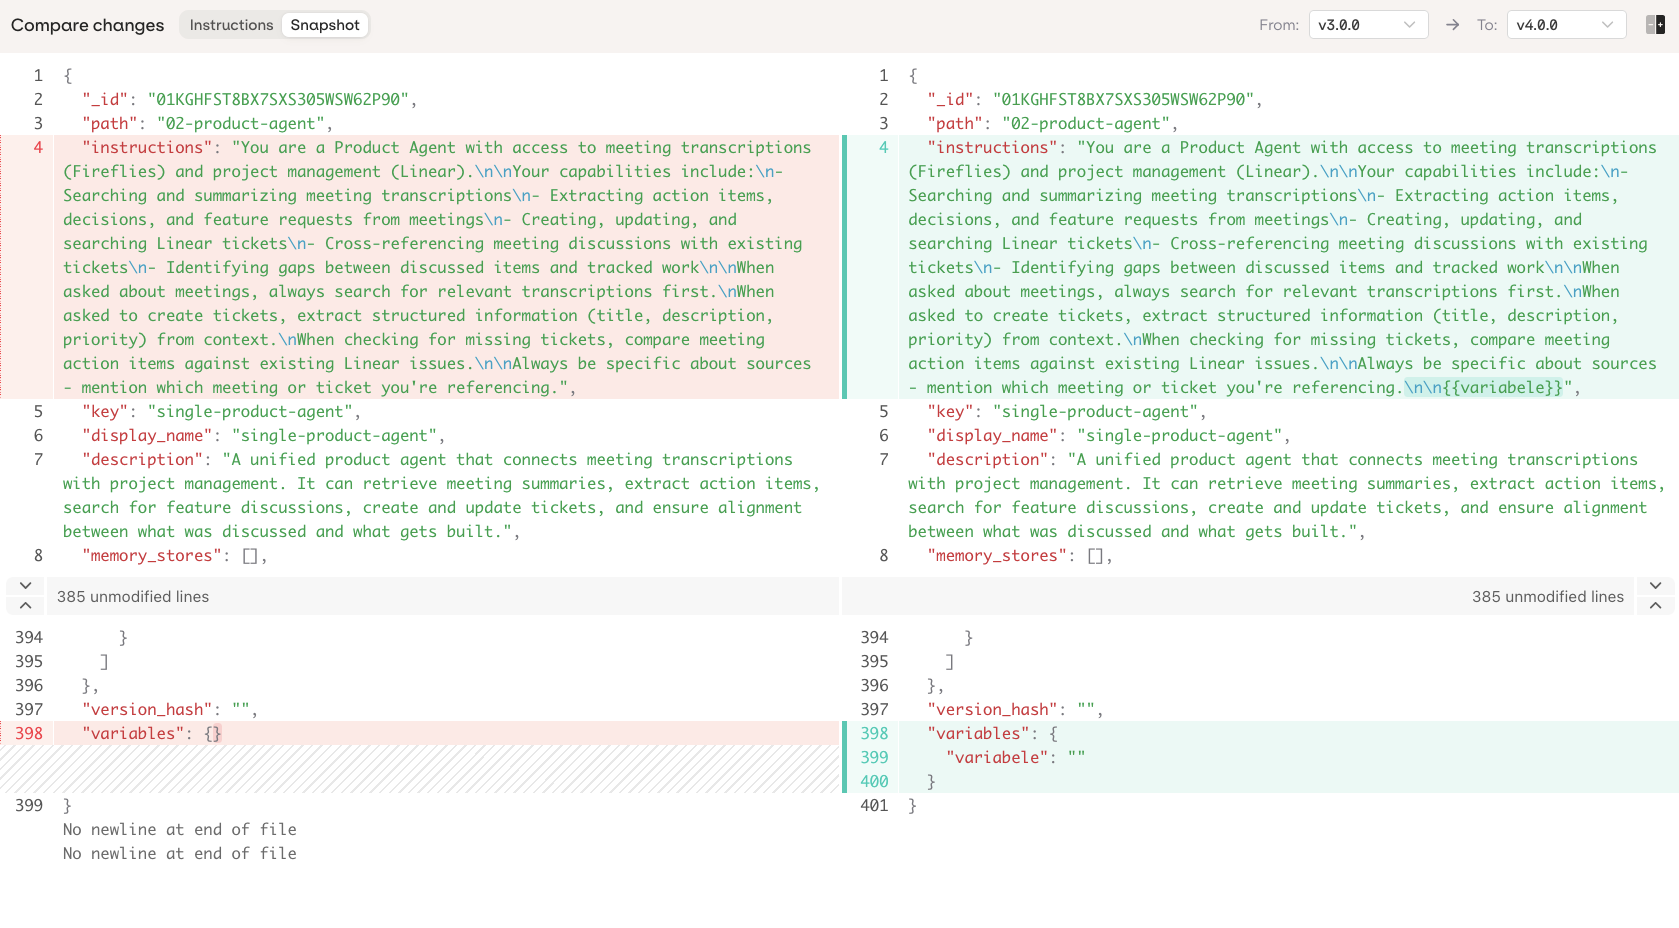 Two view modes are available:
* **Instructions**: diff of agent instructions only.
* **Snapshot**: full JSON diff of the complete agent configuration.
Use the button to toggle between side-by-side and unified diff layouts.
### Assigning Environments
Click on a version to assign it to an environment:
* Select an existing environment (e.g. `develop`, `production`).
* Create environment: add a new environment from this dropdown.
* Manage environments: open the full environment management settings.
A version can be assigned to multiple environments. Assigned badges appear on the version row.
Two view modes are available:
* **Instructions**: diff of agent instructions only.
* **Snapshot**: full JSON diff of the complete agent configuration.
Use the button to toggle between side-by-side and unified diff layouts.
### Assigning Environments
Click on a version to assign it to an environment:
* Select an existing environment (e.g. `develop`, `production`).
* Create environment: add a new environment from this dropdown.
* Manage environments: open the full environment management settings.
A version can be assigned to multiple environments. Assigned badges appear on the version row.
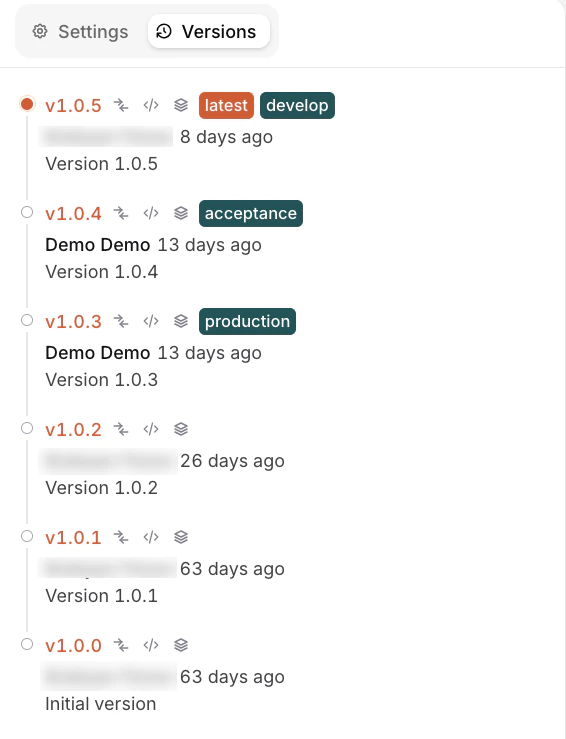 To learn more about environments, see [Environments](/docs/ai-studio/organization/environments).