> ## Documentation Index
> Fetch the complete documentation index at: https://docs.orq.ai/llms.txt
> Use this file to discover all available pages before exploring further.
# Enterprise SSO authentication
> Configure enterprise Single Sign-On for Orq.ai using any standards-compliant OIDC or SAML identity provider.
Feature available with the [Enterprise Plan](https://orq.ai/solutions/enterprise)
Connect an identity provider to **Orq.ai** to allow the team to sign in using their existing credentials. Any identity provider that supports OIDC or SAML 2.0 is compatible.
## Choose a Protocol
Two protocols are available:
* **OIDC**: Modern, lightweight protocol based on OAuth 2.0. Recommended for most organizations for its quick setup and JSON-based authentication.
* **SAML**: XML-based protocol recommended for enterprise environments requiring fine-grained control over security attributes and assertions.
## Configure SSO in Orq.ai
### Navigate to Auth settings
1. Log in to the **Orq.ai** account
2. Click **AI Studio** in the upper left
3. Click **Organization**
4. Click **Auth** from the sidebar
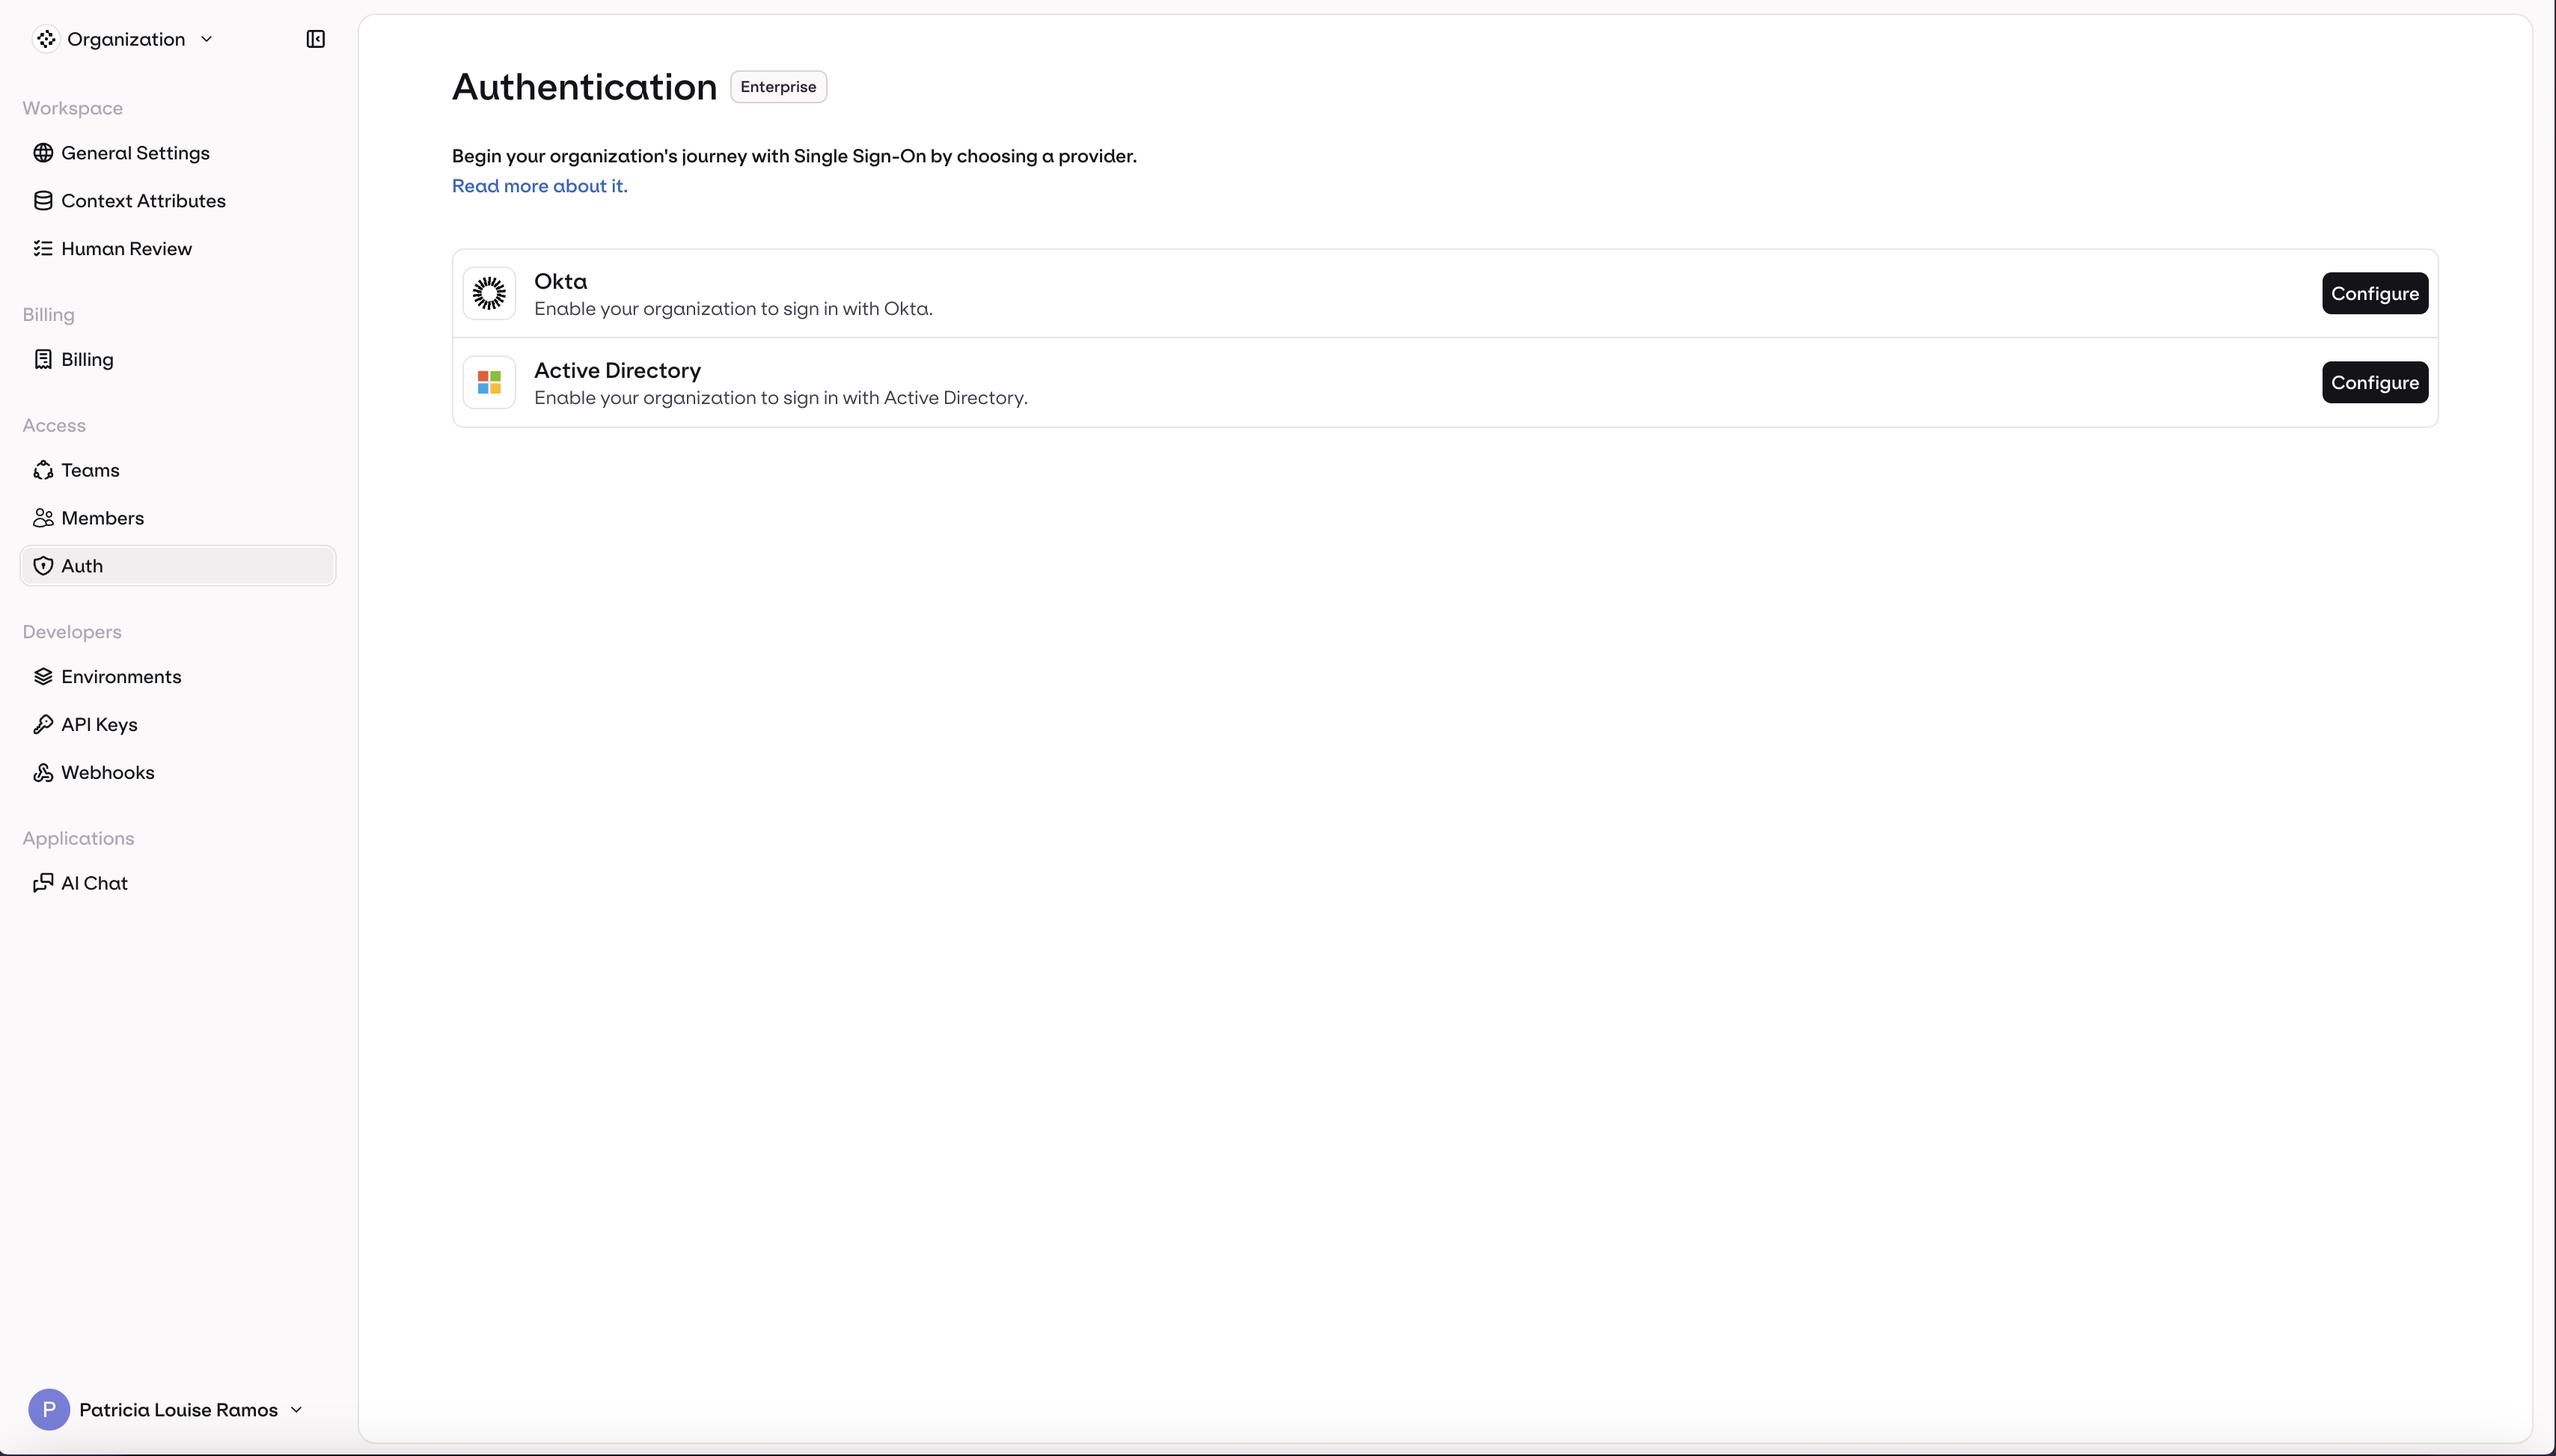 Only one SSO connection can be active at a time. To switch providers, disconnect the current connection first.
### Connect a provider
Click **Add SSO Connection**, select the protocol, and follow the guide for the identity provider:
Sign in to the **Okta Admin Console** and navigate to **Applications → Applications**.
Only one SSO connection can be active at a time. To switch providers, disconnect the current connection first.
### Connect a provider
Click **Add SSO Connection**, select the protocol, and follow the guide for the identity provider:
Sign in to the **Okta Admin Console** and navigate to **Applications → Applications**.
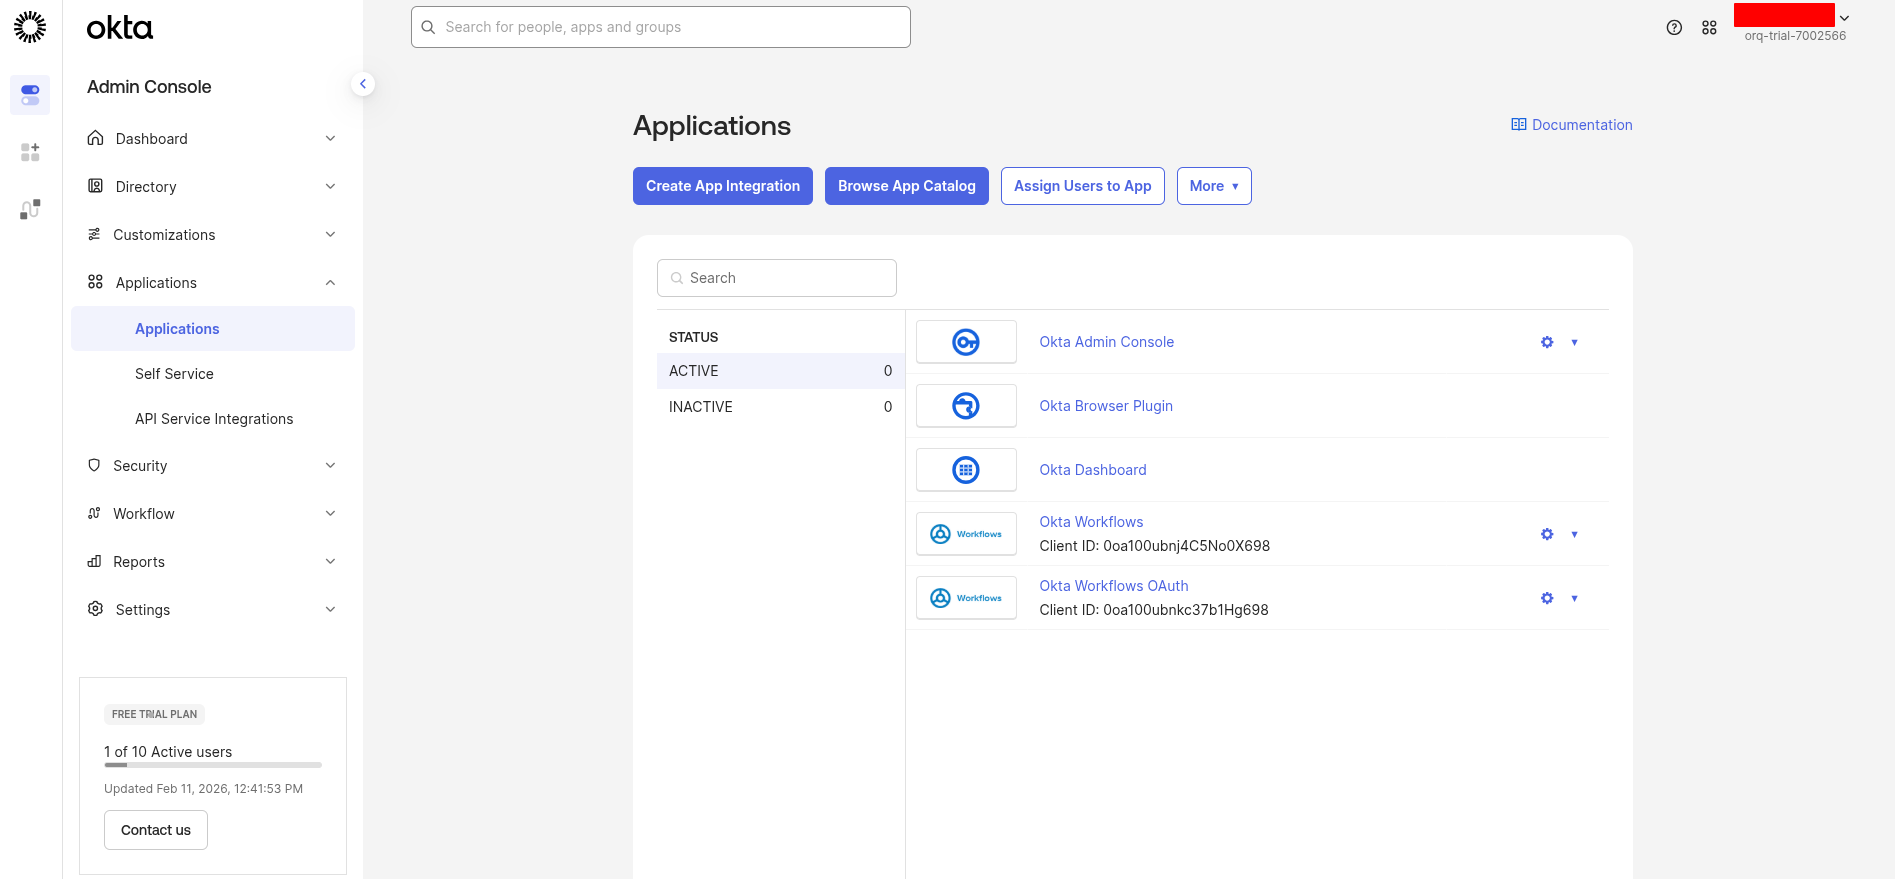 Click **Create App Integration**, then select **OIDC - OpenID Connect** and **Web Application**, and click **Next**.
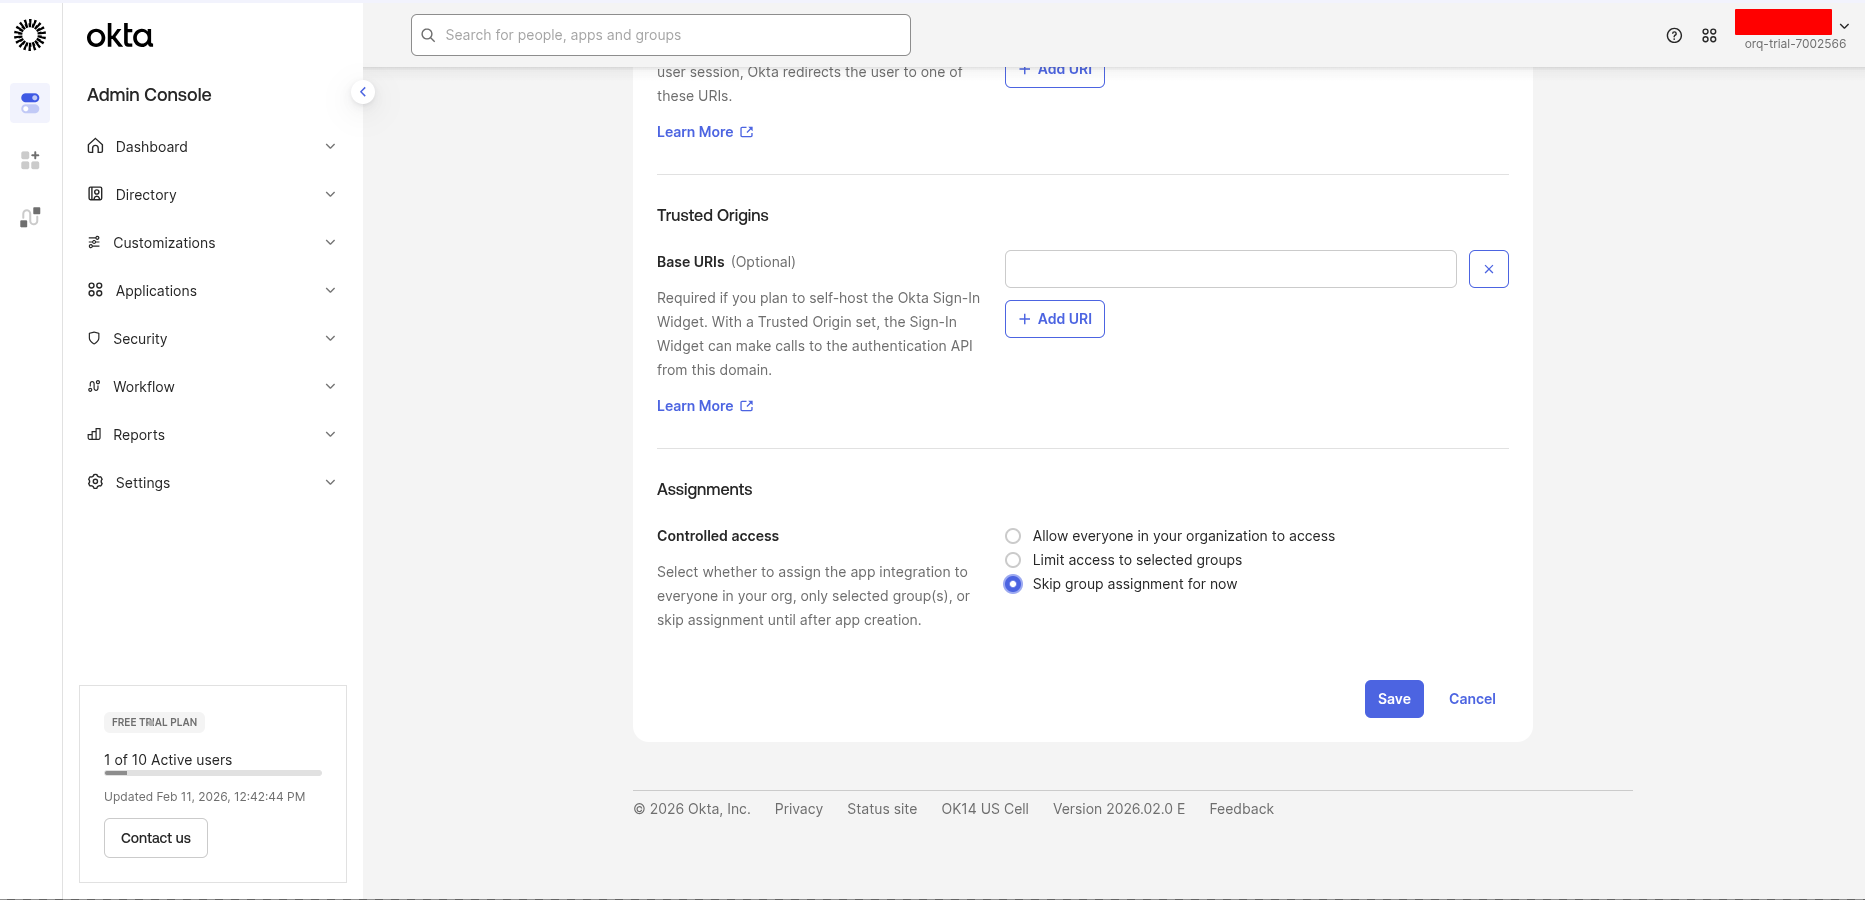
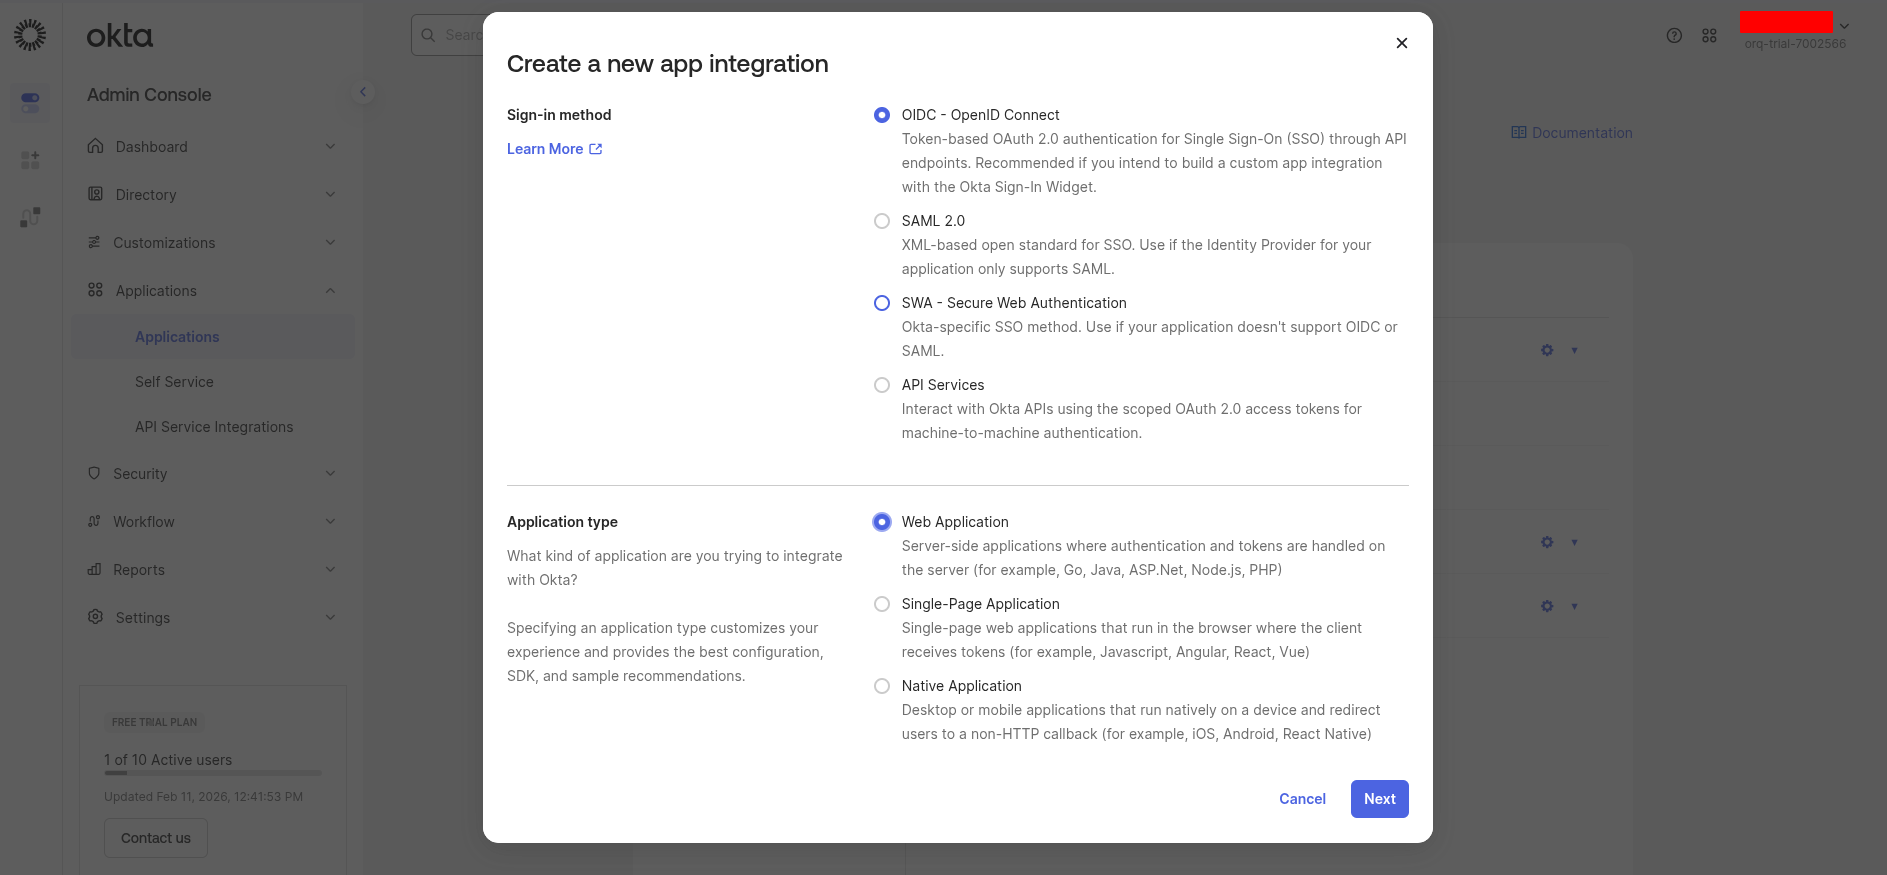 **Configure the application:**
* **App integration name**: `Orq.ai` (or preferred name)
* **Grant type**: Ensure **Authorization Code** is selected
* **Sign-in redirect URIs**:
```
https://my.orq.ai/v2/auth/sso/oidc/callback
```
* **Sign-out redirect URIs** (optional):
```
https://my.orq.ai
```
**Configure the application:**
* **App integration name**: `Orq.ai` (or preferred name)
* **Grant type**: Ensure **Authorization Code** is selected
* **Sign-in redirect URIs**:
```
https://my.orq.ai/v2/auth/sso/oidc/callback
```
* **Sign-out redirect URIs** (optional):
```
https://my.orq.ai
```
 Go to the **Assignments** tab and click Assign → Assign to People or Assign to Groups.
Select the users or groups that should have access to **Orq.ai**, then click Done.
Go to the **Assignments** tab and click Assign → Assign to People or Assign to Groups.
Select the users or groups that should have access to **Orq.ai**, then click Done.
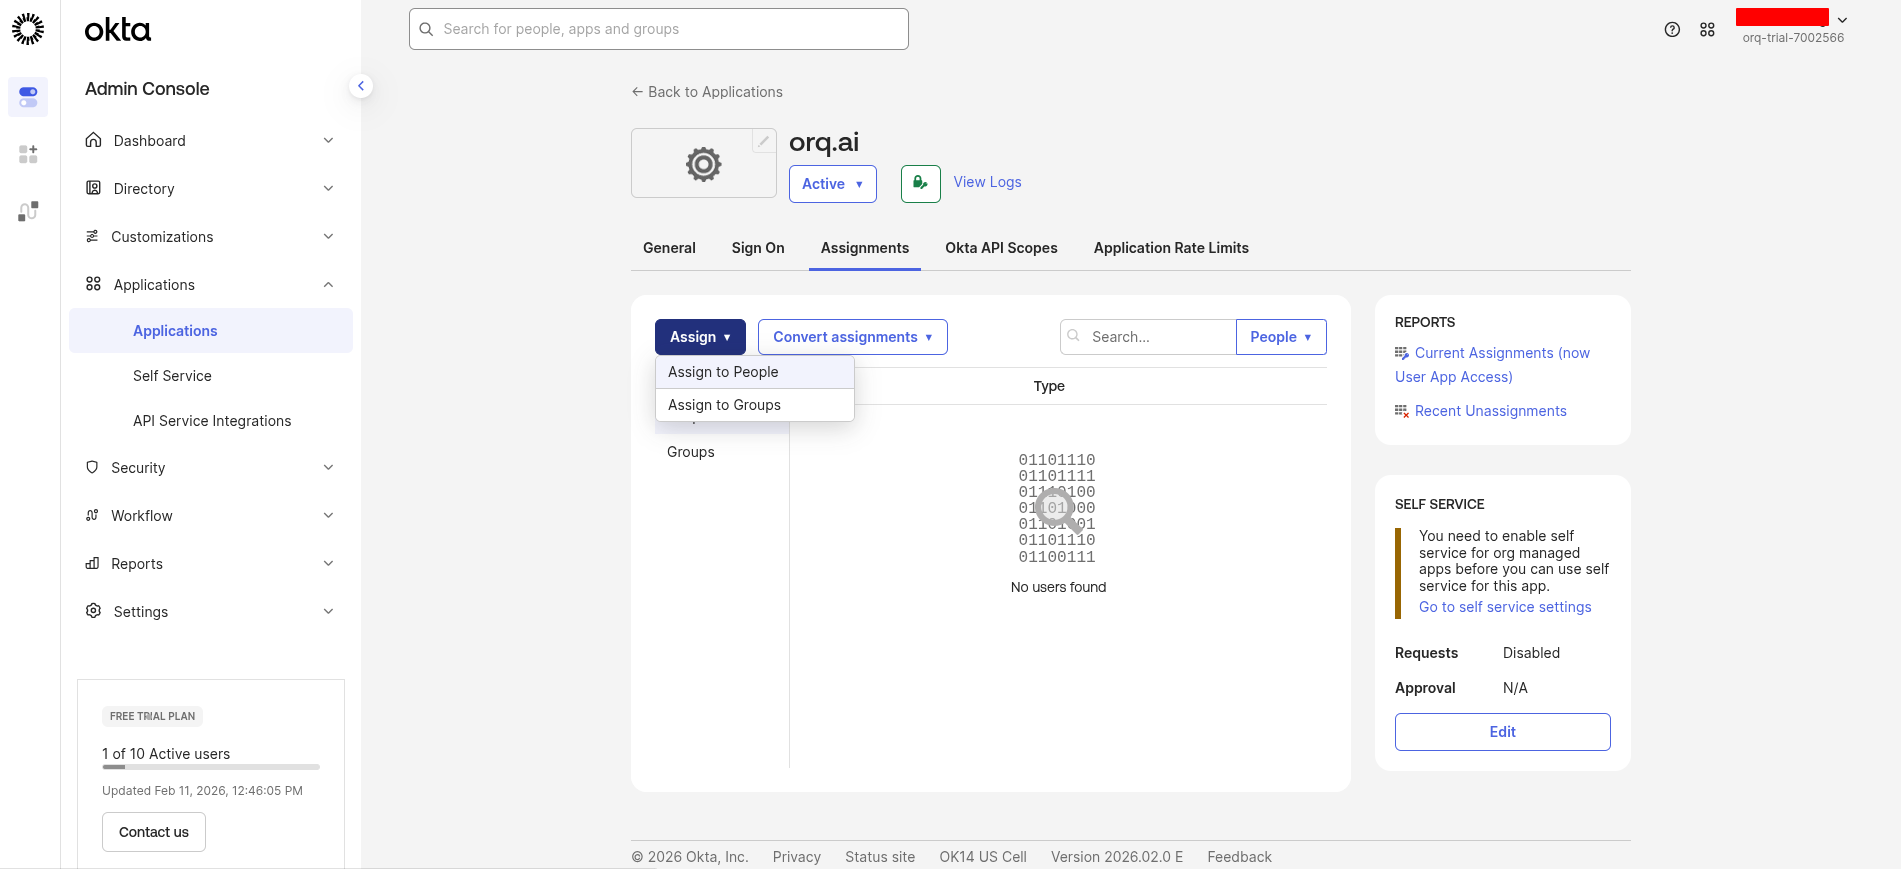 By default, no users are assigned to a new Okta app.
From the application's **General** tab, scroll down to the **Client Credentials** section.
Copy these values:
* **Client ID**: use as the **Client ID** in **Orq.ai**
* **Client secret**: click **Copy to clipboard** and use as the **Client Secret** in **Orq.ai**
By default, no users are assigned to a new Okta app.
From the application's **General** tab, scroll down to the **Client Credentials** section.
Copy these values:
* **Client ID**: use as the **Client ID** in **Orq.ai**
* **Client secret**: click **Copy to clipboard** and use as the **Client Secret** in **Orq.ai**
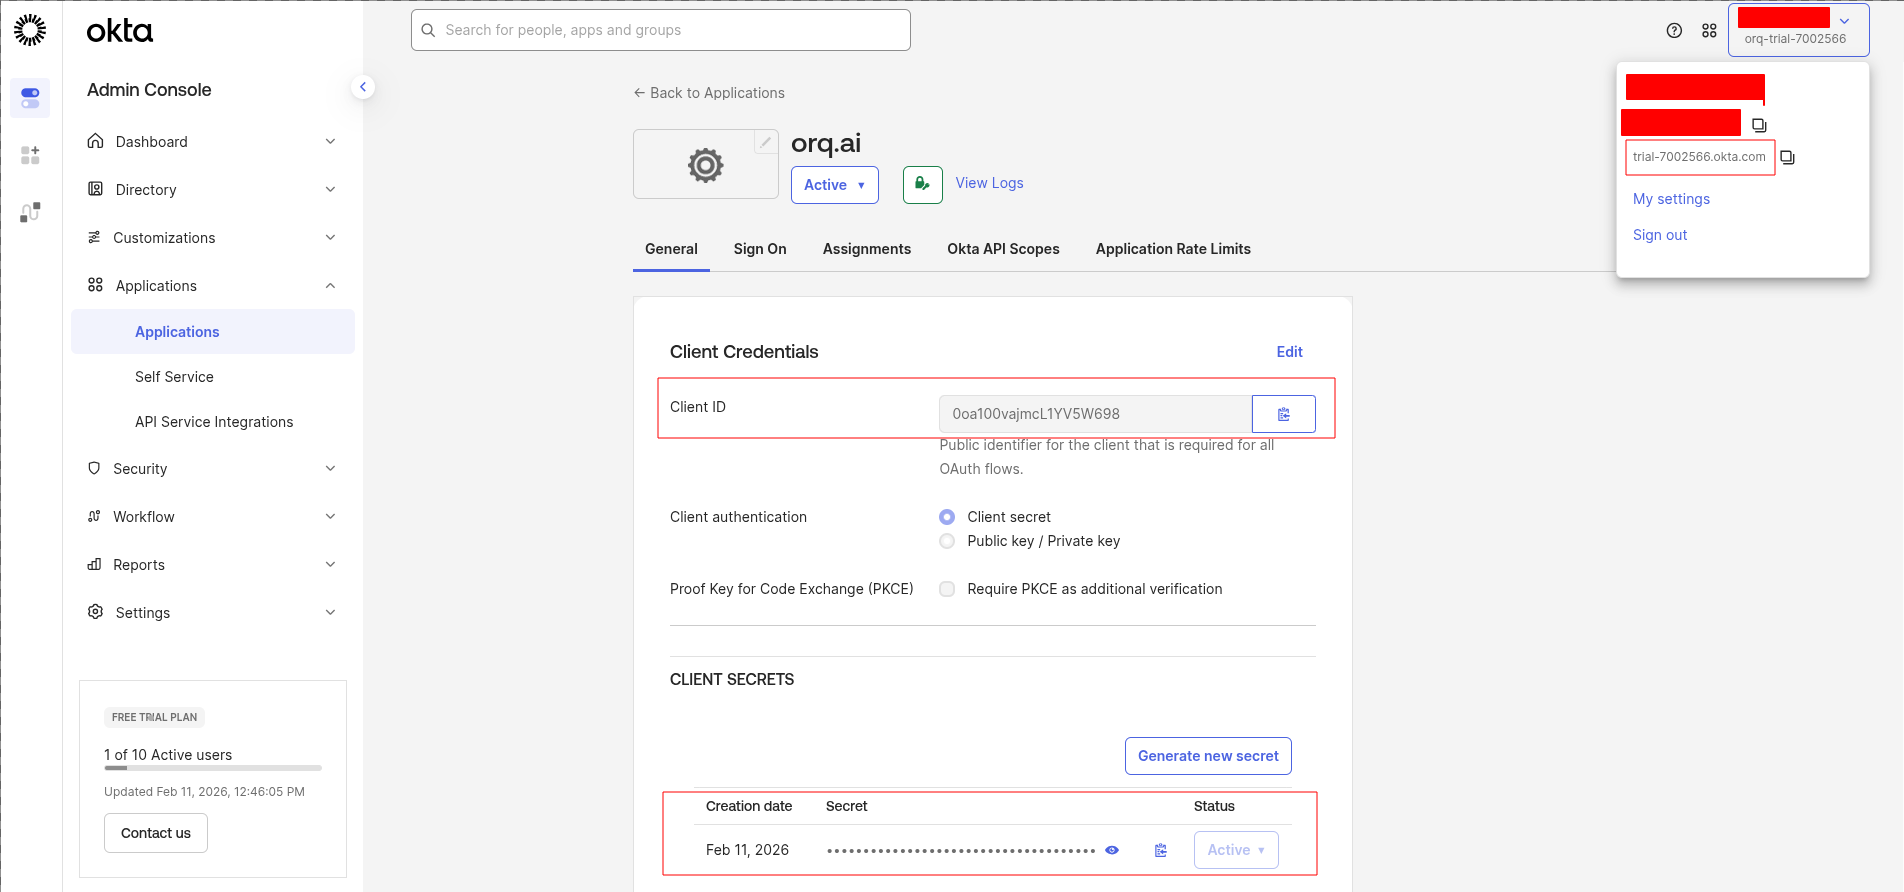 The Provider URL is the Okta domain's authorization server issuer URL:
```
https://{yourOktaDomain}/oauth2/default
```
Find the Okta domain in the top-right corner of the **Okta Admin Console** (e.g. `acme.okta.com`).
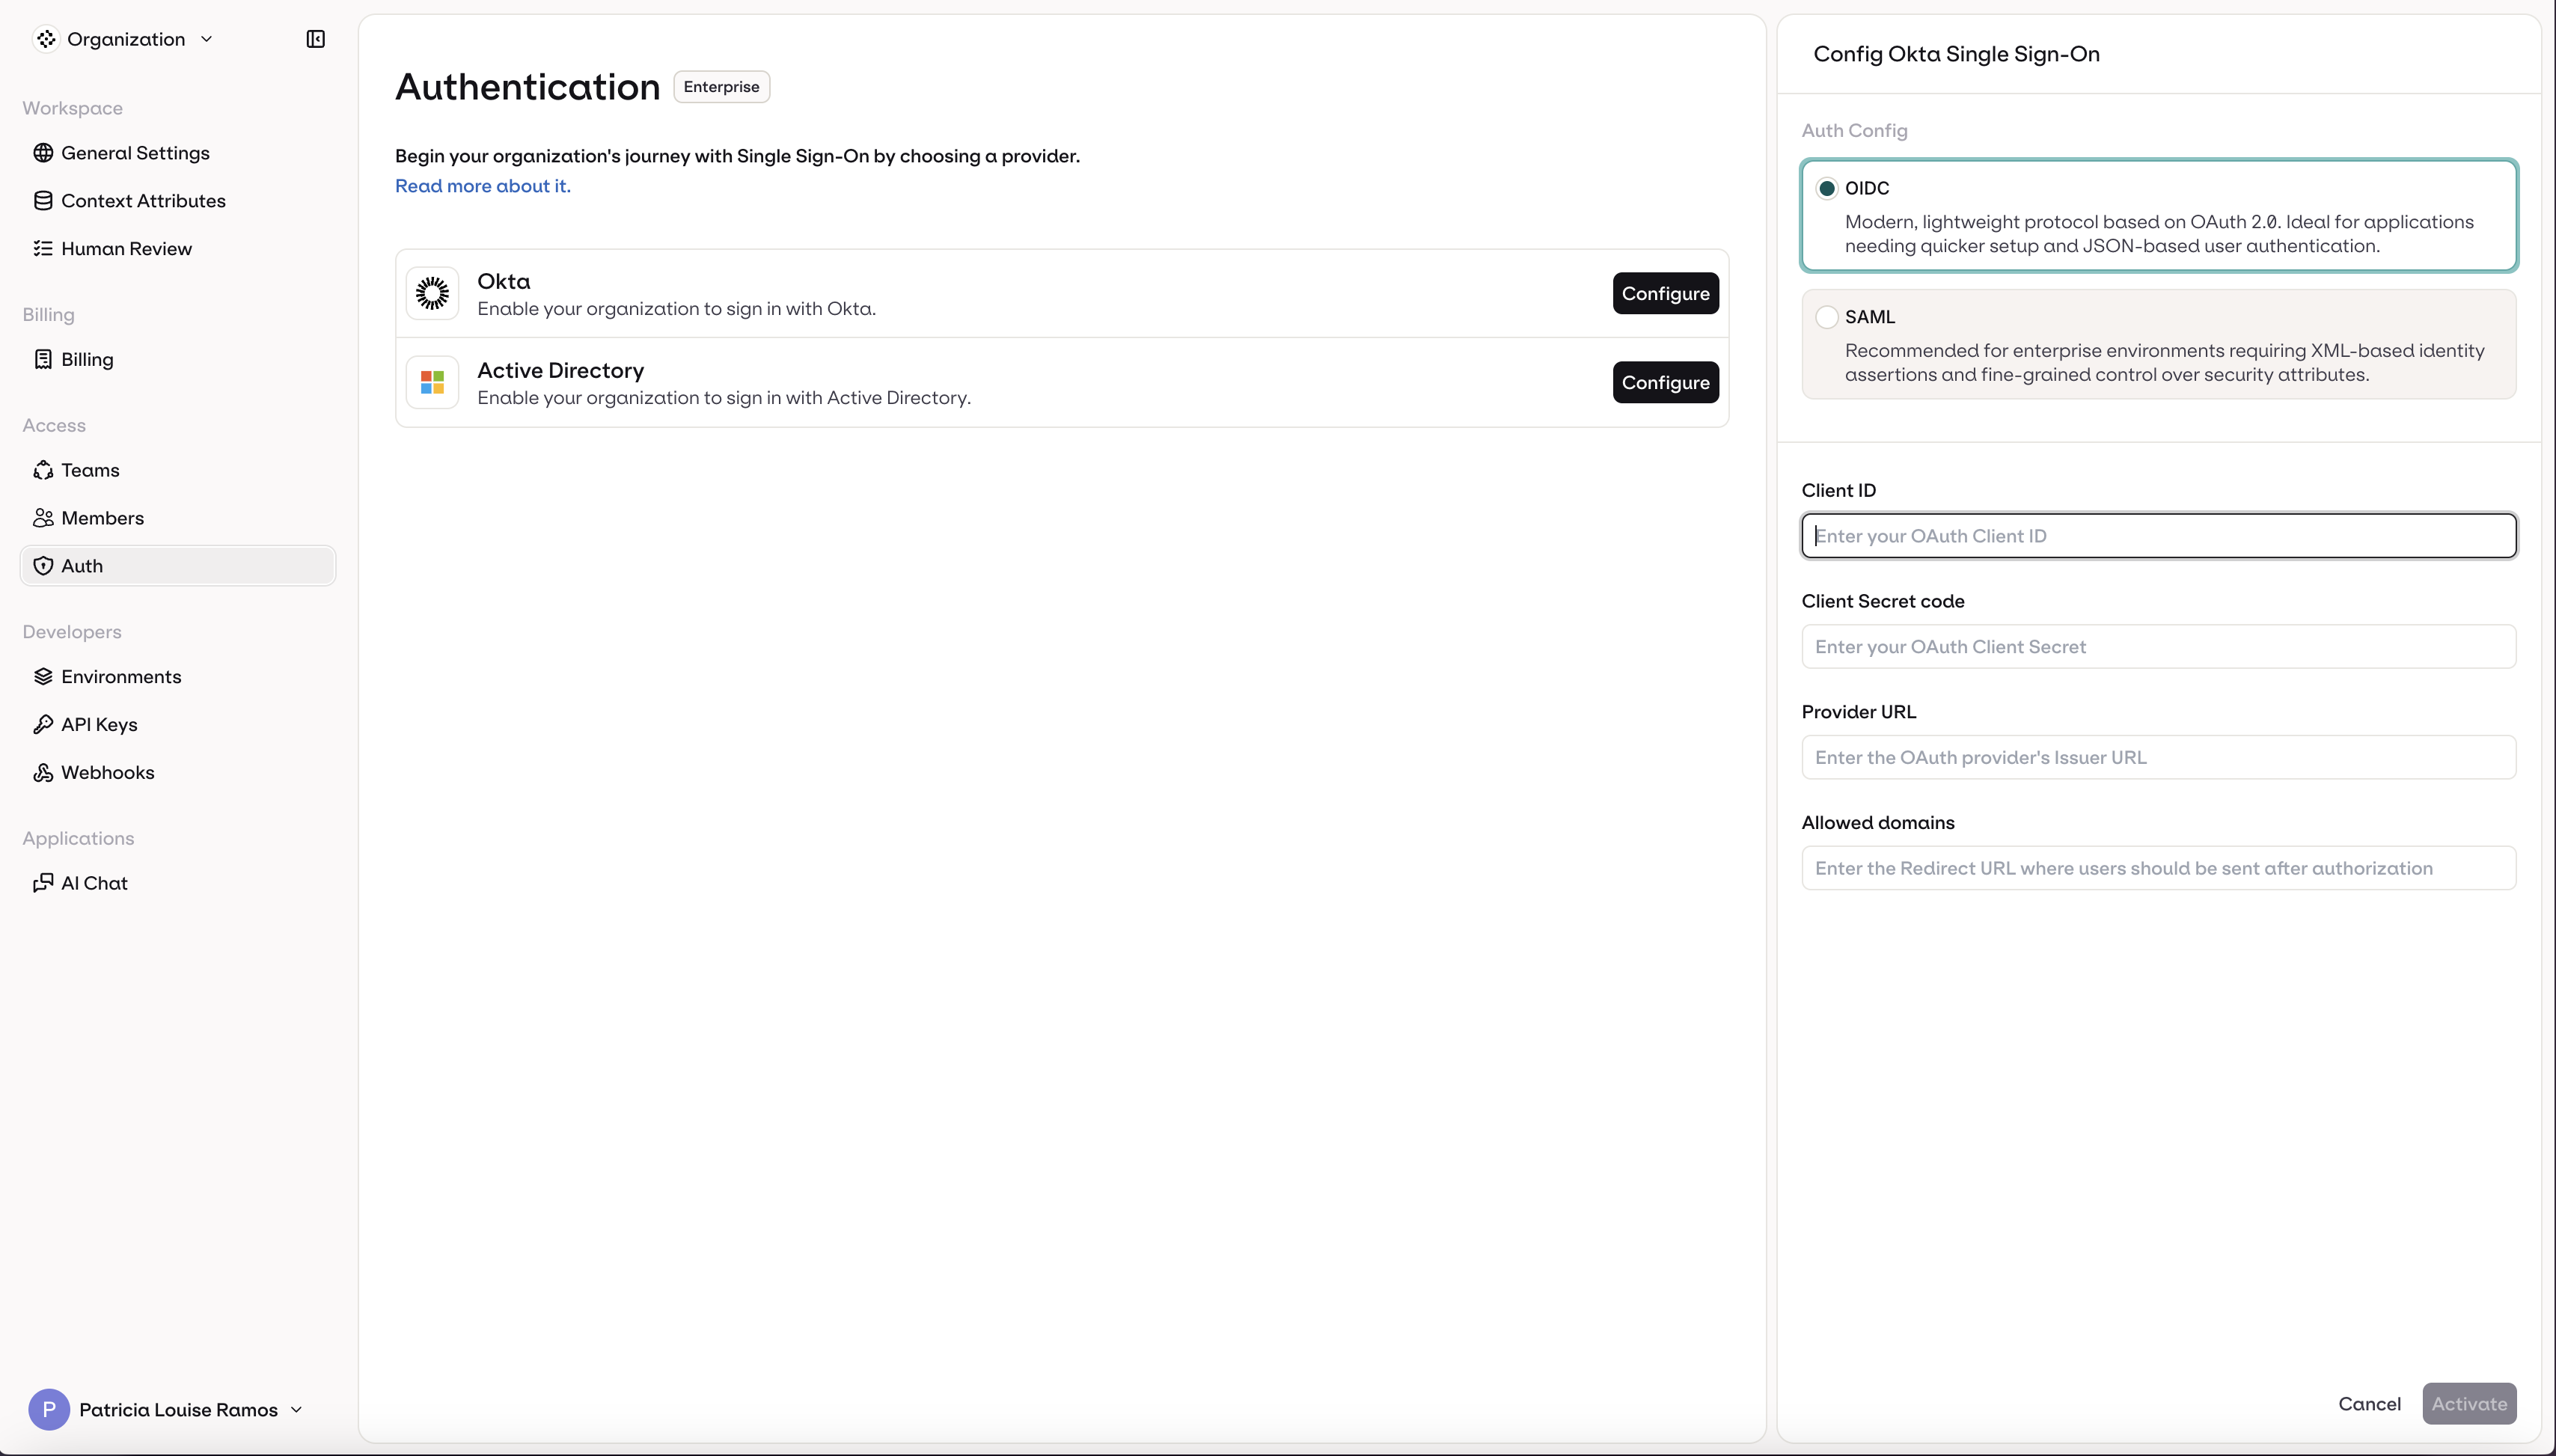
Navigate to **AI Studio** → **Organization** → **Auth**.
Enter the credentials collected from Okta:
1. Select **OIDC** (selected by default)
2. Enter the **Client ID**
3. Enter the **Client Secret**
4. Enter the **Provider URL**
5. Enter the organization's email domain(s) in **Allowed domains** (e.g., `orq.ai`)
6. Click **Activate**
The Provider URL is the Okta domain's authorization server issuer URL:
```
https://{yourOktaDomain}/oauth2/default
```
Find the Okta domain in the top-right corner of the **Okta Admin Console** (e.g. `acme.okta.com`).
Navigate to **AI Studio** → **Organization** → **Auth**.
Enter the credentials collected from Okta:
1. Select **OIDC** (selected by default)
2. Enter the **Client ID**
3. Enter the **Client Secret**
4. Enter the **Provider URL**
5. Enter the organization's email domain(s) in **Allowed domains** (e.g., `orq.ai`)
6. Click **Activate**
 SSO is now configured. Users can sign in at:
```
https://my.orq.ai/{your-workspace-key}/login
```
SSO is now configured. Users can sign in at:
```
https://my.orq.ai/{your-workspace-key}/login
```
 Choose a unique identifier for the Service Provider Entity ID. We recommend:
```
urn:orq.ai:{your-workspace-key}
```
For example, if the workspace key is `acme-corp`, use `urn:orq.ai:acme-corp`.
The SP Entity ID must match exactly in both Okta and **Orq.ai**. Write it down; it is needed in multiple steps.
In the **Okta Admin Console**, go to **Applications → Applications**.
Choose a unique identifier for the Service Provider Entity ID. We recommend:
```
urn:orq.ai:{your-workspace-key}
```
For example, if the workspace key is `acme-corp`, use `urn:orq.ai:acme-corp`.
The SP Entity ID must match exactly in both Okta and **Orq.ai**. Write it down; it is needed in multiple steps.
In the **Okta Admin Console**, go to **Applications → Applications**.
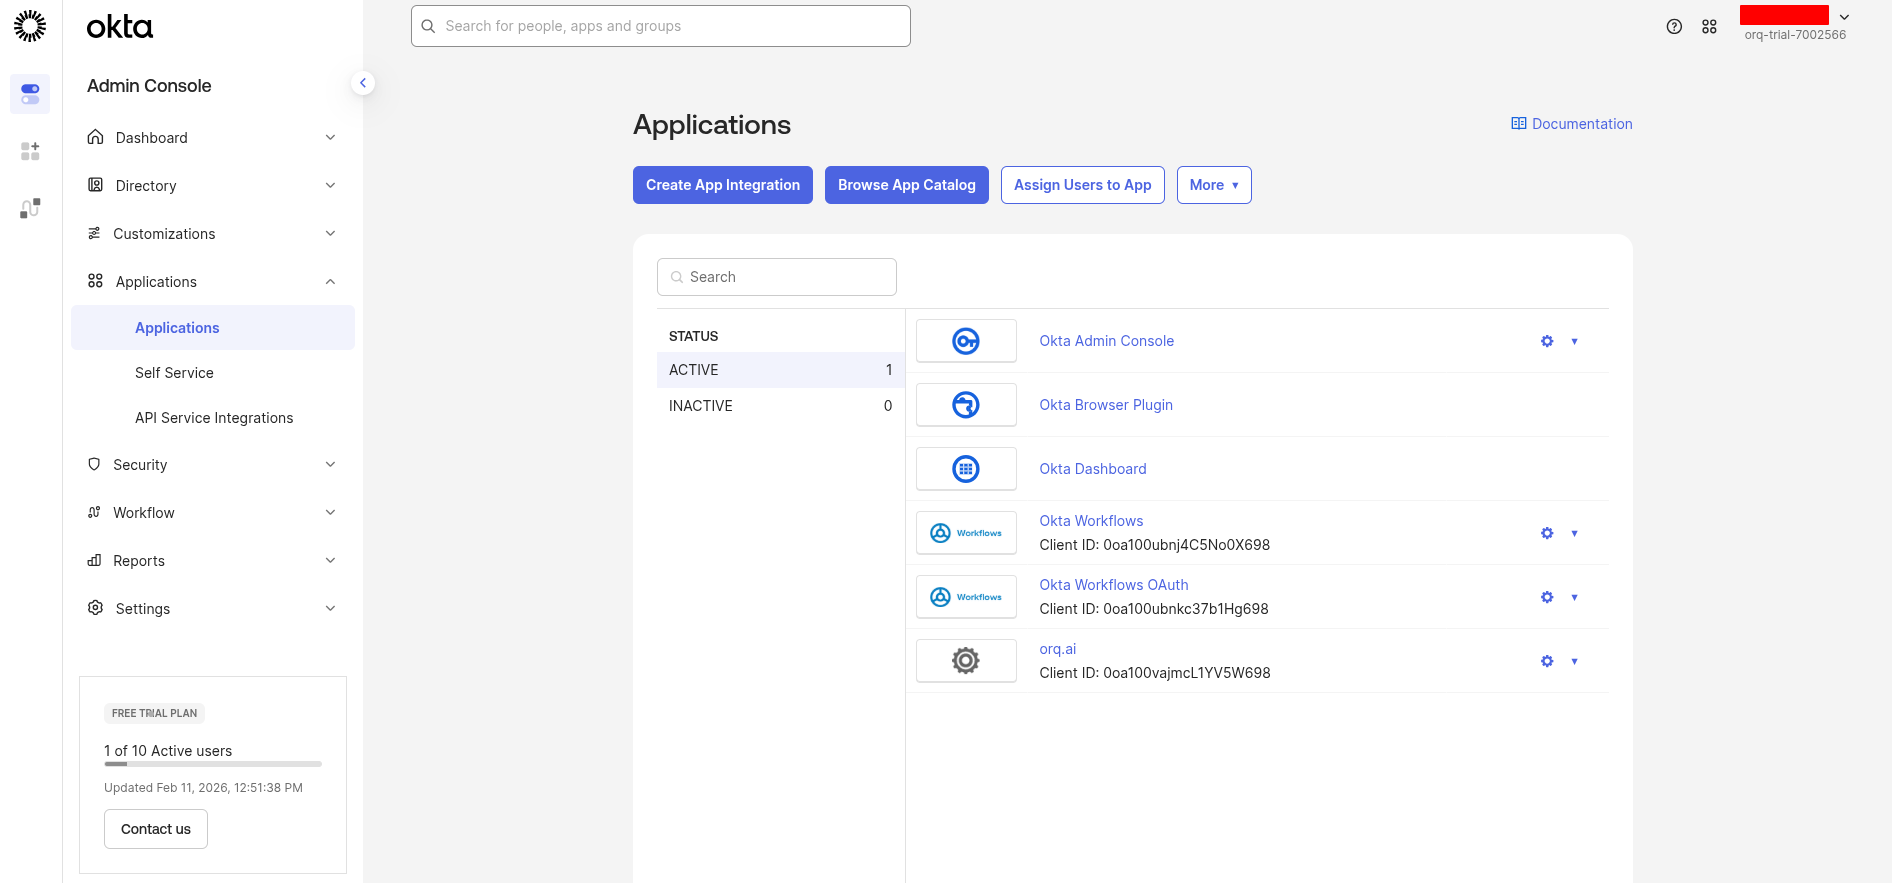 Click **Create App Integration**, select **SAML 2.0**, and click **Next**.
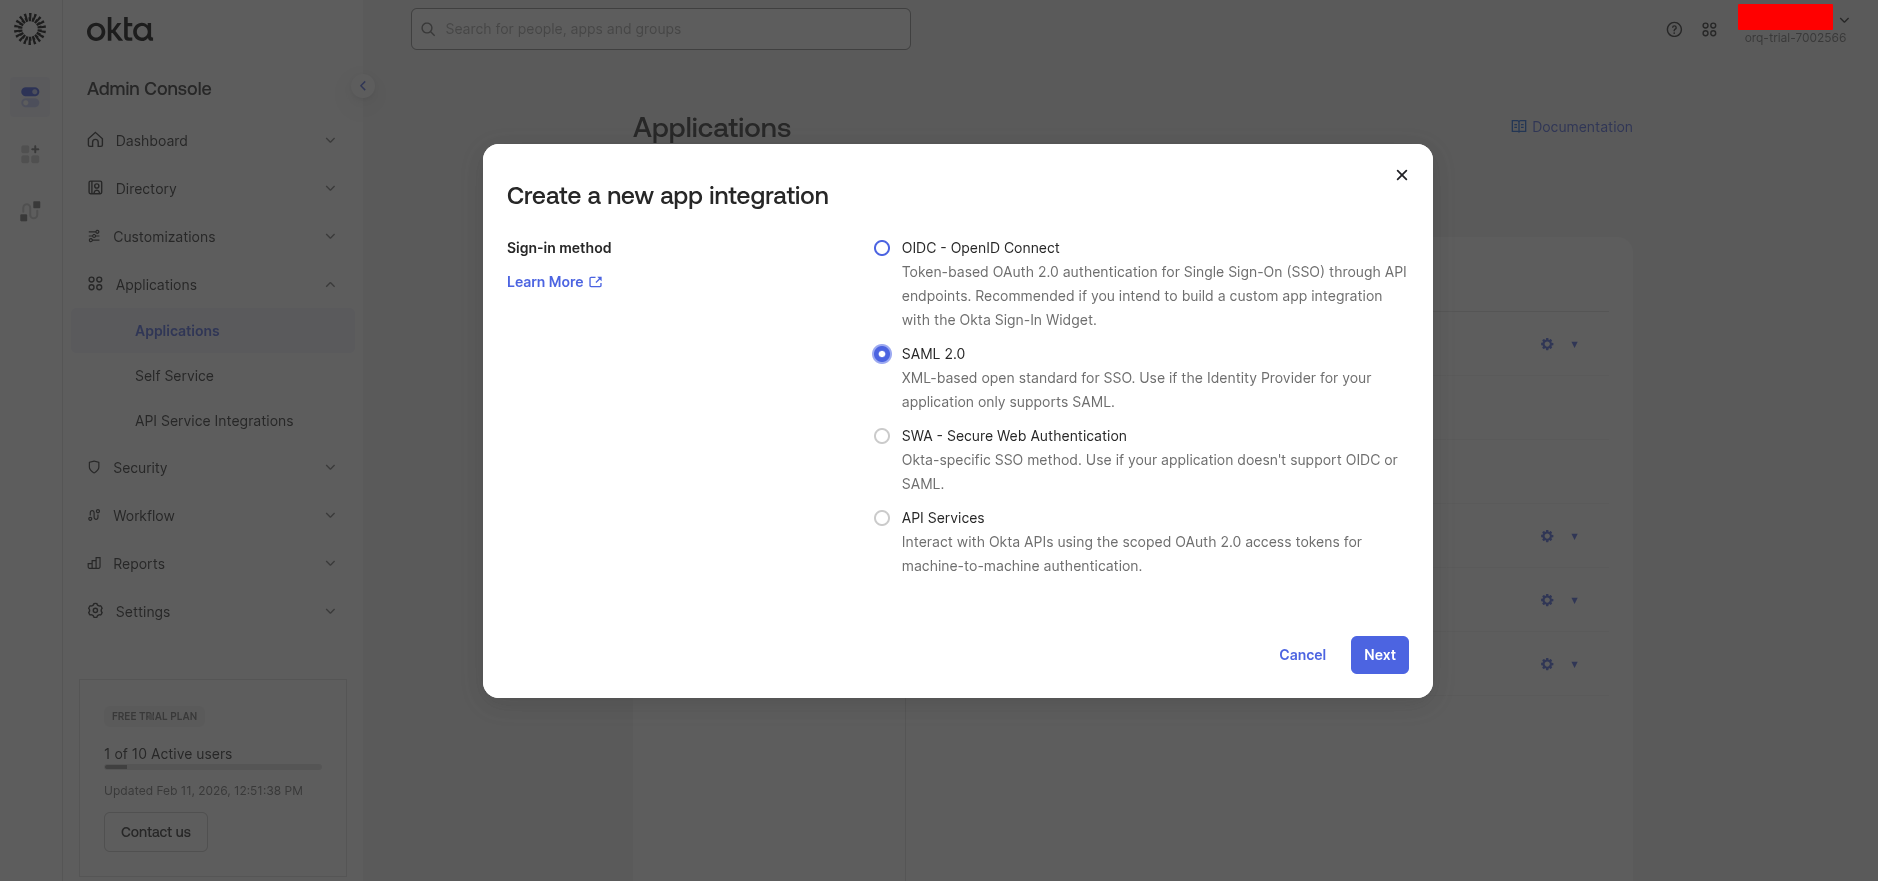 Enter a name (e.g. `Orq.ai SSO`) and click **Next**.
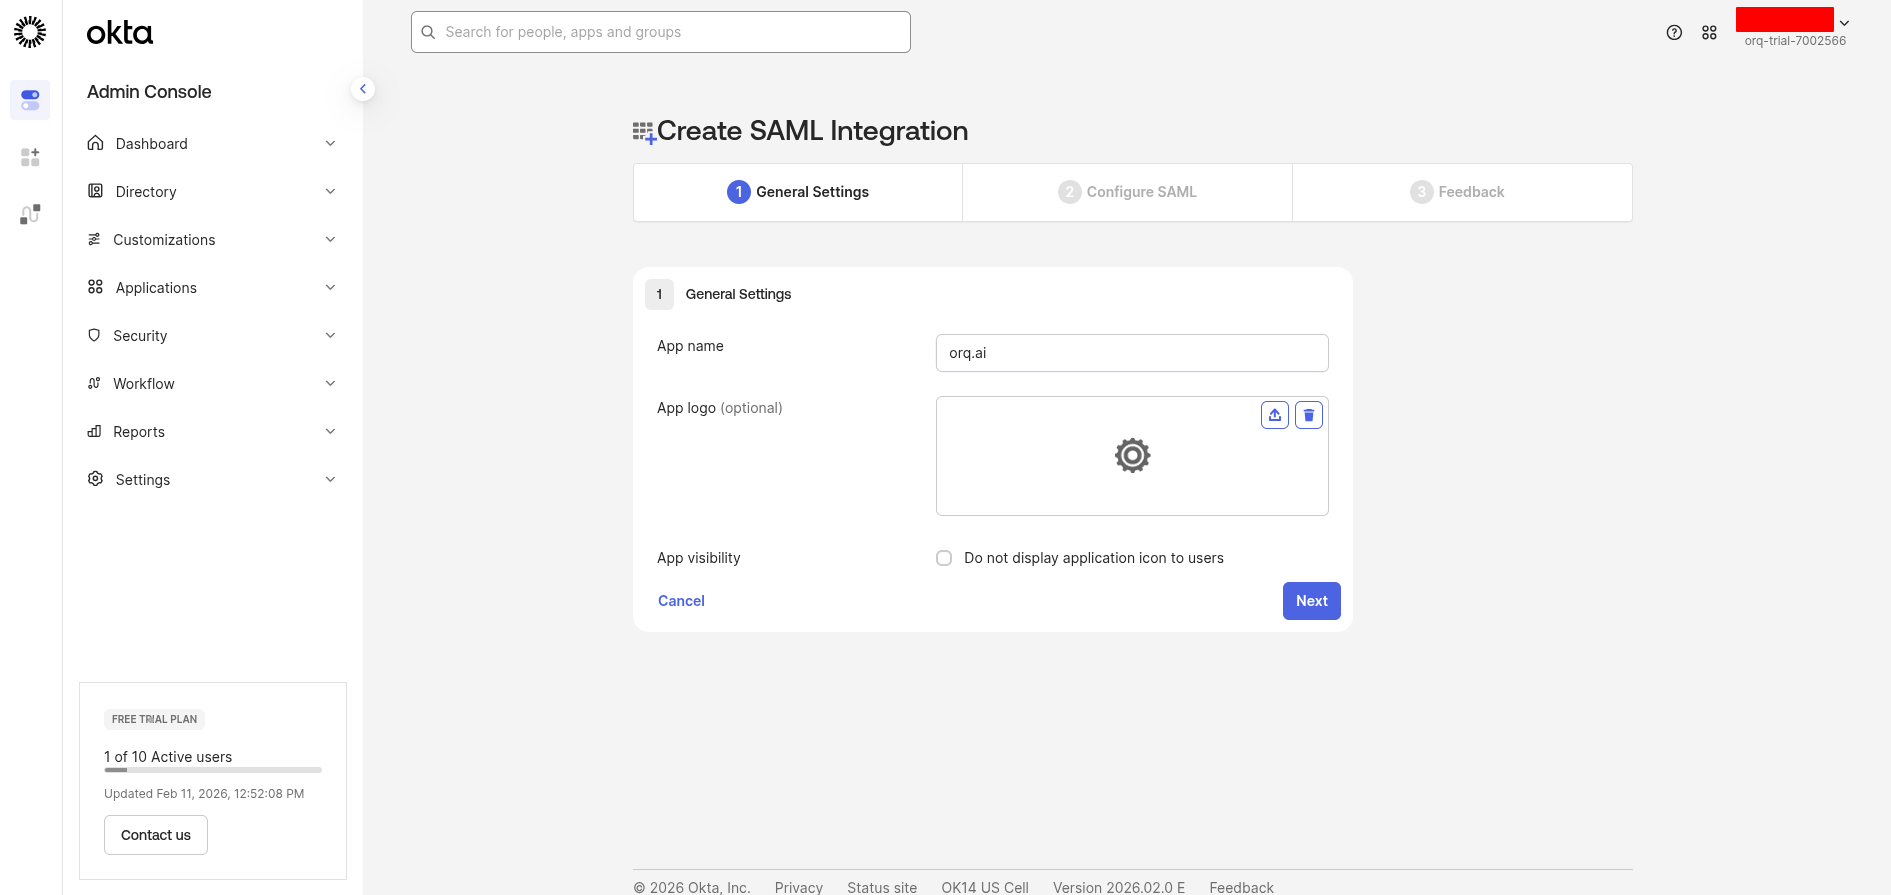 Under **SAML Settings**, enter:
* **Single sign-on URL**:
```
https://my.orq.ai/v2/auth/sso/saml/callback
```
* **Audience URI (SP Entity ID)**: the SP Entity ID defined in Step 1
* **Name ID format**: `EmailAddress`
* **Application username**: `Email`
Under **SAML Settings**, enter:
* **Single sign-on URL**:
```
https://my.orq.ai/v2/auth/sso/saml/callback
```
* **Audience URI (SP Entity ID)**: the SP Entity ID defined in Step 1
* **Name ID format**: `EmailAddress`
* **Application username**: `Email`
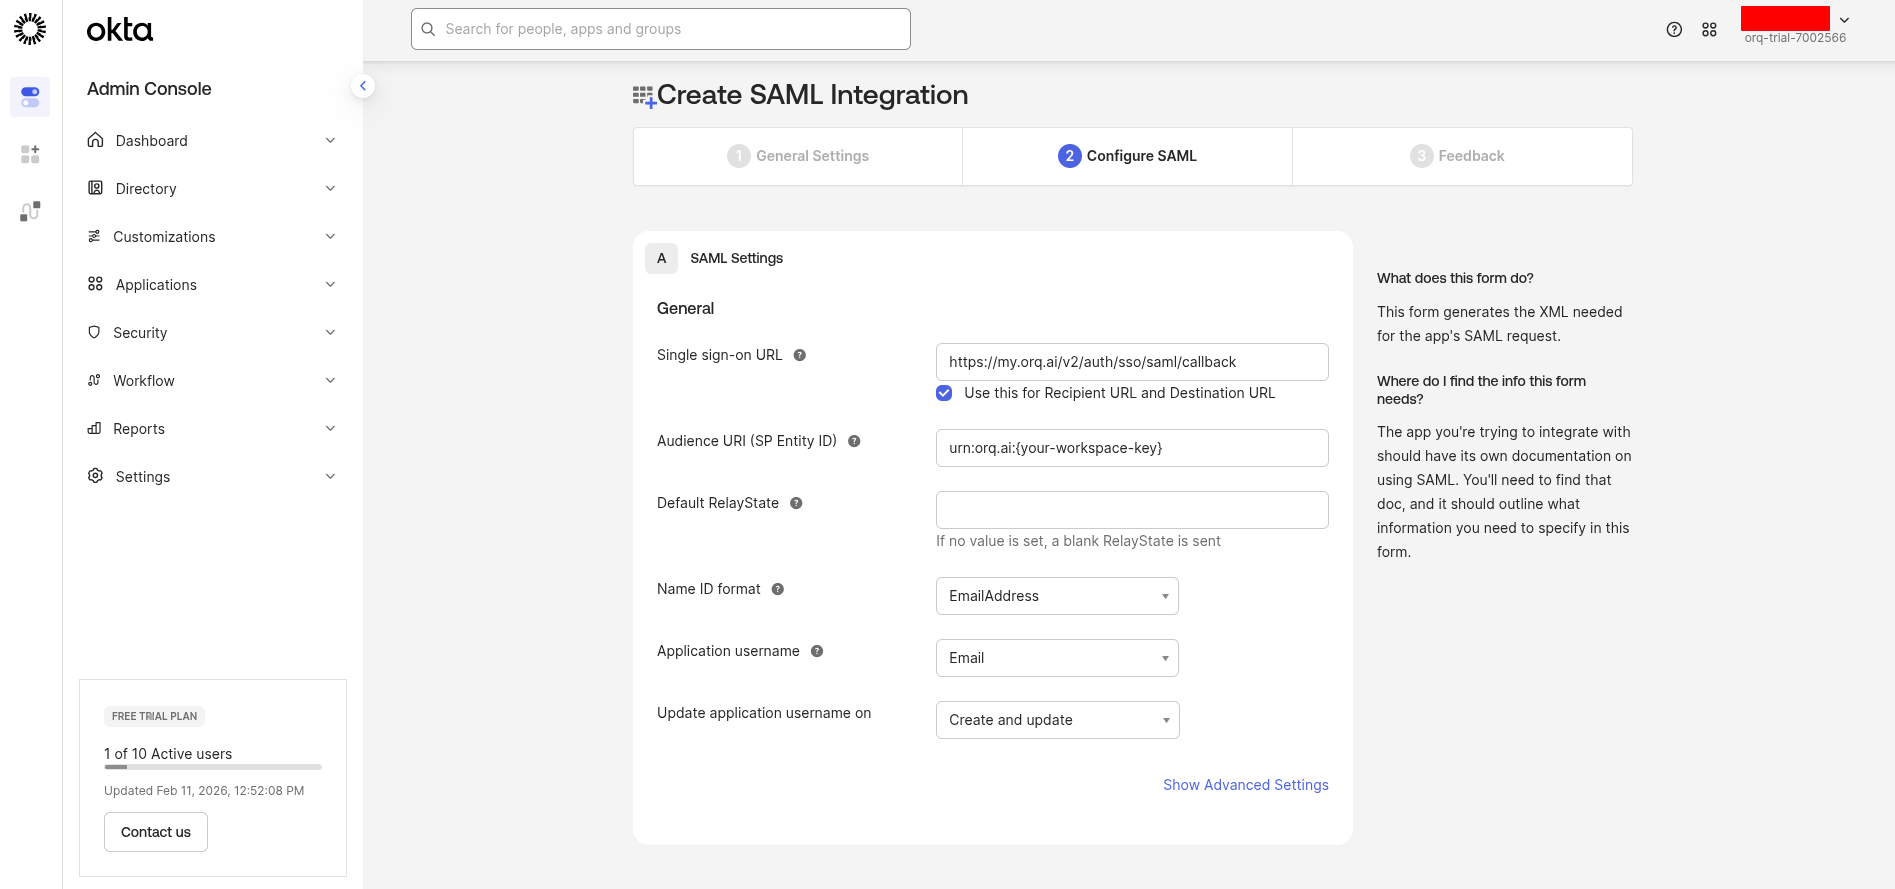 Click **Next**, then **Finish**.
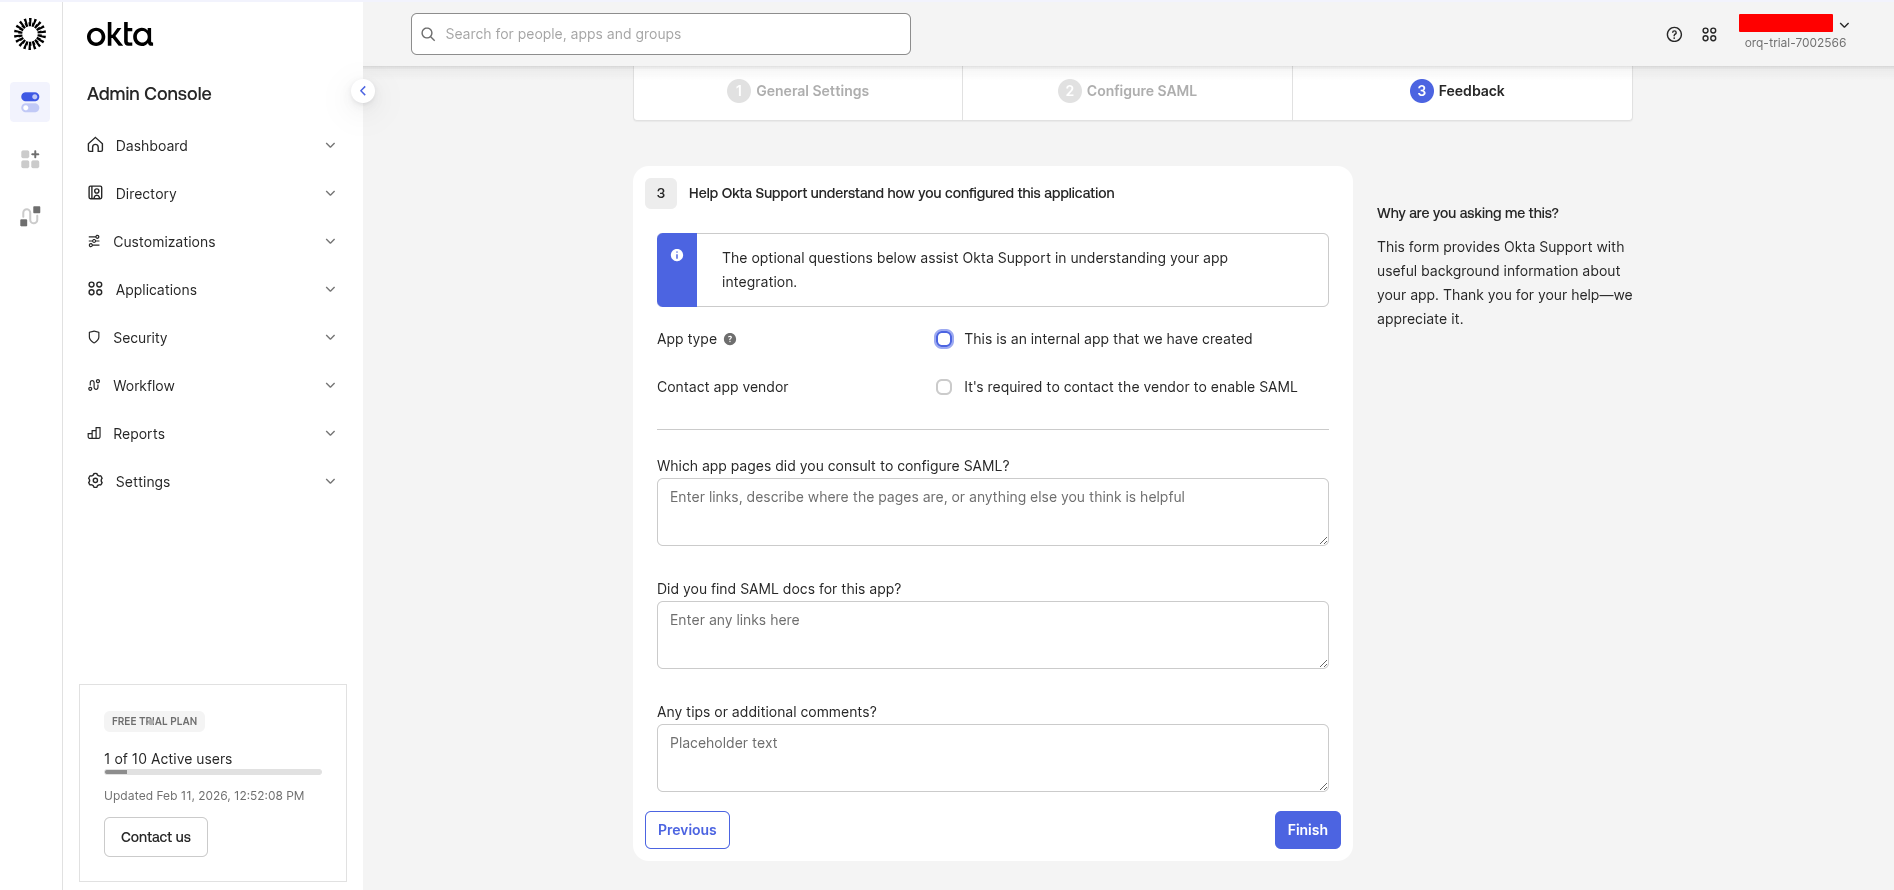 Go to the **Sign On** tab and click **Edit** in the Settings section.
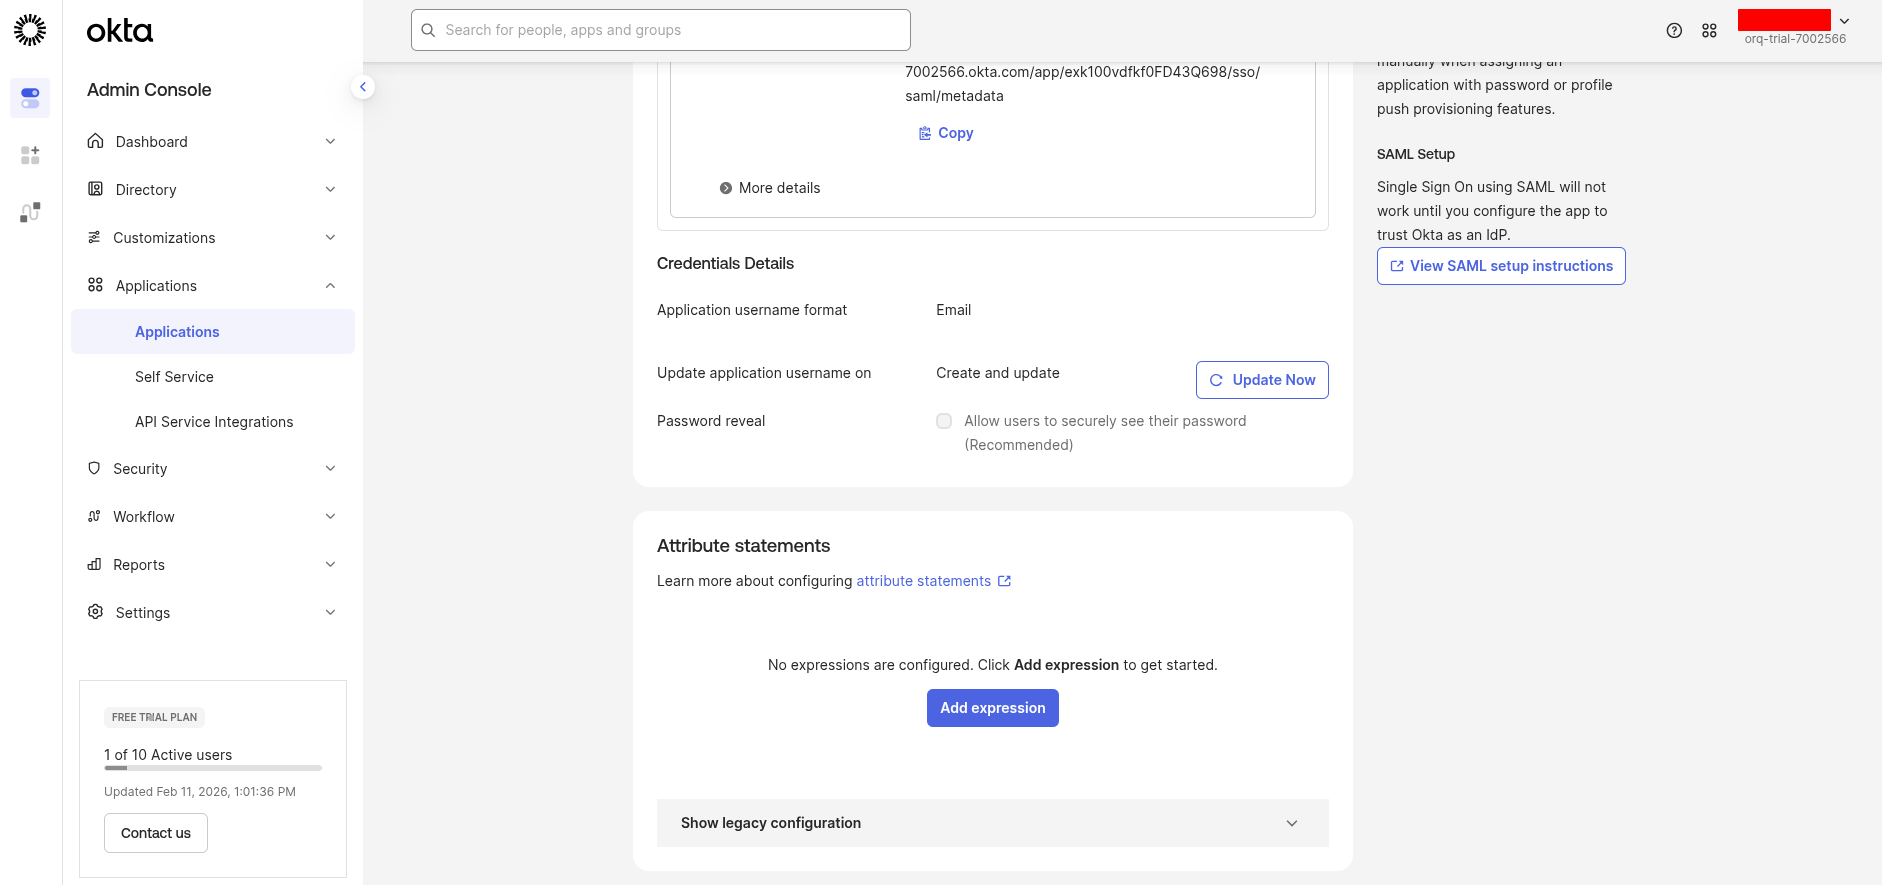 Under **Attribute Statements**, add these mappings:
| Name | Expression |
| ----------- | ---------------- |
| `email` | `user.email` |
| `firstName` | `user.firstName` |
| `lastName` | `user.lastName` |
If a **Show legacy configuration** link appears, click it and use the classic format with Name, Name format (Basic), and Value columns.
Under **Attribute Statements**, add these mappings:
| Name | Expression |
| ----------- | ---------------- |
| `email` | `user.email` |
| `firstName` | `user.firstName` |
| `lastName` | `user.lastName` |
If a **Show legacy configuration** link appears, click it and use the classic format with Name, Name format (Basic), and Value columns.
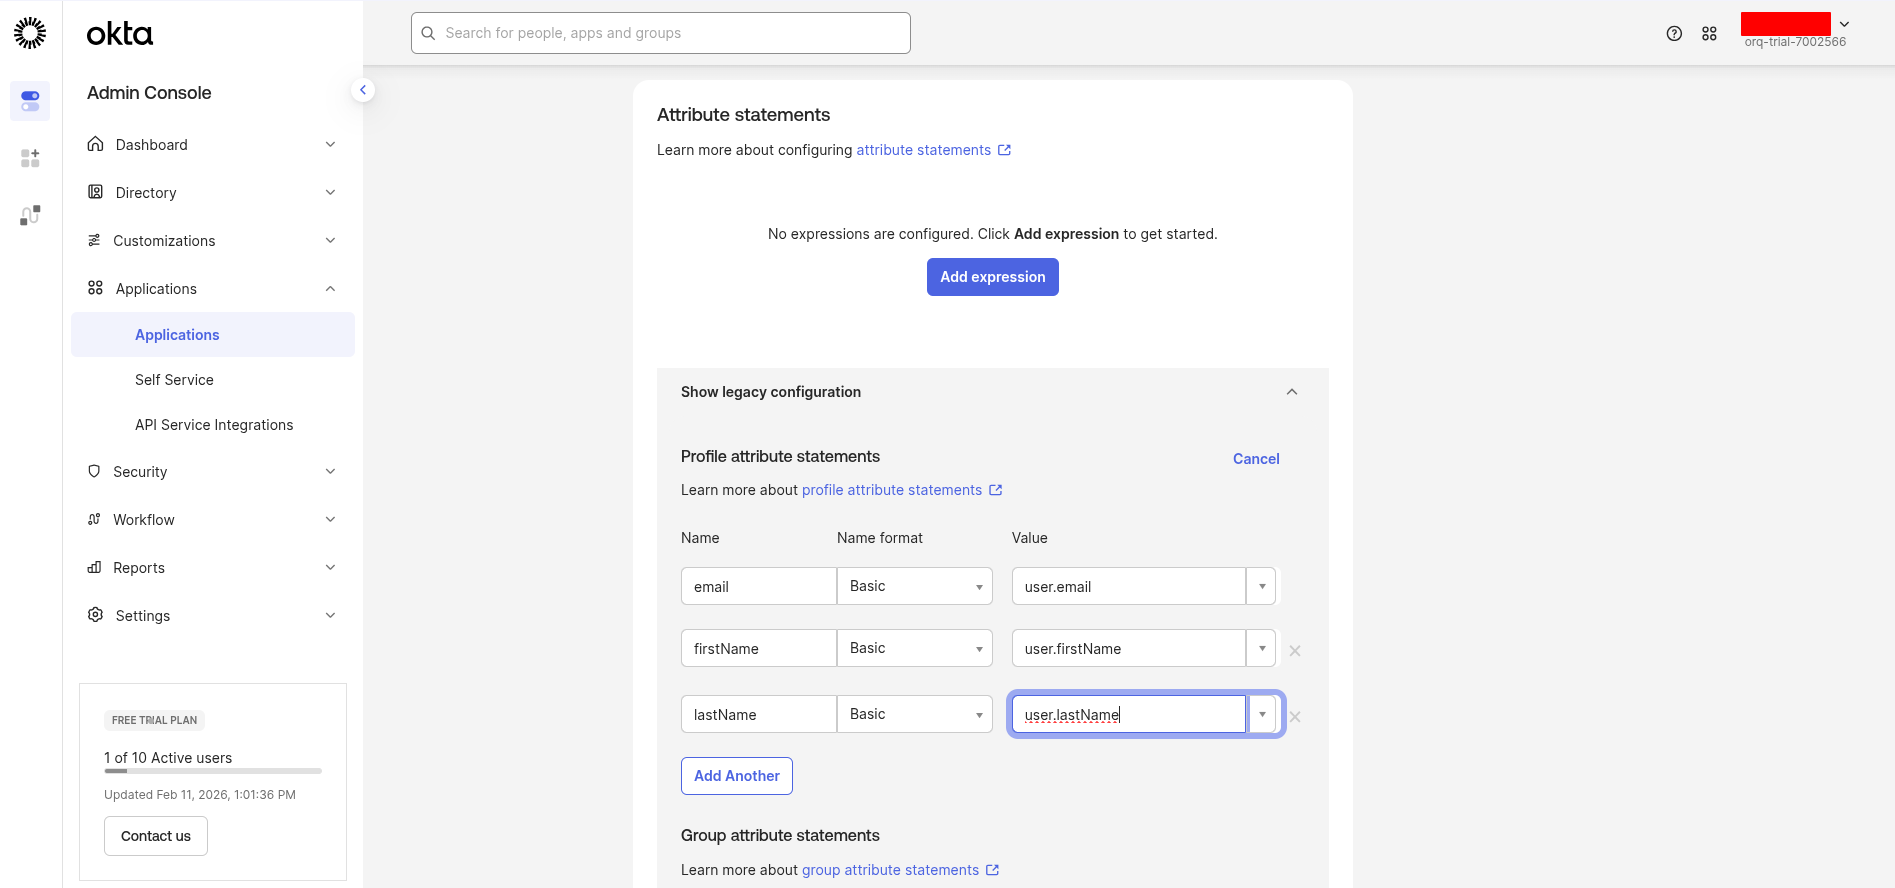 Click **Save**.
These attribute mappings are required for SAML to work correctly with **Orq.ai**.
In the **Sign On** tab, under **Settings**, click **Edit** to reveal the **Metadata details**.
Collect these values:
| Okta Field | Use in Orq.ai as |
| ------------------------------- | -------------------------------- |
| **Sign on URL** | **Single Sign-On URL** |
| **Issuer** | **Identity Provider Entity ID** |
| **Signing Certificate (X.509)** | **X.509 Certificate** (download) |
Click **Save**.
These attribute mappings are required for SAML to work correctly with **Orq.ai**.
In the **Sign On** tab, under **Settings**, click **Edit** to reveal the **Metadata details**.
Collect these values:
| Okta Field | Use in Orq.ai as |
| ------------------------------- | -------------------------------- |
| **Sign on URL** | **Single Sign-On URL** |
| **Issuer** | **Identity Provider Entity ID** |
| **Signing Certificate (X.509)** | **X.509 Certificate** (download) |
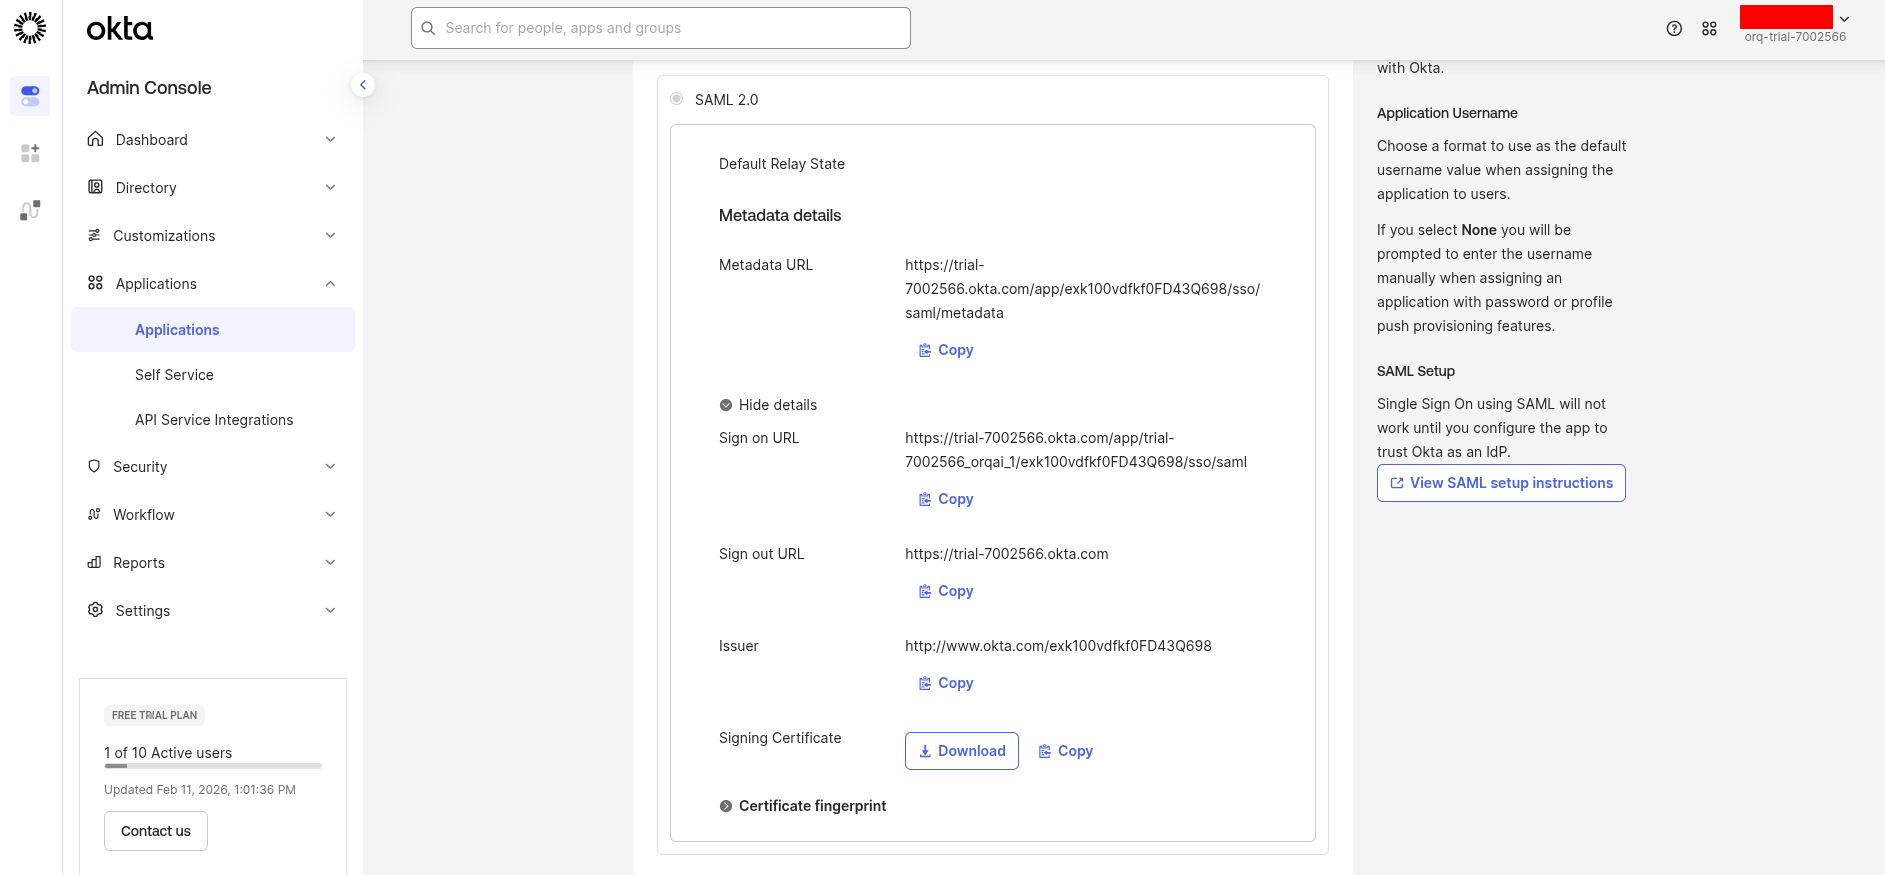 Go to the **Assignments** tab and click Assign → Assign to People or Assign to Groups.
Select the users or groups that should have access, then click Done.
Go to the **Assignments** tab and click Assign → Assign to People or Assign to Groups.
Select the users or groups that should have access, then click Done.
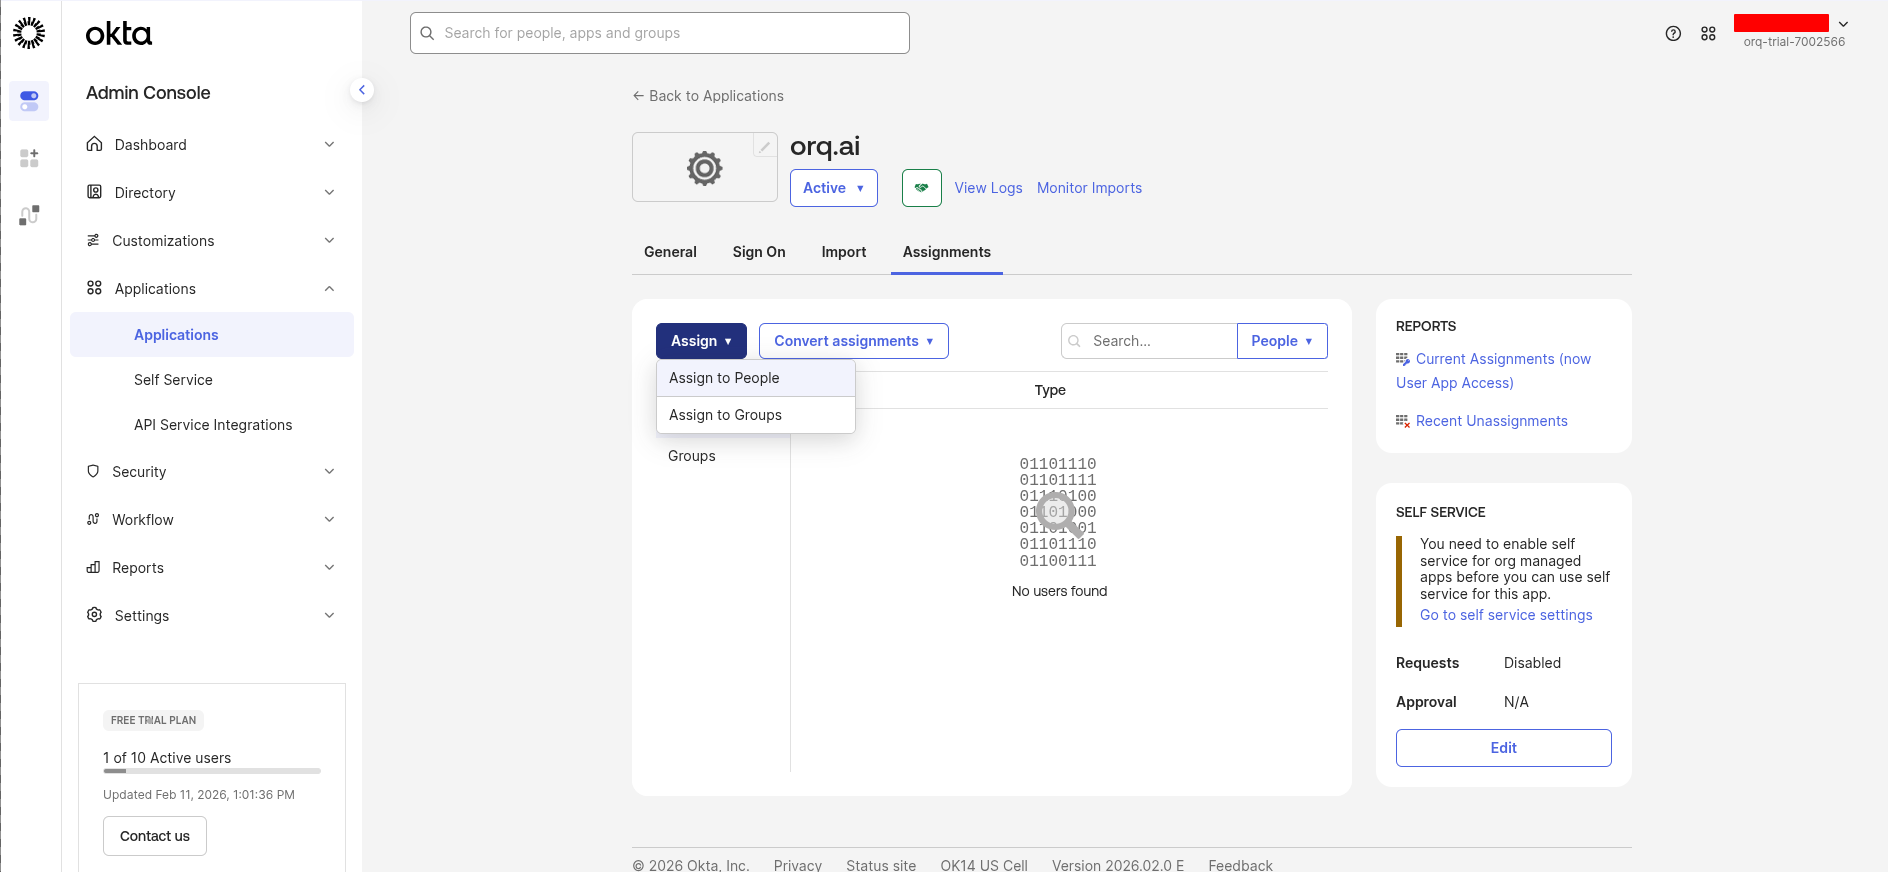 By default, no users are assigned to a new Okta app.
Navigate to **AI Studio** → **Organization** → **Auth**.
Enter the credentials collected from Okta:
1. Select **SAML**
2. Enter the **Service Provider Entity ID** (from Step 1)
3. Enter the **Identity Provider Entity ID** (Issuer from Okta)
4. Enter the **Single Sign-On URL** (Sign on URL from Okta)
5. For **X.509 Certificate**: open the downloaded certificate file in a text editor, copy all content including the `-----BEGIN CERTIFICATE-----` and `-----END CERTIFICATE-----` lines, and paste it here
6. Enter the organization's email domain(s) in **Allowed domains** (e.g., `orq.ai`)
7. Click **Activate**
By default, no users are assigned to a new Okta app.
Navigate to **AI Studio** → **Organization** → **Auth**.
Enter the credentials collected from Okta:
1. Select **SAML**
2. Enter the **Service Provider Entity ID** (from Step 1)
3. Enter the **Identity Provider Entity ID** (Issuer from Okta)
4. Enter the **Single Sign-On URL** (Sign on URL from Okta)
5. For **X.509 Certificate**: open the downloaded certificate file in a text editor, copy all content including the `-----BEGIN CERTIFICATE-----` and `-----END CERTIFICATE-----` lines, and paste it here
6. Enter the organization's email domain(s) in **Allowed domains** (e.g., `orq.ai`)
7. Click **Activate**
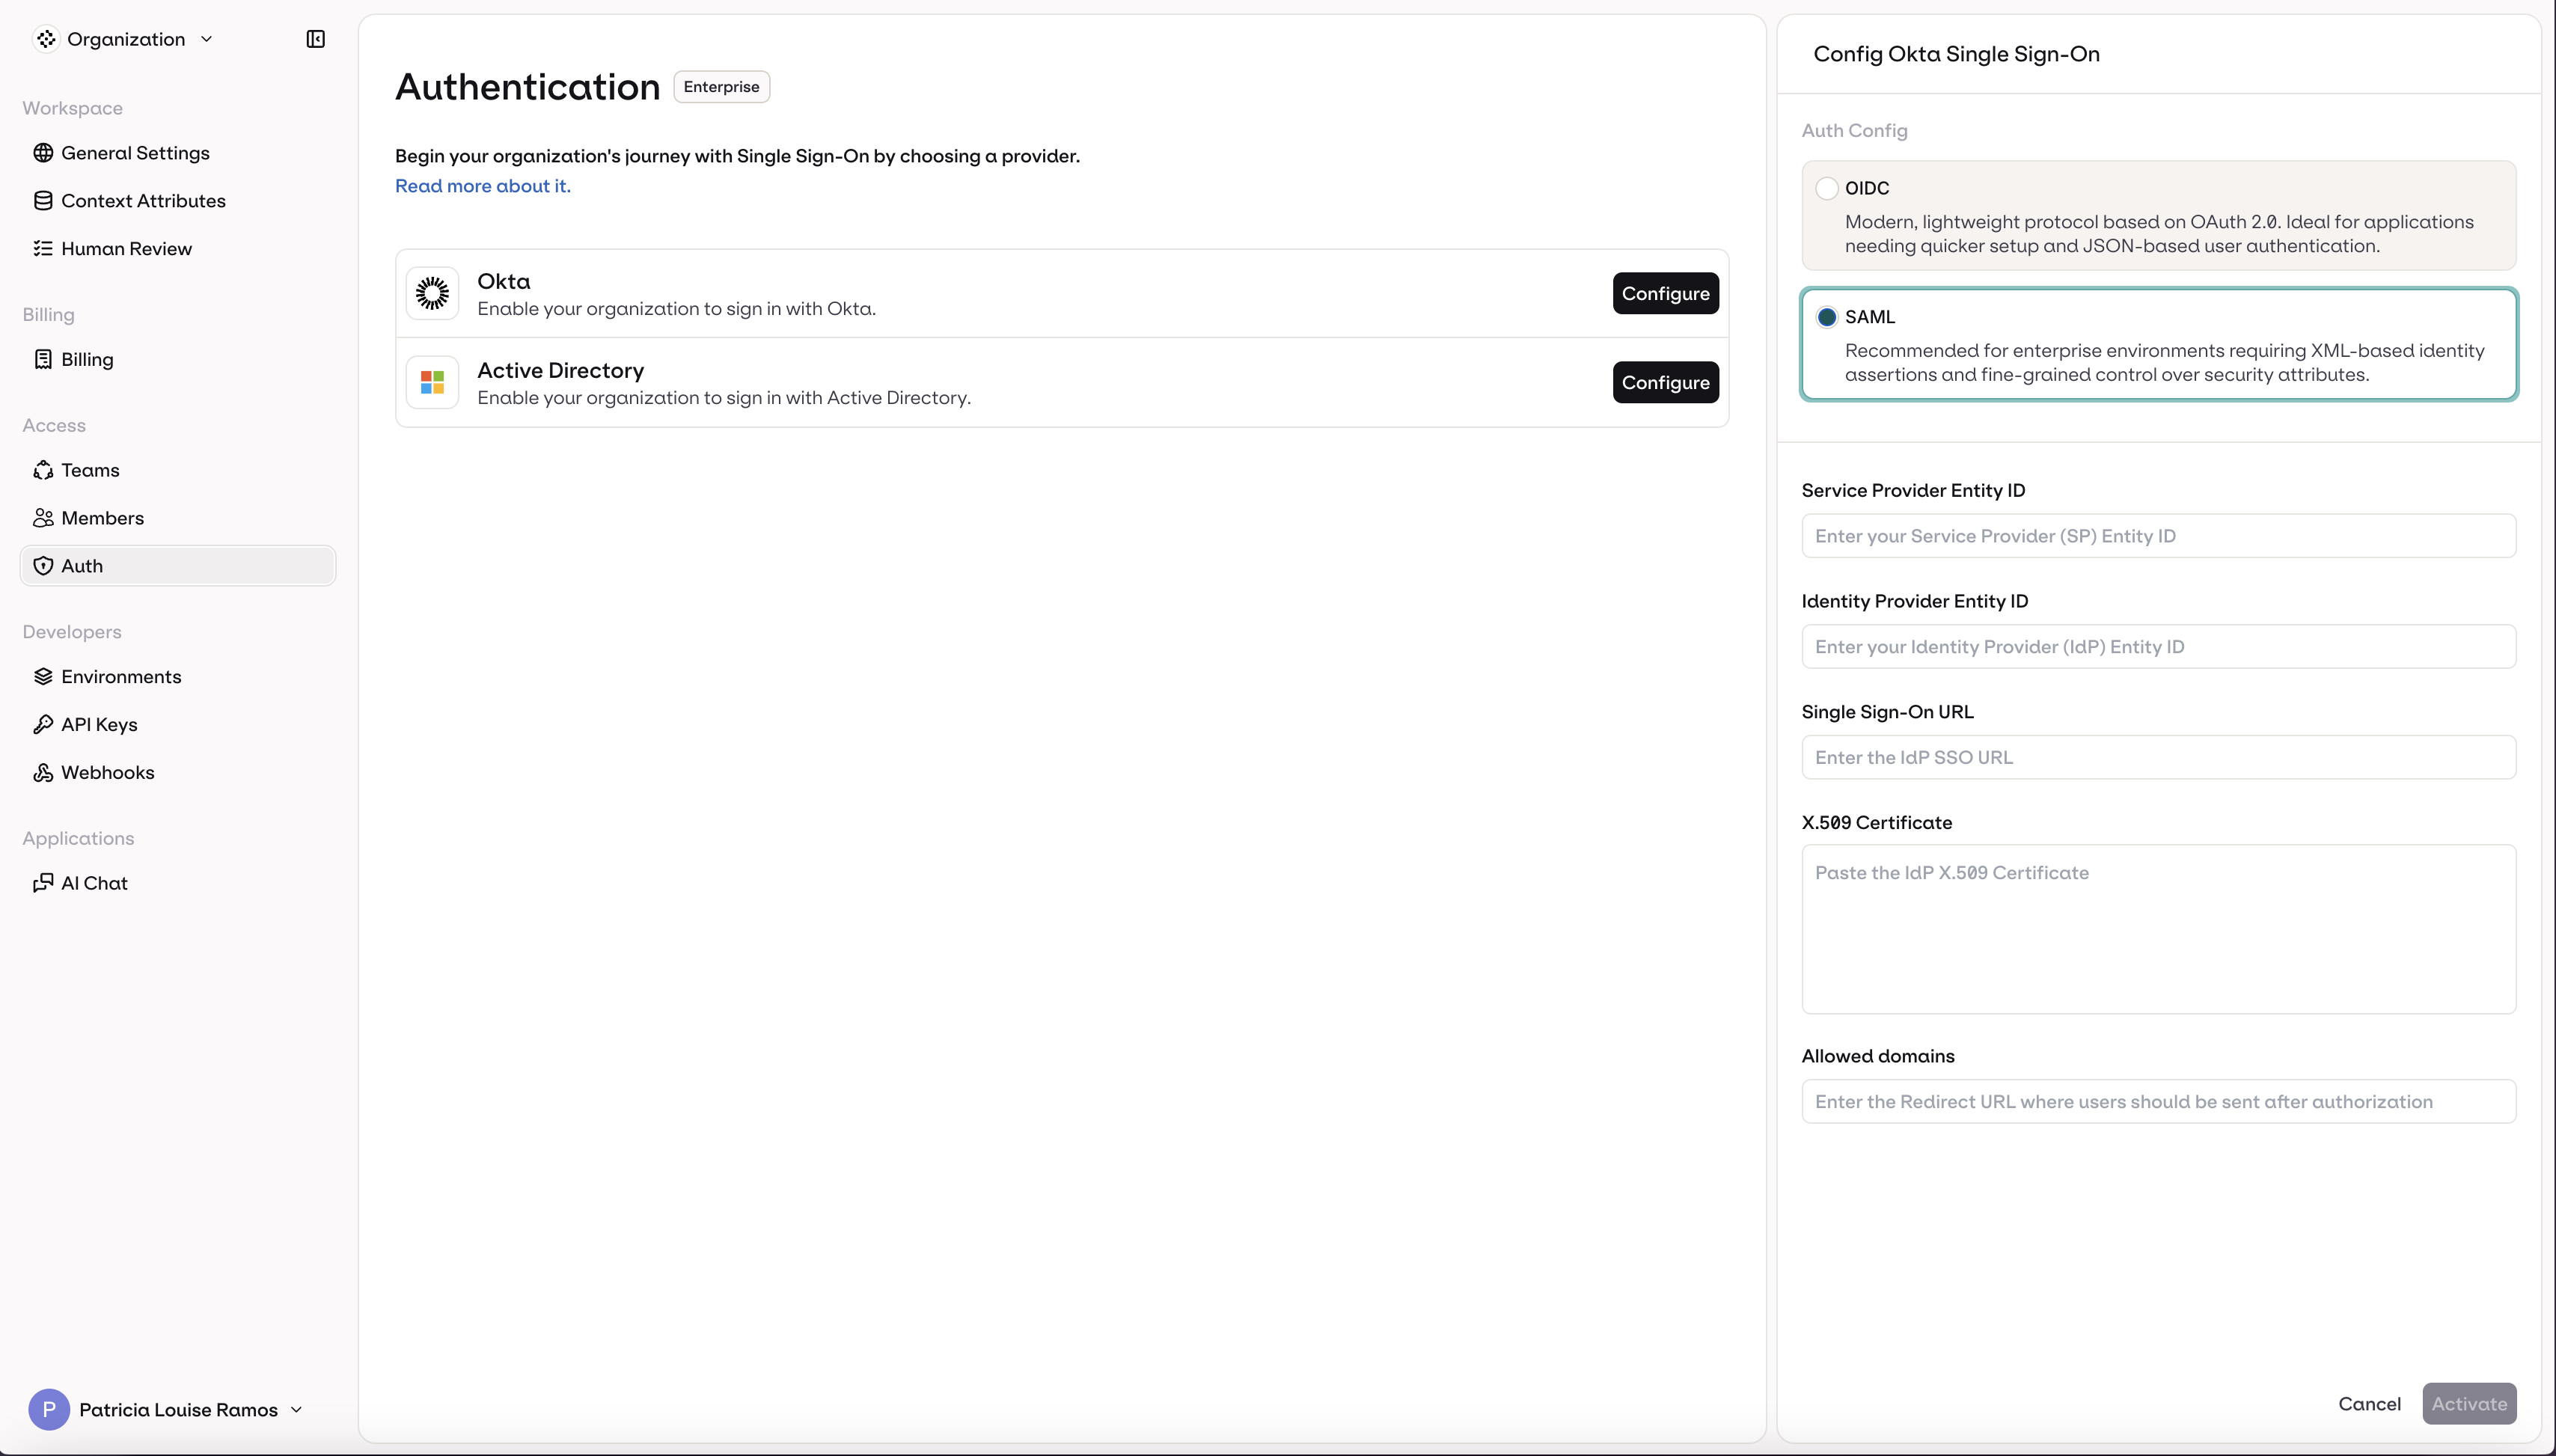 SSO is now configured. Users can sign in at:
```
https://my.orq.ai/{your-workspace-key}/login
```
Sign in to the [Azure portal](https://entra.microsoft.com) and navigate to **Microsoft Entra ID → App registrations**.
SSO is now configured. Users can sign in at:
```
https://my.orq.ai/{your-workspace-key}/login
```
Sign in to the [Azure portal](https://entra.microsoft.com) and navigate to **Microsoft Entra ID → App registrations**.
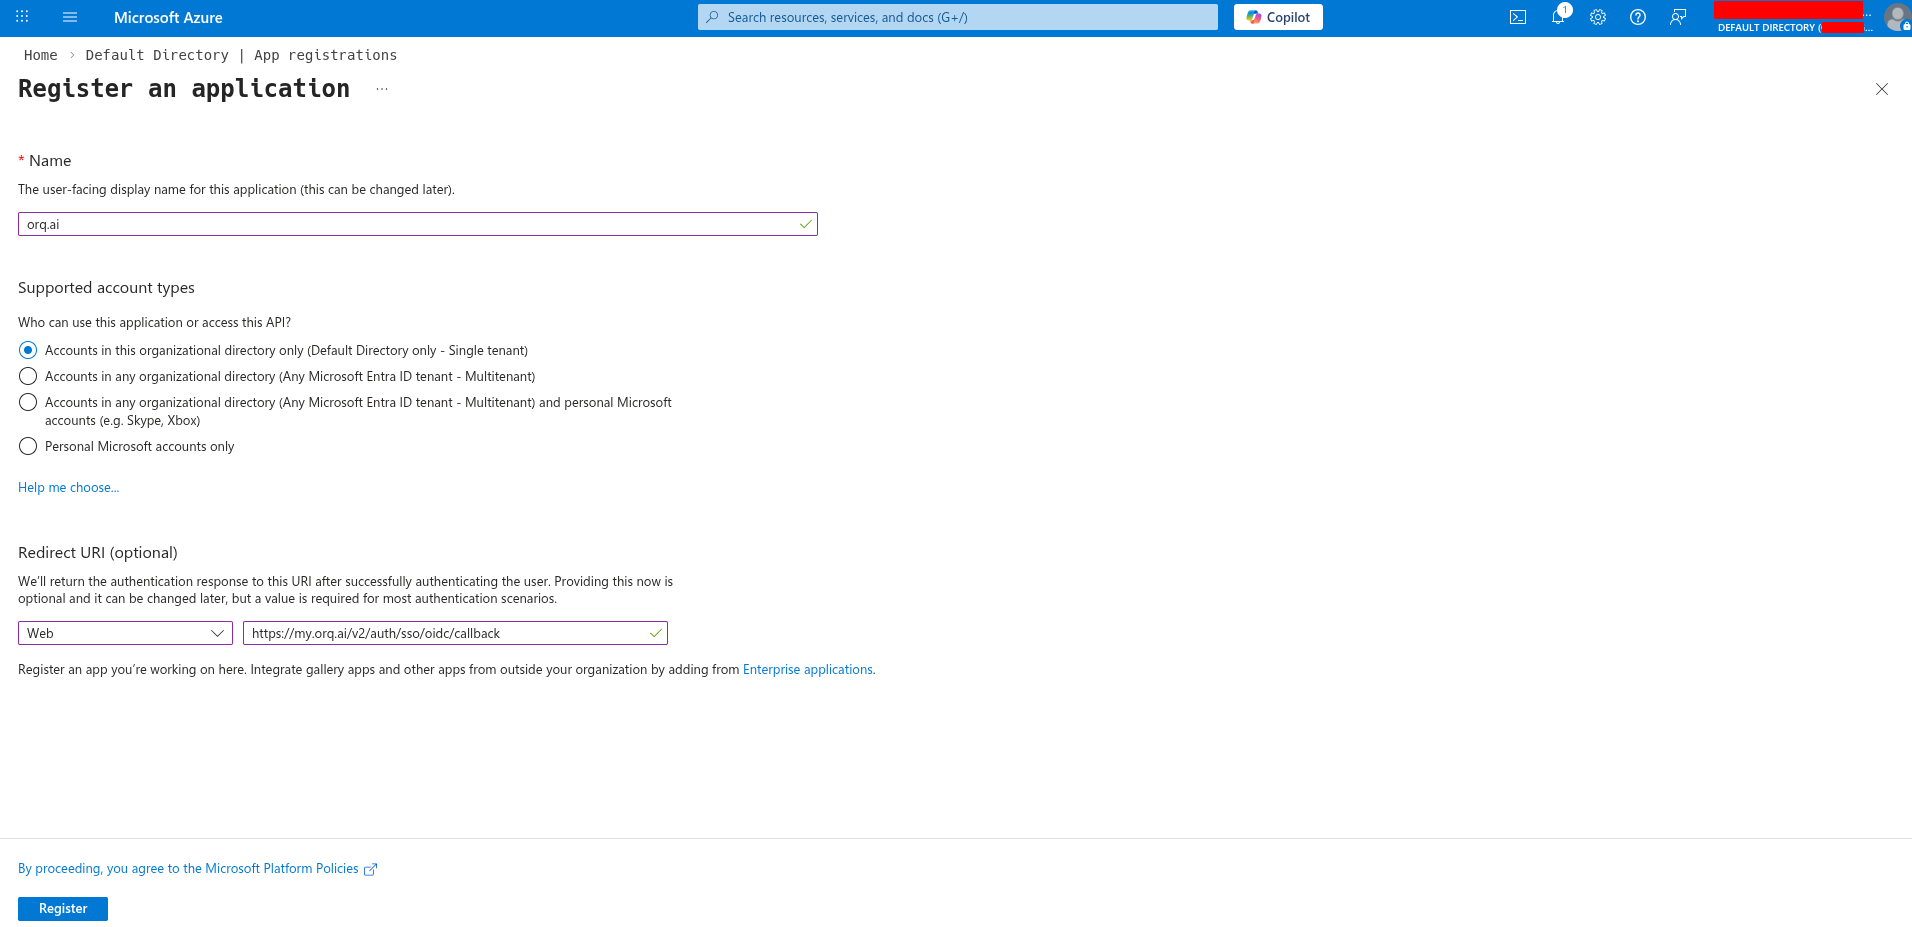
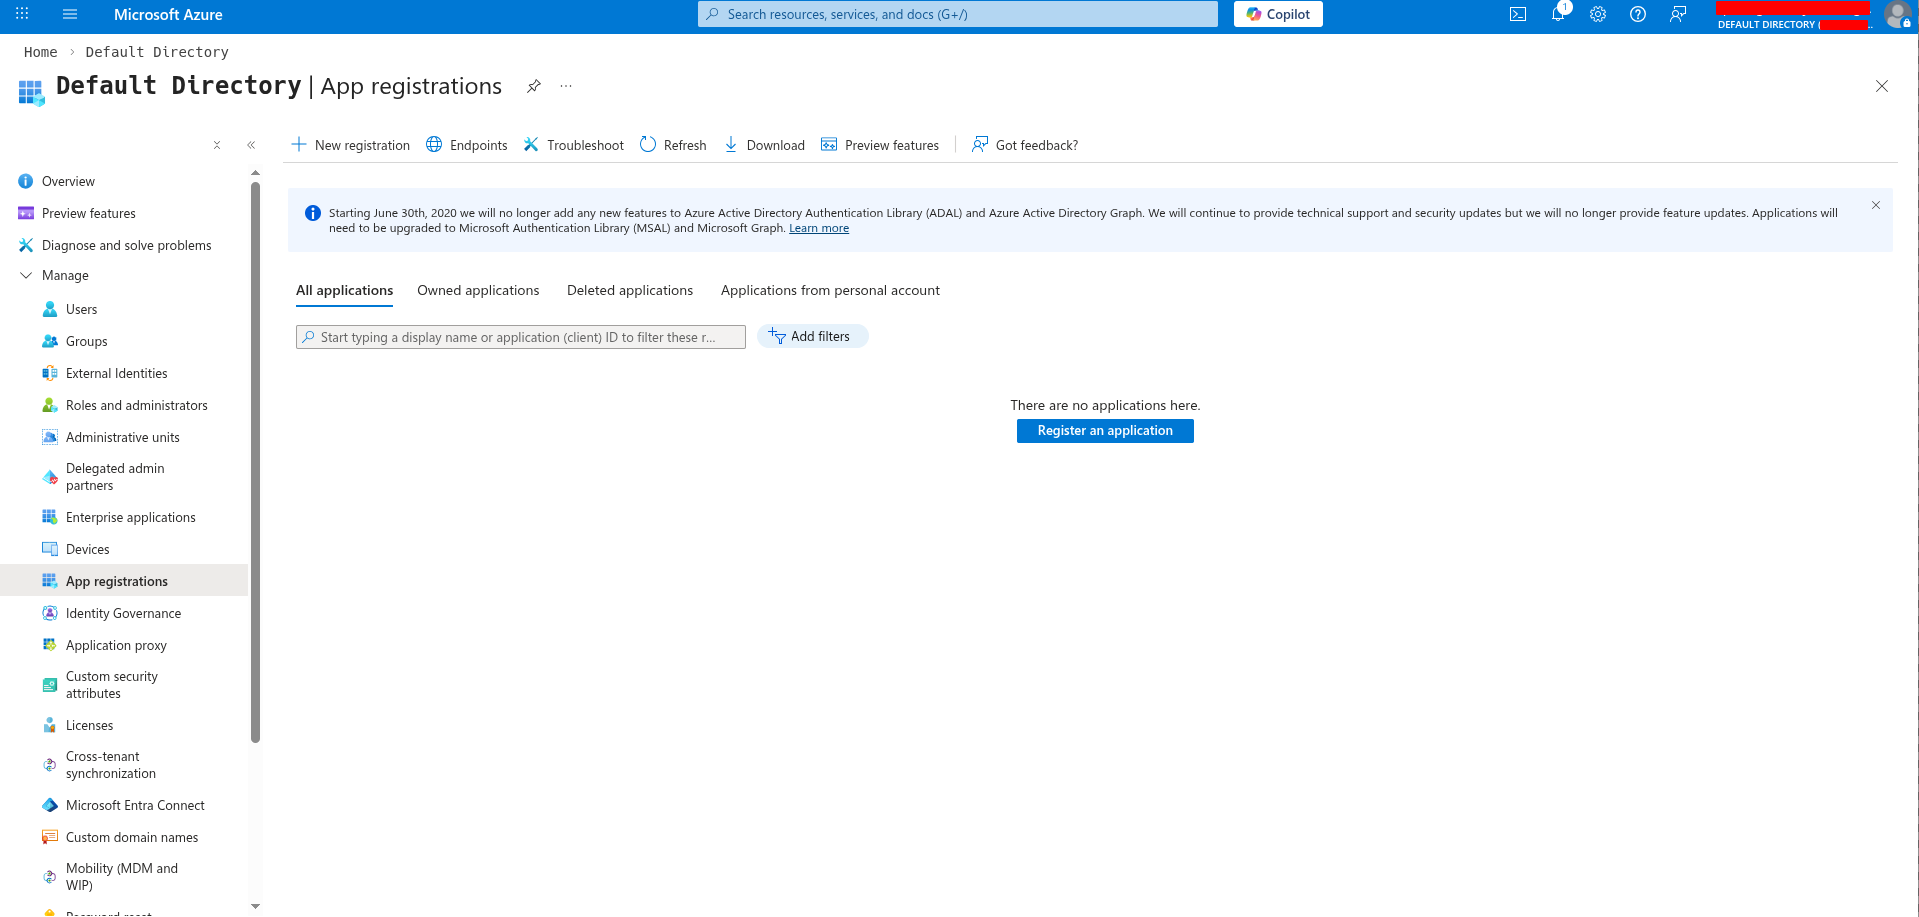 Configure the registration:
* **Name**: `Orq.ai` (or preferred name)
* **Supported account types**: select based on the organization's needs
* **Redirect URI**: select **Web** and enter:
```
https://my.orq.ai/v2/auth/sso/oidc/callback
```
Click **Register**.
Configure the registration:
* **Name**: `Orq.ai` (or preferred name)
* **Supported account types**: select based on the organization's needs
* **Redirect URI**: select **Web** and enter:
```
https://my.orq.ai/v2/auth/sso/oidc/callback
```
Click **Register**.
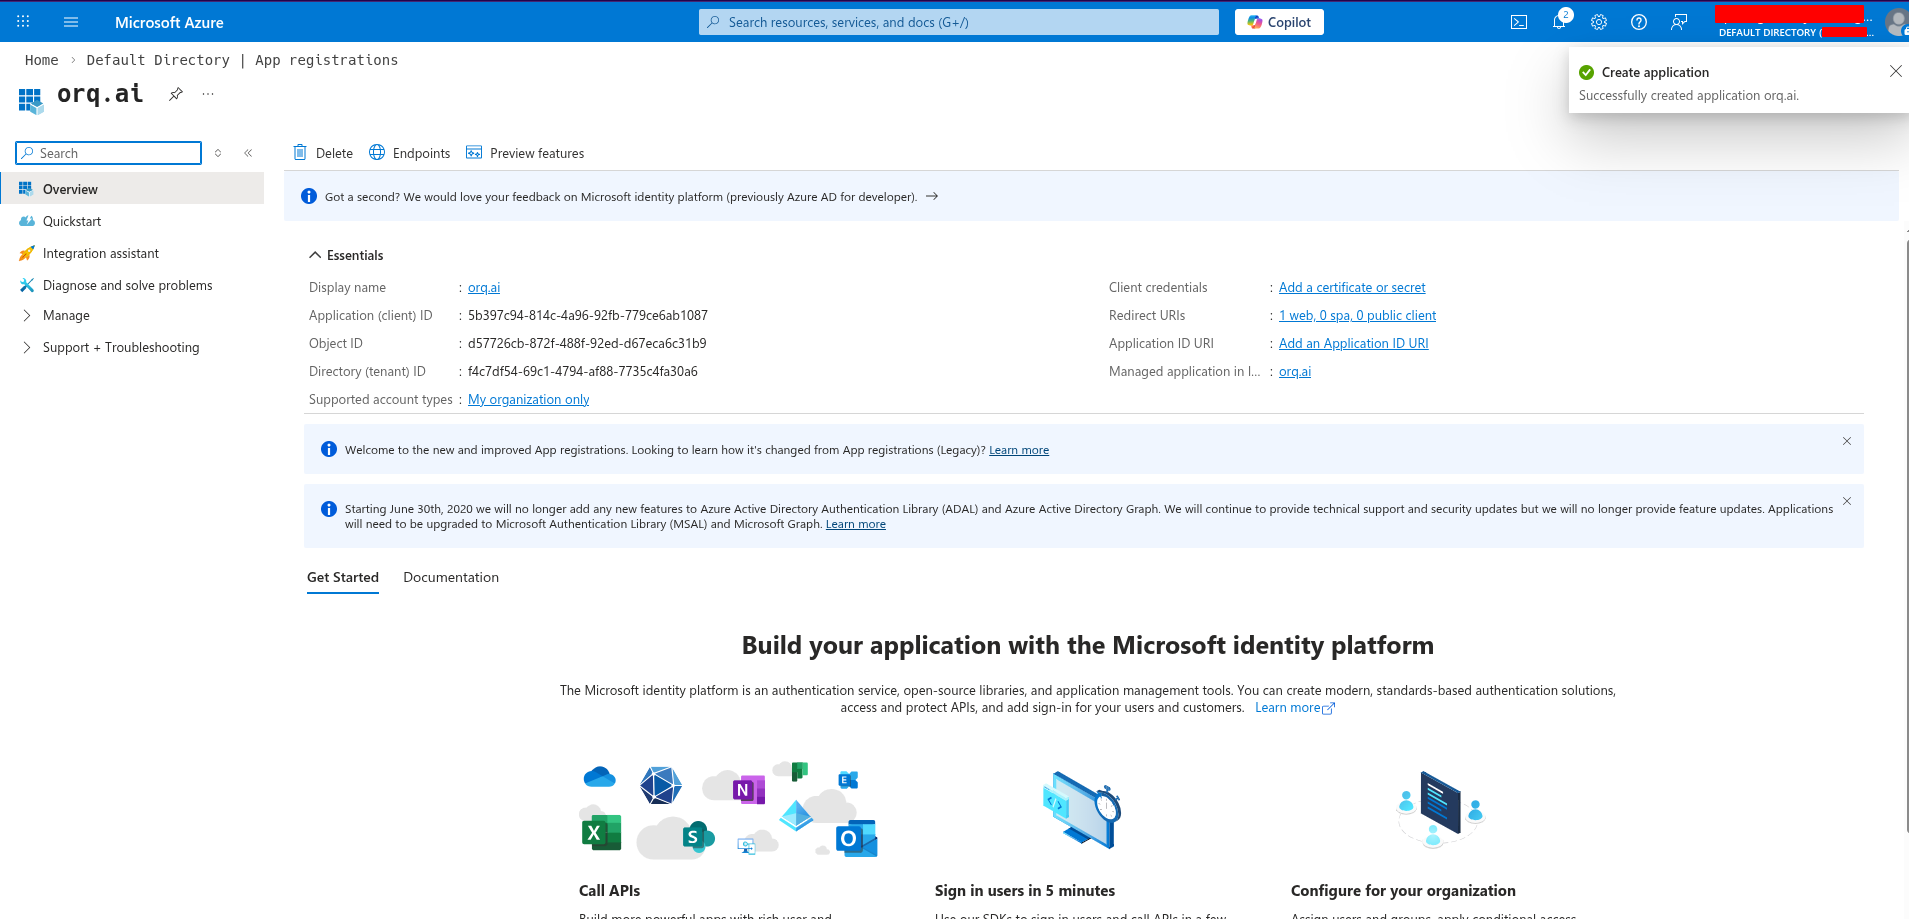
 **Get the Client ID:**
From the app registration **Overview** page, copy the **Application (client) ID**: this is the **Client ID** for **Orq.ai**.
**Get the Client ID:**
From the app registration **Overview** page, copy the **Application (client) ID**: this is the **Client ID** for **Orq.ai**.
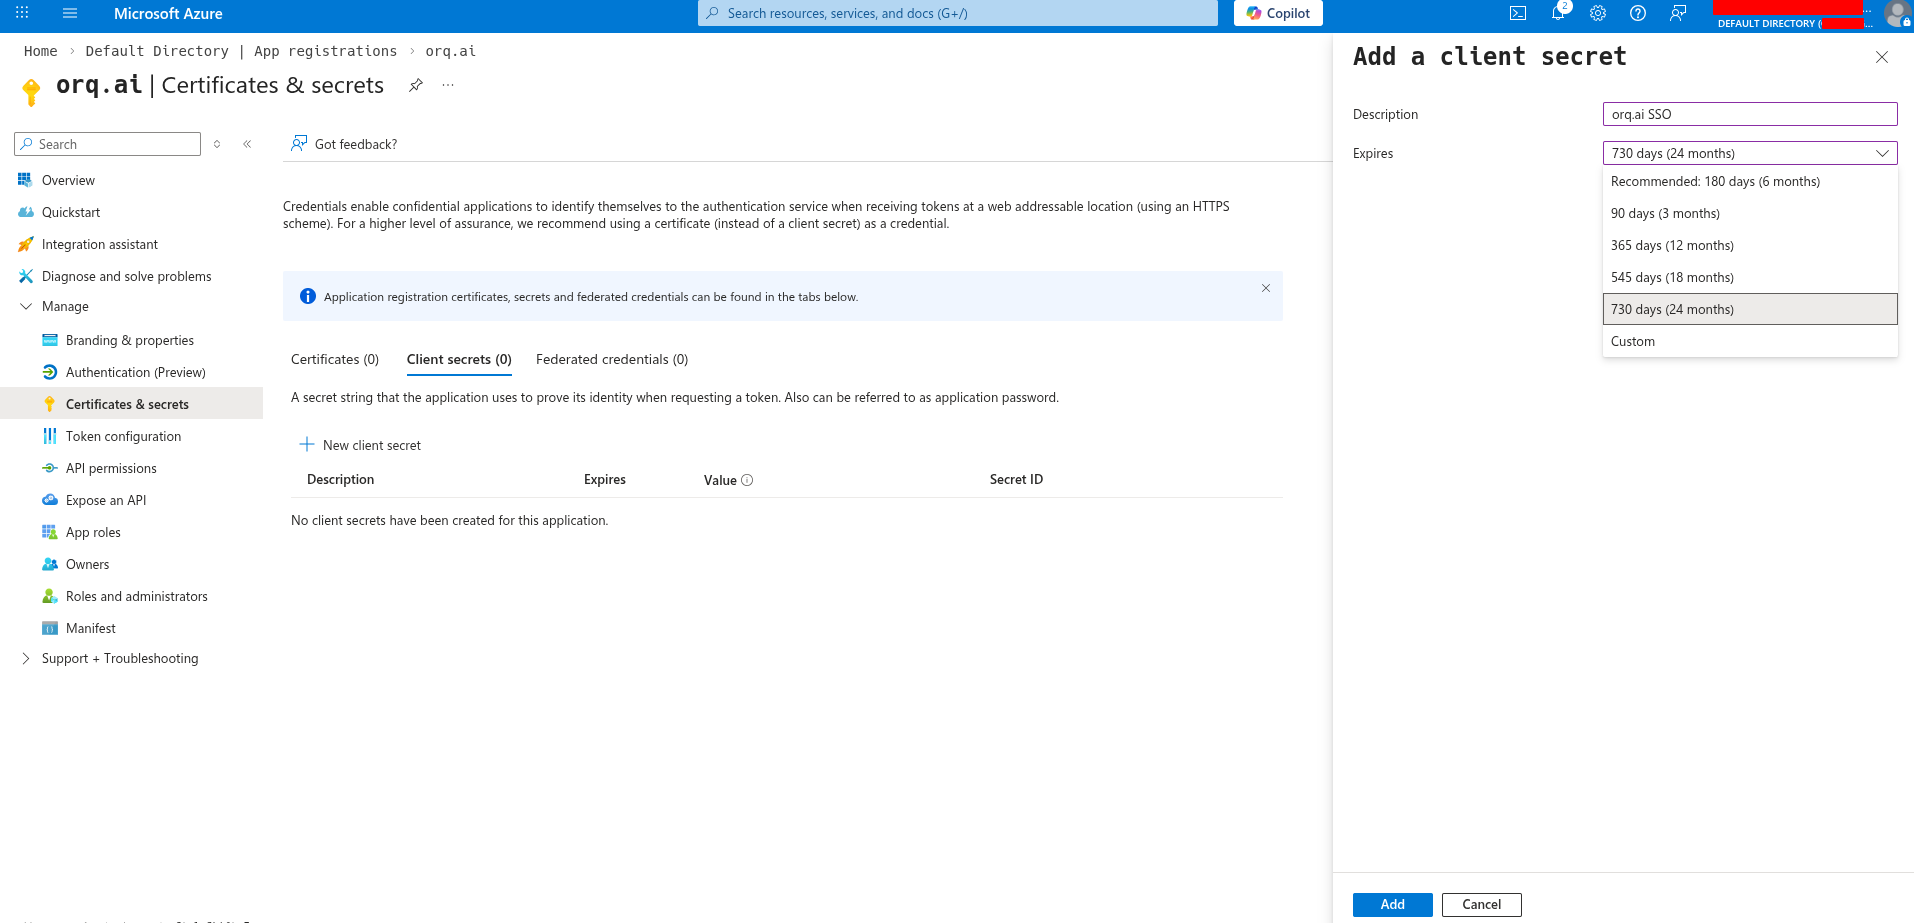
 **Create a Client Secret:**
Go to **Certificates & secrets → Client secrets → New client secret**.
Add a description (e.g., `Orq.ai SSO`), select an expiration period, and click **Add**.
**Create a Client Secret:**
Go to **Certificates & secrets → Client secrets → New client secret**.
Add a description (e.g., `Orq.ai SSO`), select an expiration period, and click **Add**.
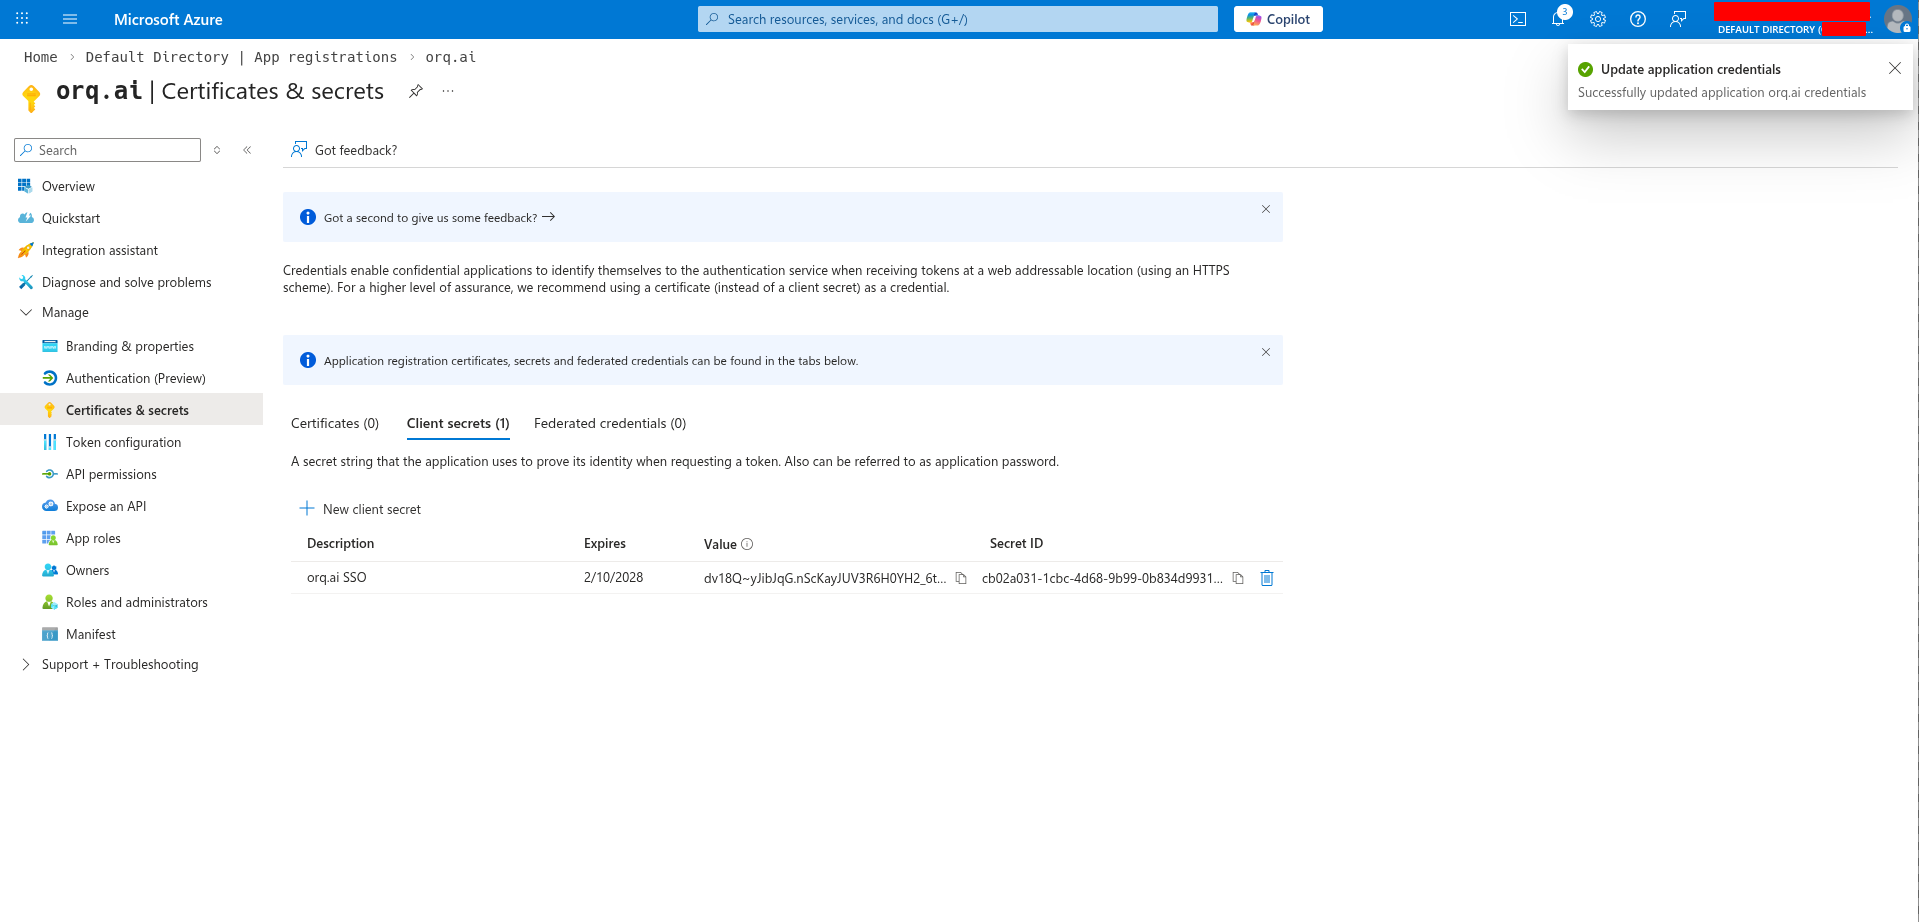
 **Copy the secret value immediately.** Azure only displays it once. If lost, generate a new secret.
Copy the **Value** field: this is the **Client Secret** for **Orq.ai**.
**Copy the secret value immediately.** Azure only displays it once. If lost, generate a new secret.
Copy the **Value** field: this is the **Client Secret** for **Orq.ai**.
 The Provider URL is the tenant's issuer URL:
```
https://login.microsoftonline.com/{tenant-id}/v2.0
```
Replace `{tenant-id}` with the **Directory (tenant) ID**, found on the app registration overview page.
Go to **API permissions** and ensure these Microsoft Graph permissions are granted:
* `openid`
* `email`
* `profile`
The Provider URL is the tenant's issuer URL:
```
https://login.microsoftonline.com/{tenant-id}/v2.0
```
Replace `{tenant-id}` with the **Directory (tenant) ID**, found on the app registration overview page.
Go to **API permissions** and ensure these Microsoft Graph permissions are granted:
* `openid`
* `email`
* `profile`
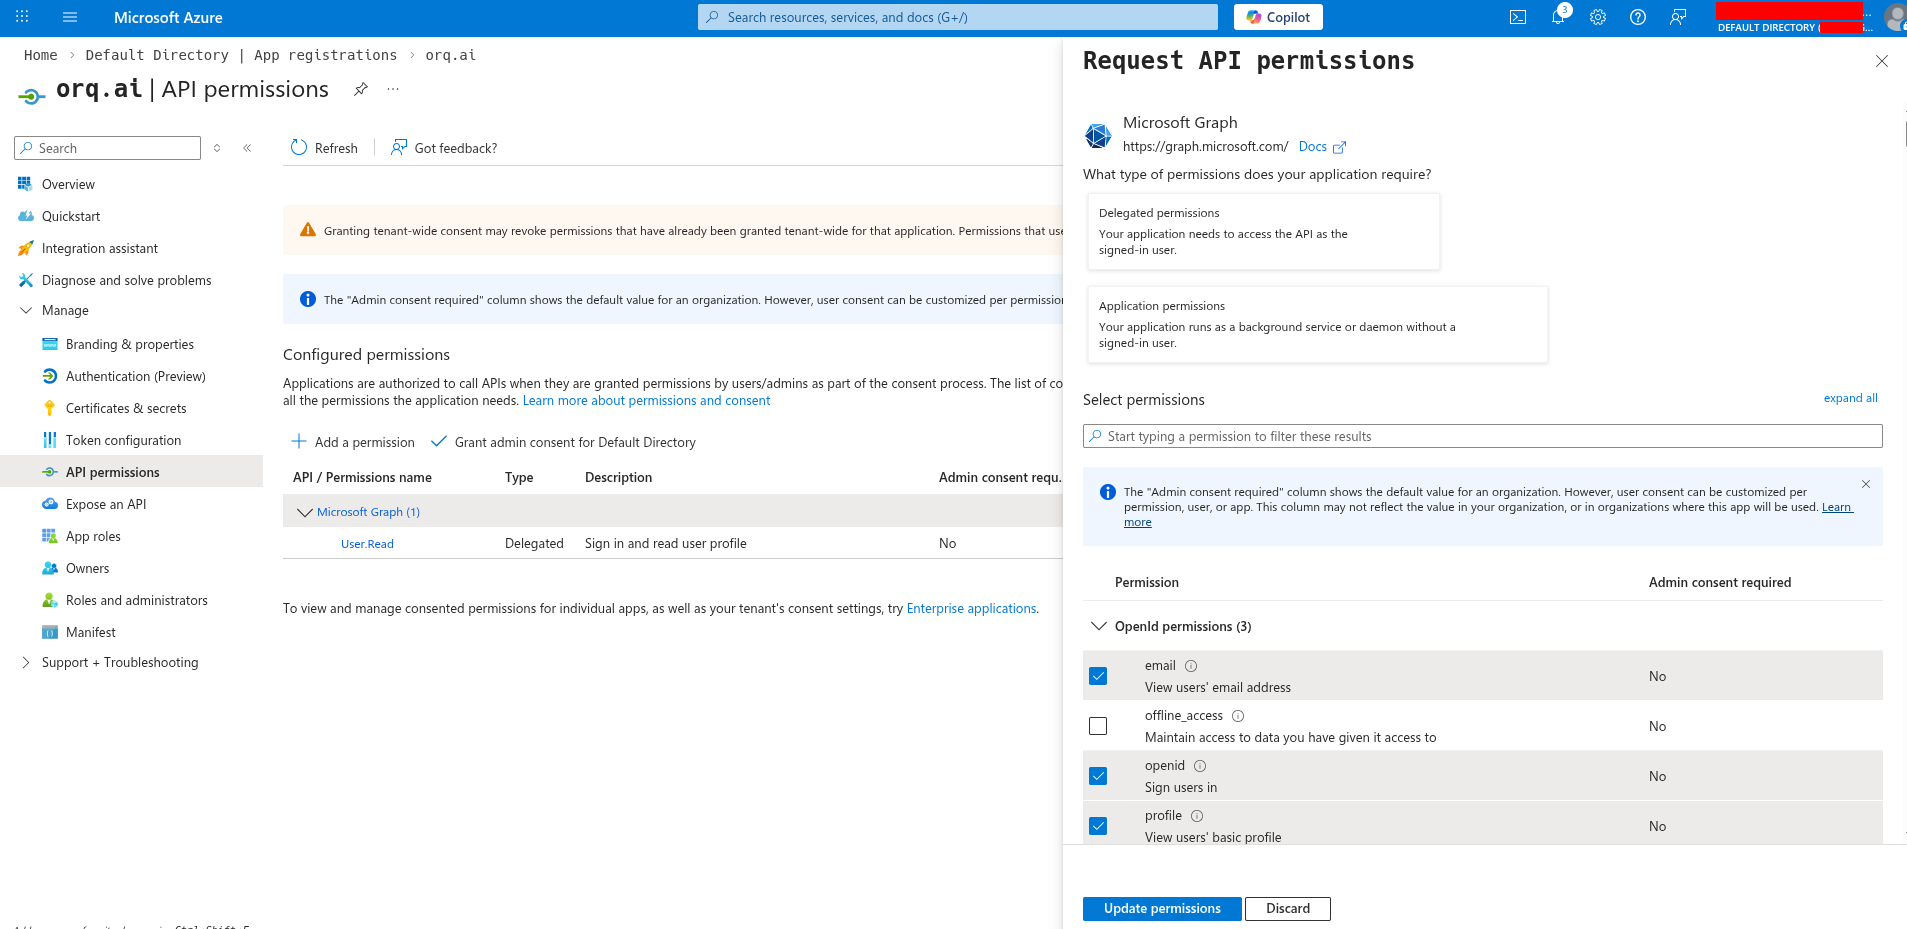 Click **Grant admin consent** if required by the organization.
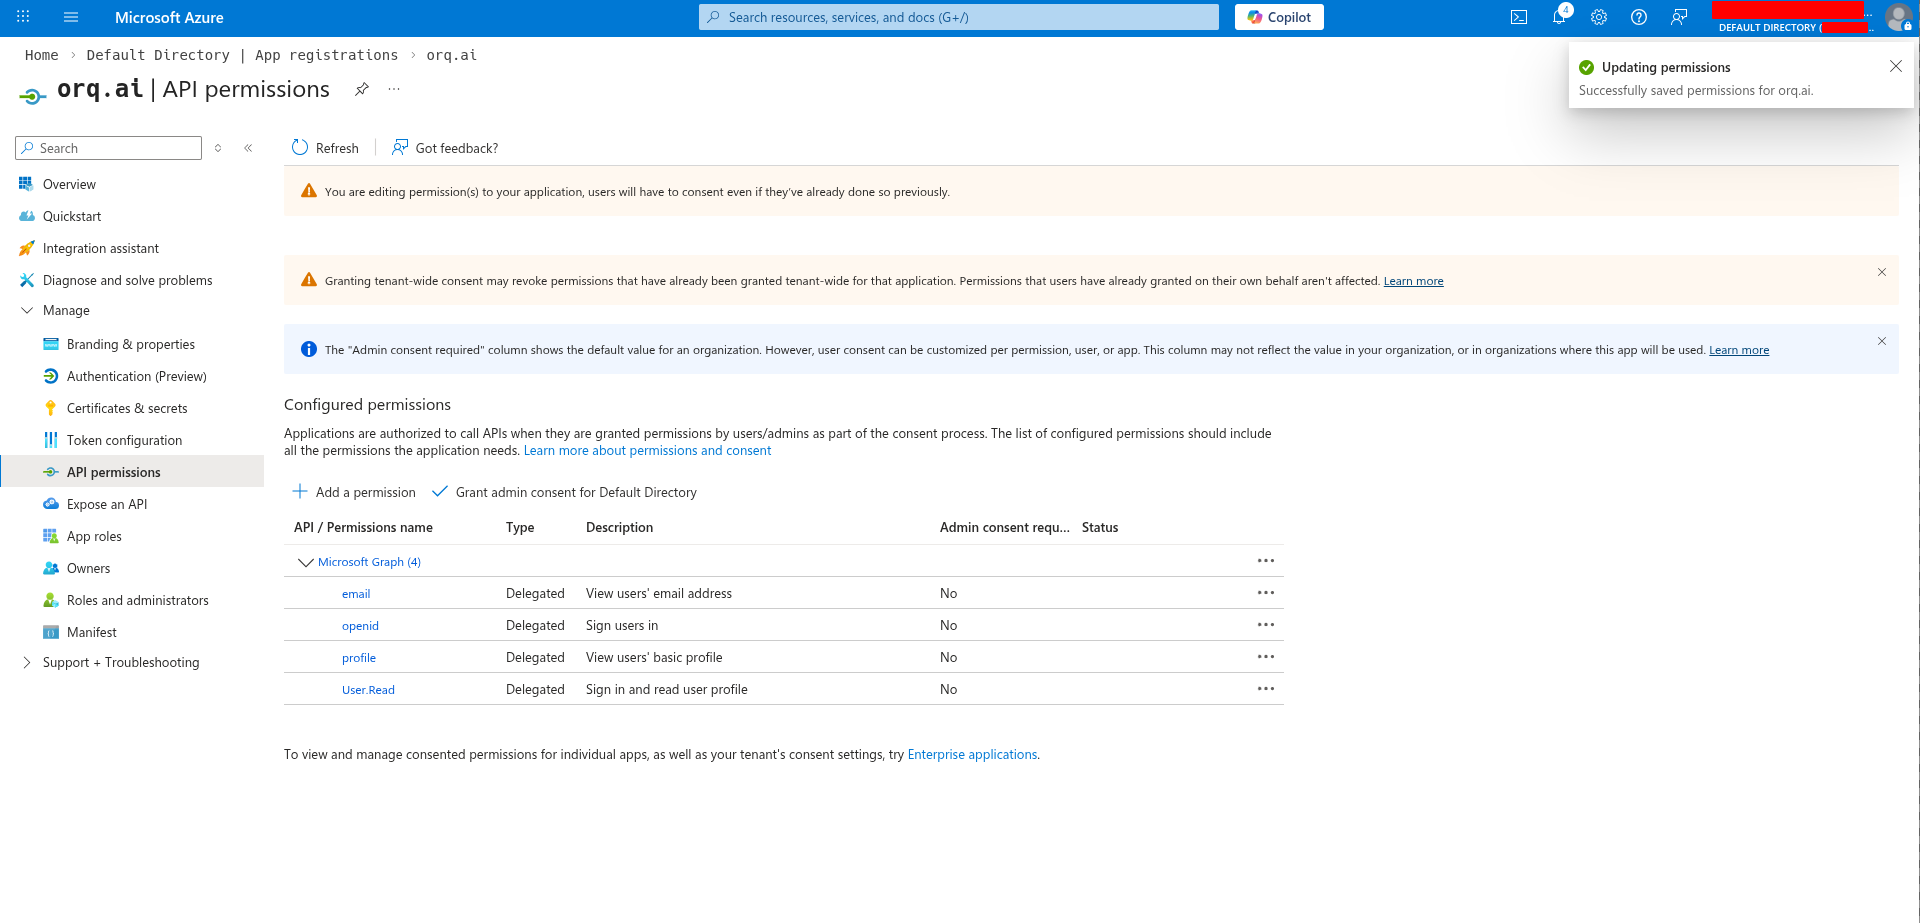 **Orq.ai** automatically requests the `User.Read` scope to retrieve user email addresses when the standard OIDC `email` claim is not available.
Navigate to **AI Studio** → **Organization** → **Auth**.
Enter the credentials collected from Azure:
1. Select **OIDC** (selected by default)
2. Enter the **Client ID**
3. Enter the **Client Secret**
4. Enter the **Provider URL**
5. Enter the organization's email domain(s) in **Allowed domains** (e.g., `acme.com`)
6. Click **Activate**
SSO is now configured. Users can sign in at:
```
https://my.orq.ai/{your-workspace-key}/login
```
Choose a unique identifier for the Service Provider Entity ID. We recommend:
```
urn:orq.ai:{your-workspace-key}
```
For example, if the workspace key is `acme-corp`, use `urn:orq.ai:acme-corp`.
The SP Entity ID must match exactly in both Azure and **Orq.ai**. Write it down; it is needed in multiple steps.
In the [Azure portal](https://entra.microsoft.com), go to **Microsoft Entra ID → Enterprise applications → New application**.
**Orq.ai** automatically requests the `User.Read` scope to retrieve user email addresses when the standard OIDC `email` claim is not available.
Navigate to **AI Studio** → **Organization** → **Auth**.
Enter the credentials collected from Azure:
1. Select **OIDC** (selected by default)
2. Enter the **Client ID**
3. Enter the **Client Secret**
4. Enter the **Provider URL**
5. Enter the organization's email domain(s) in **Allowed domains** (e.g., `acme.com`)
6. Click **Activate**
SSO is now configured. Users can sign in at:
```
https://my.orq.ai/{your-workspace-key}/login
```
Choose a unique identifier for the Service Provider Entity ID. We recommend:
```
urn:orq.ai:{your-workspace-key}
```
For example, if the workspace key is `acme-corp`, use `urn:orq.ai:acme-corp`.
The SP Entity ID must match exactly in both Azure and **Orq.ai**. Write it down; it is needed in multiple steps.
In the [Azure portal](https://entra.microsoft.com), go to **Microsoft Entra ID → Enterprise applications → New application**.
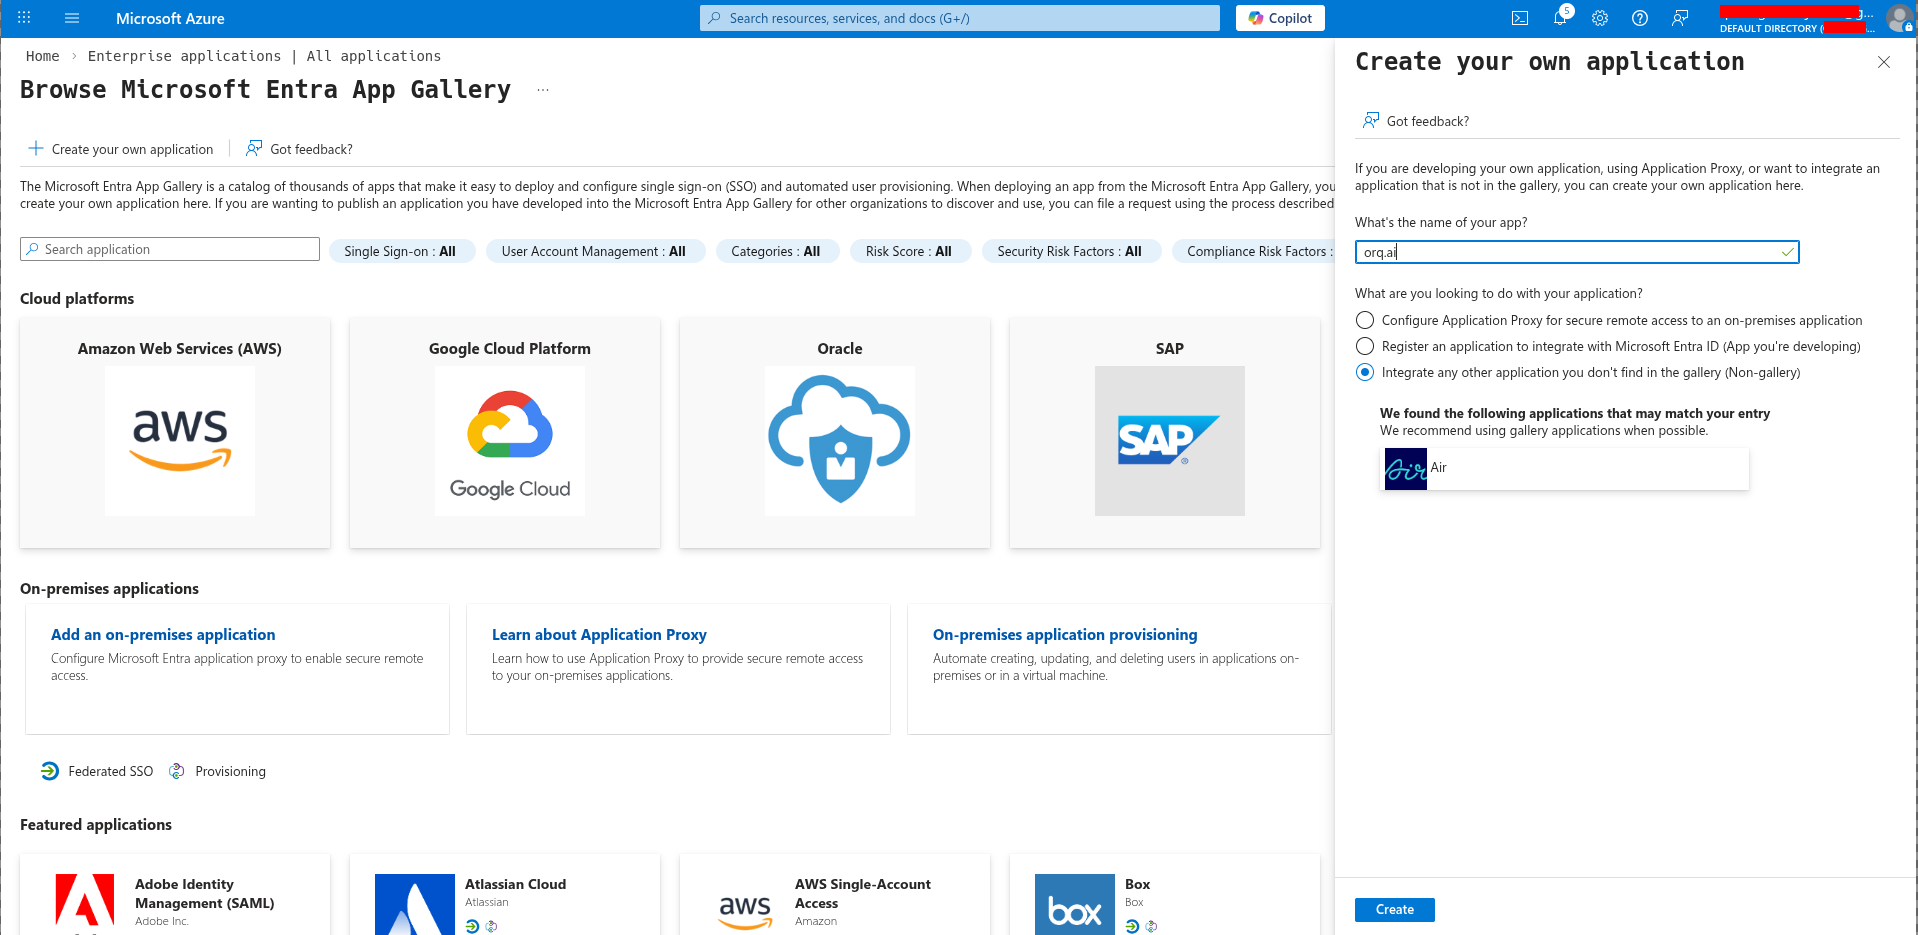
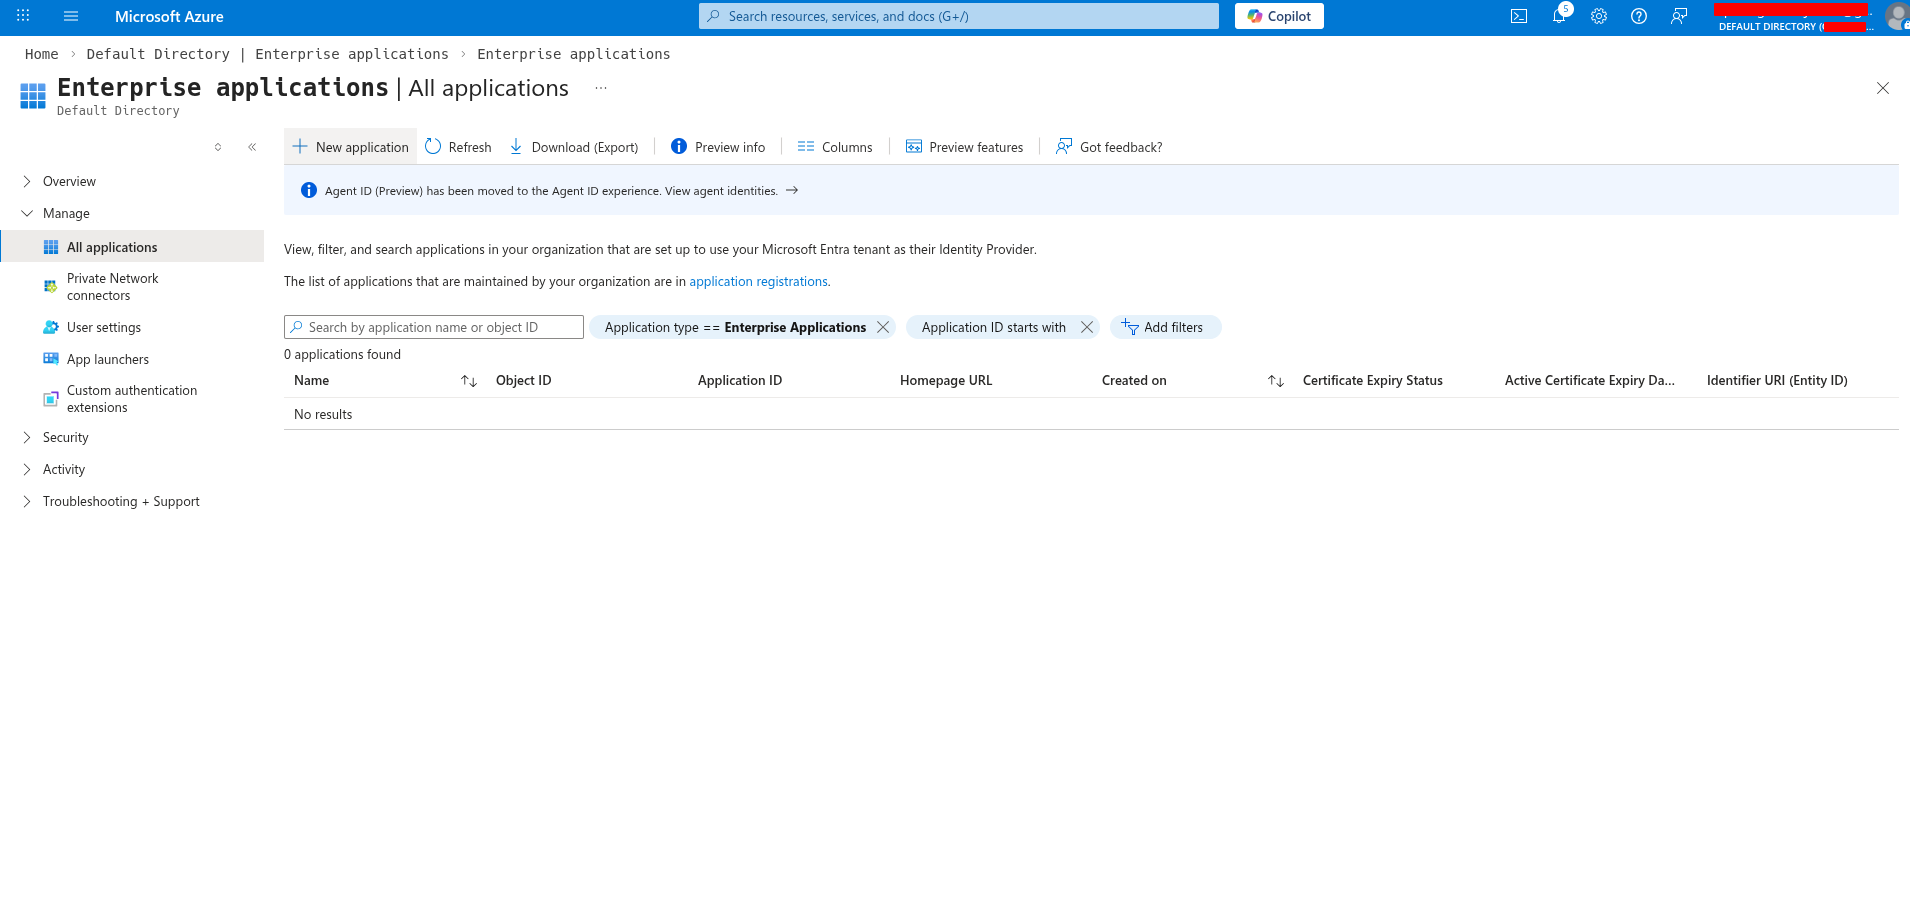 Click Create your own application, name it (e.g. `Orq.ai SSO`), select **Integrate any other application you don't find in the gallery (Non-gallery)**, and click Create.
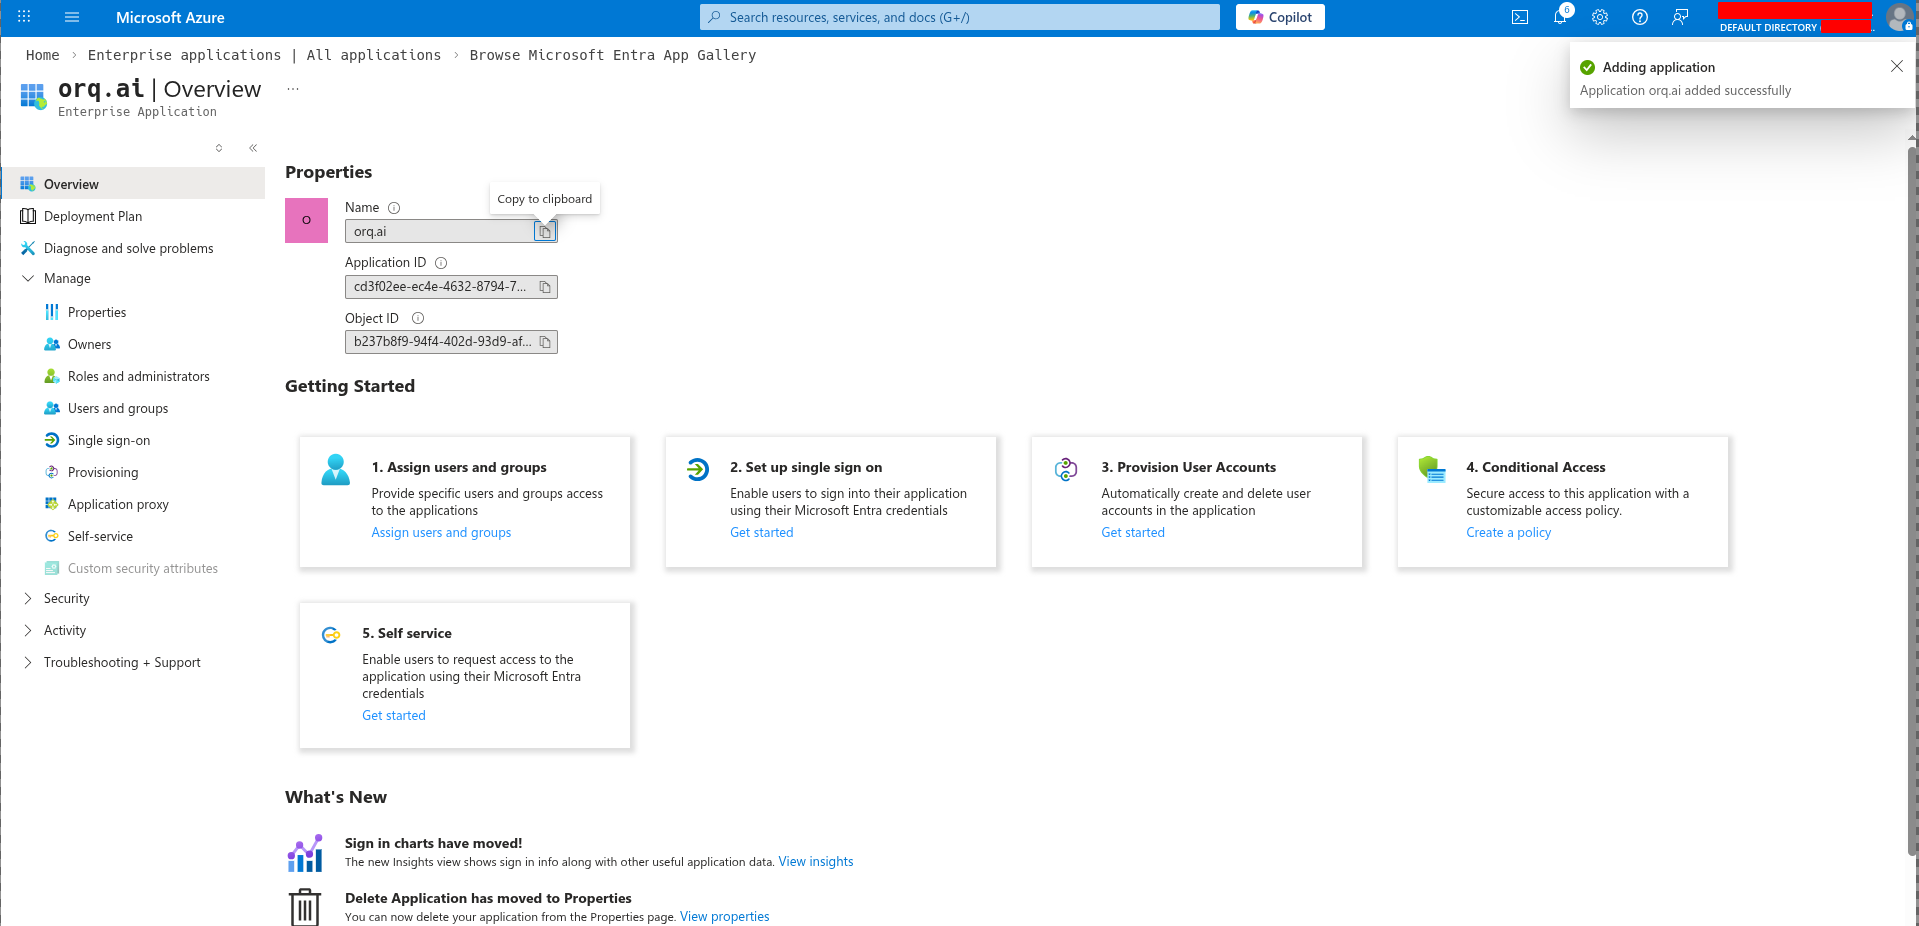 In the application, go to **Single sign-on** and select **SAML**.
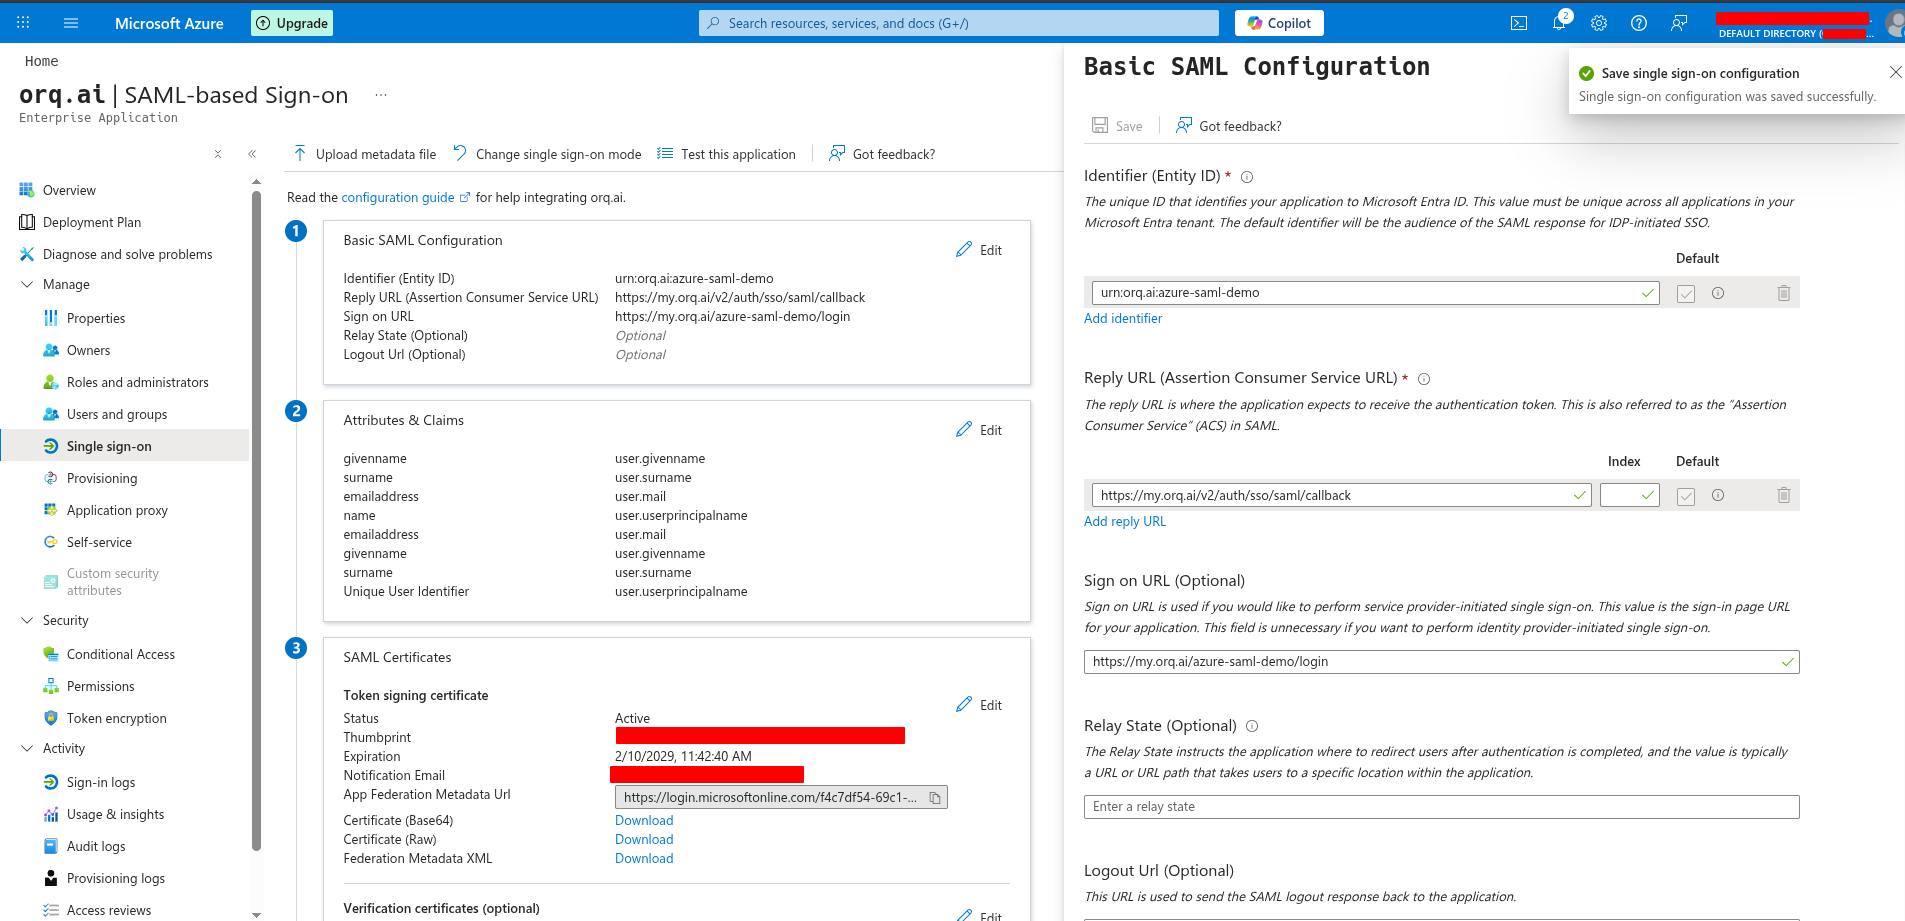
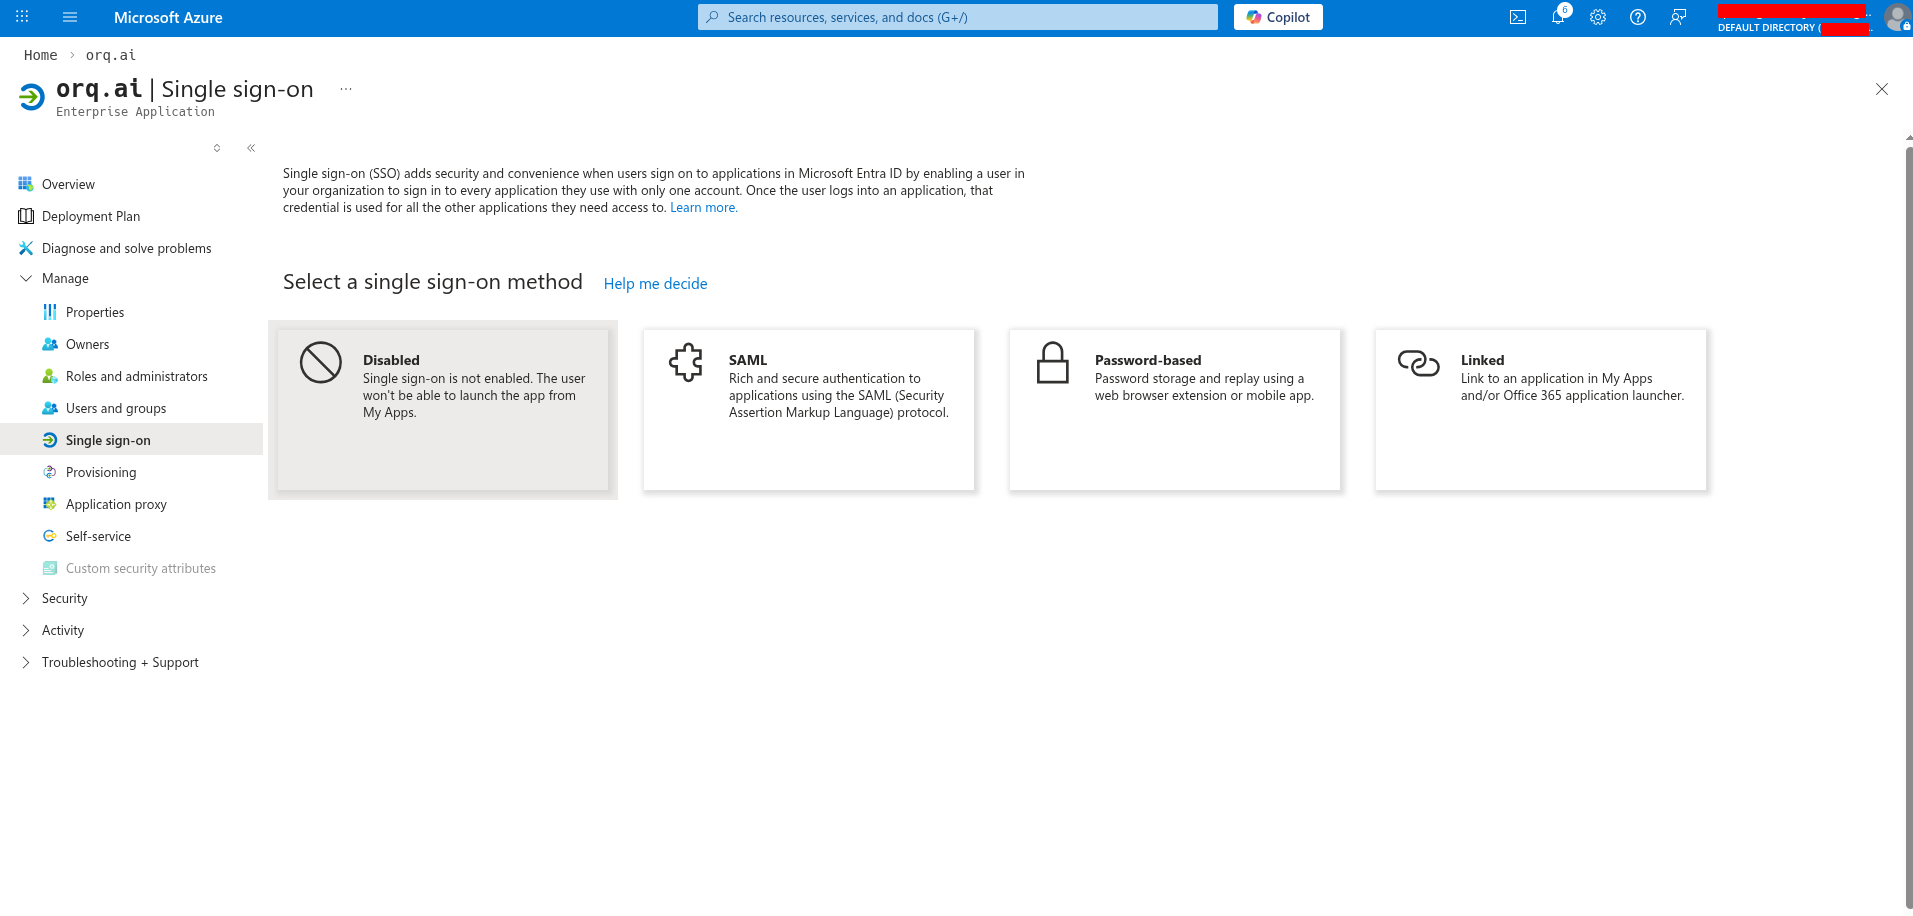 Under **Basic SAML Configuration**, click **Edit** and set:
* **Identifier (Entity ID)**: the SP Entity ID defined in Step 1
* **Reply URL (ACS URL)**:
```
https://my.orq.ai/v2/auth/sso/saml/callback
```
* **Sign on URL**:
```
https://my.orq.ai/{your-workspace-key}/login
```
Click **Save**.
Under **Basic SAML Configuration**, click **Edit** and set:
* **Identifier (Entity ID)**: the SP Entity ID defined in Step 1
* **Reply URL (ACS URL)**:
```
https://my.orq.ai/v2/auth/sso/saml/callback
```
* **Sign on URL**:
```
https://my.orq.ai/{your-workspace-key}/login
```
Click **Save**.
 Click **Edit** on **Attributes & Claims**.
Verify or add these claim mappings:
| Short name | Full claim URI | Source attribute |
| -------------- | -------------------------------------------------------------------- | ---------------- |
| `emailaddress` | `http://schemas.xmlsoap.org/ws/2005/05/identity/claims/emailaddress` | `user.mail` |
| `givenname` | `http://schemas.xmlsoap.org/ws/2005/05/identity/claims/givenname` | `user.givenname` |
| `surname` | `http://schemas.xmlsoap.org/ws/2005/05/identity/claims/surname` | `user.surname` |
Click **Edit** on **Attributes & Claims**.
Verify or add these claim mappings:
| Short name | Full claim URI | Source attribute |
| -------------- | -------------------------------------------------------------------- | ---------------- |
| `emailaddress` | `http://schemas.xmlsoap.org/ws/2005/05/identity/claims/emailaddress` | `user.mail` |
| `givenname` | `http://schemas.xmlsoap.org/ws/2005/05/identity/claims/givenname` | `user.givenname` |
| `surname` | `http://schemas.xmlsoap.org/ws/2005/05/identity/claims/surname` | `user.surname` |
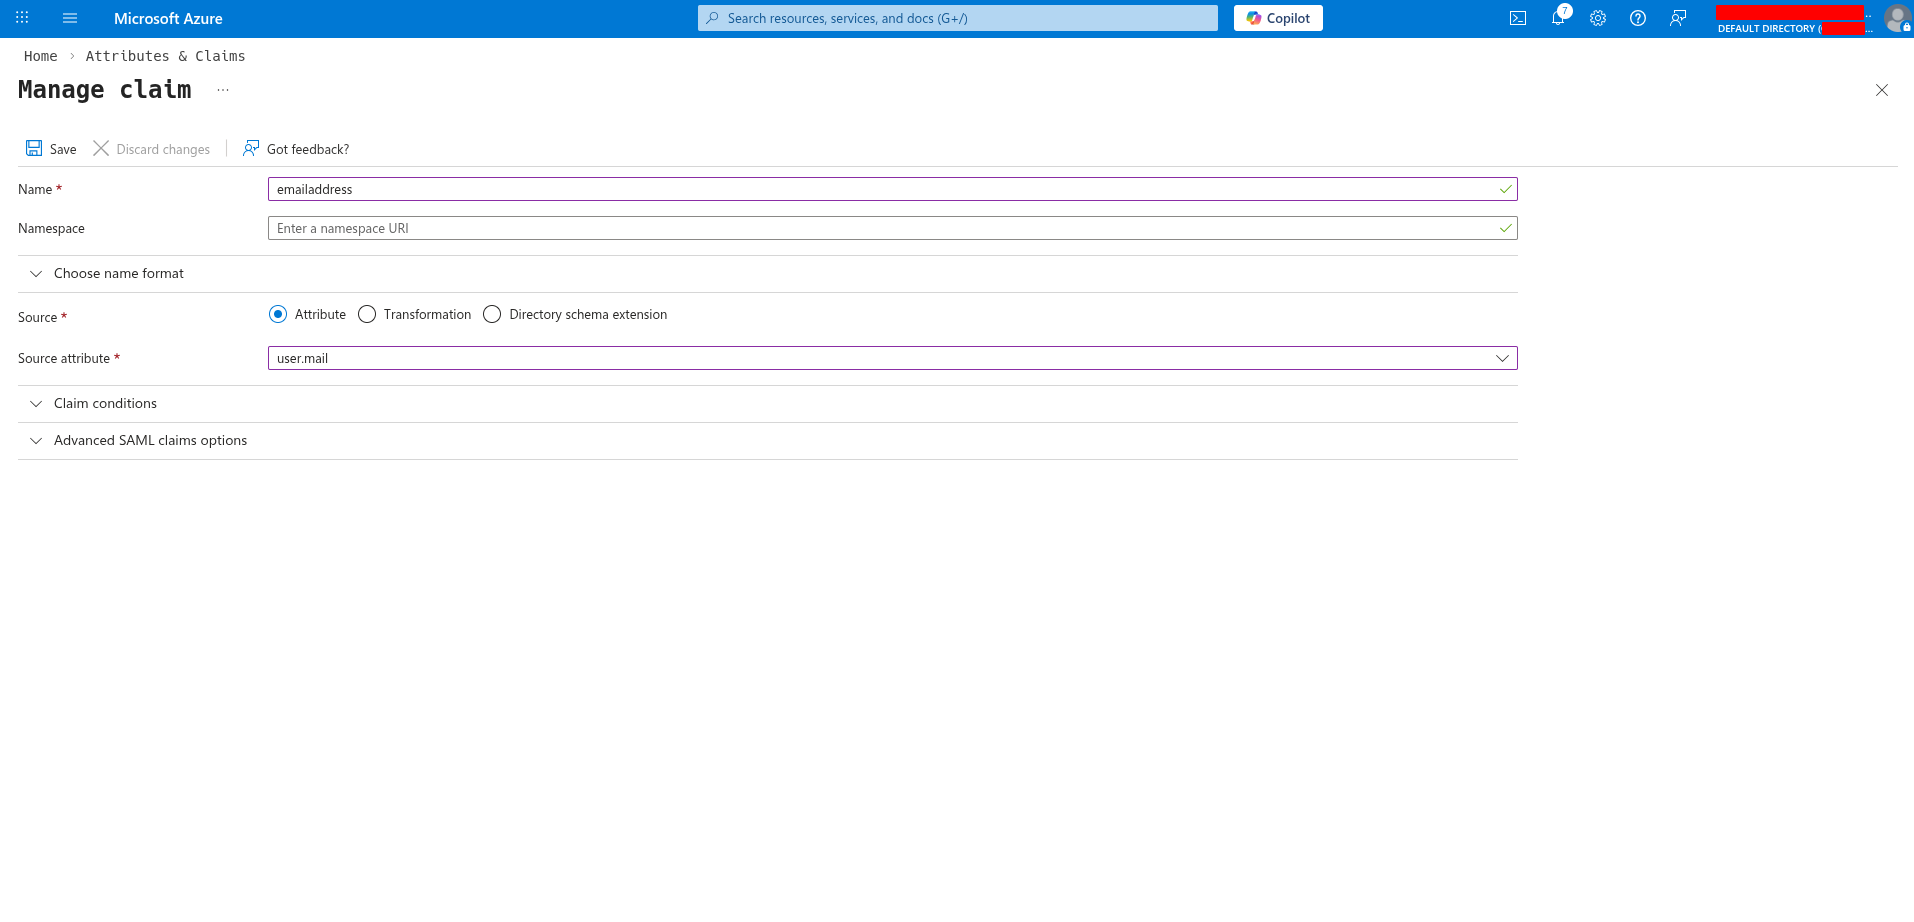
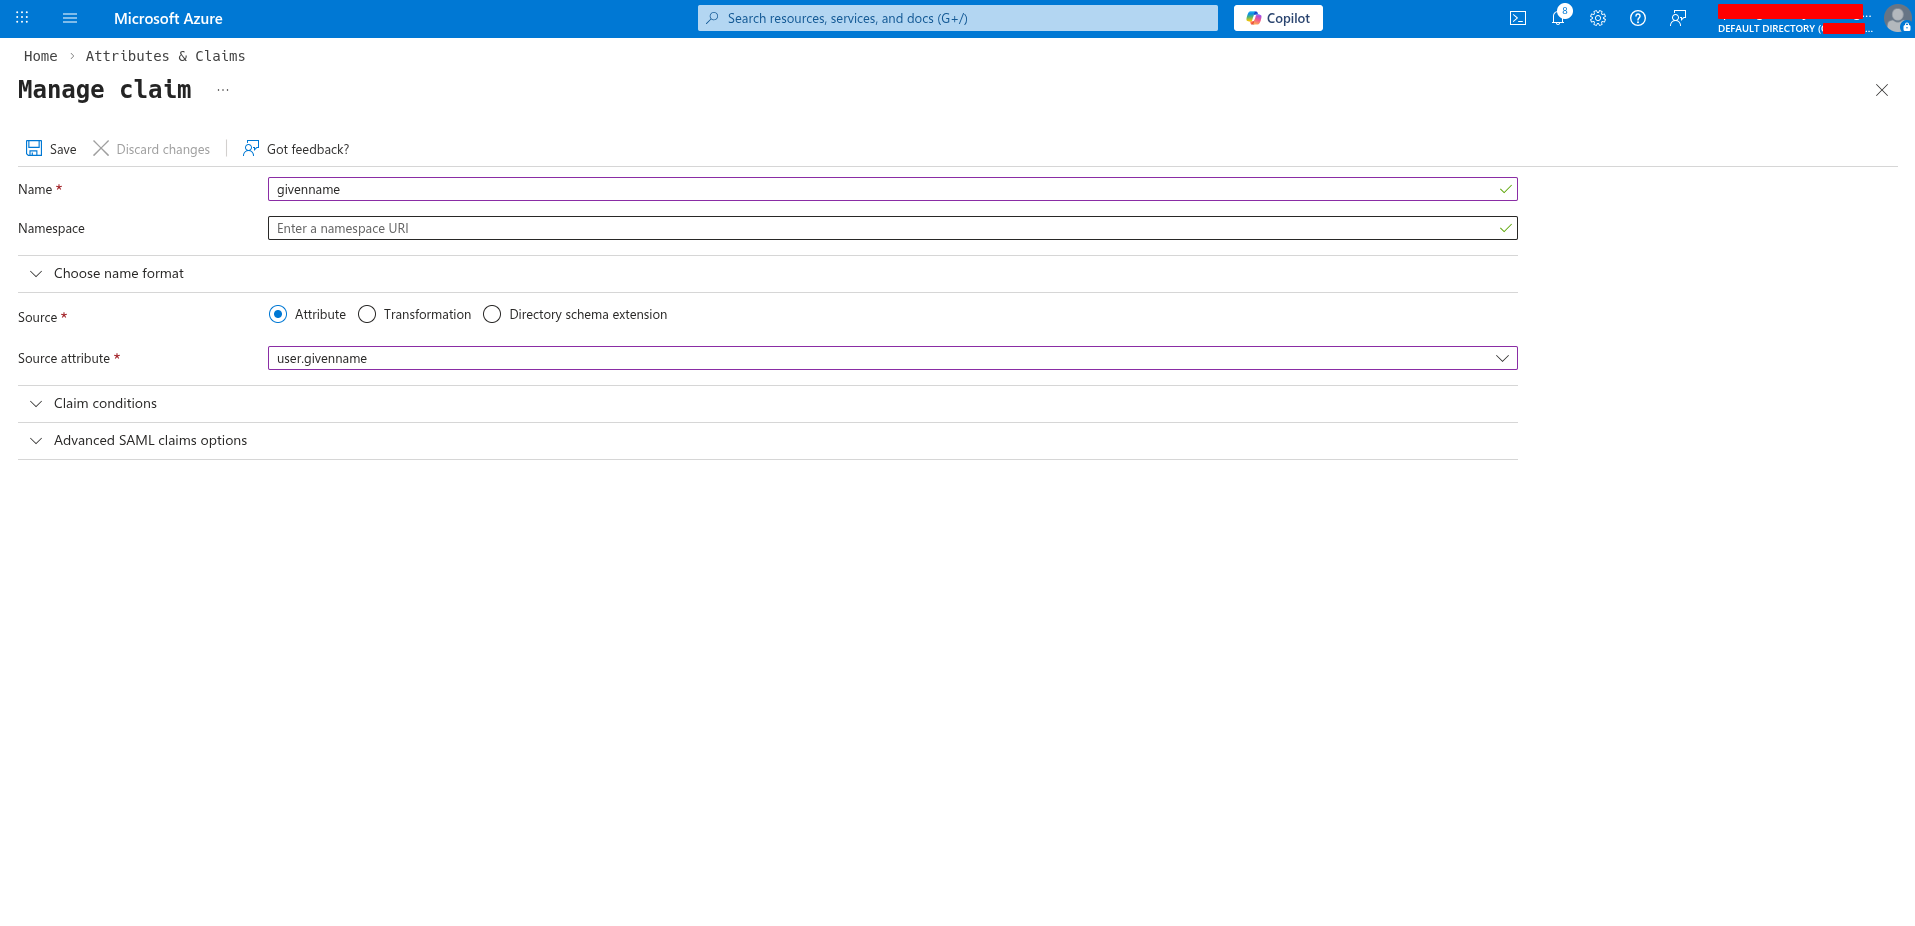
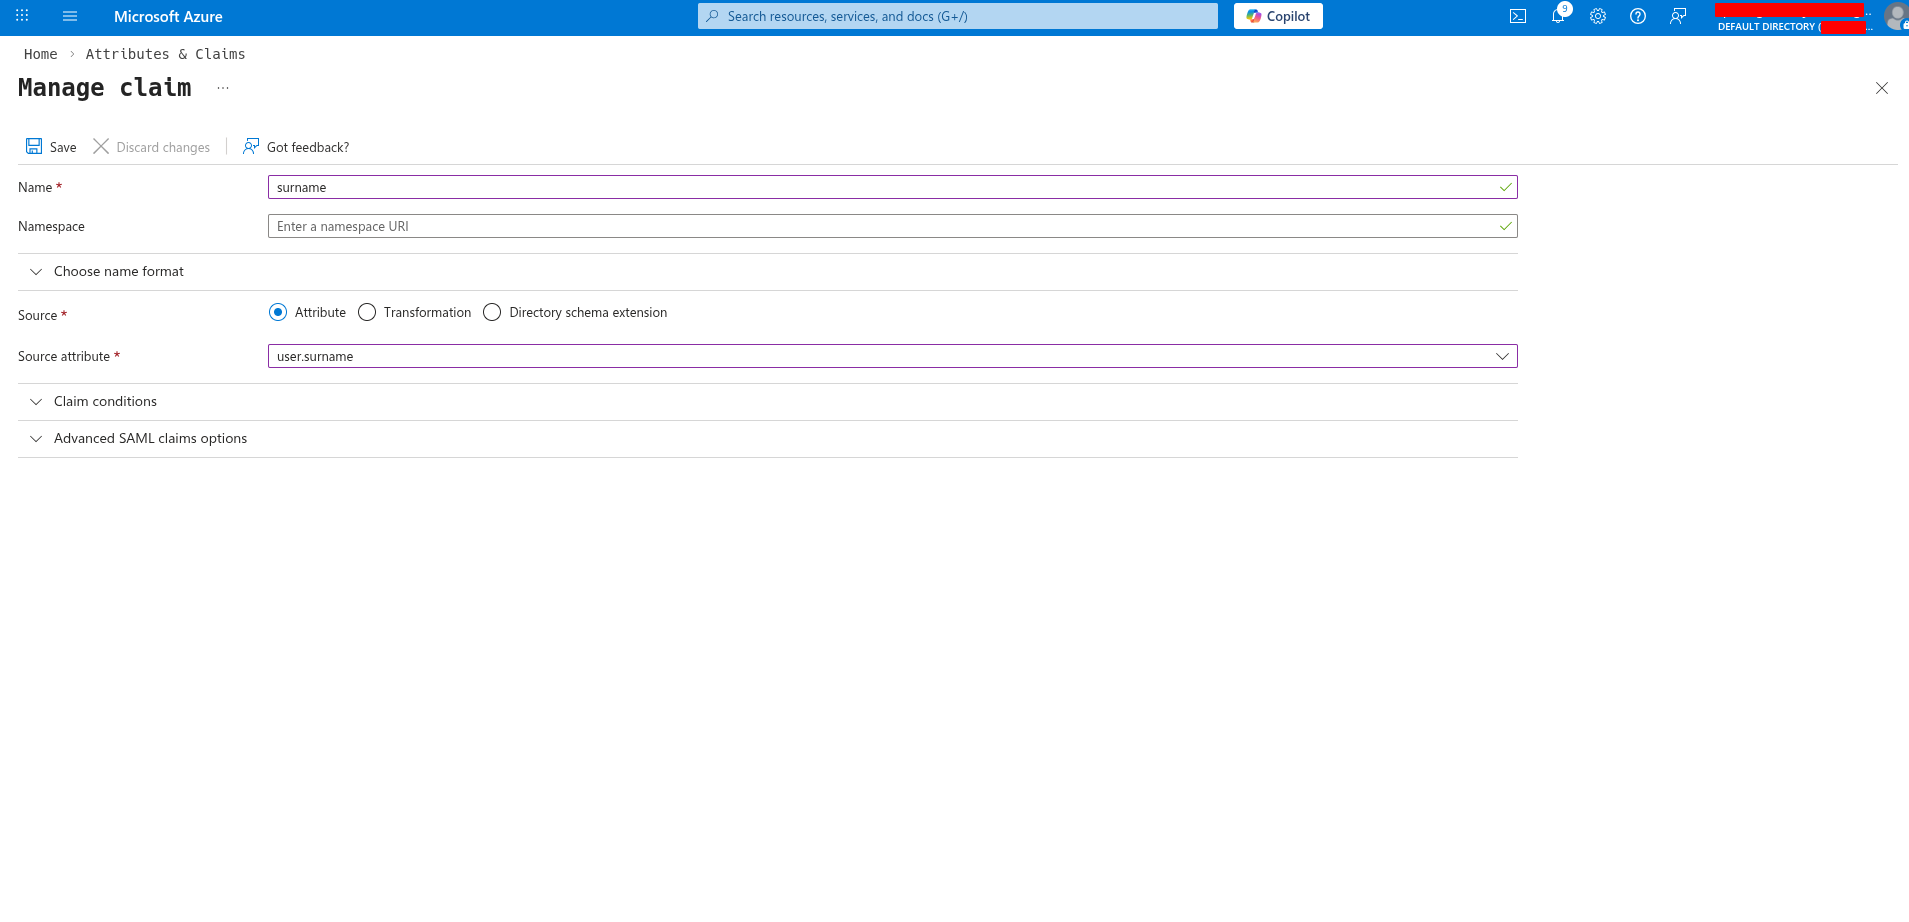
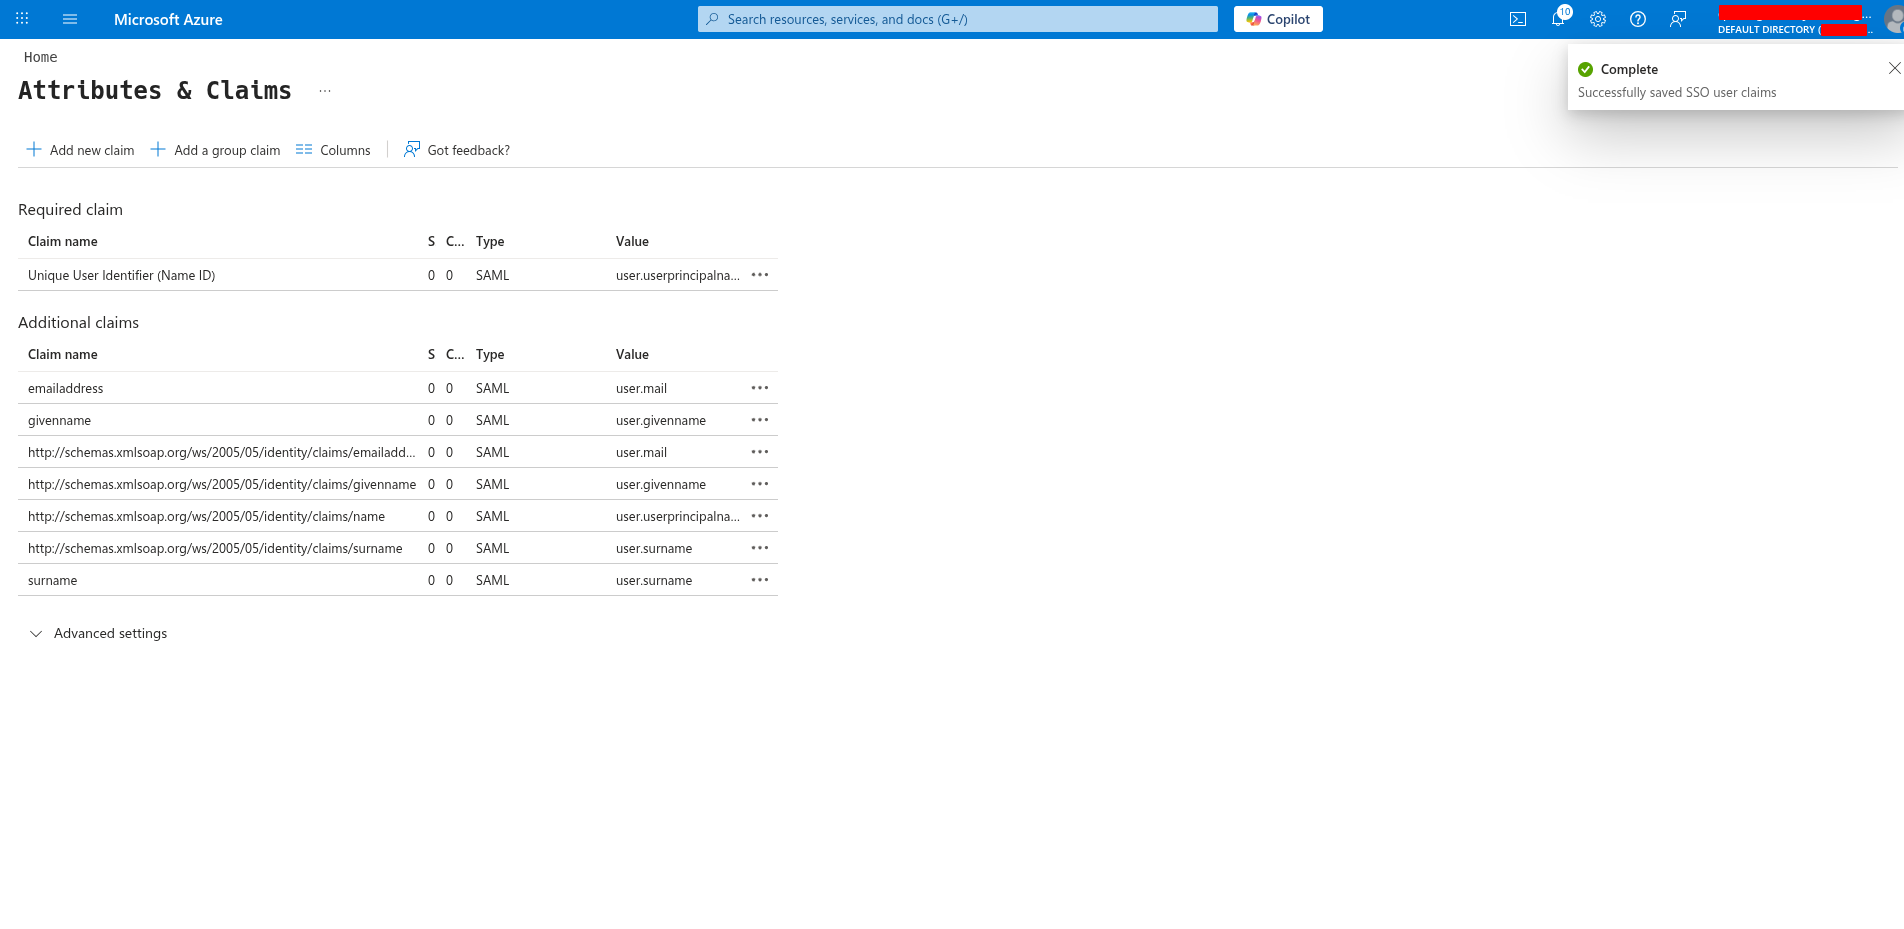 **Orq.ai** supports both standard attribute names and full Microsoft Entra ID claim URIs (e.g., `http://schemas.xmlsoap.org/ws/2005/05/identity/claims/emailaddress`). The default Entra ID claim mappings work out of the box.
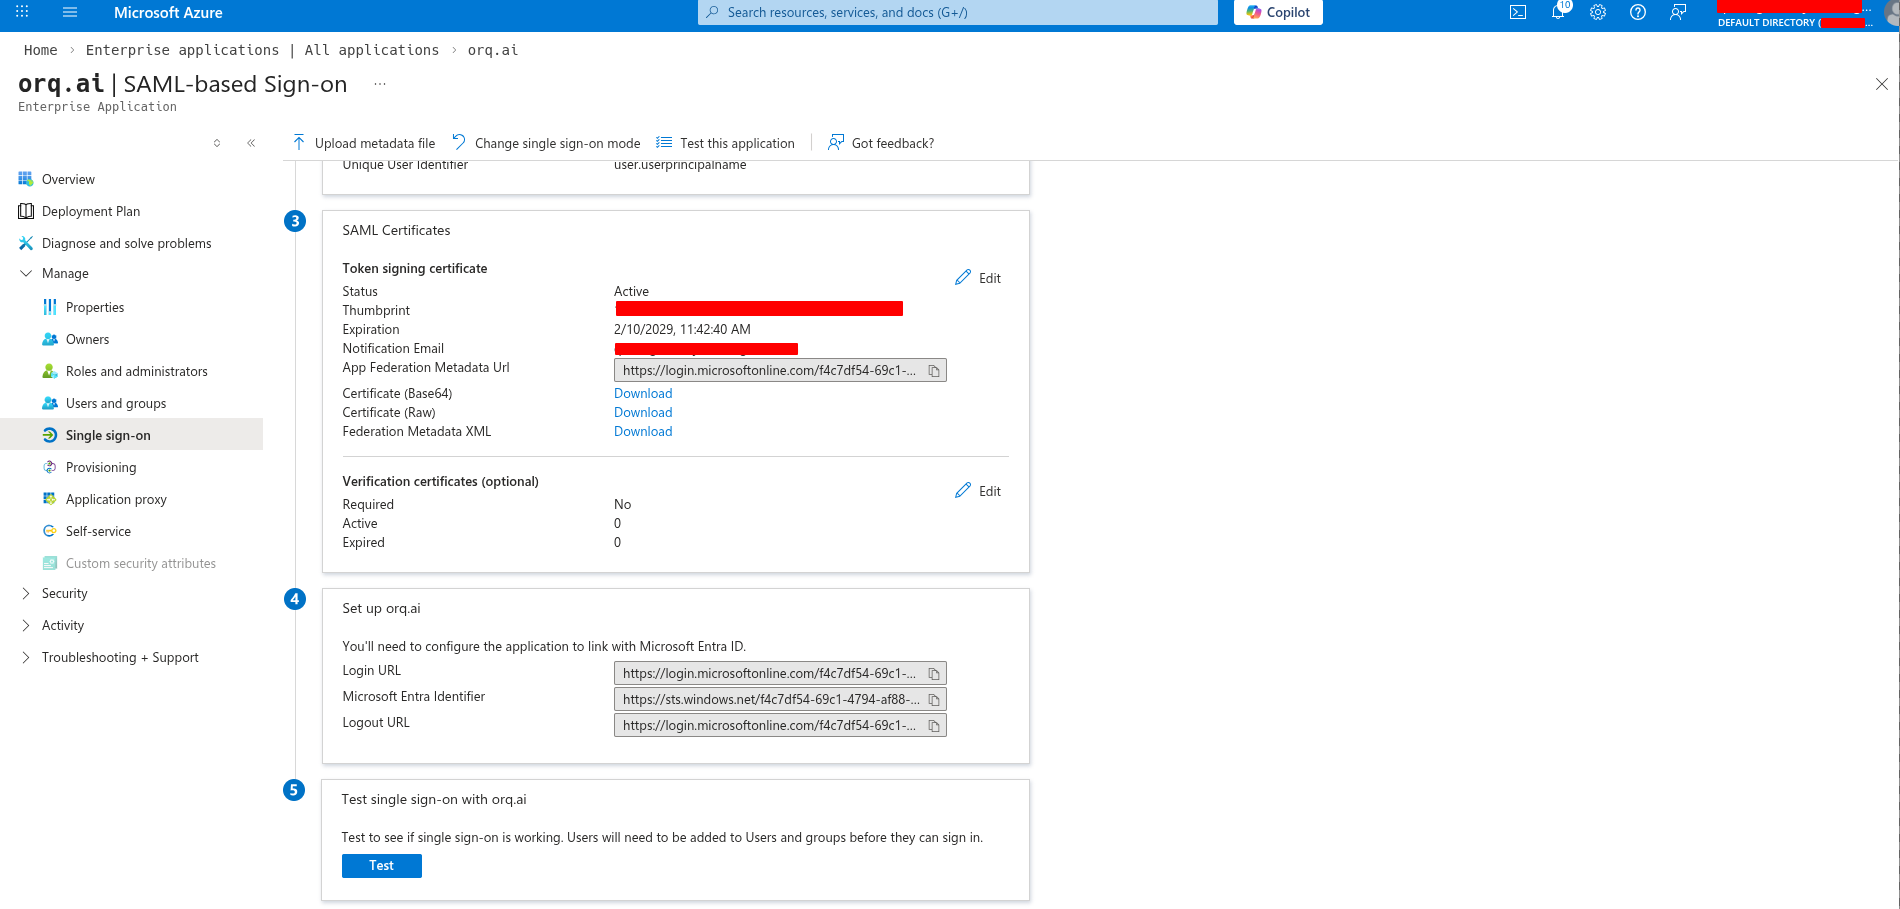
On the SAML configuration page, collect these values:
**From the "Set up" section:**
* **Login URL**: use as the **Single Sign-On URL** in **Orq.ai**
* **Microsoft Entra Identifier**: use as the **Identity Provider Entity ID** in **Orq.ai**
**From the "SAML Certificates" section:**
* Click **Download** next to **Certificate (Base64)** and save the file
**Orq.ai** supports both standard attribute names and full Microsoft Entra ID claim URIs (e.g., `http://schemas.xmlsoap.org/ws/2005/05/identity/claims/emailaddress`). The default Entra ID claim mappings work out of the box.
On the SAML configuration page, collect these values:
**From the "Set up" section:**
* **Login URL**: use as the **Single Sign-On URL** in **Orq.ai**
* **Microsoft Entra Identifier**: use as the **Identity Provider Entity ID** in **Orq.ai**
**From the "SAML Certificates" section:**
* Click **Download** next to **Certificate (Base64)** and save the file
 Go to **Users and groups** (left menu) and click **Add user/group**.
Select the users or groups that should have access to **Orq.ai**, then click Assign.
Go to **Users and groups** (left menu) and click **Add user/group**.
Select the users or groups that should have access to **Orq.ai**, then click Assign.
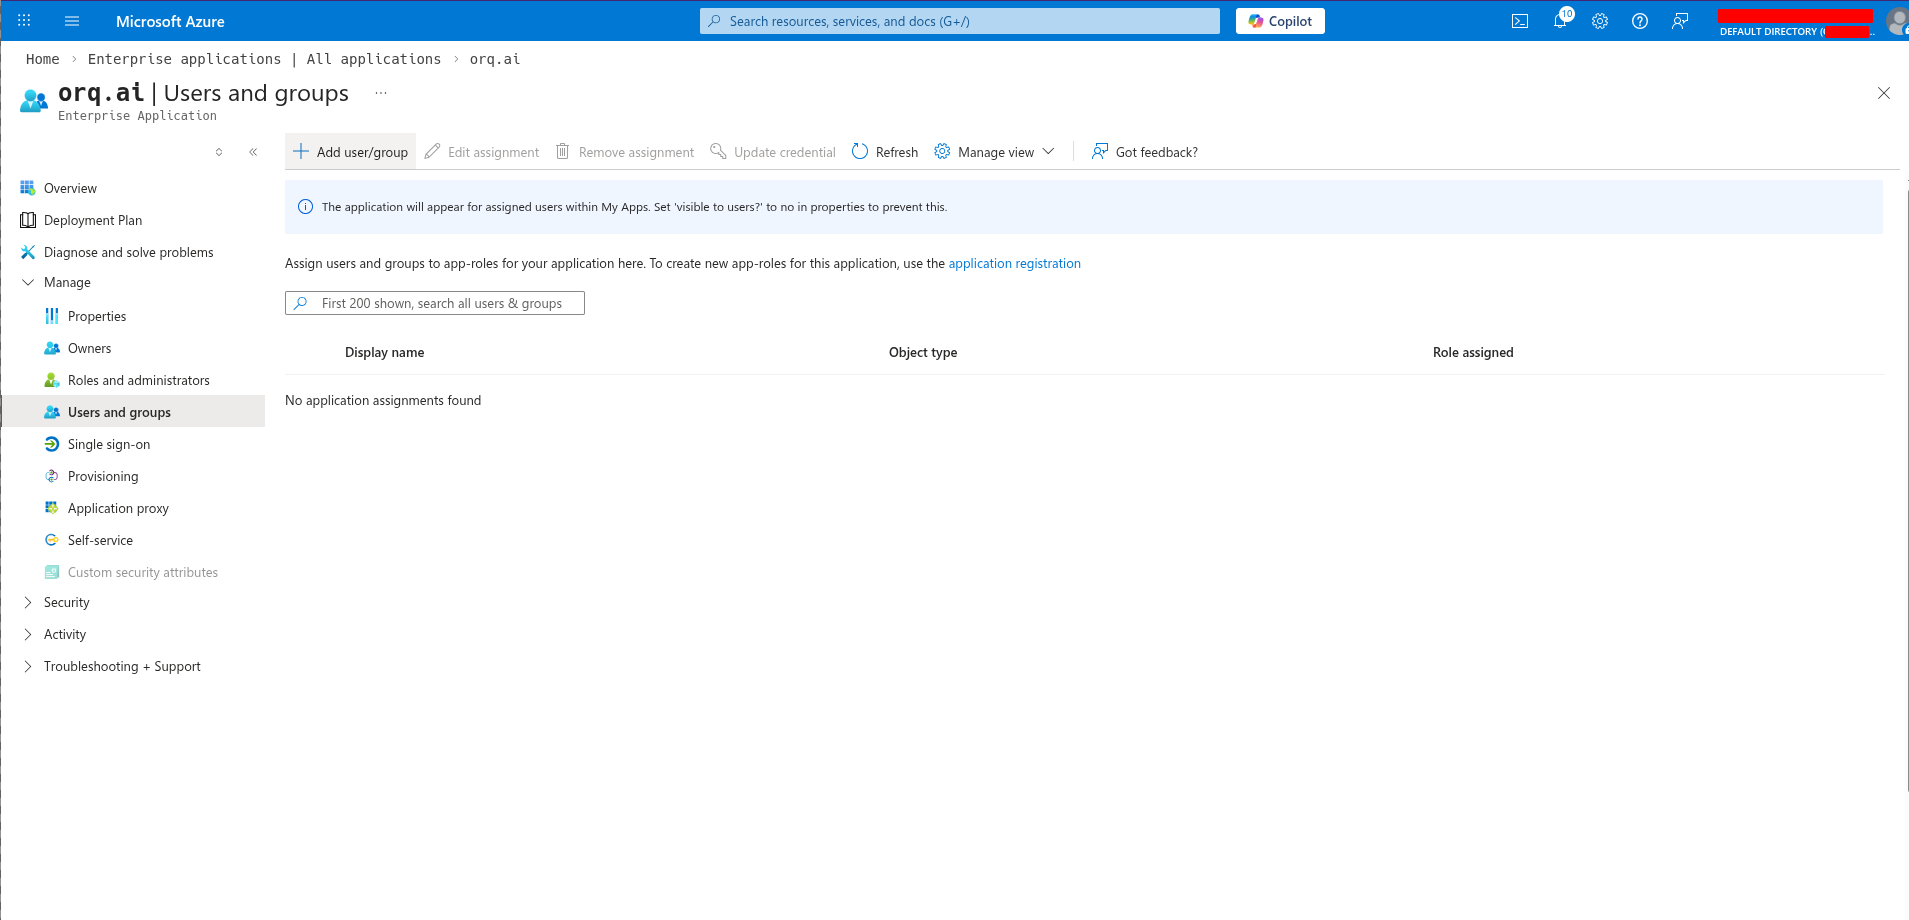 By default, any user in the directory can authenticate. Assigning specific users or groups restricts access.
Navigate to **AI Studio** → **Organization** → **Auth**.
Enter the credentials collected from Azure:
1. Select **SAML**
2. Enter the **Service Provider Entity ID** (from Step 1)
3. Enter the **Identity Provider Entity ID** (Microsoft Entra Identifier from Azure)
4. Enter the **Single Sign-On URL** (Login URL from Azure)
5. For **X.509 Certificate**: open the downloaded certificate file in a text editor, copy all content including the `-----BEGIN CERTIFICATE-----` and `-----END CERTIFICATE-----` lines, and paste it here
6. Enter the organization's email domain(s) in **Allowed domains** (e.g., `orq.ai`)
7. Click **Activate**
SSO is now configured. Users can sign in at:
```
https://my.orq.ai/{your-workspace-key}/login
```
Log in to the **Keycloak admin console**. From the realm dropdown (top-left), select an existing realm or click **Create realm**. Note the realm name; it is needed for the Provider URL.
Keycloak may update their admin console interface over time. Refer to [Keycloak's official documentation](https://www.keycloak.org/documentation) if any steps differ.
In the chosen realm, navigate to **Clients** and click **Create client**.
By default, any user in the directory can authenticate. Assigning specific users or groups restricts access.
Navigate to **AI Studio** → **Organization** → **Auth**.
Enter the credentials collected from Azure:
1. Select **SAML**
2. Enter the **Service Provider Entity ID** (from Step 1)
3. Enter the **Identity Provider Entity ID** (Microsoft Entra Identifier from Azure)
4. Enter the **Single Sign-On URL** (Login URL from Azure)
5. For **X.509 Certificate**: open the downloaded certificate file in a text editor, copy all content including the `-----BEGIN CERTIFICATE-----` and `-----END CERTIFICATE-----` lines, and paste it here
6. Enter the organization's email domain(s) in **Allowed domains** (e.g., `orq.ai`)
7. Click **Activate**
SSO is now configured. Users can sign in at:
```
https://my.orq.ai/{your-workspace-key}/login
```
Log in to the **Keycloak admin console**. From the realm dropdown (top-left), select an existing realm or click **Create realm**. Note the realm name; it is needed for the Provider URL.
Keycloak may update their admin console interface over time. Refer to [Keycloak's official documentation](https://www.keycloak.org/documentation) if any steps differ.
In the chosen realm, navigate to **Clients** and click **Create client**.
 Configure the General Settings:
| Field | Value |
| --------------- | ---------------------------------- |
| **Client type** | `OpenID Connect` |
| **Client ID** | `orq-ai` (or preferred identifier) |
| **Name** | `orq.ai` (optional display name) |
Click **Next**.
Configure the General Settings:
| Field | Value |
| --------------- | ---------------------------------- |
| **Client type** | `OpenID Connect` |
| **Client ID** | `orq-ai` (or preferred identifier) |
| **Name** | `orq.ai` (optional display name) |
Click **Next**.
 Enable the following:
| Field | Value |
| ------------------------- | ----- |
| **Client authentication** | `On` |
| **Standard flow** | `On` |
Leave **Direct access grants**, **Implicit flow**, and **Service accounts roles** off unless the organization requires them. Click **Next**.
Enable the following:
| Field | Value |
| ------------------------- | ----- |
| **Client authentication** | `On` |
| **Standard flow** | `On` |
Leave **Direct access grants**, **Implicit flow**, and **Service accounts roles** off unless the organization requires them. Click **Next**.
 Enter the following:
| Field | Value |
| ----------------------- | --------------------------------------------- |
| **Valid redirect URIs** | `https://my.orq.ai/v2/auth/sso/oidc/callback` |
| **Web origins** | `https://my.orq.ai` |
Click **Save**.
Enter the following:
| Field | Value |
| ----------------------- | --------------------------------------------- |
| **Valid redirect URIs** | `https://my.orq.ai/v2/auth/sso/oidc/callback` |
| **Web origins** | `https://my.orq.ai` |
Click **Save**.
 Open the client just created, go to the **Credentials** tab, and copy the **Client Secret**.
 The OIDC Issuer URL follows this pattern:
```
https://{your-keycloak-domain}/realms/{realm-name}
```
For example, with Keycloak at `https://auth.example.com` and realm `orq-prod`:
```
https://auth.example.com/realms/orq-prod
```
Verify the Provider URL by visiting `{issuer-url}/.well-known/openid-configuration` in a browser; it should return a JSON discovery document.
| Field | Where to Find |
| ----------------- | ---------------------------------------------------- |
| **Client ID** | The Client ID entered in Step 2 |
| **Client Secret** | Copied from the **Credentials** tab |
| **Provider URL** | `https://{your-keycloak-domain}/realms/{realm-name}` |
Any user in the realm can sign in by default. To restrict access, configure client-level roles and assign them:
1. Open the client → **Roles** tab → create roles as needed
2. Open **Users** → select user → **Role mappings** → assign the client roles
The OIDC Issuer URL follows this pattern:
```
https://{your-keycloak-domain}/realms/{realm-name}
```
For example, with Keycloak at `https://auth.example.com` and realm `orq-prod`:
```
https://auth.example.com/realms/orq-prod
```
Verify the Provider URL by visiting `{issuer-url}/.well-known/openid-configuration` in a browser; it should return a JSON discovery document.
| Field | Where to Find |
| ----------------- | ---------------------------------------------------- |
| **Client ID** | The Client ID entered in Step 2 |
| **Client Secret** | Copied from the **Credentials** tab |
| **Provider URL** | `https://{your-keycloak-domain}/realms/{realm-name}` |
Any user in the realm can sign in by default. To restrict access, configure client-level roles and assign them:
1. Open the client → **Roles** tab → create roles as needed
2. Open **Users** → select user → **Role mappings** → assign the client roles
 Navigate to **AI Studio** → **Organization** → **Auth**.
1. Select **OIDC**
2. Enter the **Client ID**
3. Enter the **Client Secret**
4. Enter the **Provider URL** (the Issuer URL from Keycloak)
5. Enter the organization's email domain(s) in **Allowed domains**
6. Click **Activate**
SSO is now configured. Users can sign in at:
```
https://my.orq.ai/{your-workspace-key}/login
```
Choose a unique identifier for the SP Entity ID. It must match exactly in both **Keycloak** and **Orq.ai**. We recommend:
```
urn:orq.ai:{your-workspace-key}
```
For example: `urn:orq.ai:example-corp`.
Write it down; it is needed in multiple steps.
Log in to the **Keycloak admin console**. From the realm dropdown (top-left), select an existing realm or click **Create realm**. Note the realm name.
Keycloak may update their admin console interface over time. Refer to [Keycloak's official documentation](https://www.keycloak.org/documentation) if any steps differ.
In the chosen realm, navigate to **Clients** and click **Create client**.
Configure the General Settings:
| Field | Value |
| --------------- | -------------------------------------------------------------- |
| **Client type** | `SAML` |
| **Client ID** | The SP Entity ID from Step 1 (e.g., `urn:orq.ai:example-corp`) |
| **Name** | `orq.ai` (optional display name) |
Click **Next**.
Navigate to **AI Studio** → **Organization** → **Auth**.
1. Select **OIDC**
2. Enter the **Client ID**
3. Enter the **Client Secret**
4. Enter the **Provider URL** (the Issuer URL from Keycloak)
5. Enter the organization's email domain(s) in **Allowed domains**
6. Click **Activate**
SSO is now configured. Users can sign in at:
```
https://my.orq.ai/{your-workspace-key}/login
```
Choose a unique identifier for the SP Entity ID. It must match exactly in both **Keycloak** and **Orq.ai**. We recommend:
```
urn:orq.ai:{your-workspace-key}
```
For example: `urn:orq.ai:example-corp`.
Write it down; it is needed in multiple steps.
Log in to the **Keycloak admin console**. From the realm dropdown (top-left), select an existing realm or click **Create realm**. Note the realm name.
Keycloak may update their admin console interface over time. Refer to [Keycloak's official documentation](https://www.keycloak.org/documentation) if any steps differ.
In the chosen realm, navigate to **Clients** and click **Create client**.
Configure the General Settings:
| Field | Value |
| --------------- | -------------------------------------------------------------- |
| **Client type** | `SAML` |
| **Client ID** | The SP Entity ID from Step 1 (e.g., `urn:orq.ai:example-corp`) |
| **Name** | `orq.ai` (optional display name) |
Click **Next**.
 Enter the following:
| Field | Value |
| ------------------------------ | --------------------------------------------- |
| **Valid redirect URIs** | `https://my.orq.ai/v2/auth/sso/saml/callback` |
| **Master SAML Processing URL** | `https://my.orq.ai/v2/auth/sso/saml/callback` |
Click **Save**.
Enter the following:
| Field | Value |
| ------------------------------ | --------------------------------------------- |
| **Valid redirect URIs** | `https://my.orq.ai/v2/auth/sso/saml/callback` |
| **Master SAML Processing URL** | `https://my.orq.ai/v2/auth/sso/saml/callback` |
Click **Save**.
 Open the client → **Settings** tab. Scroll to **SAML capabilities** and **Signature and Encryption** sections.
Set the following:
| Field | Value |
| ------------------- | ------- |
| **Sign assertions** | `On` |
| **Sign documents** | `On` |
| **Name ID format** | `email` |
Click **Save**.
Open the client → **Settings** tab. Scroll to **SAML capabilities** and **Signature and Encryption** sections.
Set the following:
| Field | Value |
| ------------------- | ------- |
| **Sign assertions** | `On` |
| **Sign documents** | `On` |
| **Name ID format** | `email` |
Click **Save**.

 Open the client → **Keys** tab.
Under **Signing keys config**, set:
| Field | Value |
| ----------------------------- | ----- |
| **Client signature required** | `Off` |
Under **Encryption keys config**, confirm:
| Field | Value |
| ---------------------- | ----- |
| **Encrypt assertions** | `Off` |
Open the client → **Keys** tab.
Under **Signing keys config**, set:
| Field | Value |
| ----------------------------- | ----- |
| **Client signature required** | `Off` |
Under **Encryption keys config**, confirm:
| Field | Value |
| ---------------------- | ----- |
| **Encrypt assertions** | `Off` |
 `Client signature required` defaults to **On** in Keycloak: turn it **Off**. **Orq.ai** does not sign outbound SAML AuthnRequests, so leaving this on causes Keycloak to reject every login attempt.
`Encrypt assertions` must remain **Off**. **Orq.ai** does not decrypt assertions.
A new Keycloak SAML client only sends the NameID and role list by default, not email, first name, or last name. Add mappers so **Orq.ai** can populate the user profile.
1. Open the client → **Client scopes** tab
2. Click the dedicated scope row (named `{client-id}-dedicated`)
3. Open the **Mappers** tab inside that scope
**Option A (recommended): Add predefined X500 mappers**
1. Click **Add predefined mapper**
2. Select these three rows:
* `X500 email`
* `X500 givenName`
* `X500 surname`
3. Click **Add**
`Client signature required` defaults to **On** in Keycloak: turn it **Off**. **Orq.ai** does not sign outbound SAML AuthnRequests, so leaving this on causes Keycloak to reject every login attempt.
`Encrypt assertions` must remain **Off**. **Orq.ai** does not decrypt assertions.
A new Keycloak SAML client only sends the NameID and role list by default, not email, first name, or last name. Add mappers so **Orq.ai** can populate the user profile.
1. Open the client → **Client scopes** tab
2. Click the dedicated scope row (named `{client-id}-dedicated`)
3. Open the **Mappers** tab inside that scope
**Option A (recommended): Add predefined X500 mappers**
1. Click **Add predefined mapper**
2. Select these three rows:
* `X500 email`
* `X500 givenName`
* `X500 surname`
3. Click **Add**

 **Option B: Configure custom mappers with simple names**
Click **Configure a new mapper**, select **User Property**, and create three mappers:
| Mapper | Property | SAML Attribute Name | NameFormat |
| ----------- | ----------- | ------------------- | ---------- |
| `email` | `email` | `email` | `Basic` |
| `firstName` | `firstName` | `firstName` | `Basic` |
| `lastName` | `lastName` | `lastName` | `Basic` |
1. In the left navigation, click **Realm settings**
2. Open the **Keys** tab → **Keys list** sub-tab
3. Find the row where **Algorithm = `RS256`**, **Type = `RSA`**, **Use = `SIG`**
4. In the **Public keys** column, click **Certificate**
5. Copy the entire base64 value from the modal
**Option B: Configure custom mappers with simple names**
Click **Configure a new mapper**, select **User Property**, and create three mappers:
| Mapper | Property | SAML Attribute Name | NameFormat |
| ----------- | ----------- | ------------------- | ---------- |
| `email` | `email` | `email` | `Basic` |
| `firstName` | `firstName` | `firstName` | `Basic` |
| `lastName` | `lastName` | `lastName` | `Basic` |
1. In the left navigation, click **Realm settings**
2. Open the **Keys** tab → **Keys list** sub-tab
3. Find the row where **Algorithm = `RS256`**, **Type = `RSA`**, **Use = `SIG`**
4. In the **Public keys** column, click **Certificate**
5. Copy the entire base64 value from the modal
 **Orq.ai** accepts the certificate as raw base64 or PEM-wrapped with `-----BEGIN CERTIFICATE-----` / `-----END CERTIFICATE-----` markers. Pasting raw base64 directly works.
The SAML endpoints follow these patterns:
| Field | Pattern |
| ------------------------------- | ------------------------------------------------------------------ |
| **Identity Provider Entity ID** | `https://{your-keycloak-domain}/realms/{realm-name}` |
| **Single Sign-On URL** | `https://{your-keycloak-domain}/realms/{realm-name}/protocol/saml` |
For example with Keycloak at `https://auth.example.com` and realm `orq-prod`:
* IdP Entity ID: `https://auth.example.com/realms/orq-prod`
* SSO URL: `https://auth.example.com/realms/orq-prod/protocol/saml`
Navigate to **AI Studio** → **Organization** → **Auth**.
1. Select **SAML**
2. Enter the **Service Provider Entity ID** (from Step 1)
3. Enter the **Identity Provider Entity ID**
4. Enter the **Single Sign-On URL**
5. Paste the **X.509 Certificate** copied from Realm settings
6. Enter the organization's email domain(s) in **Allowed domains**
7. Click **Activate**
SSO is now configured. Users can sign in at:
```
https://my.orq.ai/{your-workspace-key}/login
```
Log in to the **Authentik admin interface** and navigate to **Applications → Providers**.
**Orq.ai** accepts the certificate as raw base64 or PEM-wrapped with `-----BEGIN CERTIFICATE-----` / `-----END CERTIFICATE-----` markers. Pasting raw base64 directly works.
The SAML endpoints follow these patterns:
| Field | Pattern |
| ------------------------------- | ------------------------------------------------------------------ |
| **Identity Provider Entity ID** | `https://{your-keycloak-domain}/realms/{realm-name}` |
| **Single Sign-On URL** | `https://{your-keycloak-domain}/realms/{realm-name}/protocol/saml` |
For example with Keycloak at `https://auth.example.com` and realm `orq-prod`:
* IdP Entity ID: `https://auth.example.com/realms/orq-prod`
* SSO URL: `https://auth.example.com/realms/orq-prod/protocol/saml`
Navigate to **AI Studio** → **Organization** → **Auth**.
1. Select **SAML**
2. Enter the **Service Provider Entity ID** (from Step 1)
3. Enter the **Identity Provider Entity ID**
4. Enter the **Single Sign-On URL**
5. Paste the **X.509 Certificate** copied from Realm settings
6. Enter the organization's email domain(s) in **Allowed domains**
7. Click **Activate**
SSO is now configured. Users can sign in at:
```
https://my.orq.ai/{your-workspace-key}/login
```
Log in to the **Authentik admin interface** and navigate to **Applications → Providers**.
 Click **Create**, select **OAuth2/OpenID Provider**, and click **Next**.
 Authentik may update their admin interface over time. Refer to [Authentik's official documentation](https://docs.goauthentik.io/) if any steps differ.
Enter the following values:
| Field | Value |
| --------------------------- | ----------------------------------------------------------- |
| **Name** | `orq.ai` (or preferred name) |
| **Authorization flow** | `default-provider-authorization-implicit-consent` |
| **Client type** | `Confidential` |
| **Redirect URIs / Origins** | `https://my.orq.ai/v2/auth/sso/oidc/callback` (Strict mode) |
Authentik pre-generates the **Client ID** and **Client Secret** inside this form. Copy both values now; they are needed to configure **Orq.ai** in the final step.
Authentik may update their admin interface over time. Refer to [Authentik's official documentation](https://docs.goauthentik.io/) if any steps differ.
Enter the following values:
| Field | Value |
| --------------------------- | ----------------------------------------------------------- |
| **Name** | `orq.ai` (or preferred name) |
| **Authorization flow** | `default-provider-authorization-implicit-consent` |
| **Client type** | `Confidential` |
| **Redirect URIs / Origins** | `https://my.orq.ai/v2/auth/sso/oidc/callback` (Strict mode) |
Authentik pre-generates the **Client ID** and **Client Secret** inside this form. Copy both values now; they are needed to configure **Orq.ai** in the final step.
 Click **Finish**.
Navigate to **Applications → Applications** and click **Create**.
Click **Finish**.
Navigate to **Applications → Applications** and click **Create**.
 Enter the following:
| Field | Value |
| ------------ | -------------------------------------------- |
| **Name** | `orq.ai` |
| **Slug** | `orq-ai` (becomes part of the Issuer URL) |
| **Provider** | The OAuth2/OpenID provider created in Step 1 |
Click **Create**.
Enter the following:
| Field | Value |
| ------------ | -------------------------------------------- |
| **Name** | `orq.ai` |
| **Slug** | `orq-ai` (becomes part of the Issuer URL) |
| **Provider** | The OAuth2/OpenID provider created in Step 1 |
Click **Create**.
 The OIDC Issuer URL follows this pattern:
```
https://{your-authentik-domain}/application/o/{application-slug}/
```
For example, with Authentik at `https://auth.example.com` and slug `orq-ai`:
```
https://auth.example.com/application/o/orq-ai/
```
The trailing slash on the Issuer URL is required. Authentik's discovery endpoint fails without it.
Open the application, go to the **Policy / Group / User Bindings** tab, and add a binding for the users or groups that should have access.
The OIDC Issuer URL follows this pattern:
```
https://{your-authentik-domain}/application/o/{application-slug}/
```
For example, with Authentik at `https://auth.example.com` and slug `orq-ai`:
```
https://auth.example.com/application/o/orq-ai/
```
The trailing slash on the Issuer URL is required. Authentik's discovery endpoint fails without it.
Open the application, go to the **Policy / Group / User Bindings** tab, and add a binding for the users or groups that should have access.
 If no bindings are configured, every authenticated Authentik user can access the application. If a binding excludes the user, Authentik shows `Request has been denied. Unknown error` on sign-in.
Navigate to **AI Studio** → **Organization** → **Auth**.
1. Select **OIDC**
2. Enter the **Client ID** (copied in Step 2)
3. Enter the **Client Secret** (copied in Step 2)
4. Enter the **Provider URL** (the Issuer URL from Authentik, with trailing slash)
5. Enter the organization's email domain(s) in **Allowed domains**
6. Click **Activate**
SSO is now configured. Users can sign in at:
```
https://my.orq.ai/{your-workspace-key}/login
```
Choose a unique identifier for the SP Entity ID. It must match exactly in both **Authentik** and **Orq.ai**. Recommended format:
```
urn:orq.ai:{your-workspace-key}
```
For example: `urn:orq.ai:example-corp`.
Write it down; it is needed in multiple steps.
Log in to the **Authentik admin interface** and navigate to **Applications → Providers**.
Click **Create**, select **SAML Provider**, and click **Next**.
If no bindings are configured, every authenticated Authentik user can access the application. If a binding excludes the user, Authentik shows `Request has been denied. Unknown error` on sign-in.
Navigate to **AI Studio** → **Organization** → **Auth**.
1. Select **OIDC**
2. Enter the **Client ID** (copied in Step 2)
3. Enter the **Client Secret** (copied in Step 2)
4. Enter the **Provider URL** (the Issuer URL from Authentik, with trailing slash)
5. Enter the organization's email domain(s) in **Allowed domains**
6. Click **Activate**
SSO is now configured. Users can sign in at:
```
https://my.orq.ai/{your-workspace-key}/login
```
Choose a unique identifier for the SP Entity ID. It must match exactly in both **Authentik** and **Orq.ai**. Recommended format:
```
urn:orq.ai:{your-workspace-key}
```
For example: `urn:orq.ai:example-corp`.
Write it down; it is needed in multiple steps.
Log in to the **Authentik admin interface** and navigate to **Applications → Providers**.
Click **Create**, select **SAML Provider**, and click **Next**.
 Authentik may update their admin interface over time. Refer to [Authentik's official documentation](https://docs.goauthentik.io/) if any steps differ.
Fill in the main form fields:
| Field | Value |
| ---------------------------- | -------------------------------------------------------------- |
| **Name** | `orq.ai` (or preferred name) |
| **Authorization flow** | `default-provider-authorization-implicit-consent` |
| **ACS URL** | `https://my.orq.ai/v2/auth/sso/saml/callback` |
| **Issuer** | `authentik` (default) or a descriptive identifier |
| **Service Provider Binding** | `Post` |
| **Audience** | The SP Entity ID from Step 1 (e.g., `urn:orq.ai:example-corp`) |
Expand **Advanced protocol settings** and configure:
| Field | Value |
| ---------------------------- | ----------------------------------- |
| **Signing Certificate** | `authentik Self-signed Certificate` |
| **Sign assertions** | `On` |
| **Sign responses** | `On` |
| **Verification Certificate** | Leave empty |
| **Encryption Certificate** | Leave empty |
**Sign assertions** must be `On`. Even with the Signing Certificate pre-populated, Authentik will not sign assertions (and omits `` from metadata) unless this toggle is enabled. **Orq.ai** rejects unsigned assertions.
Authentik may update their admin interface over time. Refer to [Authentik's official documentation](https://docs.goauthentik.io/) if any steps differ.
Fill in the main form fields:
| Field | Value |
| ---------------------------- | -------------------------------------------------------------- |
| **Name** | `orq.ai` (or preferred name) |
| **Authorization flow** | `default-provider-authorization-implicit-consent` |
| **ACS URL** | `https://my.orq.ai/v2/auth/sso/saml/callback` |
| **Issuer** | `authentik` (default) or a descriptive identifier |
| **Service Provider Binding** | `Post` |
| **Audience** | The SP Entity ID from Step 1 (e.g., `urn:orq.ai:example-corp`) |
Expand **Advanced protocol settings** and configure:
| Field | Value |
| ---------------------------- | ----------------------------------- |
| **Signing Certificate** | `authentik Self-signed Certificate` |
| **Sign assertions** | `On` |
| **Sign responses** | `On` |
| **Verification Certificate** | Leave empty |
| **Encryption Certificate** | Leave empty |
**Sign assertions** must be `On`. Even with the Signing Certificate pre-populated, Authentik will not sign assertions (and omits `` from metadata) unless this toggle is enabled. **Orq.ai** rejects unsigned assertions.
 Click **Finish**.
Navigate to **Applications → Applications** and click **Create**.
Enter the following:
| Field | Value |
| ------------ | ------------------------------------------- |
| **Name** | `orq.ai` |
| **Slug** | `orq-ai-saml` (becomes part of the SSO URL) |
| **Provider** | The SAML provider created in Step 2 |
Click **Create**.
Click **Finish**.
Navigate to **Applications → Applications** and click **Create**.
Enter the following:
| Field | Value |
| ------------ | ------------------------------------------- |
| **Name** | `orq.ai` |
| **Slug** | `orq-ai-saml` (becomes part of the SSO URL) |
| **Provider** | The SAML provider created in Step 2 |
Click **Create**.
 Open **Applications → Providers** and click the SAML provider. In the **SAML Configuration** section:
* Copy the **EntityID/Issuer**: this is the Identity Provider Entity ID
* Copy the **SSO URL (Redirect)**: use the **Redirect** binding URL, not the Post one
The Redirect SSO URL follows this pattern:
```
https://{your-authentik-domain}/application/saml/{application-slug}/sso/binding/redirect/
```
**Orq.ai** issues the SAML AuthnRequest via HTTP-Redirect binding. Using the `/binding/post/` endpoint results in `Bad Request: The SAML request payload is missing`. Always use the Redirect URL.
In the **Related objects** section, click **Download signing certificate** to save the PEM file.
Open **Applications → Providers** and click the SAML provider. In the **SAML Configuration** section:
* Copy the **EntityID/Issuer**: this is the Identity Provider Entity ID
* Copy the **SSO URL (Redirect)**: use the **Redirect** binding URL, not the Post one
The Redirect SSO URL follows this pattern:
```
https://{your-authentik-domain}/application/saml/{application-slug}/sso/binding/redirect/
```
**Orq.ai** issues the SAML AuthnRequest via HTTP-Redirect binding. Using the `/binding/post/` endpoint results in `Bad Request: The SAML request payload is missing`. Always use the Redirect URL.
In the **Related objects** section, click **Download signing certificate** to save the PEM file.
 The **Download signing certificate** button only appears after selecting a Signing Certificate and enabling Sign assertions in Step 3. If not visible, edit the provider and complete the Advanced protocol settings first.
Open the application, go to the **Policy / Group / User Bindings** tab, and add a binding for the users or groups that should have access.
Navigate to **AI Studio** → **Organization** → **Auth**.
1. Select **SAML**
2. Enter the **Service Provider Entity ID** (from Step 1)
3. Enter the **Identity Provider Entity ID** (the Issuer value from Authentik)
4. Enter the **Single Sign-On URL** (the Redirect-binding SSO URL)
5. Paste the certificate downloaded from Authentik
6. Enter the organization's email domain(s) in **Allowed domains**
7. Click **Activate**
SSO is now configured. Users can sign in at:
```
https://my.orq.ai/{your-workspace-key}/login
```
**Orq.ai** works with any standards-compliant OIDC 1.0 identity provider (Auth0, Google Workspace, JumpCloud, OneLogin, Ping Identity, Duo, Rippling, Authelia, Zitadel, and others).
**What Orq.ai requires from the IdP**
**Orq.ai** acts as an OIDC Relying Party using the Authorization Code flow:
| Requirement | Value |
| ------------------------------ | ------------------------------------------------------------- |
| **Flow** | Authorization Code (with or without PKCE) |
| **Application type** | Web application / Confidential client |
| **Grant type** | `authorization_code` |
| **Token endpoint auth method** | `client_secret_post` or `client_secret_basic` |
| **Discovery** | `{issuer}/.well-known/openid-configuration` must be reachable |
In the IdP's admin interface, register a new web application with:
| Field | Value |
| --------------------------------------- | --------------------------------------------- |
| **Application type** | Web application (confidential client) |
| **Grant type / Flow** | Authorization Code |
| **Redirect URI** | `https://my.orq.ai/v2/auth/sso/oidc/callback` |
| **Post-logout redirect URI** (optional) | `https://my.orq.ai` |
| **Allowed scopes** | `openid`, `email`, `profile` |
Grant the IdP's equivalent of admin consent if required.
**Orq.ai** expects the ID token or `/userinfo` endpoint to return:
| Claim | Required? | Description |
| ---------------- | ----------- | --------------------------- |
| `sub` | Required | Stable user identifier |
| `email` | Required | User's email address |
| `email_verified` | Recommended | Marks the email as verified |
| `given_name` | Recommended | First name |
| `family_name` | Recommended | Last name |
| `name` | Recommended | Full display name |
Most IdPs return these automatically when the `profile` and `email` scopes are granted. If the IdP requires manual claim mapping, map user-directory fields to the names above.
| Field | Where to Find |
| ----------------- | --------------------------------------------------------------------------------- |
| **Client ID** | Provided by the IdP after registration |
| **Client Secret** | Generated by the IdP; copy immediately |
| **Provider URL** | Base URL whose `/.well-known/openid-configuration` returns the discovery document |
Verify the Provider URL by visiting `{issuer-url}/.well-known/openid-configuration` in a browser. It must return a JSON document containing `authorization_endpoint`, `token_endpoint`, `jwks_uri`, and `issuer`. The `issuer` field in that JSON must match exactly the URL entered in **Orq.ai**.
Use the IdP's standard user/group assignment to grant access to the **Orq.ai** application.
Navigate to **AI Studio** → **Organization** → **Auth**:
1. Select **OIDC**
2. Enter the **Client ID**
3. Enter the **Client Secret**
4. Enter the **Provider URL** (the Issuer URL from the IdP)
5. Enter the organization's email domain(s) in **Allowed domains**
6. Click **Activate**
Open a private browser window and navigate to `https://my.orq.ai`. The SSO login button will appear automatically.
**Orq.ai** works with any standards-compliant SAML 2.0 identity provider.
**What Orq.ai requires from the IdP**
| Requirement | Value |
| ----------------------------------- | -------------------------------------------------------- |
| **SP-initiated SSO** | Required |
| **AuthnRequest binding (SP → IdP)** | HTTP-Redirect |
| **Response binding (IdP → SP)** | HTTP-POST to the ACS URL |
| **NameID format** | `urn:oasis:names:tc:SAML:1.1:nameid-format:emailAddress` |
| **Assertion signing** | Required: RSA-SHA256 |
| **AuthnRequest signing** | Not required |
| **Assertion encryption** | Not supported; leave disabled |
Choose a unique identifier that must match exactly in both the IdP and **Orq.ai**. We recommend:
```
urn:orq.ai:{your-workspace-key}
```
In the IdP's admin interface, create a SAML 2.0 application with:
| IdP Field (common names) | Value |
| --------------------------- | --------------------------------------------- |
| **Audience / SP Entity ID** | The SP Entity ID from Step 1 |
| **ACS URL / Reply URL** | `https://my.orq.ai/v2/auth/sso/saml/callback` |
| **NameID format** | `EmailAddress` |
| **NameID source attribute** | The user's email address |
| Setting | Value |
| ------------------------------- | ------------- |
| **Sign assertion** | On (required) |
| **Signature algorithm** | `RSA-SHA256` |
| **Require signed AuthnRequest** | Off |
| **Encrypt assertion** | Off |
**Orq.ai** accepts a wide range of attribute name variants:
| Canonical | Also accepted |
| ----------- | --------------------------------------------------------------------------------------------------------------------------------- |
| `email` | `emailAddress`, `mail`, `http://schemas.xmlsoap.org/ws/2005/05/identity/claims/emailaddress`, `urn:oid:0.9.2342.19200300.100.1.3` |
| `firstName` | `givenName`, `http://schemas.xmlsoap.org/ws/2005/05/identity/claims/givenname`, `urn:oid:2.5.4.42` |
| `lastName` | `familyName`, `surname`, `http://schemas.xmlsoap.org/ws/2005/05/identity/claims/surname`, `urn:oid:2.5.4.4` |
Many IdPs do not send name and email attributes by default. After registering the application, explicitly add attribute mappers / claim rules / attribute statements in the IdP before the assertion will contain anything **Orq.ai** can read.
| orq.ai Field | Common IdP Label(s) |
| ------------------------------- | -------------------------------------------------------------------------- |
| **Identity Provider Entity ID** | `Issuer`, `IdP Entity ID`, `Microsoft Entra Identifier`, `entityID` |
| **Single Sign-On URL** | `SSO URL`, `Sign-on URL`, `Login URL`, `SingleSignOnService Location` |
| **X.509 Certificate** | `Signing Certificate`, `Token Signing Certificate`, `Certificate (Base64)` |
If the IdP provides a SAML metadata XML file or URL, the IdP Entity ID, SSO URL, and certificate are all embedded inside. Use the `HTTP-Redirect` binding URL for the SSO URL.
Navigate to **AI Studio** → **Organization** → **Auth**:
1. Select **SAML**
2. Enter the **Service Provider Entity ID**
3. Enter the **Identity Provider Entity ID**
4. Enter the **Single Sign-On URL** (HTTP-Redirect endpoint)
5. Paste the **X.509 Certificate**
6. Enter the organization's email domain(s) in **Allowed domains**
7. Click **Activate**
Open a private browser window and navigate to `https://my.orq.ai`. The SSO login button will appear automatically.
### Edit a connection
1. Click the menu on the active SSO connection
2. Click **Edit**
3. Update the desired fields
4. Click **Save Changes**
The **Download signing certificate** button only appears after selecting a Signing Certificate and enabling Sign assertions in Step 3. If not visible, edit the provider and complete the Advanced protocol settings first.
Open the application, go to the **Policy / Group / User Bindings** tab, and add a binding for the users or groups that should have access.
Navigate to **AI Studio** → **Organization** → **Auth**.
1. Select **SAML**
2. Enter the **Service Provider Entity ID** (from Step 1)
3. Enter the **Identity Provider Entity ID** (the Issuer value from Authentik)
4. Enter the **Single Sign-On URL** (the Redirect-binding SSO URL)
5. Paste the certificate downloaded from Authentik
6. Enter the organization's email domain(s) in **Allowed domains**
7. Click **Activate**
SSO is now configured. Users can sign in at:
```
https://my.orq.ai/{your-workspace-key}/login
```
**Orq.ai** works with any standards-compliant OIDC 1.0 identity provider (Auth0, Google Workspace, JumpCloud, OneLogin, Ping Identity, Duo, Rippling, Authelia, Zitadel, and others).
**What Orq.ai requires from the IdP**
**Orq.ai** acts as an OIDC Relying Party using the Authorization Code flow:
| Requirement | Value |
| ------------------------------ | ------------------------------------------------------------- |
| **Flow** | Authorization Code (with or without PKCE) |
| **Application type** | Web application / Confidential client |
| **Grant type** | `authorization_code` |
| **Token endpoint auth method** | `client_secret_post` or `client_secret_basic` |
| **Discovery** | `{issuer}/.well-known/openid-configuration` must be reachable |
In the IdP's admin interface, register a new web application with:
| Field | Value |
| --------------------------------------- | --------------------------------------------- |
| **Application type** | Web application (confidential client) |
| **Grant type / Flow** | Authorization Code |
| **Redirect URI** | `https://my.orq.ai/v2/auth/sso/oidc/callback` |
| **Post-logout redirect URI** (optional) | `https://my.orq.ai` |
| **Allowed scopes** | `openid`, `email`, `profile` |
Grant the IdP's equivalent of admin consent if required.
**Orq.ai** expects the ID token or `/userinfo` endpoint to return:
| Claim | Required? | Description |
| ---------------- | ----------- | --------------------------- |
| `sub` | Required | Stable user identifier |
| `email` | Required | User's email address |
| `email_verified` | Recommended | Marks the email as verified |
| `given_name` | Recommended | First name |
| `family_name` | Recommended | Last name |
| `name` | Recommended | Full display name |
Most IdPs return these automatically when the `profile` and `email` scopes are granted. If the IdP requires manual claim mapping, map user-directory fields to the names above.
| Field | Where to Find |
| ----------------- | --------------------------------------------------------------------------------- |
| **Client ID** | Provided by the IdP after registration |
| **Client Secret** | Generated by the IdP; copy immediately |
| **Provider URL** | Base URL whose `/.well-known/openid-configuration` returns the discovery document |
Verify the Provider URL by visiting `{issuer-url}/.well-known/openid-configuration` in a browser. It must return a JSON document containing `authorization_endpoint`, `token_endpoint`, `jwks_uri`, and `issuer`. The `issuer` field in that JSON must match exactly the URL entered in **Orq.ai**.
Use the IdP's standard user/group assignment to grant access to the **Orq.ai** application.
Navigate to **AI Studio** → **Organization** → **Auth**:
1. Select **OIDC**
2. Enter the **Client ID**
3. Enter the **Client Secret**
4. Enter the **Provider URL** (the Issuer URL from the IdP)
5. Enter the organization's email domain(s) in **Allowed domains**
6. Click **Activate**
Open a private browser window and navigate to `https://my.orq.ai`. The SSO login button will appear automatically.
**Orq.ai** works with any standards-compliant SAML 2.0 identity provider.
**What Orq.ai requires from the IdP**
| Requirement | Value |
| ----------------------------------- | -------------------------------------------------------- |
| **SP-initiated SSO** | Required |
| **AuthnRequest binding (SP → IdP)** | HTTP-Redirect |
| **Response binding (IdP → SP)** | HTTP-POST to the ACS URL |
| **NameID format** | `urn:oasis:names:tc:SAML:1.1:nameid-format:emailAddress` |
| **Assertion signing** | Required: RSA-SHA256 |
| **AuthnRequest signing** | Not required |
| **Assertion encryption** | Not supported; leave disabled |
Choose a unique identifier that must match exactly in both the IdP and **Orq.ai**. We recommend:
```
urn:orq.ai:{your-workspace-key}
```
In the IdP's admin interface, create a SAML 2.0 application with:
| IdP Field (common names) | Value |
| --------------------------- | --------------------------------------------- |
| **Audience / SP Entity ID** | The SP Entity ID from Step 1 |
| **ACS URL / Reply URL** | `https://my.orq.ai/v2/auth/sso/saml/callback` |
| **NameID format** | `EmailAddress` |
| **NameID source attribute** | The user's email address |
| Setting | Value |
| ------------------------------- | ------------- |
| **Sign assertion** | On (required) |
| **Signature algorithm** | `RSA-SHA256` |
| **Require signed AuthnRequest** | Off |
| **Encrypt assertion** | Off |
**Orq.ai** accepts a wide range of attribute name variants:
| Canonical | Also accepted |
| ----------- | --------------------------------------------------------------------------------------------------------------------------------- |
| `email` | `emailAddress`, `mail`, `http://schemas.xmlsoap.org/ws/2005/05/identity/claims/emailaddress`, `urn:oid:0.9.2342.19200300.100.1.3` |
| `firstName` | `givenName`, `http://schemas.xmlsoap.org/ws/2005/05/identity/claims/givenname`, `urn:oid:2.5.4.42` |
| `lastName` | `familyName`, `surname`, `http://schemas.xmlsoap.org/ws/2005/05/identity/claims/surname`, `urn:oid:2.5.4.4` |
Many IdPs do not send name and email attributes by default. After registering the application, explicitly add attribute mappers / claim rules / attribute statements in the IdP before the assertion will contain anything **Orq.ai** can read.
| orq.ai Field | Common IdP Label(s) |
| ------------------------------- | -------------------------------------------------------------------------- |
| **Identity Provider Entity ID** | `Issuer`, `IdP Entity ID`, `Microsoft Entra Identifier`, `entityID` |
| **Single Sign-On URL** | `SSO URL`, `Sign-on URL`, `Login URL`, `SingleSignOnService Location` |
| **X.509 Certificate** | `Signing Certificate`, `Token Signing Certificate`, `Certificate (Base64)` |
If the IdP provides a SAML metadata XML file or URL, the IdP Entity ID, SSO URL, and certificate are all embedded inside. Use the `HTTP-Redirect` binding URL for the SSO URL.
Navigate to **AI Studio** → **Organization** → **Auth**:
1. Select **SAML**
2. Enter the **Service Provider Entity ID**
3. Enter the **Identity Provider Entity ID**
4. Enter the **Single Sign-On URL** (HTTP-Redirect endpoint)
5. Paste the **X.509 Certificate**
6. Enter the organization's email domain(s) in **Allowed domains**
7. Click **Activate**
Open a private browser window and navigate to `https://my.orq.ai`. The SSO login button will appear automatically.
### Edit a connection
1. Click the menu on the active SSO connection
2. Click **Edit**
3. Update the desired fields
4. Click **Save Changes**
 To switch protocols (OIDC to SAML or vice versa), **Orq.ai** confirms the switch and presents an empty form; the two configurations differ entirely. The active connection remains unchanged until **Save Changes** is clicked. Cancel to preserve the current configuration.
 The **Certificate** and **Client Secret** fields are blank in the edit form; they update only when a new value is provided and **Save Changes** is clicked.
## Testing
Before rolling out to the entire organization:
1. Test the configuration with a single user
2. Verify the user is created automatically in **Orq.ai** (if auto-provisioning is enabled)
3. Confirm the user's profile information (name, email) is correct
Users sign in at:
```
https://my.orq.ai/{your-workspace-key}/login
```
## Troubleshooting
**Error:** "redirect\_uri\_mismatch" or "Invalid redirect URI"
**Solution:** Verify the callback URL in the IdP exactly matches:
* **OIDC:** `https://my.orq.ai/v2/auth/sso/oidc/callback`
* **SAML:** `https://my.orq.ai/v2/auth/sso/saml/callback`
Common mistakes: extra slash at end, `http://` instead of `https://`, typo in URL.
**Error:** "Audience restriction" or "Invalid audience"
**Solution:** Verify the SP Entity ID matches exactly in both the IdP and **Orq.ai** configuration. It is case-sensitive.
**Error:** "invalid\_client" or "unauthorized\_client"
**Solution:** Regenerate the client secret in the IdP and update it in **Orq.ai**. Copy the secret immediately after creation.
**Symptom:** User cannot see the app or gets "access denied"
**Solution:**
* **Okta:** Go to application → Assignments and assign the user or their group
* **Azure:** Go to Enterprise application → Users and groups → Add user/group
* **Keycloak:** Open the client → Roles tab, create roles, and assign them to the user under Role mappings
* **Authentik:** Open the application → Policy / Group / User Bindings and add a binding
**Symptom:** SAML authentication suddenly stops working
**Solution:**
1. Download a new certificate from the IdP
2. Update the certificate in **Orq.ai** (AI Studio → Organization → Auth → Edit)
3. Click **Save Changes**
**Error:** "Email domain not allowed"
**Solution:** Add the user's email domain to **Allowed domains** in the **Orq.ai** SSO configuration. Separate multiple domains with commas (e.g., `acme.com, acme.io`).
**Symptom:** Authentication succeeds but user has no email
**Solution:** **Orq.ai** automatically requests the `User.Read` Microsoft Graph scope. Verify this permission is granted:
1. Go to API permissions in the app registration
2. Verify `User.Read` is present
3. Click "Grant admin consent" if needed
**Error:** "Invalid signature on document" or login redirects back to Keycloak
**Solution:** The SAML client's **Client signature required** (Keys tab) is `On`. Turn it `Off`; **Orq.ai** does not sign outbound AuthnRequests.
**Symptom:** User signs in but first name, last name, or email are missing in **Orq.ai**
**Solution:** The SAML client has no attribute mappers. For **Keycloak**, add X500 predefined mappers to the dedicated client scope. For **Authentik**, ensure Sign assertions is `On` in the provider's Advanced protocol settings.
**Error:** "Bad Request: The SAML request payload is missing"
**Solution:** The SSO URL points at `/binding/post/`. Switch to the `/binding/redirect/` URL; **Orq.ai** sends AuthnRequests via HTTP-Redirect.
**Error:** Issuer URL rejected
**Solution:** **Orq.ai** rejects `http://` issuers in production. The identity provider must be served over HTTPS.
### Need Help?
Contact [support@orq.ai](mailto:support@orq.ai) with:
* Workspace key
* Identity provider and protocol (e.g., "Keycloak SAML")
* Error message or screenshot
The **Certificate** and **Client Secret** fields are blank in the edit form; they update only when a new value is provided and **Save Changes** is clicked.
## Testing
Before rolling out to the entire organization:
1. Test the configuration with a single user
2. Verify the user is created automatically in **Orq.ai** (if auto-provisioning is enabled)
3. Confirm the user's profile information (name, email) is correct
Users sign in at:
```
https://my.orq.ai/{your-workspace-key}/login
```
## Troubleshooting
**Error:** "redirect\_uri\_mismatch" or "Invalid redirect URI"
**Solution:** Verify the callback URL in the IdP exactly matches:
* **OIDC:** `https://my.orq.ai/v2/auth/sso/oidc/callback`
* **SAML:** `https://my.orq.ai/v2/auth/sso/saml/callback`
Common mistakes: extra slash at end, `http://` instead of `https://`, typo in URL.
**Error:** "Audience restriction" or "Invalid audience"
**Solution:** Verify the SP Entity ID matches exactly in both the IdP and **Orq.ai** configuration. It is case-sensitive.
**Error:** "invalid\_client" or "unauthorized\_client"
**Solution:** Regenerate the client secret in the IdP and update it in **Orq.ai**. Copy the secret immediately after creation.
**Symptom:** User cannot see the app or gets "access denied"
**Solution:**
* **Okta:** Go to application → Assignments and assign the user or their group
* **Azure:** Go to Enterprise application → Users and groups → Add user/group
* **Keycloak:** Open the client → Roles tab, create roles, and assign them to the user under Role mappings
* **Authentik:** Open the application → Policy / Group / User Bindings and add a binding
**Symptom:** SAML authentication suddenly stops working
**Solution:**
1. Download a new certificate from the IdP
2. Update the certificate in **Orq.ai** (AI Studio → Organization → Auth → Edit)
3. Click **Save Changes**
**Error:** "Email domain not allowed"
**Solution:** Add the user's email domain to **Allowed domains** in the **Orq.ai** SSO configuration. Separate multiple domains with commas (e.g., `acme.com, acme.io`).
**Symptom:** Authentication succeeds but user has no email
**Solution:** **Orq.ai** automatically requests the `User.Read` Microsoft Graph scope. Verify this permission is granted:
1. Go to API permissions in the app registration
2. Verify `User.Read` is present
3. Click "Grant admin consent" if needed
**Error:** "Invalid signature on document" or login redirects back to Keycloak
**Solution:** The SAML client's **Client signature required** (Keys tab) is `On`. Turn it `Off`; **Orq.ai** does not sign outbound AuthnRequests.
**Symptom:** User signs in but first name, last name, or email are missing in **Orq.ai**
**Solution:** The SAML client has no attribute mappers. For **Keycloak**, add X500 predefined mappers to the dedicated client scope. For **Authentik**, ensure Sign assertions is `On` in the provider's Advanced protocol settings.
**Error:** "Bad Request: The SAML request payload is missing"
**Solution:** The SSO URL points at `/binding/post/`. Switch to the `/binding/redirect/` URL; **Orq.ai** sends AuthnRequests via HTTP-Redirect.
**Error:** Issuer URL rejected
**Solution:** **Orq.ai** rejects `http://` issuers in production. The identity provider must be served over HTTPS.
### Need Help?
Contact [support@orq.ai](mailto:support@orq.ai) with:
* Workspace key
* Identity provider and protocol (e.g., "Keycloak SAML")
* Error message or screenshot