> ## Documentation Index
> Fetch the complete documentation index at: https://docs.orq.ai/llms.txt
> Use this file to discover all available pages before exploring further.
# Simple RAG pattern
> Build a simple RAG system with Orq.ai. Combine knowledge bases with LLMs for accurate, document-grounded responses. Step-by-step implementation guide.
## Objective
A Simple RAG (Retrieval-Augmented Generation) system provides intelligent information retrieval and answer generation by combining your own knowledge base with large language models. This architecture enables applications to provide accurate, contextual responses based on your specific documents and data while maintaining the natural language capabilities of modern LLMs.
## Use Case
Simple RAG is ideal for applications that need:
* **Document-Based Q\&A**: Answer questions based on company documents, manuals, or knowledge repositories.
* **Internal Knowledge Search**: Help employees find information from internal wikis, policies, or procedures.
* **Customer Support**: Provide accurate answers based on product documentation and support materials.
* **Domain-Specific Information**: Reduce hallucinations by grounding responses in verified company data.
* **Contextual Responses**: Generate answers that reference specific sources and maintain accuracy.
## Prerequisite
Before configuring a Simple RAG, ensure you have:
* **Orq.ai Account**: Active workspace in the AI Studio.
* **API Access**: Valid API key from [Workspace Settings > API Keys](/docs/ai-studio/organization/api-keys).
* **Model Access**: At least one text generation model enabled in the [AI Gateway](/docs/ai-studio/ai-gateway/add-models), such as `gpt-5.4`, `claude-sonnet-4-6`, or `gpt-5.4-mini`.
* **Embedding Model**: At least one embedding model enabled for knowledge base functionality, such as `text-embedding-ada-002` or `text-embedding-3-small`.
* **Source Documents**: PDF, TXT, DOCX, CSV, or XML files containing your knowledge base content (max 10MB per file).
**Set up SDK**
Choose a programming language and install the corresponding SDK:
```bash Bash theme={"theme":{"light":"github-light","dark":"github-dark"}}
pip install orq-ai-sdk
```
````bash Bash theme={"theme":{"light":"github-light","dark":"github-dark"}}
npm install @orq-ai/node
```bash Python
pip install orq-ai-sdk
````
```bash Node.js theme={"theme":{"light":"github-light","dark":"github-dark"}}
npm install @orq-ai/node
```
Initialize the SDK as follows:
```python Python theme={"theme":{"light":"github-light","dark":"github-dark"}}
import os
from orq_ai_sdk import Orq
client = Orq(
api_key=os.environ.get("ORQ_API_KEY", "__API_KEY__"),
)
```
```typescript TypeScript theme={"theme":{"light":"github-light","dark":"github-dark"}}
import { Orq } from "@orq-ai/node";
const client = new Orq({
apiKey: process.env.ORQ_API_KEY || "__API_KEY__",
});
```
**Creating a Knowledge Base**
Begin by creating a knowledge base. The `embedding_model` uses the `provider/model` format, and the `key` is what the deployment prompt references later (use `companyDocs` to follow this guide).
```bash cURL theme={"theme":{"light":"github-light","dark":"github-dark"}}
curl --request POST \
--url https://api.orq.ai/v2/knowledge \
--header 'accept: application/json' \
--header 'authorization: Bearer ' \
--header 'content-type: application/json' \
--data '
{
"key": "companyDocs",
"embedding_model": "openai/text-embedding-3-small",
"path": "Default",
"description": "Customer service documentation"
}
'
```
```python Python theme={"theme":{"light":"github-light","dark":"github-dark"}}
res = client.knowledge.create(request={
"key": "companyDocs",
"embedding_model": "openai/text-embedding-3-small",
"path": "Default",
"description": "Customer service documentation",
})
knowledge_id = res.id
print(res)
```
```typescript TypeScript theme={"theme":{"light":"github-light","dark":"github-dark"}}
const res = await client.knowledge.create({
key: "companyDocs",
embeddingModel: "openai/text-embedding-3-small",
path: "Default",
description: "Customer service documentation",
});
const knowledgeId = res.id;
console.log(res);
```
Save the `knowledge_id` from the response. The datasource step below needs it.
**Create a datasource**
A datasource is the container the chunks live in inside the knowledge base. Because chunks are supplied directly in the next step rather than uploaded as a file, create the datasource empty: give it a `display_name` and leave `file_id` out.
Passing a `file_id` here would tell Orq.ai to chunk that file automatically. That is the file-based flow. This guide takes control of chunking instead, so the datasource starts empty.
```bash cURL theme={"theme":{"light":"github-light","dark":"github-dark"}}
curl --request POST \
--url https://api.orq.ai/v2/knowledge//datasources \
--header 'accept: application/json' \
--header 'authorization: Bearer ' \
--header 'content-type: application/json' \
--data '
{
"display_name": "customer_service_guide.txt"
}
'
```
```python Python theme={"theme":{"light":"github-light","dark":"github-dark"}}
res = client.knowledge.create_datasource(
knowledge_id=knowledge_id,
display_name="customer_service_guide.txt",
)
datasource_id = res.id
```
```typescript TypeScript theme={"theme":{"light":"github-light","dark":"github-dark"}}
const res = await client.knowledge.createDatasource({
knowledgeId,
requestBody: {
displayName: "customer_service_guide.txt",
},
});
const datasourceId = res.id;
```
**Chunk the Text and Add It to the Datasource**
This is the core of the pattern, in two parts: chunk the text with the [Chunking API](/reference/chunking/parse-text), then add the returned chunks to the datasource.
Chunking is the single biggest lever on retrieval quality. Splitting the text directly puts the strategy and chunk size under direct control instead of relying on a default.
The example below uses the `token` strategy, which splits purely on token count so every chunk is a predictable size, with `chunk_overlap` carrying a little context across boundaries. The Chunking API also supports `sentence`, `recursive`, `semantic`, `agentic`, and `fast` strategies. For the full list of strategies and parameters, see the [Chunking API reference](/reference/chunking/parse-text).
```bash cURL theme={"theme":{"light":"github-light","dark":"github-dark"}}
# 1. Chunk the text.
curl --request POST \
--url https://api.orq.ai/v2/chunking \
--header 'accept: application/json' \
--header 'authorization: Bearer ' \
--header 'content-type: application/json' \
--data '
{
"text": "",
"strategy": "token",
"chunk_size": 50,
"chunk_overlap": 20
}
'
# 2. Add the returned chunks to the datasource.
# Pipe the step 1 response through jq to build the request body,
# then pass it with --data @chunks.json:
# curl ... (step 1) | jq '[.chunks[] | {text: .text}]' > chunks.json
curl --request POST \
--url https://api.orq.ai/v2/knowledge//datasources//chunks \
--header 'accept: application/json' \
--header 'authorization: Bearer ' \
--header 'content-type: application/json' \
--data @chunks.json
```
```python Python theme={"theme":{"light":"github-light","dark":"github-dark"}}
document_text = """
Returns and refunds. Items may be returned within 30 days of delivery for a
full refund, provided they are unused and in their original packaging. Refunds
are issued to the original payment method within 5 to 7 business days. Items
returned after 30 days are eligible for store credit only.
Shipping. Standard shipping takes 3 to 5 business days. Express shipping
delivers within 1 to 2 business days for an additional fee.
"""
# 1. Chunk the text with the Chunking API.
chunked = client.chunking.parse(request={
"text": document_text,
"strategy": "token",
"chunk_size": 50,
"chunk_overlap": 20,
})
print(f"{len(chunked.chunks)} chunks created")
# 2. Add the chunks to the datasource.
client.knowledge.create_chunks(
knowledge_id=knowledge_id,
datasource_id=datasource_id,
request_body=[{"text": chunk.text} for chunk in chunked.chunks],
)
print("Chunks added to the knowledge base")
```
```typescript TypeScript theme={"theme":{"light":"github-light","dark":"github-dark"}}
const documentText = `
Returns and refunds. Items may be returned within 30 days of delivery for a
full refund, provided they are unused and in their original packaging. Refunds
are issued to the original payment method within 5 to 7 business days. Items
returned after 30 days are eligible for store credit only.
Shipping. Standard shipping takes 3 to 5 business days. Express shipping
delivers within 1 to 2 business days for an additional fee.
`;
// 1. Chunk the text with the Chunking API.
const chunked = await client.chunking.parse({
text: documentText,
strategy: "token",
chunkSize: 50,
chunkOverlap: 20,
});
console.log(`${chunked.chunks.length} chunks created`);
// 2. Add the chunks to the datasource.
await client.knowledge.createChunks({
knowledgeId,
datasourceId,
requestBody: chunked.chunks.map((chunk) => ({ text: chunk.text })),
});
console.log("Chunks added to the knowledge base");
```
**Search the Knowledge Base**
Once the chunks are added, search the knowledge base directly to retrieve the most relevant chunks for a query. Orq.ai embeds the query, finds the most similar chunks, and ranks them by similarity. `top_k` controls how many chunks are returned, and each match includes the chunk `text` and relevance `scores`.
```bash cURL theme={"theme":{"light":"github-light","dark":"github-dark"}}
curl --request POST \
--url https://api.orq.ai/v2/knowledge//search \
--header 'accept: application/json' \
--header 'authorization: Bearer ' \
--header 'content-type: application/json' \
--data '
{
"query": "What is the return policy for items bought more than 30 days ago?",
"top_k": 3
}
'
```
```python Python theme={"theme":{"light":"github-light","dark":"github-dark"}}
QUERY = "What is the return policy for items bought more than 30 days ago?"
results = client.knowledge.search(
knowledge_id=knowledge_id,
query=QUERY,
top_k=3,
)
for i, match in enumerate(results.matches, 1):
print(f"--- Chunk {i} ---")
print(match.text)
print()
```
```typescript TypeScript theme={"theme":{"light":"github-light","dark":"github-dark"}}
const query = "What is the return policy for items bought more than 30 days ago?";
const results = await client.knowledge.search({
knowledgeId,
requestBody: {
query,
topK: 3,
},
});
results.matches.forEach((match, i) => {
console.log(`--- Chunk ${i + 1} ---`);
console.log(match.text);
console.log();
});
```
For more information on Knowledge Base SDK, see [SDK Knowledge](/reference/sdk/knowledge).
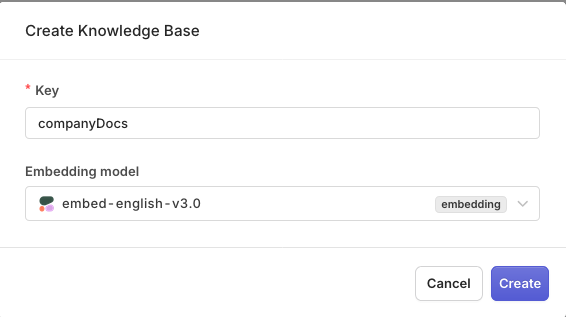
**Creating a Knowledge Base**
First, create a knowledge base to store your documents. Head to the AI Studio:
* Choose a [Project](/docs/ai-studio/get-started/projects) and Folder and select the button.
* Choose **Knowledge Base**.
* Enter a unique **Key** (e.g., `companyDocs`) and **Name**.
* Select an **Embedding Model** from your enabled models.
 **Adding Source Documents**
After creating the knowledge base:
* Click **Browse** to upload documents.
* Select files from your computer (TXT, PDF, DOCX, CSV, XLS formats supported).
* Configure chunking settings for optimal retrieval performance (to learn more, see [Chunking Strategy](/docs/ai-studio/ai-engineering/knowledge-bases-memory-stores#datasource-and-chunking))
* Wait for the documents to be processed and indexed.
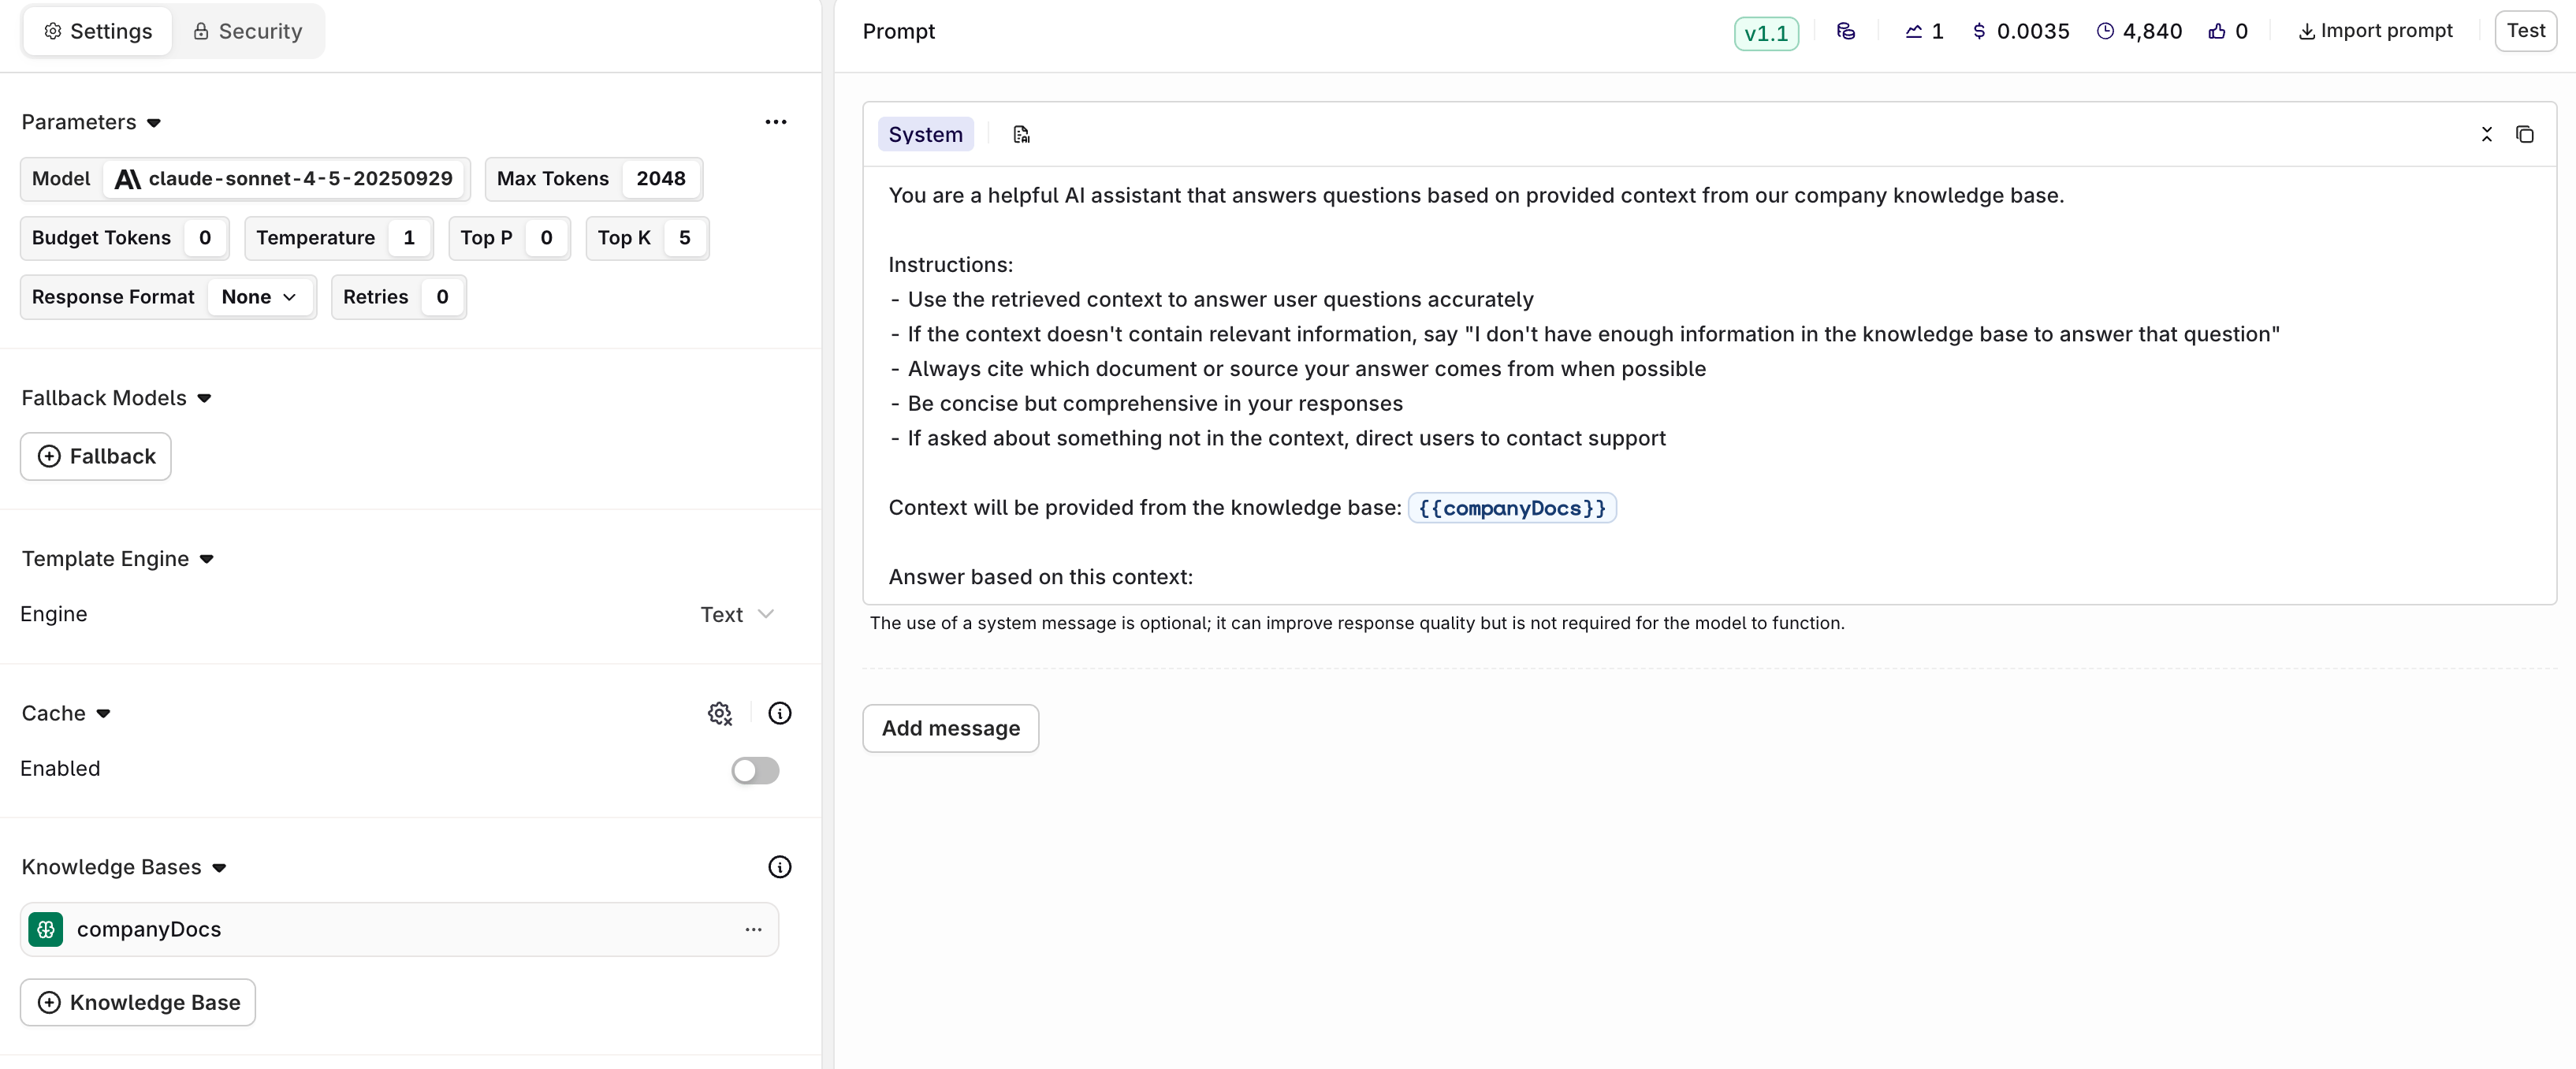
## Configuring a RAG Deployment
A RAG **Deployment** is a standard **Deployment** with a **Knowledge Base** attached. For the full deployment walkthrough, see the [Simple Deployment](/docs/common-architecture/simple-deployment) cookbook. The RAG-specific steps are below.
To create the **Deployment**:
* Choose a [Project](/docs/ai-studio/get-started/projects) and Folder and select the button.
* Choose **Deployment**.
* Enter name **simpleRAG**.
* Choose a primary **Model**.
Then configure your prompt messages. Click **Add Message** and select **System** role:
```yaml YAML theme={"theme":{"light":"github-light","dark":"github-dark"}}
You are a helpful AI assistant that answers questions based on provided context from our company knowledge base.
Instructions:
- Use the retrieved context to answer user questions accurately
- If the context doesn't contain relevant information, say "I don't have enough information in the knowledge base to answer that question"
- Always cite which document or source your answer comes from when possible
- Be concise but comprehensive in your responses
- If asked about something not in the context, direct users to contact support
Context will be provided from the knowledge base: {{companyDocs}}
Answer based on this context:
```
### Adding Knowledge Base to Prompt
* Click **Add Knowledge Base** in the settings of the Deployment.
* Choose the knowledge base key (`companyDocs`).
The `{{companyDocs}}` variable in the system prompt must match the **Knowledge Base** key. Retrieved chunks are injected at that position on each call. If the variable is omitted, the chunks are appended to the end of the system message instead.
**Adding Source Documents**
After creating the knowledge base:
* Click **Browse** to upload documents.
* Select files from your computer (TXT, PDF, DOCX, CSV, XLS formats supported).
* Configure chunking settings for optimal retrieval performance (to learn more, see [Chunking Strategy](/docs/ai-studio/ai-engineering/knowledge-bases-memory-stores#datasource-and-chunking))
* Wait for the documents to be processed and indexed.
## Configuring a RAG Deployment
A RAG **Deployment** is a standard **Deployment** with a **Knowledge Base** attached. For the full deployment walkthrough, see the [Simple Deployment](/docs/common-architecture/simple-deployment) cookbook. The RAG-specific steps are below.
To create the **Deployment**:
* Choose a [Project](/docs/ai-studio/get-started/projects) and Folder and select the button.
* Choose **Deployment**.
* Enter name **simpleRAG**.
* Choose a primary **Model**.
Then configure your prompt messages. Click **Add Message** and select **System** role:
```yaml YAML theme={"theme":{"light":"github-light","dark":"github-dark"}}
You are a helpful AI assistant that answers questions based on provided context from our company knowledge base.
Instructions:
- Use the retrieved context to answer user questions accurately
- If the context doesn't contain relevant information, say "I don't have enough information in the knowledge base to answer that question"
- Always cite which document or source your answer comes from when possible
- Be concise but comprehensive in your responses
- If asked about something not in the context, direct users to contact support
Context will be provided from the knowledge base: {{companyDocs}}
Answer based on this context:
```
### Adding Knowledge Base to Prompt
* Click **Add Knowledge Base** in the settings of the Deployment.
* Choose the knowledge base key (`companyDocs`).
The `{{companyDocs}}` variable in the system prompt must match the **Knowledge Base** key. Retrieved chunks are injected at that position on each call. If the variable is omitted, the chunks are appended to the end of the system message instead.
 Test your RAG in the **Test** tab by asking questions about your uploaded documents.
Learn more about knowledge base configuration in [Knowledge Base](/docs/ai-studio/ai-engineering/knowledge-bases-memory-stores), and prompt configuration in [Knowledge Base in Deployments](/docs/ai-studio/ai-engineering/deployments#knowledge-base).
When ready with your Deployment choose **Deploy**, learn more about [Deployment Versioning](/docs/ai-studio/ai-engineering/deployments#versioning).
## Calling the Deployment
To implement a RAG-powered question answering system:
```python Python theme={"theme":{"light":"github-light","dark":"github-dark"}}
class RAG:
def __init__(self, client, deployment_key):
self.client = client
self.deployment_key = deployment_key
def ask_question(self, question, include_sources=True):
"""Ask a question and get a RAG-powered response"""
try:
# Invoke the RAG deployment
generation = self.client.deployments.invoke(
key=self.deployment_key,
messages=[
{
"role": "user",
"content": question
}
],
context={
"include_retrievals": include_sources # Include source chunks
},
metadata={
"query_type": "rag_question",
"user_intent": "information_seeking"
}
)
# Extract the response
answer = generation.choices[0].message.content
# Extract retrieved sources if available
sources = []
if hasattr(generation, 'retrievals') and generation.retrievals:
sources = [
{
"content": retrieval.content,
"source": retrieval.metadata.get("source", "Unknown"),
"score": retrieval.score
}
for retrieval in generation.retrievals
]
return {
"answer": answer,
"sources": sources,
"question": question
}
except Exception as e:
return {
"answer": "I'm sorry, I'm experiencing technical difficulties. Please try again later.",
"sources": [],
"error": str(e)
}
# Initialize and use the RAG system
rag = RAG(client, "simpleRAG")
result = rag.ask_question("What is our company return policy?")
print(f"Answer: {result['answer']}")
if result['sources']:
print("\nSources:")
for source in result['sources']:
print(f"- {source['source']}: {source['content'][:100]}...")
```
```typescript TypeScript theme={"theme":{"light":"github-light","dark":"github-dark"}}
class RAG {
constructor(client, deploymentKey) {
this.client = client;
this.deploymentKey = deploymentKey;
}
async askQuestion(question, includeSources = true) {
try {
const response = await this.client.deployments.invoke({
key: this.deploymentKey,
messages: [
{
role: "user",
content: question
}
],
context: {
include_retrievals: includeSources
},
metadata: {
query_type: "rag_question",
user_intent: "information_seeking"
}
});
const answer = response.choices[0].message.content;
// Extract retrieved sources if available
const sources = response.retrievals ? response.retrievals.map(retrieval => ({
content: retrieval.content,
source: retrieval.metadata?.source || "Unknown",
score: retrieval.score
})) : [];
return {
answer,
sources,
question
};
} catch (error) {
return {
answer: "I'm sorry, I'm experiencing technical difficulties. Please try again later.",
sources: [],
error: error.message
};
}
}
}
// Initialize and use the RAG system
const rag = new RAG(client, "simpleRAG");
const result = await rag.askQuestion("What is our company return policy?");
console.log(`Answer: ${result.answer}`);
if (result.sources.length > 0) {
console.log("\nSources:");
result.sources.forEach(source => {
console.log(`- ${source.source}: ${source.content.substring(0, 100)}...`);
});
}
```
Here is what the output looks like:
```python Python theme={"theme":{"light":"github-light","dark":"github-dark"}}
❯ python3 rag_system.py
Answer: Based on our company documentation, our return policy allows customers to return items within 30 days of purchase with a valid receipt. Items must be in original condition and packaging. Refunds are processed within 5-7 business days after we receive the returned item.
Sources:
- company_policies.pdf: Return Policy: All items can be returned within 30 days of purchase provided...
- customer_service_guide.pdf: For returns, customers must provide proof of purchase and items must be...
```
## Viewing Traces
Open the **Traces** tab on the [Deployment](/docs/ai-studio/ai-engineering/deployments) page to inspect every call made through the RAG application. Click any trace to see the full span detail: the user's question, the generated response, retrieved document chunks with relevance scores, and performance timings.
Test your RAG in the **Test** tab by asking questions about your uploaded documents.
Learn more about knowledge base configuration in [Knowledge Base](/docs/ai-studio/ai-engineering/knowledge-bases-memory-stores), and prompt configuration in [Knowledge Base in Deployments](/docs/ai-studio/ai-engineering/deployments#knowledge-base).
When ready with your Deployment choose **Deploy**, learn more about [Deployment Versioning](/docs/ai-studio/ai-engineering/deployments#versioning).
## Calling the Deployment
To implement a RAG-powered question answering system:
```python Python theme={"theme":{"light":"github-light","dark":"github-dark"}}
class RAG:
def __init__(self, client, deployment_key):
self.client = client
self.deployment_key = deployment_key
def ask_question(self, question, include_sources=True):
"""Ask a question and get a RAG-powered response"""
try:
# Invoke the RAG deployment
generation = self.client.deployments.invoke(
key=self.deployment_key,
messages=[
{
"role": "user",
"content": question
}
],
context={
"include_retrievals": include_sources # Include source chunks
},
metadata={
"query_type": "rag_question",
"user_intent": "information_seeking"
}
)
# Extract the response
answer = generation.choices[0].message.content
# Extract retrieved sources if available
sources = []
if hasattr(generation, 'retrievals') and generation.retrievals:
sources = [
{
"content": retrieval.content,
"source": retrieval.metadata.get("source", "Unknown"),
"score": retrieval.score
}
for retrieval in generation.retrievals
]
return {
"answer": answer,
"sources": sources,
"question": question
}
except Exception as e:
return {
"answer": "I'm sorry, I'm experiencing technical difficulties. Please try again later.",
"sources": [],
"error": str(e)
}
# Initialize and use the RAG system
rag = RAG(client, "simpleRAG")
result = rag.ask_question("What is our company return policy?")
print(f"Answer: {result['answer']}")
if result['sources']:
print("\nSources:")
for source in result['sources']:
print(f"- {source['source']}: {source['content'][:100]}...")
```
```typescript TypeScript theme={"theme":{"light":"github-light","dark":"github-dark"}}
class RAG {
constructor(client, deploymentKey) {
this.client = client;
this.deploymentKey = deploymentKey;
}
async askQuestion(question, includeSources = true) {
try {
const response = await this.client.deployments.invoke({
key: this.deploymentKey,
messages: [
{
role: "user",
content: question
}
],
context: {
include_retrievals: includeSources
},
metadata: {
query_type: "rag_question",
user_intent: "information_seeking"
}
});
const answer = response.choices[0].message.content;
// Extract retrieved sources if available
const sources = response.retrievals ? response.retrievals.map(retrieval => ({
content: retrieval.content,
source: retrieval.metadata?.source || "Unknown",
score: retrieval.score
})) : [];
return {
answer,
sources,
question
};
} catch (error) {
return {
answer: "I'm sorry, I'm experiencing technical difficulties. Please try again later.",
sources: [],
error: error.message
};
}
}
}
// Initialize and use the RAG system
const rag = new RAG(client, "simpleRAG");
const result = await rag.askQuestion("What is our company return policy?");
console.log(`Answer: ${result.answer}`);
if (result.sources.length > 0) {
console.log("\nSources:");
result.sources.forEach(source => {
console.log(`- ${source.source}: ${source.content.substring(0, 100)}...`);
});
}
```
Here is what the output looks like:
```python Python theme={"theme":{"light":"github-light","dark":"github-dark"}}
❯ python3 rag_system.py
Answer: Based on our company documentation, our return policy allows customers to return items within 30 days of purchase with a valid receipt. Items must be in original condition and packaging. Refunds are processed within 5-7 business days after we receive the returned item.
Sources:
- company_policies.pdf: Return Policy: All items can be returned within 30 days of purchase provided...
- customer_service_guide.pdf: For returns, customers must provide proof of purchase and items must be...
```
## Viewing Traces
Open the **Traces** tab on the [Deployment](/docs/ai-studio/ai-engineering/deployments) page to inspect every call made through the RAG application. Click any trace to see the full span detail: the user's question, the generated response, retrieved document chunks with relevance scores, and performance timings.
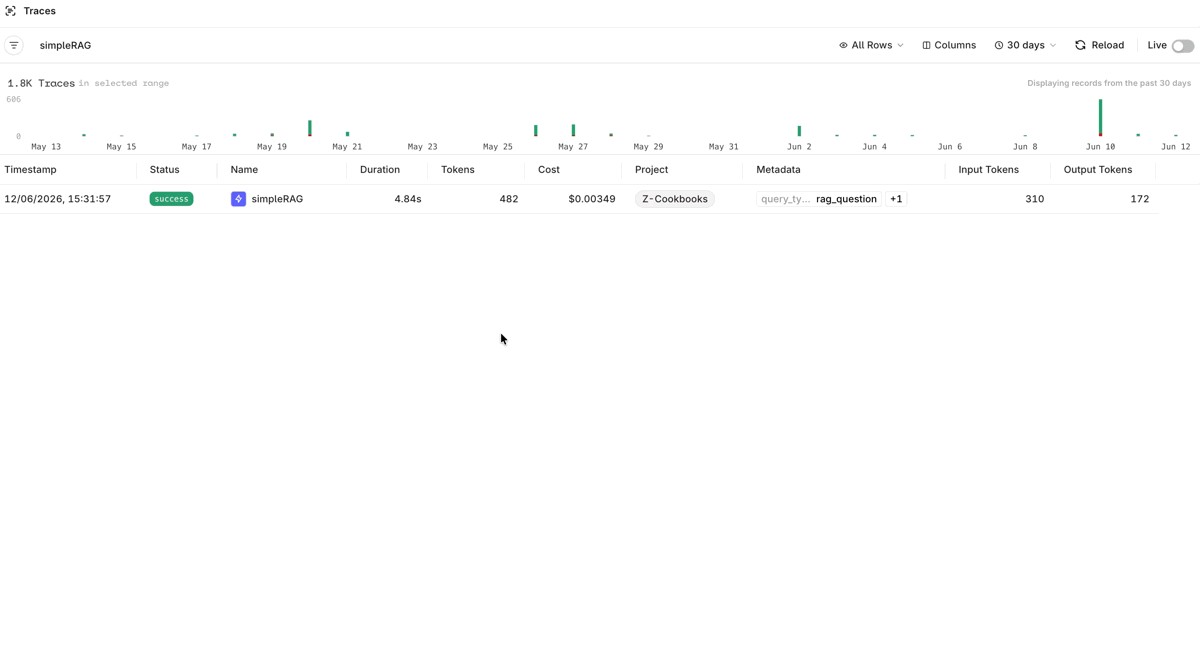 To learn more about **Traces** see [Traces](/docs/ai-studio/observability/traces).
You've completed the setup for a Simple RAG system. Explore other Common Architecture patterns to see more advanced RAG implementations.
To learn more about **Traces** see [Traces](/docs/ai-studio/observability/traces).
You've completed the setup for a Simple RAG system. Explore other Common Architecture patterns to see more advanced RAG implementations.