> ## Documentation Index
> Fetch the complete documentation index at: https://docs.orq.ai/llms.txt
> Use this file to discover all available pages before exploring further.
# Automate Evals & Observability with Claude Code + orq.ai
> Build, run, and analyze evaluations with Claude Code and orq.ai MCP. Query observability data and automate eval workflows from your terminal.
TL;DR
* **Automate evals from the terminal**, Claude Code + orq.ai MCP lets you work directly with production data without leaving your IDE
* **Derive evaluators from real failures**, mine traces, pick the dominant failure mode, and build an LLM-as-a-judge for exactly that mode
* **Validate before shipping**, synthetic or production datasets, side-by-side experiment runs, and human annotation tighten TPR/TNR before you attach the evaluator to live traffic
* **Treat evaluators as a system**, not a one-off. Iterate, validate against data, align with human judgment, then monitor in production
## What you'll build
A validated, production-ready LLM-as-a-judge evaluator, tuned against real failure modes from production traces and attached to a live agent. The research assistant agent in this guide is just the vehicle: the focus is the **evaluator optimization loop**, not the agent itself.
## What you'll learn
In this guide we walk through how to:
* **Connect Claude Code to orq.ai** and work directly with your production data from the terminal
* **Use MCP to analyze traces** and uncover real failure modes in your system
* **Generate an initial LLM-as-a-judge evaluator** based on those failure patterns
* **Create a dataset** (synthetic or production-based) and run experiments to test evaluator quality
* **Iteratively improve the evaluator**, analyze weak performance, refine prompts (few-shot, structure, tokens), and re-run experiments
* **Add human annotation** to validate whether the evaluator actually reflects what "good" looks like
* **Push a validated evaluator back into production** and monitor it on live traffic (with sampling if needed)
**Core takeaway:** your evaluator is not a one-off. It's a system that needs to be iterated on, validated against data, and aligned with human judgment before you can trust it in production.
## Two main directions
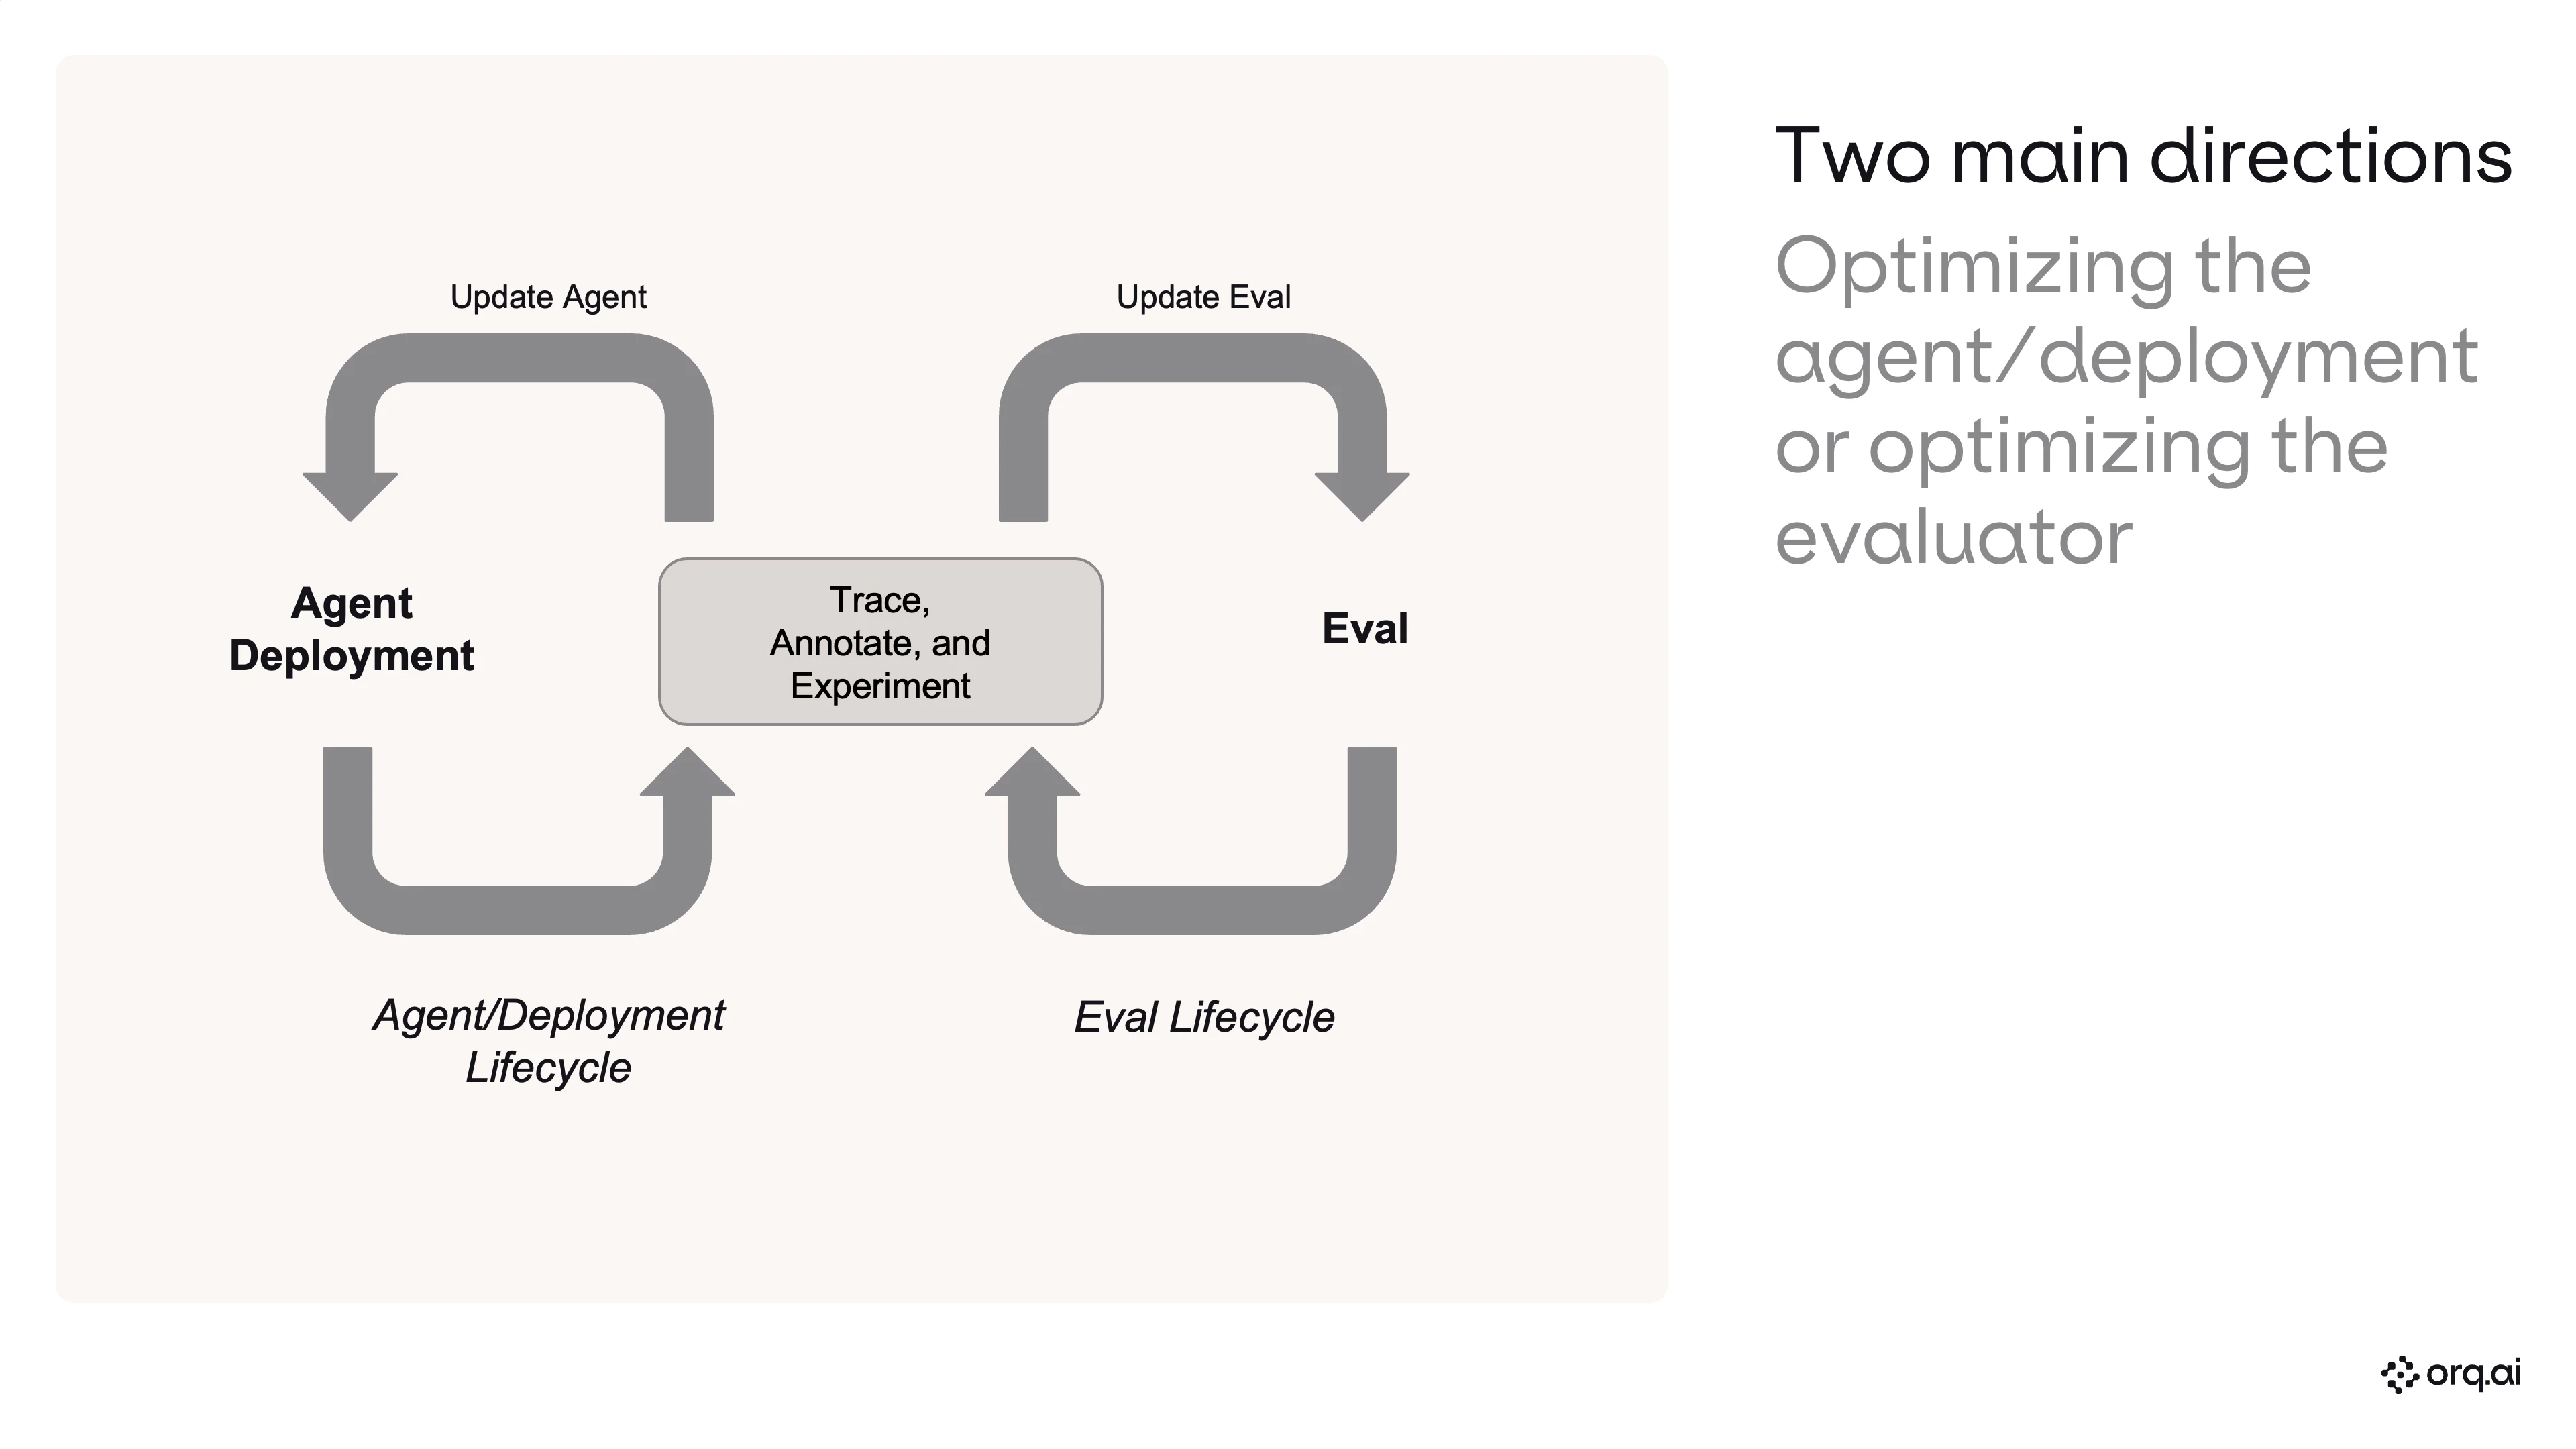
When you're shipping AI features and using an **LLM-as-a-judge** to measure how your system is performing, the judge itself is a system under test. You need to know how stable your evaluator is and iterate on it, tracing, annotating, and experimenting against it, with the same rigor you apply to your agent or deployment. Otherwise you're grading production with a ruler you've never calibrated.
This cookbook focuses **solely on optimizing the evaluator** (the right-hand loop below). The left loop, optimizing the agent or deployment, uses the same primitives and is covered in the [Agents API tutorial](/docs/tutorials/agents-API).
 ## Pre-requisites
* An [orq.ai](https://my.orq.ai) workspace and API key
* [Node.js](https://nodejs.org) 18+
* Python 3.10+ (for the invocation script)
## Step 0: Connect Claude Code to orq.ai
Install Claude Code, wire up the orq.ai MCP server, and load the skills plugin.
```bash Shell - Fresh install theme={"theme":{"light":"github-light","dark":"github-dark"}}
# Install Claude Code
npm install -g @anthropic-ai/claude-code
# Set your orq.ai API key
export ORQ_API_KEY="sk-orq-REPLACE_WITH_REAL_KEY"
# Add the orq.ai MCP server
claude mcp add --transport http orq https://my.orq.ai/v2/mcp \
--header "Authorization: Bearer ${ORQ_API_KEY}"
# Installs skills, commands, agents, and the MCP server in one step
claude plugin marketplace add orq-ai/claude-plugins
claude plugin install orq-skills@orq-claude-plugin
# Add orq.ai documentation server
claude mcp add --transport http orq-documentation https://docs.orq.ai/mcp
# Launch Claude Code
claude
```
## Step 1: Workspace overview
See what's already in your orq.ai workspace.
```text Claude Code theme={"theme":{"light":"github-light","dark":"github-dark"}}
/orq:workspace
```
## Step 1.5: Enable models in AI Gateway
New users: go to **AI Studio → AI Gateway** in [my.orq.ai](https://my.orq.ai) and toggle on the models you need (e.g. Claude Sonnet 4.5, GPT-5.4-mini). Agents and experiments can only use models that are enabled here.
| Where | Action |
| ---------------------------------- | ------------------------- |
| my.orq.ai → AI Studio → AI Gateway | Toggle on required models |
## Step 2: Build the agent
Create a research assistant with web search and current date tools.
```text Claude Code theme={"theme":{"light":"github-light","dark":"github-dark"}}
Build a single agent called my-research-assistant in the Default project,
inside a folder called single-agent.
Run it on Anthropic's Claude Sonnet 4.5, resolve that against the
orq.ai model catalog.
Attach two built-in tools: Web Search and Current Date. Web Search lets
it pull live information, and Current Date anchors "current" to today's
actual date rather than the model's training cutoff.
Use these instructions verbatim:
"You are a research assistant. When asked about a topic, use web search
to find current, specific information. Always include source URLs in
your response. Be specific, include names, numbers, and dates rather
than generic summaries.
Be efficient with your web searches. Use at most 2 Google searches per
question, craft precise, targeted queries rather than running many
broad ones. Synthesize your findings after each search before deciding
whether another search is truly needed."
Also set max iterations to 3 and max execution time to 60 seconds.
```
## Step 3: Write the invocation script
Generate a script that sends 10 diverse research questions to the agent via the REST API.
```text Claude Code theme={"theme":{"light":"github-light","dark":"github-dark"}}
Write invoke_agent.py (Python, stdlib only) that dispatches 10 diverse
research questions to my orq.ai agent my-research-assistant in parallel
- one thread per question, all fired at once. Just print status and
response time per query.
API reference: /docs/ai-studio/ai-engineering/run-agents
```
## Step 4: Invoke the agent
Run the script to generate traces.
```bash Shell theme={"theme":{"light":"github-light","dark":"github-dark"}}
python3 invoke_agent.py
```
## Step 5: Analyze traces & build a failure taxonomy
Read recent traces, identify failure modes, quantify, and prioritize.
```text Claude Code theme={"theme":{"light":"github-light","dark":"github-dark"}}
Analyze recent trace failures and quality issues for my-research-assistant.
Read recent traces, inspect outputs, and build a failure taxonomy.
What is working, what is failing, and how often?
```
**Expected outcome**
| Artifact | Shape |
| --------------------------- | ---------------- |
| Failure taxonomy with rates | Per-mode error % |
| Transition failure matrix | Stage-by-stage |
| Prioritized recommendations | P0 / P1 / P2 |
## Step 6: Build an evaluator from the dominant failure mode
Identify the #1 failure pattern and create a targeted LLM-as-a-judge evaluator.
```text Claude Code theme={"theme":{"light":"github-light","dark":"github-dark"}}
Analyze recent trace failures, identify the single highest-frequency
and highest-impact failure mode, then build one LLM-as-a-judge
evaluator specifically for that mode.
- Do not pre-commit to an evaluator name.
- Derive the name dynamically from the dominant failure pattern.
- Evaluator must be broadly applicable across any agent/workspace.
- Model: openai/gpt-5.4-mini.
```
## Step 7: Create a validation dataset
Generate a complex, ambiguous dataset to stress-test the evaluator.
```text Claude Code theme={"theme":{"light":"github-light","dark":"github-dark"}}
/orq:generate-synthetic-dataset
Create "evaluator-validation", 24 rows, 12 PASS / 12 FAIL.
Structure: inputs.query, inputs.response, expected_output ("PASS"/"FAIL").
PASS = specific (entities, numbers, dates, sources, tradeoffs).
FAIL = generic/vague (capability-listing, no evidence, no sources).
Make it complex: borderline cases, confident-sounding but weak responses.
Topics: policy, finance, travel, SaaS comparisons, infra/tooling.
```
## Step 8: Run the baseline experiment
Test the evaluator prompt against the dataset.
```text Claude Code theme={"theme":{"light":"github-light","dark":"github-dark"}}
/orq:run-experiment
Experiment "evaluator-validation-depth" on dataset "evaluator-validation".
One task column, model openai/gpt-5.4-mini.
Instructions: binary PASS/FAIL on response depth, PASS if specific+sourced,
FAIL if vague. Input: "Query: {{query}}\nResponse: {{response}}\nReply PASS
or FAIL only." Evaluate against expected_output with exact-match.
```
## Step 9: Analyze experiment results
Compute accuracy, confusion matrix, and diagnose mismatches.
```text Claude Code theme={"theme":{"light":"github-light","dark":"github-dark"}}
Analyze the experiment run: accuracy, confusion matrix (TP/FN/TN/FP),
TPR, TNR. Show per-row breakdown. Inspect all mismatches, what's the
root cause?
```
**Example baseline**
| Metric | Baseline |
| ----------------- | ------------------------------------------- |
| Accuracy | 79.2% |
| TPR (sensitivity) | 58.3% |
| TNR (specificity) | 100.0% |
| Root cause | Too strict on long, detailed PASS responses |
## Step 10: Improve the prompt and re-run side by side
Add a second task column with an improved prompt and compare.
```text Claude Code theme={"theme":{"light":"github-light","dark":"github-dark"}}
Add a second task column with an improved prompt (few-shot examples,
length-is-not-a-penalty rule, sharper FAIL definition). Keep openai/gpt-5.4-mini.
Re-run both columns side by side over the same dataset. Show accuracy,
TPR, TNR, fixes, and regressions.
```
**Example result**
| Metric | Original | Improved | Delta |
| -------- | -------- | -------- | ----------------- |
| Accuracy | 79.2% | 100.0% | +20.8pp |
| TPR | 58.3% | 100.0% | +41.7pp |
| TNR | 100.0% | 100.0% | = |
| Fixes | | | +5, 0 regressions |
## Step 10.5: Annotate in AI Studio
Before checking alignment programmatically, add human review labels to the experiment run directly in AI Studio. Open the experiment, click into the **Review** tab, and annotate each row with your judgment.
| Where | Action |
| ------------------------------------------------------------------------------------------------ | ---------------------------------- |
| my.orq.ai → Experiments → Review tab | Add human review labels per row |
| [Human Reviews in AI Studio](https://docs.orq.ai/docs/annotations/ai-studio#using-human-reviews) | Setup guide for annotation columns |
## Step 11: Human annotation & alignment check
Validate evaluator accuracy against human judgment.
```text Claude Code theme={"theme":{"light":"github-light","dark":"github-dark"}}
Export the run with the eval_check human annotation column. Show
annotated vs pending, agreement rates, and flag any human-vs-expected
disagreements.
```
## Step 12: Create evaluator & attach to agent
Productionize the winning evaluator prompt and wire it to the agent.
```text Claude Code theme={"theme":{"light":"github-light","dark":"github-dark"}}
Create an LLM evaluator from the winning column's prompt. Attach it
to "my-research-assistant" on output at 100% sample rate.
```
## The evaluator optimization loop
You now have a repeatable loop for taking an evaluator from "vibes" to production: **traces → dominant failure mode → evaluator draft → synthetic validation dataset → experiment → prompt iteration → human annotation → alignment check → attach**. Each pass tightens TPR/TNR against the failure modes you actually see in production, so you ship evaluators with evidence instead of assumptions.
## Next steps
* [Running evaluations in parallel with Evaluatorq](/docs/tutorials/evaluator-q)
* [Red-teaming agents](/docs/tutorials/red-teaming)
* [Agents API tutorial](/docs/tutorials/agents-API)
## Pre-requisites
* An [orq.ai](https://my.orq.ai) workspace and API key
* [Node.js](https://nodejs.org) 18+
* Python 3.10+ (for the invocation script)
## Step 0: Connect Claude Code to orq.ai
Install Claude Code, wire up the orq.ai MCP server, and load the skills plugin.
```bash Shell - Fresh install theme={"theme":{"light":"github-light","dark":"github-dark"}}
# Install Claude Code
npm install -g @anthropic-ai/claude-code
# Set your orq.ai API key
export ORQ_API_KEY="sk-orq-REPLACE_WITH_REAL_KEY"
# Add the orq.ai MCP server
claude mcp add --transport http orq https://my.orq.ai/v2/mcp \
--header "Authorization: Bearer ${ORQ_API_KEY}"
# Installs skills, commands, agents, and the MCP server in one step
claude plugin marketplace add orq-ai/claude-plugins
claude plugin install orq-skills@orq-claude-plugin
# Add orq.ai documentation server
claude mcp add --transport http orq-documentation https://docs.orq.ai/mcp
# Launch Claude Code
claude
```
## Step 1: Workspace overview
See what's already in your orq.ai workspace.
```text Claude Code theme={"theme":{"light":"github-light","dark":"github-dark"}}
/orq:workspace
```
## Step 1.5: Enable models in AI Gateway
New users: go to **AI Studio → AI Gateway** in [my.orq.ai](https://my.orq.ai) and toggle on the models you need (e.g. Claude Sonnet 4.5, GPT-5.4-mini). Agents and experiments can only use models that are enabled here.
| Where | Action |
| ---------------------------------- | ------------------------- |
| my.orq.ai → AI Studio → AI Gateway | Toggle on required models |
## Step 2: Build the agent
Create a research assistant with web search and current date tools.
```text Claude Code theme={"theme":{"light":"github-light","dark":"github-dark"}}
Build a single agent called my-research-assistant in the Default project,
inside a folder called single-agent.
Run it on Anthropic's Claude Sonnet 4.5, resolve that against the
orq.ai model catalog.
Attach two built-in tools: Web Search and Current Date. Web Search lets
it pull live information, and Current Date anchors "current" to today's
actual date rather than the model's training cutoff.
Use these instructions verbatim:
"You are a research assistant. When asked about a topic, use web search
to find current, specific information. Always include source URLs in
your response. Be specific, include names, numbers, and dates rather
than generic summaries.
Be efficient with your web searches. Use at most 2 Google searches per
question, craft precise, targeted queries rather than running many
broad ones. Synthesize your findings after each search before deciding
whether another search is truly needed."
Also set max iterations to 3 and max execution time to 60 seconds.
```
## Step 3: Write the invocation script
Generate a script that sends 10 diverse research questions to the agent via the REST API.
```text Claude Code theme={"theme":{"light":"github-light","dark":"github-dark"}}
Write invoke_agent.py (Python, stdlib only) that dispatches 10 diverse
research questions to my orq.ai agent my-research-assistant in parallel
- one thread per question, all fired at once. Just print status and
response time per query.
API reference: /docs/ai-studio/ai-engineering/run-agents
```
## Step 4: Invoke the agent
Run the script to generate traces.
```bash Shell theme={"theme":{"light":"github-light","dark":"github-dark"}}
python3 invoke_agent.py
```
## Step 5: Analyze traces & build a failure taxonomy
Read recent traces, identify failure modes, quantify, and prioritize.
```text Claude Code theme={"theme":{"light":"github-light","dark":"github-dark"}}
Analyze recent trace failures and quality issues for my-research-assistant.
Read recent traces, inspect outputs, and build a failure taxonomy.
What is working, what is failing, and how often?
```
**Expected outcome**
| Artifact | Shape |
| --------------------------- | ---------------- |
| Failure taxonomy with rates | Per-mode error % |
| Transition failure matrix | Stage-by-stage |
| Prioritized recommendations | P0 / P1 / P2 |
## Step 6: Build an evaluator from the dominant failure mode
Identify the #1 failure pattern and create a targeted LLM-as-a-judge evaluator.
```text Claude Code theme={"theme":{"light":"github-light","dark":"github-dark"}}
Analyze recent trace failures, identify the single highest-frequency
and highest-impact failure mode, then build one LLM-as-a-judge
evaluator specifically for that mode.
- Do not pre-commit to an evaluator name.
- Derive the name dynamically from the dominant failure pattern.
- Evaluator must be broadly applicable across any agent/workspace.
- Model: openai/gpt-5.4-mini.
```
## Step 7: Create a validation dataset
Generate a complex, ambiguous dataset to stress-test the evaluator.
```text Claude Code theme={"theme":{"light":"github-light","dark":"github-dark"}}
/orq:generate-synthetic-dataset
Create "evaluator-validation", 24 rows, 12 PASS / 12 FAIL.
Structure: inputs.query, inputs.response, expected_output ("PASS"/"FAIL").
PASS = specific (entities, numbers, dates, sources, tradeoffs).
FAIL = generic/vague (capability-listing, no evidence, no sources).
Make it complex: borderline cases, confident-sounding but weak responses.
Topics: policy, finance, travel, SaaS comparisons, infra/tooling.
```
## Step 8: Run the baseline experiment
Test the evaluator prompt against the dataset.
```text Claude Code theme={"theme":{"light":"github-light","dark":"github-dark"}}
/orq:run-experiment
Experiment "evaluator-validation-depth" on dataset "evaluator-validation".
One task column, model openai/gpt-5.4-mini.
Instructions: binary PASS/FAIL on response depth, PASS if specific+sourced,
FAIL if vague. Input: "Query: {{query}}\nResponse: {{response}}\nReply PASS
or FAIL only." Evaluate against expected_output with exact-match.
```
## Step 9: Analyze experiment results
Compute accuracy, confusion matrix, and diagnose mismatches.
```text Claude Code theme={"theme":{"light":"github-light","dark":"github-dark"}}
Analyze the experiment run: accuracy, confusion matrix (TP/FN/TN/FP),
TPR, TNR. Show per-row breakdown. Inspect all mismatches, what's the
root cause?
```
**Example baseline**
| Metric | Baseline |
| ----------------- | ------------------------------------------- |
| Accuracy | 79.2% |
| TPR (sensitivity) | 58.3% |
| TNR (specificity) | 100.0% |
| Root cause | Too strict on long, detailed PASS responses |
## Step 10: Improve the prompt and re-run side by side
Add a second task column with an improved prompt and compare.
```text Claude Code theme={"theme":{"light":"github-light","dark":"github-dark"}}
Add a second task column with an improved prompt (few-shot examples,
length-is-not-a-penalty rule, sharper FAIL definition). Keep openai/gpt-5.4-mini.
Re-run both columns side by side over the same dataset. Show accuracy,
TPR, TNR, fixes, and regressions.
```
**Example result**
| Metric | Original | Improved | Delta |
| -------- | -------- | -------- | ----------------- |
| Accuracy | 79.2% | 100.0% | +20.8pp |
| TPR | 58.3% | 100.0% | +41.7pp |
| TNR | 100.0% | 100.0% | = |
| Fixes | | | +5, 0 regressions |
## Step 10.5: Annotate in AI Studio
Before checking alignment programmatically, add human review labels to the experiment run directly in AI Studio. Open the experiment, click into the **Review** tab, and annotate each row with your judgment.
| Where | Action |
| ------------------------------------------------------------------------------------------------ | ---------------------------------- |
| my.orq.ai → Experiments → Review tab | Add human review labels per row |
| [Human Reviews in AI Studio](https://docs.orq.ai/docs/annotations/ai-studio#using-human-reviews) | Setup guide for annotation columns |
## Step 11: Human annotation & alignment check
Validate evaluator accuracy against human judgment.
```text Claude Code theme={"theme":{"light":"github-light","dark":"github-dark"}}
Export the run with the eval_check human annotation column. Show
annotated vs pending, agreement rates, and flag any human-vs-expected
disagreements.
```
## Step 12: Create evaluator & attach to agent
Productionize the winning evaluator prompt and wire it to the agent.
```text Claude Code theme={"theme":{"light":"github-light","dark":"github-dark"}}
Create an LLM evaluator from the winning column's prompt. Attach it
to "my-research-assistant" on output at 100% sample rate.
```
## The evaluator optimization loop
You now have a repeatable loop for taking an evaluator from "vibes" to production: **traces → dominant failure mode → evaluator draft → synthetic validation dataset → experiment → prompt iteration → human annotation → alignment check → attach**. Each pass tightens TPR/TNR against the failure modes you actually see in production, so you ship evaluators with evidence instead of assumptions.
## Next steps
* [Running evaluations in parallel with Evaluatorq](/docs/tutorials/evaluator-q)
* [Red-teaming agents](/docs/tutorials/red-teaming)
* [Agents API tutorial](/docs/tutorials/agents-API)