> ## Documentation Index
> Fetch the complete documentation index at: https://docs.orq.ai/llms.txt
> Use this file to discover all available pages before exploring further.
# Maintain chat history with a model
> Maintain conversation history with Orq.ai deployments. Build stateful chatbots that remember context across messages with Python and TypeScript examples.
## Introduction
In this cookbook, we'll build a simple chat with a model deployed on **orq.ai** using [Deployment](/docs/deployments/overview). We'll explore how to maintain a chat history and context for the conversation.
## Prerequisite
To get started make sure your **orq.ai** account is setup and that you have access to a Workspace.
We'll also need an **API Key** ready, to see how to generate an API key, see [Authentication](/reference/client-libraries).
## Preparing a Deployment
The first step is to prepare a [Deployment](/docs/deployments/overview).
We'll first head to the **AI Studio** and choose a [Projects](/docs/ai-studio/get-started/projects) where to create our [Deployment](/docs/deployments/overview).
> Prepare a [Deployment](/docs/deployments/overview) using any **chat** model, here we're using `claude sonnet 4`, the default configuration is sufficient for this cookbook.
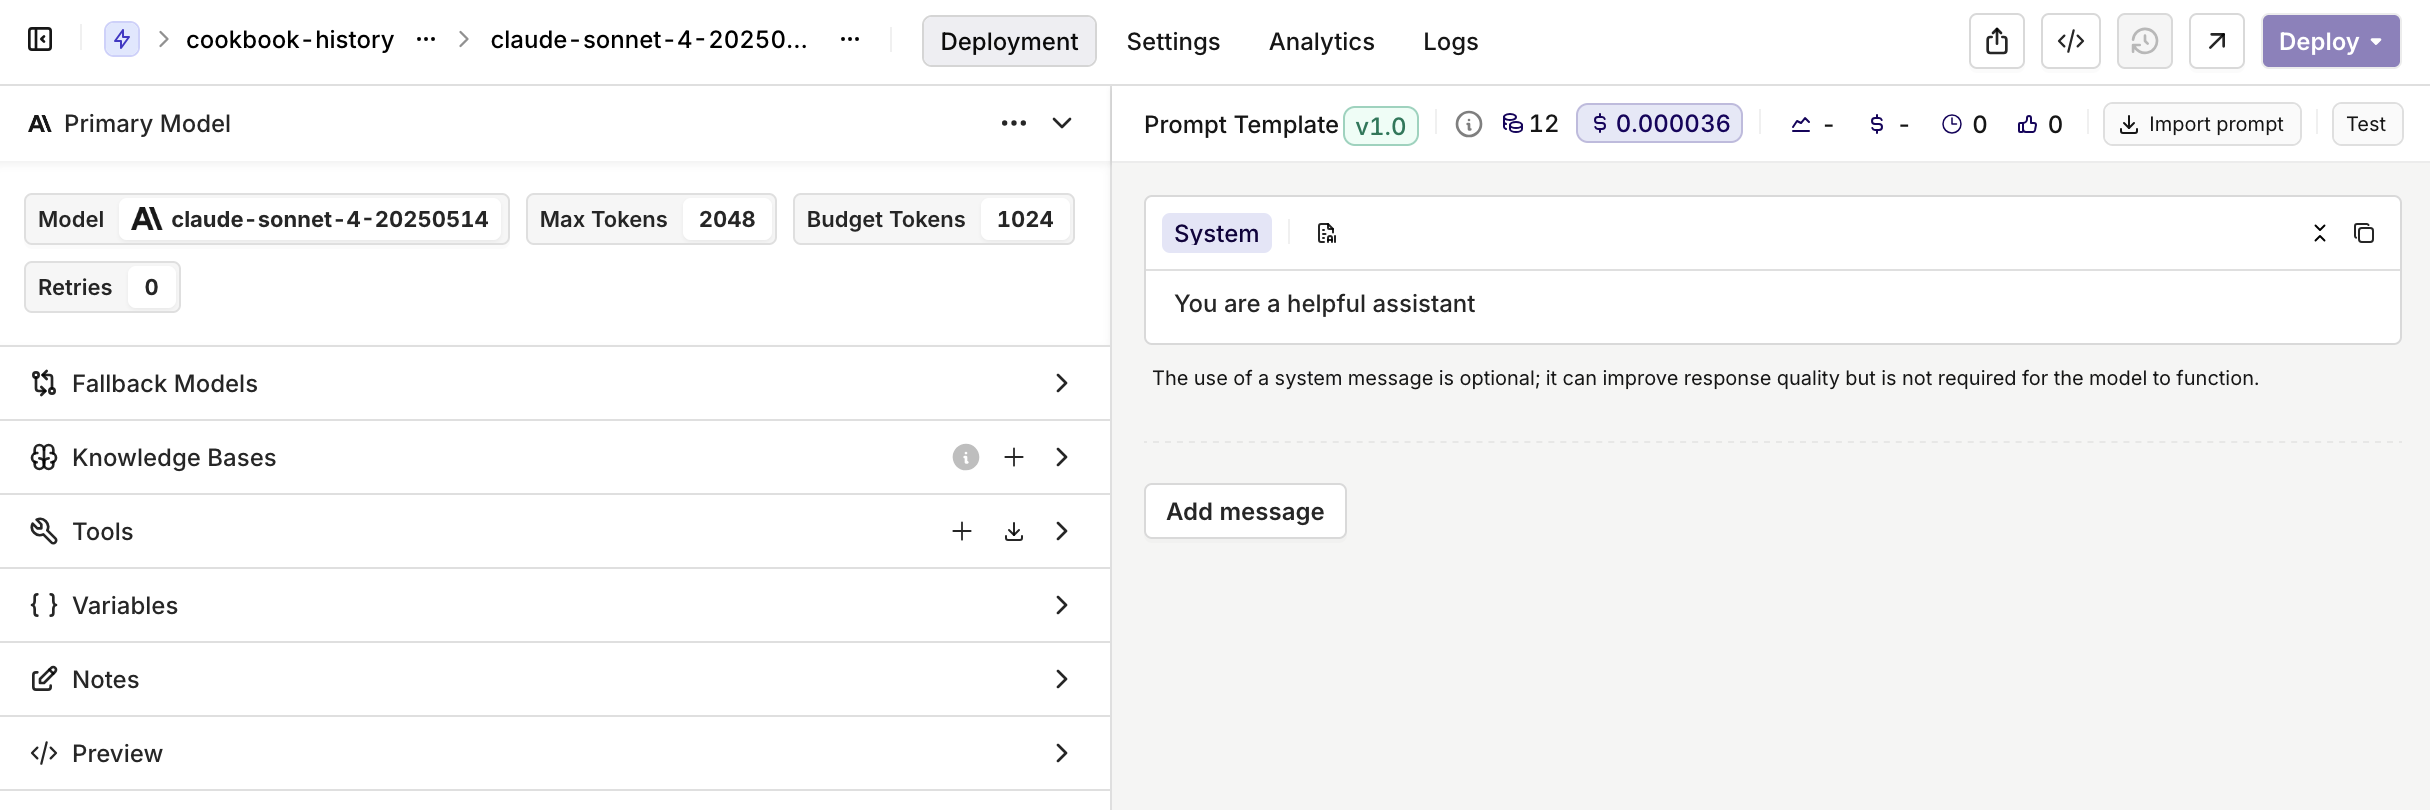 To learn more about the creation of a **Deployment**, see [Creating a Deployment](/docs/ai-studio/ai-engineering/deployments).
## SDK code
In this part we'll setup the SDK code to call the Deployment we just created.
### Get the environment ready
Install the **orq.ai** SDK using the following command:
```bash Bash theme={"theme":{"light":"github-light","dark":"github-dark"}}
pip install orq-ai-sdk
```
```bash Bash theme={"theme":{"light":"github-light","dark":"github-dark"}}
npm install @orq-ai/node --save
```
### Building a Chat Loop
Here are the main features of what we're building:
* We're building a small CLI to interact with a deployment in the terminal
* We're using a local variable `conv_memory` as a way to store history of messages the user sends to the model. Every succeeding messages will hold context for the past conversation, making the model generation stateful during the session.
* The `conv_memory` is sent to the model generation within the `messages` field, this is where context is sent to the model.
#### Identity Tracking (Optional)
Identities in Orq.ai help track user interactions and API usage across your application. They can represent users, teams, or projects and enable better analytics and budget management.
**Create an Identity through the AI Studio:**
1. Go to **Identity Analytics** in your workspace
2. Click **Create an Identity**
3. Add the user details (name, email, external ID)
4. Set optional metadata and budget limits
Learn more about creating identities, see [Creating an Identity](/docs/ai-studio/observability/identities#creating-an-identity-using-the-api).
```python Python theme={"theme":{"light":"github-light","dark":"github-dark"}}
import os
from orq_ai_sdk import Orq
client = Orq(
api_key=os.environ.get("ORQ_API_KEY", "__API_KEY__"),
)
conv_memory = []
# Call orq.ai Deployment with conversation history
def chat_with_deployment(message, conv_memory):
conv_memory.append({"role": "user", "content": message})
generation = client.deployments.invoke(
key="cookbook-history",
context={
"environments": ["production"]
},
identity={"id": ""},
metadata={
"custom-field-name": "custom-metadata-value"
},
messages=conv_memory,
)
response = generation.choices[0].message.content
conv_memory.append({"role": "assistant", "content": response})
return response
# Handle terminal input
print("\nYou can now start chatting! Type 'exit' or 'quit' to end the chat.\n")
while True:
user_input = input("You: ")
if user_input.lower() in ["exit", "quit"]:
print("Ending chat.")
break
response = chat_with_deployment(user_input, conv_memory)
print(f"Assistant: {response}")
```
```typescript TypeScript theme={"theme":{"light":"github-light","dark":"github-dark"}}
import { Orq } from '@orq-ai/node';
import readline from 'readline';
const client = new Orq({
apiKey: process.env.ORQ_API_KEY || "__API_KEY__",
});
let convMemory = [];
// Calling orq.ai with conversation history
async function chatWithDeployment(message, convMemory) {
convMemory.push({ role: "user", content: message });
const generation = await client.deployments.invoke({
key: "cookbook-history",
context: {
environments: ["production"]
},
identity: { id: "" },
metadata: {
"custom-field-name": "custom-metadata-value"
},
messages: convMemory,
});
const response = generation.choices[0].message.content;
convMemory.push({ role: "assistant", content: response });
return response;
}
const rl = readline.createInterface({
input: process.stdin,
output: process.stdout
});
console.log("\nYou can now start chatting! Type 'exit' or 'quit' to end the chat.\n");
// Handle Terminal Input
function promptUser() {
rl.question("You: ", async (userInput) => {
if (userInput.toLowerCase() === "exit" || userInput.toLowerCase() === "quit") {
console.log("Ending chat.");
rl.close();
return;
}
try {
const response = await chatWithDeployment(userInput, convMemory);
console.log(`Assistant: ${response}`);
} catch (error) {
console.error("Error:", error.message);
}
promptUser();
});
}
promptUser();
```
### Testing
Here's an example discussion, note that the second question asked directly references the first one, the model is aware of the previous par of the conversation and can therefore reply with context.
```bash Bash theme={"theme":{"light":"github-light","dark":"github-dark"}}
❯ python3 history.py
You can now start chatting! Type 'exit' or 'quit' to end the chat.
You: What is the distance between Paris and Lyon ?
Assistant: The distance between Paris and Lyon is approximately:
- **By road**: 465 kilometers (289 miles)
- **Straight-line distance**: 390 kilometers (242 miles)
The driving time is typically around 4.5-5 hours depending on traffic and route taken. There's also a high-speed TGV train connection that takes about 2 hours between the two cities.
You: How long would it take while flying ?
Assistant: A direct flight between Paris and Lyon would take approximately **1 hour and 15 minutes** of actual flight time.
However, it's worth noting that:
- **Direct flights between Paris and Lyon are quite rare** since the TGV train is so efficient and convenient
- When you factor in airport procedures (arriving early, check-in, security, boarding, baggage claim), the **total travel time would be around 3-4 hours**
- Most travelers choose the **TGV train instead**, which takes only 2 hours city center to city center and is more convenient
So while the flight itself is short, the TGV high-speed train is typically the preferred option for travel between these two French cities due to its speed and convenience.
```
### Feedback Collection (Optional)
Feedback in Orq.ai helps track response quality and identify areas for improvement. You can collect user ratings, defect classifications, and corrections to continuously enhance your application.
**Provide feedback through the AI Studio:**
1. Go to **Logs** in your workspace
2. Find the specific deployment invocation
3. Use the feedback interface to rate responses
4. Add defect classifications or corrections as needed
You can also [collect feedback programmatically via the API](/docs/tutorials/capturing-feedback-with-orq) if needed.
You've successfully interacted with a [Deployment](/docs/deployments/overview) through our SDK, integrating the
To learn more about the creation of a **Deployment**, see [Creating a Deployment](/docs/ai-studio/ai-engineering/deployments).
## SDK code
In this part we'll setup the SDK code to call the Deployment we just created.
### Get the environment ready
Install the **orq.ai** SDK using the following command:
```bash Bash theme={"theme":{"light":"github-light","dark":"github-dark"}}
pip install orq-ai-sdk
```
```bash Bash theme={"theme":{"light":"github-light","dark":"github-dark"}}
npm install @orq-ai/node --save
```
### Building a Chat Loop
Here are the main features of what we're building:
* We're building a small CLI to interact with a deployment in the terminal
* We're using a local variable `conv_memory` as a way to store history of messages the user sends to the model. Every succeeding messages will hold context for the past conversation, making the model generation stateful during the session.
* The `conv_memory` is sent to the model generation within the `messages` field, this is where context is sent to the model.
#### Identity Tracking (Optional)
Identities in Orq.ai help track user interactions and API usage across your application. They can represent users, teams, or projects and enable better analytics and budget management.
**Create an Identity through the AI Studio:**
1. Go to **Identity Analytics** in your workspace
2. Click **Create an Identity**
3. Add the user details (name, email, external ID)
4. Set optional metadata and budget limits
Learn more about creating identities, see [Creating an Identity](/docs/ai-studio/observability/identities#creating-an-identity-using-the-api).
```python Python theme={"theme":{"light":"github-light","dark":"github-dark"}}
import os
from orq_ai_sdk import Orq
client = Orq(
api_key=os.environ.get("ORQ_API_KEY", "__API_KEY__"),
)
conv_memory = []
# Call orq.ai Deployment with conversation history
def chat_with_deployment(message, conv_memory):
conv_memory.append({"role": "user", "content": message})
generation = client.deployments.invoke(
key="cookbook-history",
context={
"environments": ["production"]
},
identity={"id": ""},
metadata={
"custom-field-name": "custom-metadata-value"
},
messages=conv_memory,
)
response = generation.choices[0].message.content
conv_memory.append({"role": "assistant", "content": response})
return response
# Handle terminal input
print("\nYou can now start chatting! Type 'exit' or 'quit' to end the chat.\n")
while True:
user_input = input("You: ")
if user_input.lower() in ["exit", "quit"]:
print("Ending chat.")
break
response = chat_with_deployment(user_input, conv_memory)
print(f"Assistant: {response}")
```
```typescript TypeScript theme={"theme":{"light":"github-light","dark":"github-dark"}}
import { Orq } from '@orq-ai/node';
import readline from 'readline';
const client = new Orq({
apiKey: process.env.ORQ_API_KEY || "__API_KEY__",
});
let convMemory = [];
// Calling orq.ai with conversation history
async function chatWithDeployment(message, convMemory) {
convMemory.push({ role: "user", content: message });
const generation = await client.deployments.invoke({
key: "cookbook-history",
context: {
environments: ["production"]
},
identity: { id: "" },
metadata: {
"custom-field-name": "custom-metadata-value"
},
messages: convMemory,
});
const response = generation.choices[0].message.content;
convMemory.push({ role: "assistant", content: response });
return response;
}
const rl = readline.createInterface({
input: process.stdin,
output: process.stdout
});
console.log("\nYou can now start chatting! Type 'exit' or 'quit' to end the chat.\n");
// Handle Terminal Input
function promptUser() {
rl.question("You: ", async (userInput) => {
if (userInput.toLowerCase() === "exit" || userInput.toLowerCase() === "quit") {
console.log("Ending chat.");
rl.close();
return;
}
try {
const response = await chatWithDeployment(userInput, convMemory);
console.log(`Assistant: ${response}`);
} catch (error) {
console.error("Error:", error.message);
}
promptUser();
});
}
promptUser();
```
### Testing
Here's an example discussion, note that the second question asked directly references the first one, the model is aware of the previous par of the conversation and can therefore reply with context.
```bash Bash theme={"theme":{"light":"github-light","dark":"github-dark"}}
❯ python3 history.py
You can now start chatting! Type 'exit' or 'quit' to end the chat.
You: What is the distance between Paris and Lyon ?
Assistant: The distance between Paris and Lyon is approximately:
- **By road**: 465 kilometers (289 miles)
- **Straight-line distance**: 390 kilometers (242 miles)
The driving time is typically around 4.5-5 hours depending on traffic and route taken. There's also a high-speed TGV train connection that takes about 2 hours between the two cities.
You: How long would it take while flying ?
Assistant: A direct flight between Paris and Lyon would take approximately **1 hour and 15 minutes** of actual flight time.
However, it's worth noting that:
- **Direct flights between Paris and Lyon are quite rare** since the TGV train is so efficient and convenient
- When you factor in airport procedures (arriving early, check-in, security, boarding, baggage claim), the **total travel time would be around 3-4 hours**
- Most travelers choose the **TGV train instead**, which takes only 2 hours city center to city center and is more convenient
So while the flight itself is short, the TGV high-speed train is typically the preferred option for travel between these two French cities due to its speed and convenience.
```
### Feedback Collection (Optional)
Feedback in Orq.ai helps track response quality and identify areas for improvement. You can collect user ratings, defect classifications, and corrections to continuously enhance your application.
**Provide feedback through the AI Studio:**
1. Go to **Logs** in your workspace
2. Find the specific deployment invocation
3. Use the feedback interface to rate responses
4. Add defect classifications or corrections as needed
You can also [collect feedback programmatically via the API](/docs/tutorials/capturing-feedback-with-orq) if needed.
You've successfully interacted with a [Deployment](/docs/deployments/overview) through our SDK, integrating the