Use the Responses API (POST /v3/router/responses). Legacy /v2/agents invoke endpoints (/v2/agents/run, /v2/agents/stream-run, /v2/agents/{agent_key}/responses, /v2/agents/{key}/task, and /v2/agents/{key}/stream-task) are deprecated. Retrieve a finished response with GET /v3/router/responses/{response_id}.
The agent/<key> model reference runs both internal Orq.ai Agents and registered external A2A Agents. Register external endpoints and review their supported request controls in Agents Gateway.
Send a message to an agent using the Responses API:
API & SDK
MCP
CLI
curl -X POST https://my.orq.ai/v3/router/responses \ -H "Authorization: Bearer $ORQ_API_KEY" \ -H "Content-Type: application/json" \ -d '{ "model": "agent/my-agent", "input": "Help me plan a microservices architecture for our e-commerce platform."}'
from orq_ai_sdk import Orqimport oswith Orq(api_key=os.getenv("ORQ_API_KEY", "")) as orq: response = orq.responses.create( model="agent/my-agent", input="Help me plan a microservices architecture for our e-commerce platform.", ) print(response)
import { Orq } from '@orq-ai/node';const orq = new Orq({ apiKey: process.env['ORQ_API_KEY'] ?? '' });const response = await orq.responses.create({ model: 'agent/my-agent', input: 'Help me plan a microservices architecture for our e-commerce platform.',});console.log(response);
Invoke "my-agent" with: Help me plan a microservices architecture for our e-commerce platform.
The assistant uses invoke_agent with model: "agent/my-agent" and returns the completed response.
orq responses create \
  --model agent/my-agent \
  --input '"Help me plan a microservices architecture for our e-commerce platform."'
See install and setup to get started with the CLI. Run orq responses create --help for the full flag reference.
The call waits for the agent to finish and returns a completed response object:
Set stream: true to receive incremental output as server-sent events. The response arrives in chunks as the Agent produces it.
curl -N -X POST https://my.orq.ai/v3/router/responses \
  -H "Authorization: Bearer $ORQ_API_KEY" \
  -H "Content-Type: application/json" \
  -d '{
    "model": "agent/my-agent",
    "input": "Help me plan a microservices architecture.",
    "stream": true
  }'
from orq_ai_sdk import Orqimport oswith Orq(api_key=os.getenv("ORQ_API_KEY", "")) as orq: res = orq.responses.create( model="agent/my-agent", input="Help me plan a microservices architecture.", stream=True, ) with res as event_stream: for item in event_stream: event = item.data if event and event.type == "response.output_text.delta": print(event.delta, end="", flush=True)
import { Orq } from '@orq-ai/node';const orq = new Orq({ apiKey: process.env['ORQ_API_KEY'] ?? '' });const stream = await orq.responses.create({ model: 'agent/my-agent', input: 'Help me plan a microservices architecture.', stream: true,});for await (const chunk of stream) { const event = chunk.data; if (event?.type === 'response.output_text.delta') { process.stdout.write(event.delta); } else if (event?.type === 'response.failed') { console.error('Stream failed:', event.response.error); }}
The stream emits server-sent events as the agent produces output:
Event
When
Key field
Notes
response.created
Stream opens
id
Pass as previous_response_id to continue the conversation
Attach files in the content array of an input message item:
Images: Via URL (image_url). For base64-encoded images, also set mime_type (e.g. image/jpeg).
PDFs: Data URI only (file_data). Pass the file as data:application/pdf;base64,<base64-data>. URL links are not supported for PDFs.
For the file lifecycle and for grounding agents with uploaded documents, see the Files API.
Verify the chosen model supports the file types in use. Image support does not imply PDF support, and many models accept one without the other. See Sending files to models.
Attach an image via URL:
curl -X POST https://my.orq.ai/v3/router/responses \ -H "Authorization: Bearer $ORQ_API_KEY" \ -H "Content-Type: application/json" \ -d '{ "model": "agent/image-classifier", "input": [ { "role": "user", "content": [ { "type": "input_text", "text": "What can you see in this image?" }, { "type": "input_image", "image_url": "https://picsum.photos/seed/sample-photo/800/600", "detail": "auto" } ] } ]}'
from orq_ai_sdk import Orqimport oswith Orq(api_key=os.getenv("ORQ_API_KEY", "")) as orq: response = orq.responses.create( model="agent/image-classifier", input=[ { "role": "user", "content": [ {"type": "input_text", "text": "What can you see in this image?"}, { "type": "input_image", "image_url": "https://picsum.photos/seed/sample-photo/800/600", "detail": "auto", }, ], } ], ) print(response)
import { Orq } from '@orq-ai/node';const orq = new Orq({ apiKey: process.env['ORQ_API_KEY'] ?? '' });const response = await orq.responses.create({ model: 'agent/image-classifier', input: [ { role: 'user', content: [ { type: 'input_text', text: 'What can you see in this image?' }, { type: 'input_image', imageUrl: 'https://picsum.photos/seed/sample-photo/800/600', detail: 'auto', }, ], }, ],});console.log(response);
After receiving a response, continue the conversation by passing the previously received response id as previous_response_id in the next request. The agent maintains full context from previous exchanges.
curl -X POST https://my.orq.ai/v3/router/responses \ -H "Authorization: Bearer $ORQ_API_KEY" \ -H "Content-Type: application/json" \ -d '{ "model": "agent/my-agent", "previous_response_id": "resp_01K6D8QESESZ6SAXQPJPFQXPFT", "input": "Can you expand on the challenges section?"}'
from orq_ai_sdk import Orqimport oswith Orq(api_key=os.getenv("ORQ_API_KEY", "")) as orq: response = orq.responses.create( model="agent/my-agent", previous_response_id="resp_01K6D8QESESZ6SAXQPJPFQXPFT", input="Can you expand on the challenges section?", ) print(response)
import { Orq } from '@orq-ai/node';const orq = new Orq({ apiKey: process.env['ORQ_API_KEY'] ?? '' });const response = await orq.responses.create({ model: 'agent/my-agent', previousResponseId: 'resp_01K6D8QESESZ6SAXQPJPFQXPFT', input: 'Can you expand on the challenges section?',});console.log(response);
The continuation returns a new response id for the extended conversation. The agent retains full context from all prior turns.
To call the Agent with a memory store, we’ll use the Responses API with an Embedded message and Linked memory.
curl -X POST https://my.orq.ai/v3/router/responses \ -H "Authorization: Bearer $ORQ_API_KEY" \ -H "Content-Type: application/json" \ -d '{ "model": "agent/agent-memories", "memory": { "entity_id": "customer_456" }, "input": "Do you remember what is my name?"}'
from orq_ai_sdk import Orqimport oswith Orq(api_key=os.getenv("ORQ_API_KEY", "")) as orq: response = orq.responses.create( model="agent/agent-memories", memory={ "entity_id": "customer_456" }, input="Do you remember what is my name?", ) print(response)
import { Orq } from '@orq-ai/node';const orq = new Orq({ apiKey: process.env['ORQ_API_KEY'] ?? '' });const response = await orq.responses.create({ model: 'agent/agent-memories', memory: { entityId: 'customer_456', }, input: 'Do you remember what is my name?',});console.log(response);
Multiple memory stores per call are supported. Ensure the entity_id sent during the calls maps the same way to all previously declared memory stores during agent creation.
Attach arbitrary key-value pairs to a response using the metadata field. Metadata is stored on the response and visible in traces. Use it to tag runs by session, user, environment, or any other dimension useful for filtering in Observability. Values must be strings.
Pass tools in the tools array of any Responses API call. Multiple tools of different types can appear in the same request.
Tool type
What it does
Function
Define a custom schema. The model decides when to call it; the application executes and returns the result.
MCP Server
Connect to an MCP-compatible server. Orq.ai fetches the tool catalog and routes calls to the server.
HTTP
Call an external REST endpoint. Orq.ai executes the request; no application-side logic needed.
Built-ins
Platform-managed tools (orq:web_search, orq:web_fetch, orq:datetime) with no setup or execution logic.
Each tool type supports Inline (definition embedded in the request) or Pre-saved (created once in Studio, referenced by ID). HTTP and Built-ins are pre-saved or platform-managed only.
Function
Define a custom function schema. The model decides when to call it, fills the parameters, and returns a function_call output item. Choose Inline to embed the schema in the request, or Pre-saved to reuse a schema stored in Studio.For when to reach for a Function tool over an HTTP or MCP tool, see Choosing a tool type.
Inline
Pre-saved
Define a function schema inline. The model decides when to call it, fills the parameters, and returns a function_call output item. The application executes the function and sends the result back.Step 1: Send the request with a function tool:
curl -X POST https://my.orq.ai/v3/router/responses \
  -H "Authorization: Bearer $ORQ_API_KEY" \
  -H "Content-Type: application/json" \
  -d '{
    "model": "agent/my-agent",
    "input": "What is the weather in Paris?",
    "tools": [{
      "type": "function",
      "name": "get_weather",
      "description": "Returns the current weather for a city.",
      "parameters": {
        "type": "object",
        "properties": {
          "city": { "type": "string", "description": "City name" }
        },
        "required": ["city"]
      }
    }]
  }'
from orq_ai_sdk import Orqimport osorq = Orq(api_key=os.environ["ORQ_API_KEY"])response = orq.responses.create( model="agent/my-agent", input="What is the weather in Paris?", tools=[{ "type": "function", "name": "get_weather", "description": "Returns the current weather for a city.", "parameters": { "type": "object", "properties": { "city": {"type": "string", "description": "City name"}, }, "required": ["city"], }, }],)
import { Orq } from "@orq-ai/node";const orq = new Orq({ apiKey: process.env.ORQ_API_KEY });const response = await orq.responses.create({ model: "agent/my-agent", input: "What is the weather in Paris?", tools: [{ type: "function", name: "get_weather", description: "Returns the current weather for a city.", parameters: { type: "object", properties: { city: { type: "string", description: "City name" }, }, required: ["city"], }, }],});
The response contains a function_call output item when the model decides to use the tool:
Match the result to the call with call_id, not id. id identifies the output item; call_id is what function_call_output is keyed on.A client-side function call does not change the response status. The response remains "completed" even while local execution is pending. Inspect output for function_call items to decide whether to execute a function and send a continuation request.
The model only emits a function_call item when it decides to use the tool. Check output[0].type === "function_call" before proceeding to Step 2; if the model answered directly, read the text from response.output[0].content[0].text instead. Pass tool_choice: "required" to force a tool call.
Step 2: Execute the function and return the result:Pass previous_response_id and a function_call_output input item with the matching call_id. Include the same tools array so the model can make additional calls if needed.
import json# Execute the function locallyresult = {"temperature": 22, "unit": "celsius", "condition": "sunny"}final = orq.responses.create( model="agent/my-agent", previous_response_id=response.id, input=[{ "type": "function_call_output", "call_id": response.output[0]["call_id"], "output": json.dumps(result), }], tools=[{ "type": "function", "name": "get_weather", "description": "Returns the current weather for a city.", "parameters": { "type": "object", "properties": { "city": {"type": "string", "description": "City name"}, }, "required": ["city"], }, }],)print(final.output[0]["content"][0]["text"])
// Execute the function locallyconst result = { temperature: 22, unit: "celsius", condition: "sunny" };const final = await orq.responses.create({ model: "agent/my-agent", previousResponseId: response.id, input: [{ type: "function_call_output", callId: (response.output[0] as any).call_id, output: JSON.stringify(result), }], tools: [{ type: "function", name: "get_weather", description: "Returns the current weather for a city.", parameters: { type: "object", properties: { city: { type: "string", description: "City name" }, }, required: ["city"], }, }],});console.log(final.output?.[0]?.content?.[0]?.text);
output accepts a string, which is the common case for a JSON serialized result. It also accepts an array of content parts (text, image, file, video) when the function returns non-text content.Function tool fields:
Field
Type
Required
Description
type
string
yes
"function"
name
string
yes
Function name. Returned in the function_call output item so the application knows which function to run.
description
string
no
What the function does. Helps the model decide when to call it.
parameters
object
no
JSON Schema object describing the function’s parameters.
strict
boolean
no
Enforce strict parameter validation against the schema.
Generate the schema in Python:The Python SDK derives a function tool from a plain function, so the schema does not have to be written by hand. Decorate the function with @tool and pass it directly in tools. The name, description, and parameters come from the function name, docstring, and type hints. The decorated function stays callable, so the same object defines the tool and executes the call in Step 2.
Python
from typing import Literalfrom orq_ai_sdk.function_tools import tool@tooldef get_weather(city: str, units: Literal["celsius", "fahrenheit"]) -> str: """Returns the current weather for a city.""" return f"20 degrees {units} in {city}"response = orq.responses.create( model="agent/my-agent", input="What is the weather in Paris?", tools=[get_weather],)
Inspect the generated schema through get_weather.schema.Decorator options:
Option
Default
Description
name
Function name
Override the tool name.
description
Docstring
Override the tool description.
strict
True
Emit a strict schema with additionalProperties: false and every parameter listed in required.
Supported parameter types are str, int, float, bool, list[T], Optional[T], Literal, and Enum. Every parameter needs a type annotation, and parameter-level descriptions are not supported. Async functions, *args, **kwargs, positional-only parameters, bare containers such as dict, and nested Pydantic models or dataclasses raise a ToolSchemaError.
Under strict=True every parameter is required, so Python default values are unreachable: the model must send a value or null. Pass strict=False to keep defaulted parameters out of required.
To build the schema object without the callable wrapper, use tool_schema(func) from the same module.
Save the schema once in Studio and reference it instead of repeating it in every request. The application still executes the function and sends the result back via function_call_output, identical to the Inline tab two-step cycle above.How to reference the tool depends on what is being called:
Calling
How the tool is referenced
An Agent (model: "agent/<key>")
Attach the tool to the Agent. Its tools come from the Agent configuration, so Orq.ai ignores a tools array in the request.
A model directly (model: "openai/gpt-5.6-luna")
Pass {"type": "orq:function", "tool_id": "..."} in the request tools array.
{ "model": "openai/gpt-5.6-luna", "input": "Can we ship SKU-1180 and SKU-9042 this week?", "tools": [{ "type": "orq:function", "tool_id": "tool_01ABC..." }]}
For a worked example that creates the tool, attaches it to an Agent, and runs the loop end to end, see Function Tool.
MCP Server
Connect to any MCP-compatible server. This lets the agent read from and write to external services like Linear, Slack, or GitHub without writing any integration code. Choose Inline to supply the server URL per-request, or Pre-saved to reference a saved server by key with credentials stored on the platform.
Inline
Pre-saved
Supply the MCP server URL directly in the request. The tool catalog is fetched from the server on each call. Use for one-off calls or when the server has not yet been saved under Tools. Provide server_url (inline) or key (pre-saved), not both.
from orq_ai_sdk import Orqimport osorq = Orq(api_key=os.environ["ORQ_API_KEY"])response = orq.responses.create( model="agent/my-agent", input="List the teams in Linear", tools=[{ "type": "mcp", "server_url": "https://mcp.linear.app/mcp", "server_description": "Linear issue tracker", "headers": {"Authorization": "Bearer lin_api_..."}, }],)print(response.output[0]["content"][0]["text"])
import { Orq } from "@orq-ai/node";const orq = new Orq({ apiKey: process.env.ORQ_API_KEY });const response = await orq.responses.create({ model: "agent/my-agent", input: "List the teams in Linear", tools: [{ type: "mcp", serverUrl: "https://mcp.linear.app/mcp", serverDescription: "Linear issue tracker", headers: { Authorization: "Bearer lin_api_..." }, }],});console.log(response.output?.[0]?.content?.[0]?.text);
Per-request credentialsUse {{variable}} placeholders in headers and supply values at call time. The secret: true wrapper keeps token values out of traces and logs:
server_url must use http or https and be reachable from Orq.ai. URLs whose host resolves to a loopback, link-local, private (RFC 1918), unspecified, or cloud-metadata address are rejected.
Save the MCP server once in Studio or via the Create Tool API, then reference it by key. The tool catalog is cached at save time: no round-trip to the server on each call.
Replace my-agent with the agent key and linear_mcp with the key of the MCP tool saved in Studio. If either key does not exist in the workspace, the request returns 400.
curl -X POST https://my.orq.ai/v3/router/responses \
  -H "Authorization: Bearer $ORQ_API_KEY" \
  -H "Content-Type: application/json" \
  -d '{
    "model": "agent/my-agent",
    "input": "List the teams in Linear",
    "tools": [{ "type": "mcp", "key": "linear_mcp" }]
  }'
from orq_ai_sdk import Orqimport osorq = Orq(api_key=os.environ["ORQ_API_KEY"])response = orq.responses.create( model="agent/my-agent", input="List the teams in Linear", tools=[{"type": "mcp", "key": "linear_mcp"}],)print(response.output[0]["content"][0]["text"])
import { Orq } from "@orq-ai/node";const orq = new Orq({ apiKey: process.env.ORQ_API_KEY });const response = await orq.responses.create({ model: "agent/my-agent", input: "List the teams in Linear", tools: [{ type: "mcp", key: "linear_mcp" }],});console.log(response.output?.[0]?.content?.[0]?.text);
Encrypted headersMark sensitive headers as encrypted: true when creating the tool in Studio. Values are stored with workspace-scoped encryption, decrypted on each call, and redacted from traces:
Per-request credentialsStore a {{variable}} placeholder in the tool’s headers, then supply the value per call. Use secret: true to keep the token out of traces:
response = orq.responses.create( model="agent/my-agent", input="List the teams in Linear", tools=[{"type": "mcp", "key": "linear_mcp"}], variables={"linear_token": {"secret": True, "value": "lin_api_..."}},)print(response.output[0]["content"][0]["text"])
const response = await orq.responses.create({ model: "agent/my-agent", input: "List the teams in Linear", tools: [{ type: "mcp", key: "linear_mcp" }], variables: { linear_token: { secret: true, value: "lin_api_..." } },});console.log(response.output?.[0]?.content?.[0]?.text);
Multiple servers in one callEach entry in tools is independent. Mix server keys and types freely:
curl -X POST https://my.orq.ai/v3/router/responses \
  -H "Authorization: Bearer $ORQ_API_KEY" \
  -H "Content-Type: application/json" \
  -d '{
    "model": "agent/my-agent",
    "input": "Find tickets from yesterday in Linear and the related Slack threads.",
    "tools": [
      { "type": "mcp", "key": "linear_mcp" },
      { "type": "mcp", "key": "slack_mcp" }
    ]
  }'
response = orq.responses.create( model="agent/my-agent", input="Find tickets from yesterday in Linear and the related Slack threads.", tools=[ {"type": "mcp", "key": "linear_mcp"}, {"type": "mcp", "key": "slack_mcp"}, ],)print(response.output[0]["content"][0]["text"])
const response = await orq.responses.create({ model: "agent/my-agent", input: "Find tickets from yesterday in Linear and the related Slack threads.", tools: [ { type: "mcp", key: "linear_mcp" }, { type: "mcp", key: "slack_mcp" }, ],});console.log(response.output?.[0]?.content?.[0]?.text);
If the remote server adds new tools, refresh the saved tool in Studio to update the cached catalog.
MCP tool calls appear in traces with server hostname, tool name, arguments, and latency. See MCP Tracing for details.
HTTP
Reference an HTTP tool saved in Studio using orq:http and its tool_id. Orq.ai executes the HTTP request against the configured endpoint and returns the result to the model. No execution logic needed in the application.Add timeout (seconds, 1 to 600) to the tool reference to override the request timeout configured on the tool for this call. Tool references in agent settings accept the same field to set a per-agent override.
Tool executions are also bounded by the run’s limits.tool_timeout. Its default is 5 minutes, and a per-tool timeout longer than that still gets cut short unless limits.tool_timeout is raised for the run. The per-tool timeout caps at 10 minutes (600 seconds); limits.tool_timeout has no upper bound. See the Responses API reference for the full limits field.
curl -X POST https://my.orq.ai/v3/router/responses \
  -H "Authorization: Bearer $ORQ_API_KEY" \
  -H "Content-Type: application/json" \
  -d '{
    "model": "agent/my-agent",
    "input": "Get the latest order status for customer 42.",
    "tools": [{
      "type": "orq:http",
      "tool_id": "tool_01XYZ...",
      "timeout": 120
    }]
  }'
from orq_ai_sdk import Orqimport osorq = Orq(api_key=os.environ["ORQ_API_KEY"])response = orq.responses.create( model="agent/my-agent", input="Get the latest order status for customer 42.", tools=[{"type": "orq:http", "tool_id": "tool_01XYZ...", "timeout": 120}],)print(response.output[0]["content"][0]["text"])
import { Orq } from "@orq-ai/node";const orq = new Orq({ apiKey: process.env.ORQ_API_KEY });const response = await orq.responses.create({ model: "agent/my-agent", input: "Get the latest order status for customer 42.", tools: [{ type: "orq:http", toolId: "tool_01XYZ...", timeout: 120 }],});console.log(response.output?.[0]?.content?.[0]?.text);
To create and manage HTTP tools, see Create Tools.
Built-ins
Orq.ai includes platform-managed tools that require no configuration. Reference them by type alone. No credentials or execution logic needed in the application.
type
Description
orq:datetime
Returns the current date and time. Accepts a timezone parameter for any IANA timezone (defaults to UTC).
orq:web_search
Performs a web search and returns top results.
orq:web_fetch
Fetches and extracts text content from a URL.
curl -X POST https://my.orq.ai/v3/router/responses \
  -H "Authorization: Bearer $ORQ_API_KEY" \
  -H "Content-Type: application/json" \
  -d '{
    "model": "agent/my-agent",
    "input": "What are the top AI news stories right now?",
    "tools": [
      { "type": "orq:datetime" },
      { "type": "orq:web_search" }
    ]
  }'
from orq_ai_sdk import Orqimport osorq = Orq(api_key=os.environ["ORQ_API_KEY"])response = orq.responses.create( model="agent/my-agent", input="What are the top AI news stories right now?", tools=[ {"type": "orq:datetime"}, {"type": "orq:web_search"}, ],)print(response.output[0]["content"][0]["text"])
import { Orq } from "@orq-ai/node";const orq = new Orq({ apiKey: process.env.ORQ_API_KEY });const response = await orq.responses.create({ model: "agent/my-agent", input: "What are the top AI news stories right now?", tools: [ { type: "orq:datetime" }, { type: "orq:web_search" }, ],});console.log(response.output?.[0]?.content?.[0]?.text);
Built-in tools execute automatically on Orq.ai infrastructure. Results are fed back to the model within the same request; no function_call_output round-trip needed.
Controls whether and which tool the model calls. Applies to all tool types.
Auto: Model Decides
Default when tools are present. The model decides on each turn whether to call a tool or answer directly. Use this for conversational agents where tool use is situational.
curl -X POST https://my.orq.ai/v3/router/responses \
  -H "Authorization: Bearer $ORQ_API_KEY" \
  -H "Content-Type: application/json" \
  -d '{
    "model": "agent/my-agent",
    "input": "What is the weather in Paris?",
    "tools": [{
      "type": "function",
      "name": "get_weather",
      "description": "Returns the current weather for a city.",
      "parameters": {
        "type": "object",
        "properties": { "city": { "type": "string" } },
        "required": ["city"]
      }
    }],
    "tool_choice": "auto"
  }'
response = orq.responses.create( model="agent/my-agent", input="What is the weather in Paris?", tools=[{ "type": "function", "name": "get_weather", "description": "Returns the current weather for a city.", "parameters": { "type": "object", "properties": {"city": {"type": "string"}}, "required": ["city"], }, }], tool_choice="auto",)
const response = await orq.responses.create({ model: "agent/my-agent", input: "What is the weather in Paris?", tools: [{ type: "function", name: "get_weather", description: "Returns the current weather for a city.", parameters: { type: "object", properties: { city: { type: "string" } }, required: ["city"], }, }], toolChoice: "auto",});
Required: Always Call a Tool
The model must call at least one tool before producing a final response. Use when a tool call is always necessary: for example, a retrieval step before every answer.
curl -X POST https://my.orq.ai/v3/router/responses \
  -H "Authorization: Bearer $ORQ_API_KEY" \
  -H "Content-Type: application/json" \
  -d '{
    "model": "agent/my-agent",
    "input": "What is the weather in Paris?",
    "tools": [{
      "type": "function",
      "name": "get_weather",
      "description": "Returns the current weather for a city.",
      "parameters": {
        "type": "object",
        "properties": { "city": { "type": "string" } },
        "required": ["city"]
      }
    }],
    "tool_choice": "required"
  }'
response = orq.responses.create( model="agent/my-agent", input="What is the weather in Paris?", tools=[{ "type": "function", "name": "get_weather", "description": "Returns the current weather for a city.", "parameters": { "type": "object", "properties": {"city": {"type": "string"}}, "required": ["city"], }, }], tool_choice="required",)
const response = await orq.responses.create({ model: "agent/my-agent", input: "What is the weather in Paris?", tools: [{ type: "function", name: "get_weather", description: "Returns the current weather for a city.", parameters: { type: "object", properties: { city: { type: "string" } }, required: ["city"], }, }], toolChoice: "required",});
None: Disable Tools
The model must not call any tool. Tools remain present in the request (the model can see their schemas) but cannot invoke them. Use to temporarily disable tools without removing them from the request.
curl -X POST https://my.orq.ai/v3/router/responses \
  -H "Authorization: Bearer $ORQ_API_KEY" \
  -H "Content-Type: application/json" \
  -d '{
    "model": "agent/my-agent",
    "input": "What is the weather in Paris?",
    "tools": [{
      "type": "function",
      "name": "get_weather",
      "description": "Returns the current weather for a city.",
      "parameters": {
        "type": "object",
        "properties": { "city": { "type": "string" } },
        "required": ["city"]
      }
    }],
    "tool_choice": "none"
  }'
response = orq.responses.create( model="agent/my-agent", input="What is the weather in Paris?", tools=[{ "type": "function", "name": "get_weather", "description": "Returns the current weather for a city.", "parameters": { "type": "object", "properties": {"city": {"type": "string"}}, "required": ["city"], }, }], tool_choice="none",)
const response = await orq.responses.create({ model: "agent/my-agent", input: "What is the weather in Paris?", tools: [{ type: "function", name: "get_weather", description: "Returns the current weather for a city.", parameters: { type: "object", properties: { city: { type: "string" } }, required: ["city"], }, }], toolChoice: "none",});
Specific Function: Force One Tool
Force the model to call one named function. Pass { "type": "function", "name": "<function name>" }, replacing <function name> with the exact name from the tool definition. Use when the application must extract structured data from a known function schema.
curl -X POST https://my.orq.ai/v3/router/responses \
  -H "Authorization: Bearer $ORQ_API_KEY" \
  -H "Content-Type: application/json" \
  -d '{
    "model": "agent/my-agent",
    "input": "What is the weather in Paris?",
    "tools": [{
      "type": "function",
      "name": "get_weather",
      "description": "Returns the current weather for a city.",
      "parameters": {
        "type": "object",
        "properties": { "city": { "type": "string" } },
        "required": ["city"]
      }
    }],
    "tool_choice": { "type": "function", "name": "get_weather" }
  }'
response = orq.responses.create( model="agent/my-agent", input="What is the weather in Paris?", tools=[{ "type": "function", "name": "get_weather", "description": "Returns the current weather for a city.", "parameters": { "type": "object", "properties": {"city": {"type": "string"}}, "required": ["city"], }, }], tool_choice={"type": "function", "name": "get_weather"},)
const response = await orq.responses.create({ model: "agent/my-agent", input: "What is the weather in Paris?", tools: [{ type: "function", name: "get_weather", description: "Returns the current weather for a city.", parameters: { type: "object", properties: { city: { type: "string" } }, required: ["city"], }, }], toolChoice: { type: "function", name: "get_weather" },});
MCP servers can expose dozens of tools. Use allowed_tools on any MCP entry (inline or pre-saved) to narrow what the model sees. Tools outside the filter are invisible to the model and cannot be invoked. allowed_tools applies only to MCP tools; it has no effect on function, HTTP, or built-in tools.
tool_names: Expose Named Tools Only
Expose only the listed tools by name. The model cannot see or call any tool not in the list.
Expose only tools the server marks as readOnlyHint: true. Use to prevent the model from calling any mutating operations. The server must annotate tools with readOnlyHint for this filter to have effect.
curl -X POST https://my.orq.ai/v3/router/responses \
  -H "Authorization: Bearer $ORQ_API_KEY" \
  -H "Content-Type: application/json" \
  -d '{
    "model": "agent/my-agent",
    "input": "Summarise the open issues in the Engineering team.",
    "tools": [{
      "type": "mcp",
      "key": "linear_mcp",
      "allowed_tools": { "read_only": true }
    }]
  }'
response = orq.responses.create( model="agent/my-agent", input="Summarise the open issues in the Engineering team.", tools=[{ "type": "mcp", "key": "linear_mcp", "allowed_tools": {"read_only": True}, }],)print(response.output[0]["content"][0]["text"])
const response = await orq.responses.create({ model: "agent/my-agent", input: "Summarise the open issues in the Engineering team.", tools: [{ type: "mcp", key: "linear_mcp", allowedTools: { readOnly: true }, }],});console.log(response.output?.[0]?.content?.[0]?.text);
Combined: Name and Read-only Filter
Intersection filter: expose only tools that are both read-only AND in the named list.
Set stream: true on any request with tools. See Streaming for setup and base event shapes. For function tools, act on response.output_item.done: it carries the complete function_call item with arguments and call_id ready for Step 2. MCP server calls also emit three additional events:
Event
When
response.mcp_call.in_progress
MCP tool starts executing.
response.mcp_call.completed
MCP tool returned a result.
response.mcp_call.failed
MCP tool raised an error or the connection failed.
MCP output items use type: "mcp_call". Function tool output items use type: "function_call". Match on type when processing output on the client.
HTTP 400, type: "invalid_request"The server_url uses a bad scheme or resolves to a disallowed address (loopback, link-local, private RFC 1918, unspecified, or cloud-metadata).
MCP server URL must not point to loopback, link-local, private, or unspecified addresses
Pre-saved Key Not Found
HTTP 400, type: "invalid_request"The key passed in the request does not match any tool saved in the workspace.
failed to resolve MCP server "foo": tool not found
Server Refused the Handshake
HTTP 400, type: "invalid_request"The MCP server rejected the connection during the initialization handshake.
mcp connect to "foo" failed: ...
Server Unreachable or Bad Response
HTTP 400, type: "invalid_request"The MCP server was not reachable or returned a malformed response during tool discovery.
mcp list tools from "foo" failed: ...
Server-side Failure
HTTP 500, type: "internal_error"An unexpected error occurred on the Orq.ai side. Retry with exponential backoff.
Tool-call Execution Failure
HTTP 200, output item with status: "failed"The tool call was routed successfully but the tool itself raised an error. The overall HTTP response is 200 because the request succeeded; inspect output[n].output for the error detail.
Agent execution can take a long time. If the agent appears to be hanging, it is most likely still running. Wait and check the panel again later.
Agent states:
State
Description
Active
Execution in progress; continuation requests blocked
Inactive
Waiting for user input or tool results; ready for continuation
Error
Execution failed; continuation blocked
Task states:
State
Description
Submitted
Task created and queued for execution
Working
Agent actively processing
Input Required
Waiting for user input or tool results
Completed
Task finished successfully
Failed
Task encountered an error
Canceled
Task was manually canceled
Response status values:
Status
Description
in_progress
Agent is actively processing
completed
Response finished successfully
failed
Response encountered an error
The status field is returned on every response object from POST /v3/router/responses. See the Create Response API reference for the full response shape.
Inspect task states through traces:
Show me the last 10 traces for "support-bot" and summarize their completion states
The assistant uses list_traces filtered to the agent and surfaces the state distribution.
The status field is returned on every response object from orq responses create:
orq responses create --model agent/my-agent --input '"..."' --json -q status
See install and setup to get started with the CLI. Run orq responses create --help for the full flag reference.
Multi-agent workflows are configured at the agent level. Each agent in a team is created individually, then the orchestrator references sub-agents through its team_of_agents configuration.The Description field on each sub-agent is critical: orchestrators use it to decide when to delegate.
To configure multi-agent setups, see Build Agents: Instructions for how to write descriptions that enable effective delegation.
Multi-agent workflows use a hierarchical system:
Orchestrator: Main agent that delegates tasks using call_sub_agent.
Sub-agents: Specialized agents for specific functions.
Delegation: Automatic routing based on sub-agent descriptions and capabilities.
Step 1: Create sub-agents.Create each specialized agent individually. The description field drives orchestrator delegation decisions.Step 2: Create the orchestrator.Reference sub-agents in the team_of_agents array. Include retrieve_agents and call_sub_agent tools.
curl -X POST https://my.orq.ai/v2/agents \ -H "Authorization: Bearer $ORQ_API_KEY" \ -H "Content-Type: application/json" \ -d '{ "key": "orchestrator", "role": "Task Coordinator", "description": "Coordinates specialized agents to handle diverse user requests", "instructions": "Answer the user using your sub-agents. Use retrieve_agents to discover available agents, then call_sub_agent to delegate tasks based on their capabilities.", "settings": { "max_iterations": 15, "max_execution_time": 600, "tools": [ { "type": "retrieve_agents" }, { "type": "call_sub_agent" } ] }, "model": "openai/gpt-5.6-sol", "path": "Default/agents", "team_of_agents": [ { "key": "specialist-a", "role": "Handles domain A" }, { "key": "specialist-b", "role": "Handles domain B" } ]}'
from orq_ai_sdk import Orqimport oswith Orq(api_key=os.getenv("ORQ_API_KEY", "")) as orq: orchestrator = orq.agents.create( key="orchestrator", role="Task Coordinator", description="Coordinates specialized agents to handle diverse user requests", instructions="Answer the user using your sub-agents. Use retrieve_agents to discover available agents, then call_sub_agent to delegate tasks based on their capabilities.", path="Default/agents", model="openai/gpt-5.6-sol", settings={ "max_iterations": 15, "max_execution_time": 600, "tools": [ {"type": "retrieve_agents"}, {"type": "call_sub_agent"} ] }, team_of_agents=[ {"key": "specialist-a", "role": "Handles domain A"}, {"key": "specialist-b", "role": "Handles domain B"} ] )
import { Orq } from '@orq-ai/node';const orq = new Orq({ apiKey: process.env['ORQ_API_KEY'] ?? '' });const orchestrator = await orq.agents.create({ key: 'orchestrator', role: 'Task Coordinator', description: 'Coordinates specialized agents to handle diverse user requests', instructions: 'Answer the user using your sub-agents. Use retrieve_agents to discover available agents, then call_sub_agent to delegate tasks based on their capabilities.', path: 'Default/agents', model: 'openai/gpt-5.6-sol', settings: { maxIterations: 15, maxExecutionTime: 600, tools: [ { type: 'retrieve_agents' }, { type: 'call_sub_agent' } ] }, teamOfAgents: [ { key: 'specialist-a', role: 'Handles domain A' }, { key: 'specialist-b', role: 'Handles domain B' } ]});
Step 3: Invoke the orchestrator.Invoke the orchestrator the same way as any other agent. It handles delegation internally.
Orchestrator agents must include retrieve_agents to discover sub-agents before delegating. Add explicit instructions: “Use retrieve_agents to see what specialized agents are available, then call_sub_agent to delegate.”
Update the orchestrator at any time with PATCH /v2/agents/{key} to add or remove sub-agents from team_of_agents.
Find all agents available as sub-agents:
Search for all agents in the Default/agents project
The assistant uses search_entities with type: "agent" to list available agents.Set up an orchestrator:
Create an orchestrator agent that coordinates "youth-agent" and "formal-agent" for tone-matched responses
The assistant uses create_agent with the team_of_agents array and retrieve_agents / call_sub_agent tools.
orq agents create \
  --key orchestrator \
  --role "Task Coordinator" \
  --description "Coordinates specialized agents to handle diverse user requests" \
  --instructions "Answer the user using your sub-agents. Use retrieve_agents to discover available agents, then call_sub_agent to delegate tasks based on their capabilities." \
  --path Default/agents \
  --model '{"id": "openai/gpt-5.6-sol"}' \
  --settings '{"max_iterations": 15, "max_execution_time": 600, "tools": [{"type": "retrieve_agents"}, {"type": "call_sub_agent"}]}' \
  --team-of-agents '[{"key": "specialist-a", "role": "Handles domain A"}, {"key": "specialist-b", "role": "Handles domain B"}]'
See install and setup to get started with the CLI. Run orq agents create --help for the full flag reference.
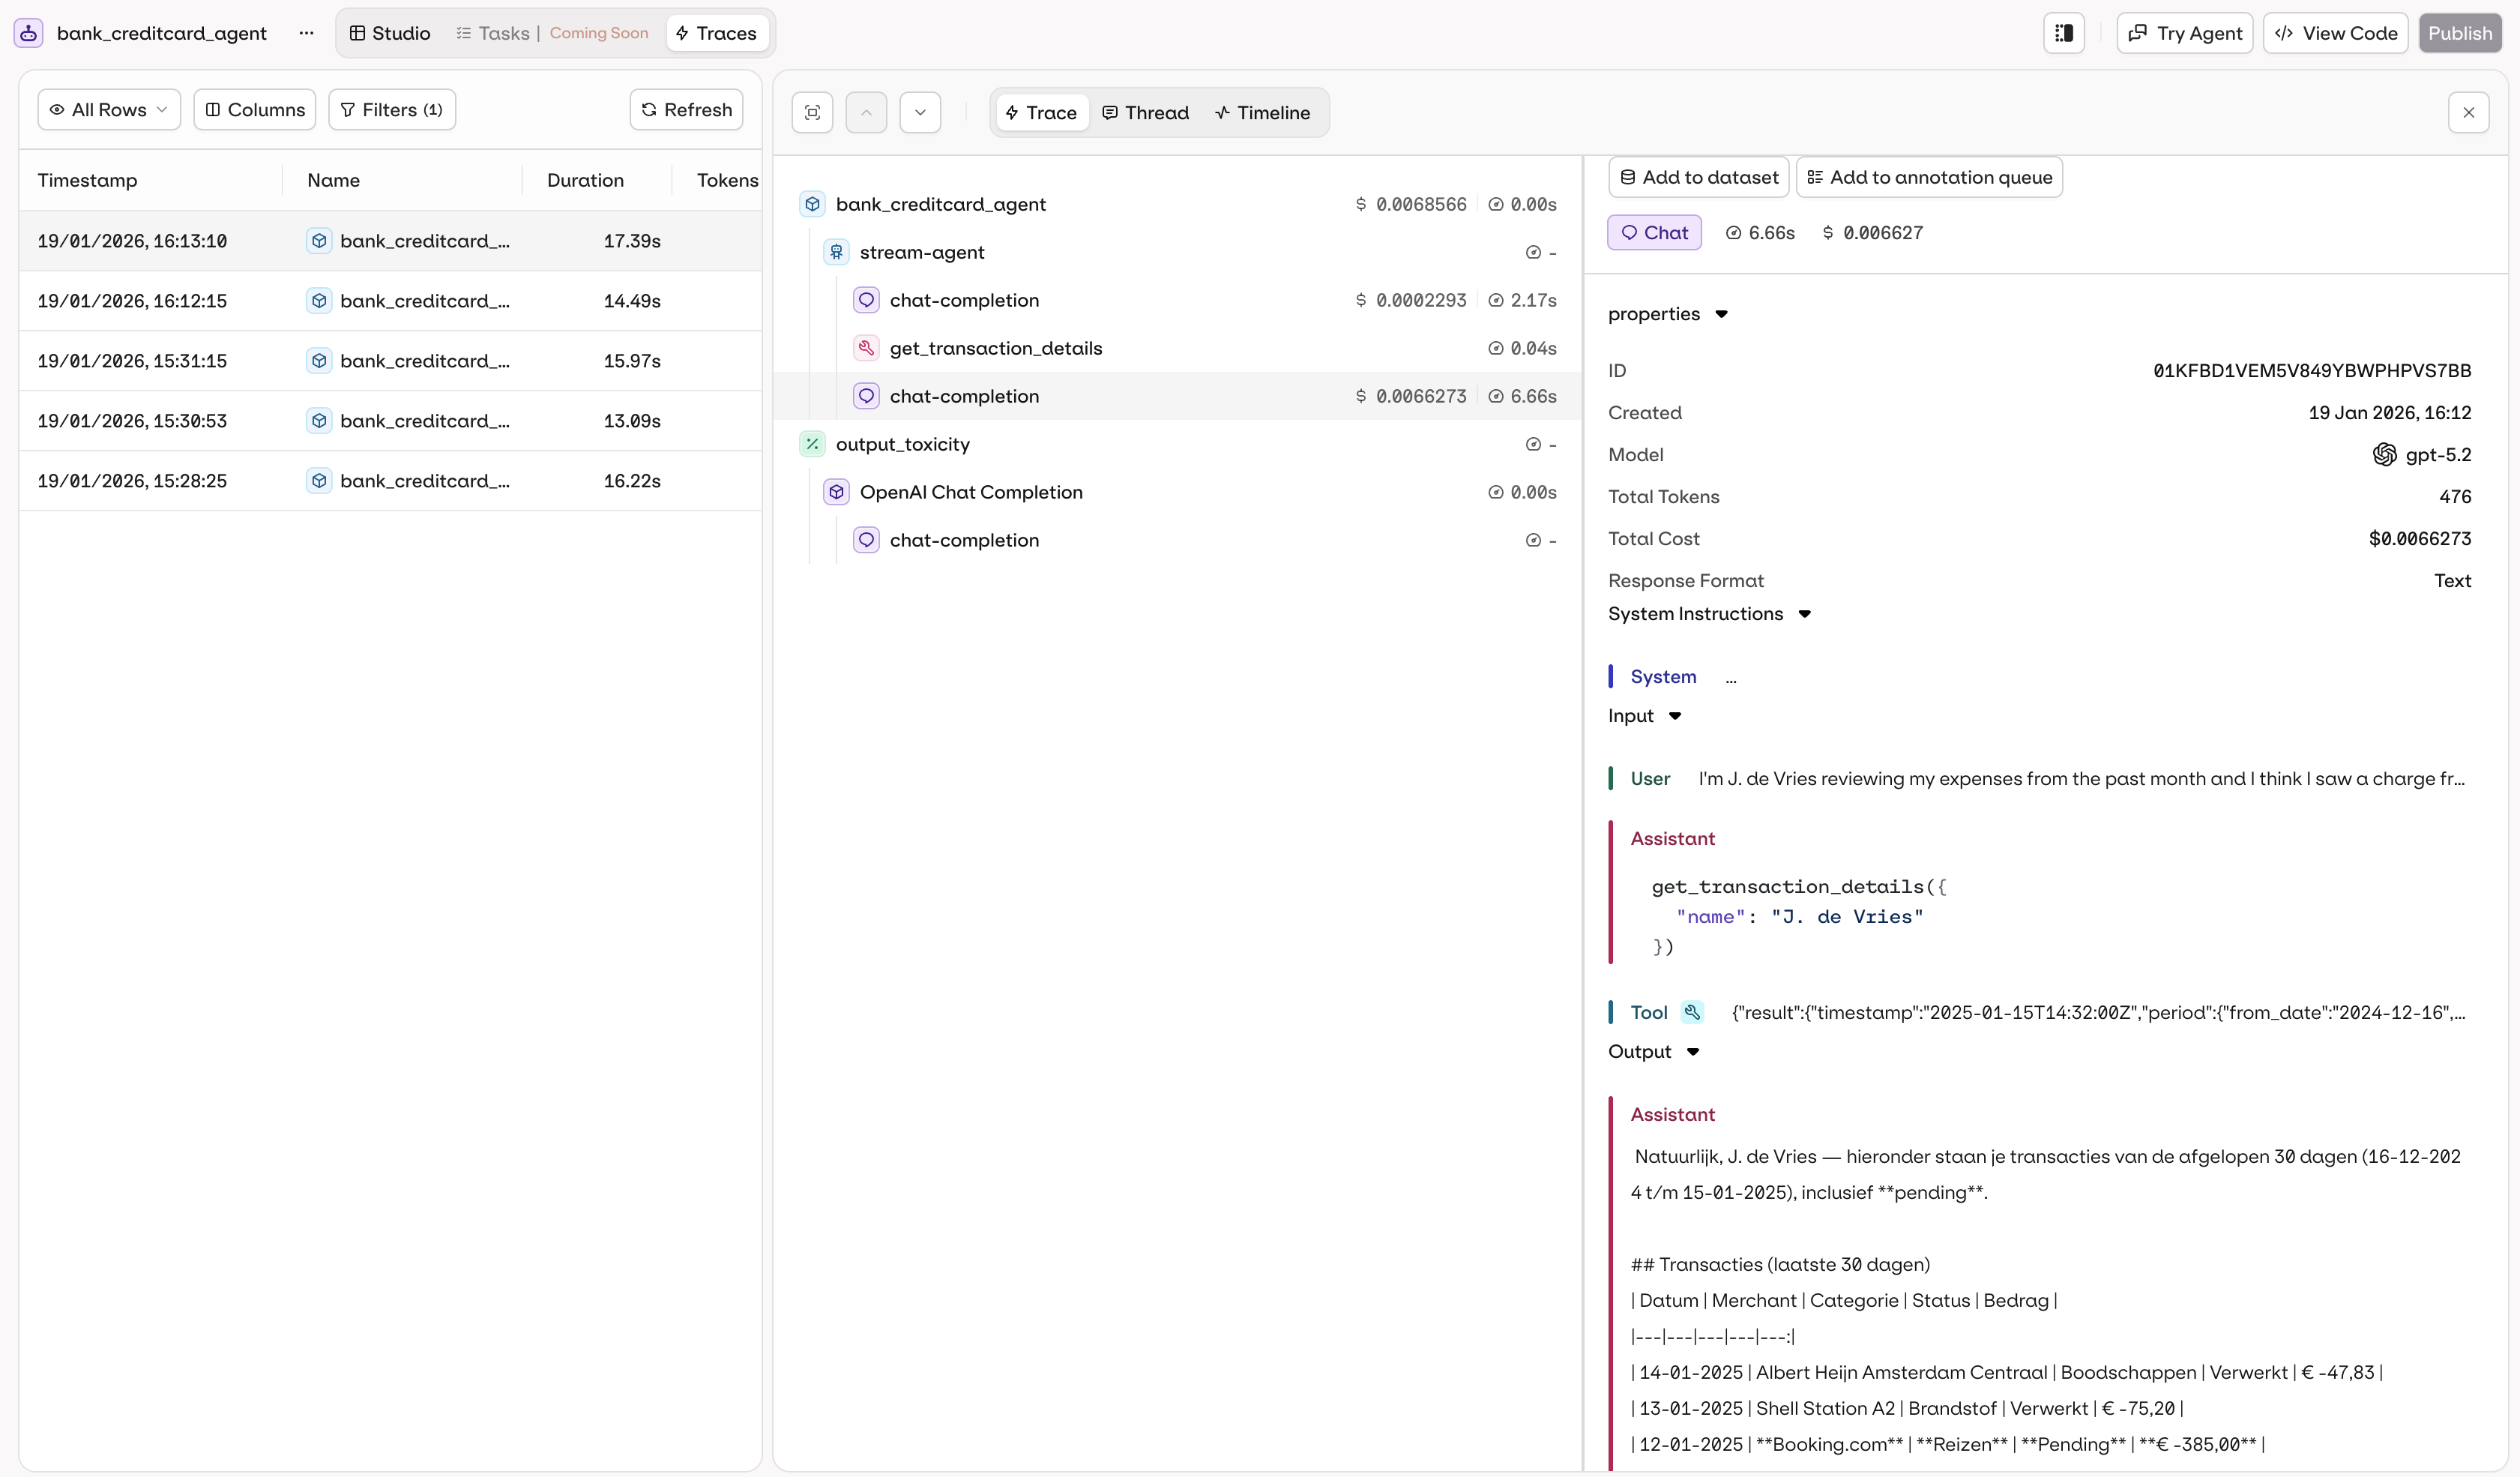
The Traces tab in the agent page shows execution logs filtered to the agent automatically.
Agent-specific traces with automatic filtering.
Trace data includes:
Execution history with timestamps
Input and output for each call
Token usage and cost per execution
Execution duration and performance metrics
Errors and debugging information
Tool calls executed (function, HTTP, code, or MCP calls)
Knowledge retrieval results and RAG context
Memory store interactions
All agent executions are automatically traced. Access traces in the AI Studio or via the Traces API.For programmatic trace access, see the Observability documentation.
List recent traces for an agent:
Show me the last 20 traces for "support-bot" sorted by most recent
The assistant uses list_traces with a filter on the agent key.Inspect a specific trace:
Show me the full span details for trace ID 01K6D8QESESZ6SAXQPJPFQXPFT
The assistant uses list_spans to retrieve the full execution tree for that trace.Debug errors:
Find all failed traces for "support-bot" from the last 24 hours and summarize the errors
The assistant uses list_traces filtered by status:=ERROR and time range, then get_span on relevant spans to surface root causes.
# Search traces in a time rangeorq traces search --from 2026-04-20T00:00:00Z --to 2026-04-21T00:00:00Z
See install and setup to get started with the CLI. Run orq traces --help for the full command reference.
Each agent run is inspected in the same Trace, Thread, and Timeline views, and reusable Custom Views can be saved, described on the Traces page. The agent page adds two conveniences: the Traces tab is pre-filtered to the current agent, and trace search is available from the agent’s MCP and CLI surfaces (above). See Traces for the full view and filtering reference, plus cross-agent analysis.To run agents on a recurring cadence, see Schedule Agents.
Was this page helpful?
Assistant
Responses are generated using AI and may contain mistakes.


 MCP
MCP AI Studio