Build an AI agent with Orq.ai: set up a coding agent or the CLI, connect a model, add tools, and call it from code. Beginner-friendly, no AI experience needed.
This guide walks through every step of getting started with Orq.ai. By the end, a working AI agent that can search the web and answer questions is live, with full visibility into every call it makes.
Setting up with a coding agent or the CLI covers every step in this guide. Studio and API alternatives are included where they exist.
Sign up for a free Orq.ai account and create a workspace.
2
Set up Orq.ai
API key only
Coding agent
Open the AI Studio getting-started screen, or Settings > Organization > API Keys, and copy the key. It is displayed once.Then open a terminal and export it, replacing your-api-key-here:
export ORQ_API_KEY="your-api-key-here"
$env:ORQ_API_KEY = "your-api-key-here"
Paste this prompt into the coding agent to set everything up:
Install the Orq.ai CLI, run `orq setup`, and build me an agent with web search.
Or install the CLI directly:
curl -fsSL https://cli.orq.ai/install.sh | sh
orq setup signs in, creates a project-scoped API key, and connects the coding agents already on the machine to Orq.ai, including the Orq MCP server and Orq Skills.
orq setup mints a project-scoped API key and writes it to ~/.orq/env as a POSIX shell export. Source that file from bash or zsh to export the key for the terminal:
source ~/.orq/env
The code samples in the next steps read the key from this environment variable.
Build an Agent named my-assistant with OpenAI GPT-5.6 Sol and the Web Search and Web Scraper tools.See Build Agents for the full field reference and configuration options.
CLI
AI Studio
API & SDK
MCP
orq agents create \
  --key my-assistant \
  --role Assistant \
  --description "A helpful assistant with web search" \
  --instructions "You are a helpful assistant. Be concise and accurate. When answering questions that require current or up-to-date information, use the web search tool to find the latest data before responding." \
  --path "YOUR_PROJECT_NAME" \
  --model '{"id": "openai/gpt-5.6-sol", "parameters": {"temperature": 1}}' \
  --settings '{"max_iterations": 5, "max_execution_time": 300, "tools": [{"type": "google_search"}, {"type": "web_scraper"}]}'
--path is where the agent is stored in the project structure, for example Default/agents. The first segment is the Project under a workspace-level API key, and a folder inside that project under the project-scoped key orq setup mints. See Projects.
See CLI reference for the full command reference. Run orq agents create --help for the full flag reference.
Open Agents in the Managed Agents section, then click Agent at the top of the list.
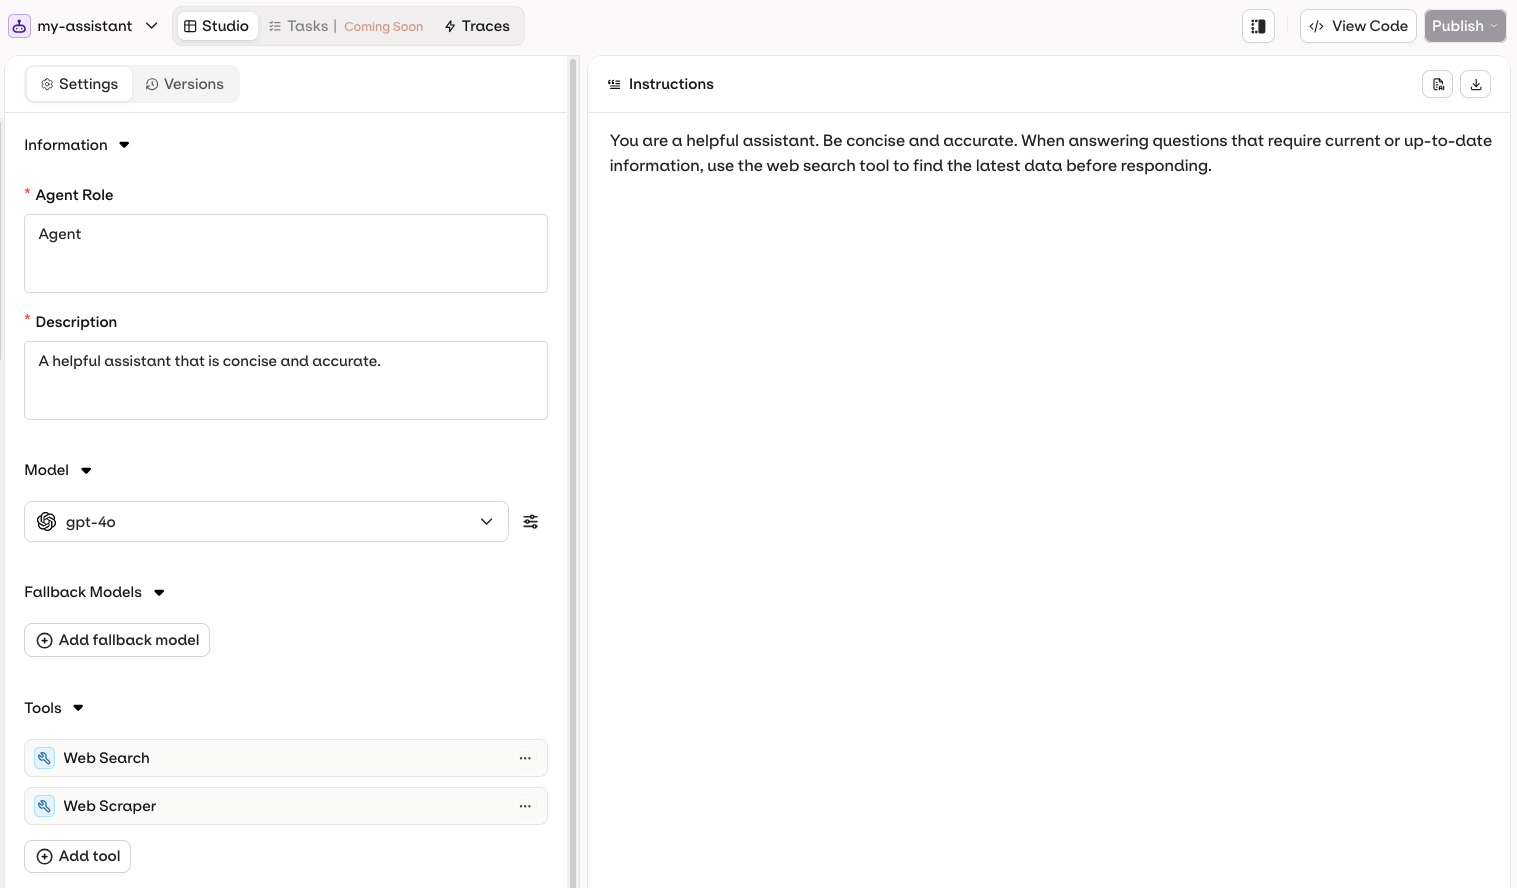
In the creation modal, configure the agent: name my-assistant, model openai/gpt-5.6-sol, description A helpful assistant with web search, temperature 1, the Web Search and Web Scraper tools, and the agent instructions. See the AI Studio guide for field-by-field setup.
Click Publish.
my-assistant agent in AI Studio
Use the Create Agent API. The key is a unique identifier for invoking the agent later, and path is the Project folder it lives in. Tools are attached under settings.tools using their built-in type.Install with pip install orq-ai-sdk (Python) or npm install @orq-ai/node (TypeScript).
curl -X POST https://my.orq.ai/v2/agents \
  -H "Authorization: Bearer $ORQ_API_KEY" \
  -H "Content-Type: application/json" \
  -d '{
    "key": "my-assistant",
    "role": "Assistant",
    "description": "A helpful assistant with web search",
    "instructions": "You are a helpful assistant. Be concise and accurate. When answering questions that require current or up-to-date information, use the web search tool to find the latest data before responding.",
    "path": "YOUR_PROJECT_NAME",
    "model": { "id": "openai/gpt-5.6-sol", "parameters": { "temperature": 1 } },
    "settings": {
      "max_iterations": 5,
      "max_execution_time": 300,
      "tools": [
        { "type": "google_search" },
        { "type": "web_scraper" }
      ]
    }
  }'
import osfrom orq_ai_sdk import Orqwith Orq(api_key=os.getenv("ORQ_API_KEY", "")) as orq: agent = orq.agents.create( key="my-assistant", role="Assistant", description="A helpful assistant with web search", instructions=( "You are a helpful assistant. Be concise and accurate. " "When answering questions that require current or up-to-date " "information, use the web search tool to find the latest data " "before responding." ), path="YOUR_PROJECT_NAME", model={"id": "openai/gpt-5.6-sol", "parameters": {"temperature": 1}}, settings={ "max_iterations": 5, "max_execution_time": 300, "tools": [ {"type": "google_search"}, {"type": "web_scraper"}, ], }, ) print(f"Agent created: {agent.key}")
import { Orq } from '@orq-ai/node';const orq = new Orq({ apiKey: process.env.ORQ_API_KEY ?? '' });const agent = await orq.agents.create({ key: 'my-assistant', role: 'Assistant', description: 'A helpful assistant with web search', instructions: 'You are a helpful assistant. Be concise and accurate. When answering questions that require current or up-to-date information, use the web search tool to find the latest data before responding.', path: 'YOUR_PROJECT_NAME', model: { id: 'openai/gpt-5.6-sol', parameters: { temperature: 1 } }, settings: { maxIterations: 5, maxExecutionTime: 300, tools: [ { type: 'google_search' }, { type: 'web_scraper' }, ], },});console.log(`Agent created: ${agent.key}`);
See Add Tools for the full list of built-in tool types and how to attach custom HTTP, function, or MCP tools.
If the Orq MCP server is not connected yet, install it in the editor or AI assistant, then ask the coding assistant:
Create an agent called "my-assistant" with the instructions "You are a helpful assistant. Be concise and accurate. When answering questions that require current or up-to-date information, use the web search tool to find the latest data before responding." using the openai/gpt-5.6-sol model with temperature 1. Add the google_search and web_scraper tools. Create it in the YOUR_PROJECT_NAME project.
Replace YOUR_PROJECT_NAME with the Project shown in the top-bar project dropdown. See Projects.The assistant calls create_agent and the new Agent appears in the AI Studio.
For a guided build, install Orq Skills and let the build-agent skill handle agent design, tool selection, and configuration.
2
Call the agent
Send a message to my-assistant and read the response.
CLI
AI Studio
API & SDK
MCP
orq responses create \
  --model agent/my-assistant \
  --input '"What is the capital of France?"'
See CLI reference for the full command reference. Run orq responses create --help for the full flag reference.
Open the Agent in the AI Studio and use the built-in chat panel to send a message. Conversations and traces are saved automatically.
curl --request POST \
  --url 'https://my.orq.ai/v3/router/responses' \
  --header "Authorization: Bearer $ORQ_API_KEY" \
  --header 'Content-Type: application/json' \
  --data '{
    "model": "agent/my-assistant",
    "input": "What is the capital of France?"
  }'
import osfrom orq_ai_sdk import Orqwith Orq(api_key=os.getenv("ORQ_API_KEY", "")) as orq: response = orq.responses.create( model="agent/my-assistant", input="What is the capital of France?", ) print(response.output[0]["content"][0]["text"]) print(response.usage)
import { Orq } from '@orq-ai/node';const orq = new Orq({ apiKey: process.env.ORQ_API_KEY ?? '' });const response = await orq.responses.create({ model: 'agent/my-assistant', input: 'What is the capital of France?',});console.log(response.output[0].content[0].text);console.log(response.usage);
Install with pip install orq-ai-sdk (Python) or npm install @orq-ai/node (TypeScript).Self-hosted and on-premise deployments serve the API under their own hostname. Pass it as server_url or serverURL instead of https://my.orq.ai, as described in Base URLs.
Streaming responses
For long-running agents or chat interfaces, use the streaming API to receive partial output as it is generated. See Execute the Agent for details.
Ask the assistant to invoke the Agent directly:
Run my-assistant with the message "What is the capital of France?" and print the response.
The assistant uses invoke_agent and returns the Agent’s reply, including any tool calls it made along the way.
3
View traces
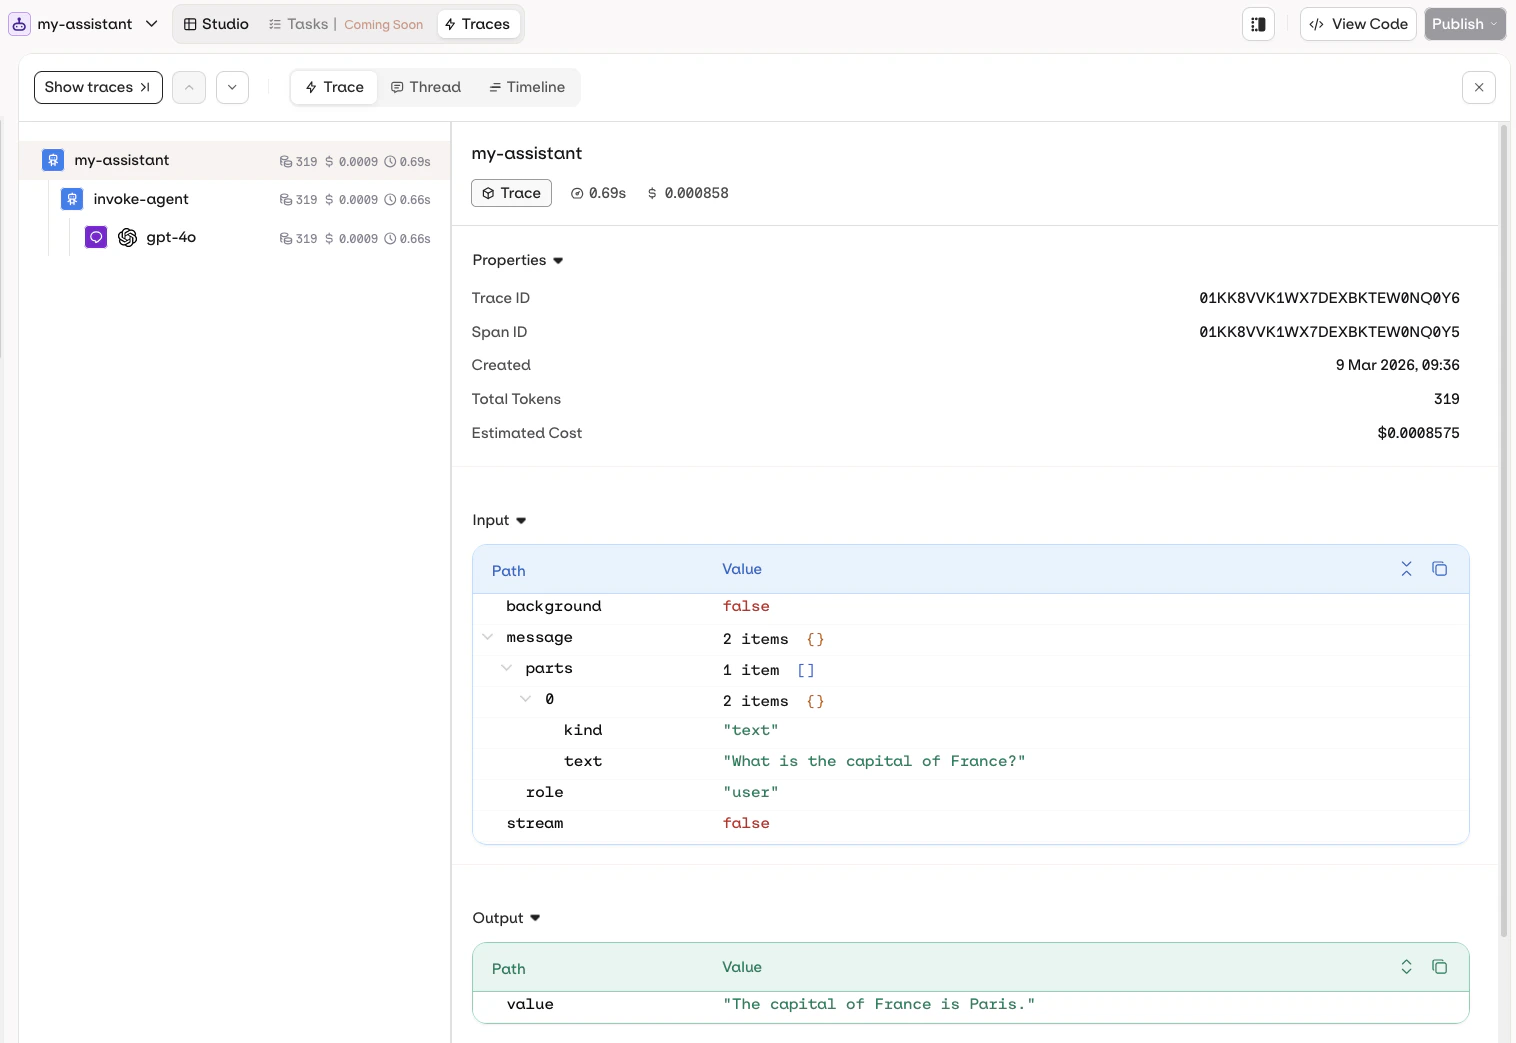
Every Agent call is automatically traced. Execution history, token counts, latency, and cost are visible in the AI Studio, from the CLI, or queryable through MCP.
CLI
AI Studio
MCP
orq traces search
See the full execution history, including model calls, tool use, token counts, and latency.
Run orq traces search --help for the full flag reference.
Open my-assistant in the AI Studio and click the Traces tab to see the full execution history, including model calls, tool use, token counts, and latency.
my-assistant traces in AI Studio
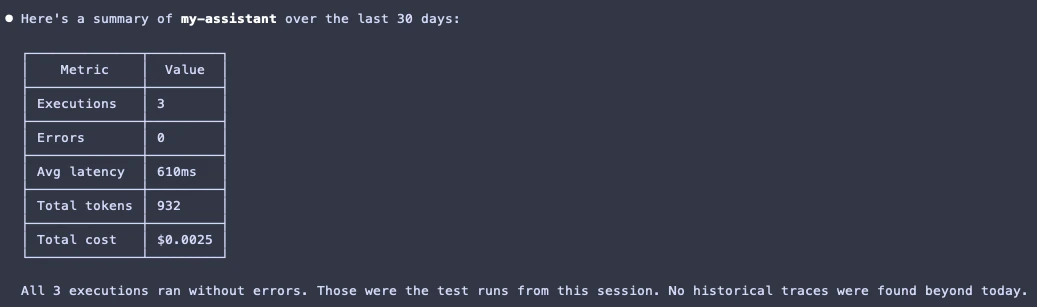
Ask the assistant to query analytics for the Agent:
How is my-assistant performing?
The assistant calls query_analytics and returns a summary:
my-assistant analytics returned by the MCP client
Run the first experiment
Compare prompts, models, and configurations side by side to find what performs best before shipping.
Add an evaluator
Score the Agent’s outputs automatically with LLM-based, code, or human Evaluators.
Connect a knowledge base
Give the Agent access to documents and data with built-in RAG.
Log the first trace
Already running agents elsewhere? Connect via OpenTelemetry to get full trace visibility and cost tracking.
Was this page helpful?
Assistant
Responses are generated using AI and may contain mistakes.


 AI Studio
 MCP
MCP