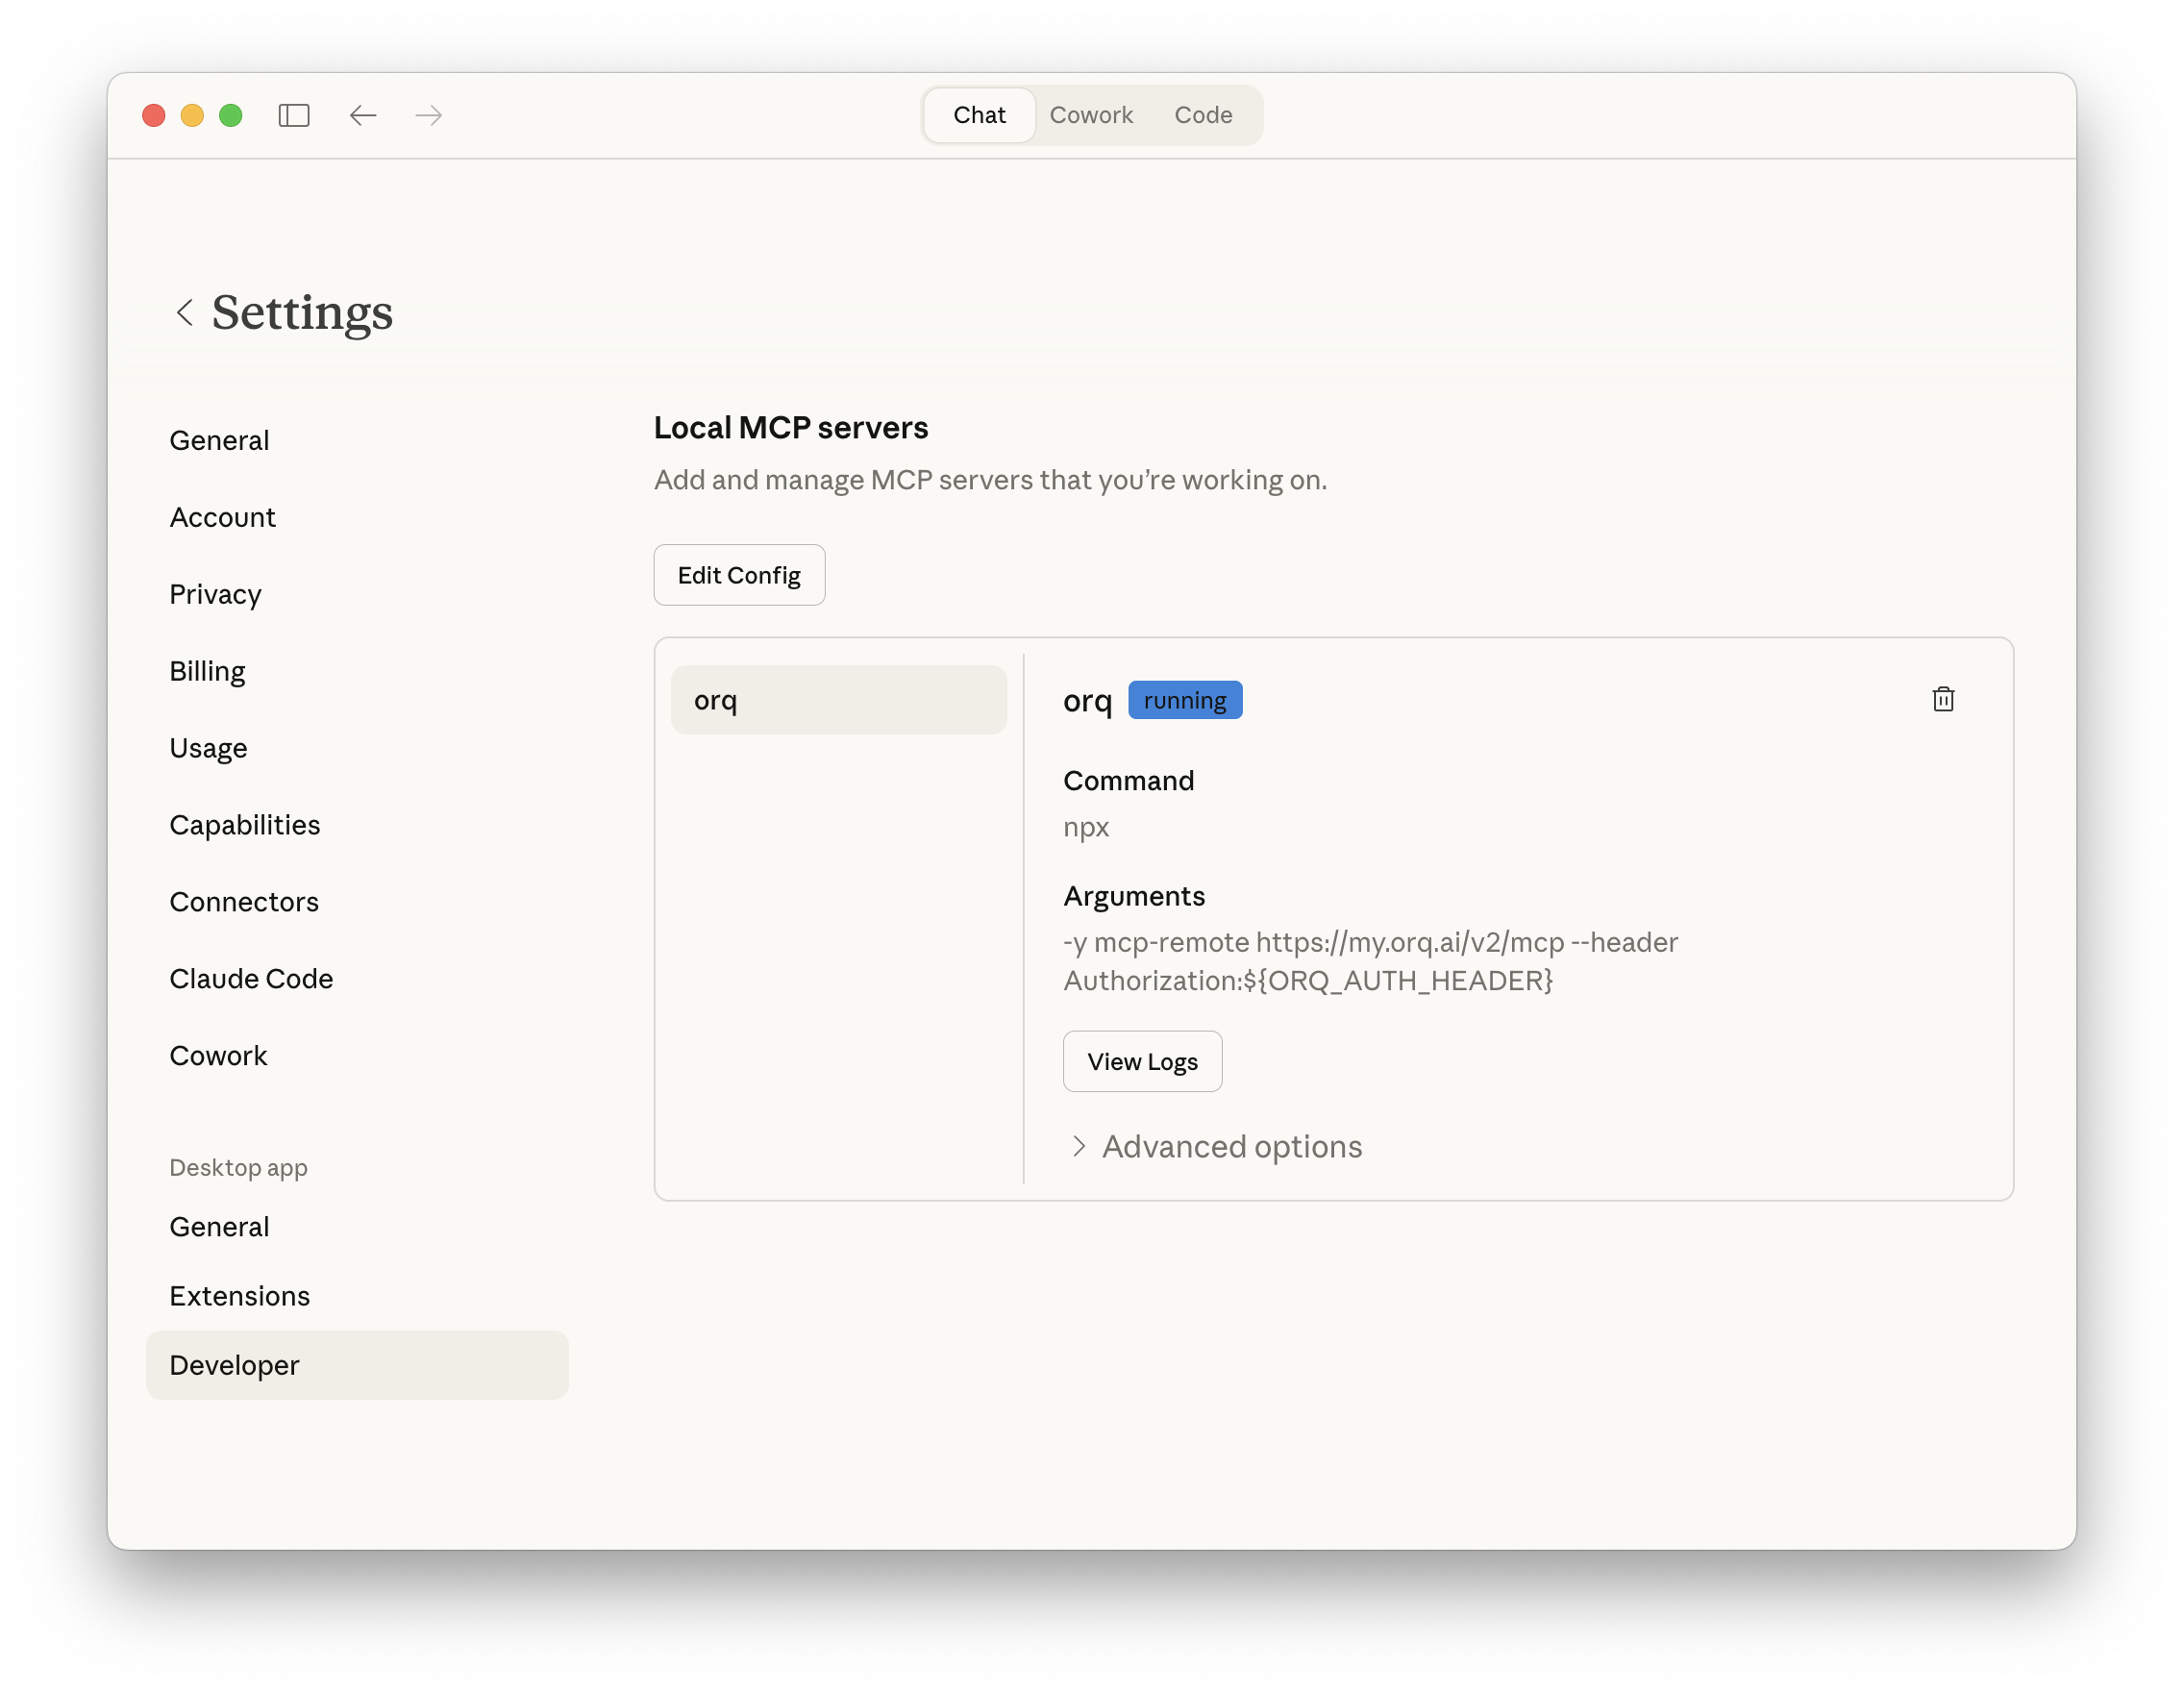
Claude Desktop integrates with Orq.ai in three ways: connect the MCP server for workspace access, install Skills for agentic workflows, or route Cowork inference through the AI Gateway.

MCP

Manage agents, experiments, and traces from Claude Desktop using natural language.

Skills

Pre-built agentic workflows for the Build, Evaluate, Optimize lifecycle.

Third-party inference (Cowork)

Route Cowork inference through the AI Gateway for fallbacks, EU residency, and cost control.

MCP

Claude Desktop is Anthropic’s desktop application that supports Model Context Protocol (MCP) integrations. By configuring the Orq MCP server, access all Orq.ai features directly in Claude Desktop conversations.

Prerequisites

Installation

You can configure the Orq MCP server through Claude Desktop Settings or using the Terminal.
If you prefer using the terminal, you can directly edit the config file:macOS:Run these commands in the terminal:
Windows:Run this command in Command Prompt or PowerShell:
Linux:Run this command in the terminal:
Then paste the following configuration:
Replace <ORQ_API_TOKEN> with your actual API key, save the file, and restart Claude Desktop.
If the file doesn’t exist, the command will create it. Make sure to use valid JSON formatting.

Verify Installation

After restarting Claude Desktop, start a new conversation and ask:
Claude will use the Orq MCP integration to fetch and display available AI models.
Claude Desktop MCP Success

Successfully connected Orq MCP in Claude Desktop

What You Can Do

Once connected, you can use natural language in Claude Desktop to perform these operations:
  • Create an agent with custom instructions and tools
  • Get agent configuration for [agent-key]
  • Update agent [agent-key] with new instructions or model
  • Configure agent with evaluators and guardrails
  • Invoke agent [agent-key] with input [message]
  • Retrieve agent response [response-id]
  • Create a deployment called [deployment-key]
  • Get deployment configuration for [deployment-key]
  • Create a skill called [skill-key]
  • List all skills in my workspace
  • Get skill [skill-key]
  • Update skill [skill-key]
  • Delete skill [skill-key]
  • Get analytics overview for my workspace
  • Show me workspace metrics for the last 7 days
  • Query analytics filtered by deployment ID
  • Create a dataset called "customer-queries"
  • List all datapoints in dataset [dataset-key]
  • Add datapoints to dataset [dataset-key]
  • Update datapoint [datapoint-id]
  • Delete specific datapoints in dataset [dataset-key]
  • Delete dataset [dataset-key]
  • Create an experiment from dataset [dataset-key]
  • List all experiment runs
  • Export experiment run [run-id] as CSV
  • Run experiment and auto-evaluate results
  • Get evaluator configuration for [evaluator-key]
  • Create an LLM-as-a-Judge evaluator for tone
  • Create a Python evaluator to check response length
  • Add evaluator to experiment [experiment-key]
  • Update evaluator [evaluator-key] with a new prompt
  • Update Python evaluator [evaluator-key] with revised code
  • List traces from the last 24 hours
  • Show me traces with errors
  • Get span details for trace [trace-id]
  • Find the slowest traces from today
  • Show all traces for thread [thread-id]
  • List all available chat models
  • List all available embedding models
  • Invoke model [model-id] with prompt [message]
  • Search for datasets named "customer"
  • Find experiments in project [project-id]
  • List directories in project [project-id]
  • Search the Orq.ai docs for [topic]
  • Delete agent [agent-key]
  • Delete experiment [experiment-key]
  • Delete evaluator [evaluator-key]
  • Delete prompt [prompt-key]
  • Delete knowledge base [knowledge-base-key]
Use delete_dataset to delete a dataset along with all its datapoints.

Usage Examples

Create Experiments

Claude will:
  1. Use search_entities to find the “customer-queries” dataset
  2. Use create_experiment with the name “Model Comparison Test” and auto-run enabled
  3. Configure two task columns (one for GPT-5.2, one for Claude Sonnet 4.6)
  4. Execute both models against the dataset automatically via the auto-run option
  5. Provide a summary of the results with evaluation metrics

Analyze Traces

Claude will:
  1. Calculate the time range for the last 24 hours
  2. Use list_traces with error status filter
  3. Analyze the trace data
  4. Provide error count and types, affected deployments, time distribution, and suggested fixes based on error patterns

Generate Synthetic Datasets

Claude will:
  1. Generate 100 realistic customer support conversation examples (questions and expected responses)
  2. Use create_dataset to create a new dataset named “Support Training”
  3. Use create_datapoints to add all 100 conversations to the dataset
  4. Confirm creation with the dataset ID and sample of generated data

Performance Analysis

Claude will:
  1. Use query_analytics with a 7-day time range
  2. Analyze average latency changes over the week
  3. Review token usage patterns and cost trends
  4. Examine error rate fluctuations
  5. Compare performance across different models
  6. Provide a summary report with insights on whether performance has improved or decreased

Troubleshooting

  1. Verify the config file path is correct for the OS in use
  2. Check the JSON syntax is valid (no trailing commas, proper quotes)
  3. Ensure the API key is valid and has the required permissions
  4. Restart Claude Desktop after making config changes
  5. Check the Claude Desktop logs for error messages
  1. Confirm the API key is active in Orq.ai Settings
  2. Make sure the API key has workspace access permissions
  3. Verify the Authorization header format: Bearer YOUR_KEY
  4. Try generating a new API key if the current one is expired
MCP operations over HTTP can take a few seconds:
  • Be patient with large dataset operations
  • Break complex workflows into smaller steps
  • Check Orq.ai service status at status.orq.ai
  1. Verify the Orq MCP server is properly configured in the config file
  2. Restart Claude Desktop to reload the Orq MCP configuration
  3. Try rephrasing the request
  4. Check the MCP tools list

Additional Configuration

Multiple Workspaces

If you work with multiple Orq.ai workspaces, you can configure multiple MCP servers:

Skills

Skills add pre-built agentic workflows to Claude for the full Build, Evaluate, Optimize lifecycle. See the Skills page for the full reference.

Installation

Skills for Claude Desktop are managed through the Claude.ai web interface and automatically apply across all Claude clients, including the desktop app.
Custom Skills require a Pro, Max, Team, or Enterprise plan. To install, open Claude.ai, go to Settings → Features → Skills, and upload the orq-skills zip.

Available Skills

Once installed, Claude picks the right skill automatically based on what you describe.
Slash commands (/orq:quickstart, /orq:traces, etc.) are only available in Claude Code. See Skills for details.

Third-party inference (Cowork)

Claude Cowork’s third-party inference mode routes all model inference through a configured gateway instead of Anthropic’s first-party infrastructure. Orq.ai’s AI Gateway speaks the Anthropic Messages API and is fully compatible.

EU data residency

Pin traffic to EU-hosted models to meet data residency requirements.

Provider fallback

Route across providers automatically to avoid rate limits and outages.

Cost control

Route to cheaper models for routine tasks by configuring them in Cowork.

Prerequisites

  • Claude Desktop installed with a Pro, Max, Team, or Enterprise plan
  • Active Orq.ai account with an API key

Setup

1

Enable Developer Mode

  1. Open Claude Desktop
  2. Click Help in the menu bar
  3. Hover over Troubleshooting
  4. Select Enable Developer Mode
  5. Restart Claude Desktop
A Developer menu appears in the menu bar after restart.
2

Open Gateway Configuration

  1. Click Developer in the menu bar
  2. Select Configure Third-party inference
  3. Select Gateway (Anthropic-compatible)
3

Enter Gateway Details

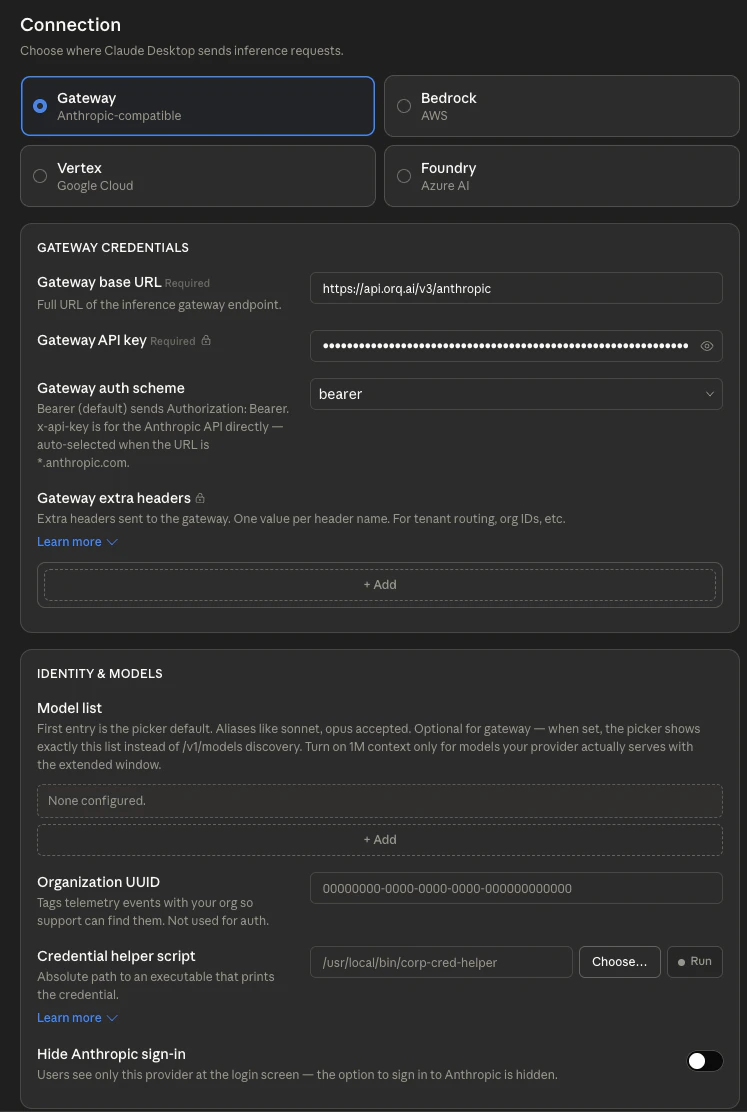
Fill in the three fields:
Cowork 3P inference gateway configuration screen showing Gateway selected as the connection type, with the Orq.ai base URL, API key, and bearer auth scheme filled in

Cowork gateway configuration with Orq.ai credentials

Click Apply locally to apply the configuration to this machine, or Export as MDM profile to deploy across an organization.
Get the API key from Orq.ai Settings under API Keys.
4

Add Models (optional)

Cowork automatically fetches available models from Orq.ai via the /v1/models endpoint, so no manual configuration is required. To pin a specific subset, add model slugs using the provider/model-name format:For the full catalog, see Supported Models.
5

Verify the Connection

A successful connection shows Cowork 3P | Gateway in the Cowork status indicator. All inference now routes through Orq.ai.

See Also

API Keys

Create and manage Orq.ai API keys.

Supported Models

Full catalog of models available through the AI Gateway.

AI Gateway

Get started with the AI Gateway for routing, fallbacks, and cost control.

Anthropic Provider

Configure the Anthropic API key and explore Claude model options.