Bundle multiple MCP servers behind a single MCP Gateway endpoint with a unified tool surface, aliases, and per-team tool access controls.
Create a single client-facing MCP endpoint that bundles one or more MCP Servers. Clients connect to the MCP Gateway URL and get a unified tool surface without knowing individual server URLs or authentication details. The gateway acts as a virtual MCP server: it aggregates tools from multiple upstream servers behind one address.
This page covers MCP Gateways, client-facing endpoints that bundle upstream MCP Servers Orq connects to. This is a different feature from Orq’s own MCP server, which coding assistants connect to for workspace administration.
MCP Portal is the AI Gateway area that manages MCP Gateways and MCP Servers. Open it at AI Gateway > MCP Portal in the sidebar; the MCP Gateways tab lists every gateway in the workspace, one row per gateway:
Name: the gateway key
Servers: the linked MCP Servers, as a stack of server avatars, with a +N count when the list is long
Exposed tools: how many tools the gateway exposes to clients
Access: which projects can use the gateway
Public URL: the endpoint clients connect to, with a copy control
A virtual MCP server is a single endpoint that gives clients access to tools from multiple upstream MCP Servers. The gateway aggregates these servers behind one address, handles authentication and routing, and resolves tool-name conflicts internally. Clients connect to one URL and see all linked tools as if they came from one provider.
Exposing multiple MCP servers through a single endpoint for clients that cannot manage multiple connections.
Aliasing server tools under consistent names so clients do not break when upstream tool names change.
Governing tool access per team: admins build an MCP Gateway from a selected subset of tools across several MCP Servers, so the Marketing team and the Research team can share the same servers while reaching different tools.
Description (optional): a note about what this MCP Gateway provides.
Key (required): a unique identifier. Used in the MCP Gateway URL. Cannot be changed after creation.
Tool settings
Tool exposure mode: how the MCP Gateway presents tools to connected clients. Code mode (default) exposes a single tool provided by the MCP Gateway that handles discovery and execution internally. Direct mode exposes each upstream tool individually.
Tool naming: how tool names are namespaced across servers. Always prefix with server key (default) prefixes all tools with the server’s key, or its alias if one is set per-link. Prefix on collision only prefixes conflicting names.
Egress policy
Allow private network, Allow public internet, Allowed domains and Blocked domains: the same controls as the Egress Policy section of the Settings tab. A new gateway allows the public internet and denies the private network.
Runtime limits
Each cap listed under Runtime Limits, filled in with its default.
Click Create.
Both key and display_name are required. The console has no display name field and sets display_name to the key.
mode and tool_naming mirror the form’s tool settings:
Tool exposure mode: MCP_GATEWAY_MODE_CODE (Code mode, the default) or MCP_GATEWAY_MODE_DIRECT (Direct mode).
Tool naming: MCP_TOOL_NAMING_PREFIX_WITH_SERVER_KEY (Always prefix with server key) or MCP_TOOL_NAMING_PREFIX_ON_COLLISION (Prefix on collision, the API default).
Orq.ai redirects to the MCP Servers tab of the new MCP Gateway. Click + Add server to link any server already configured in MCP Servers. Only servers that have completed their initial sync can be linked.Through the API, PATCH /v2/mcp-gateways/ with server_links replaces the linked servers. An empty server_links array changes nothing; send clear_server_links: true to unlink every server. The two fields cannot be combined.
Link only MCP Servers whose project access covers the MCP Gateway project access. An MCP Gateway on All projects therefore needs MCP Servers on All projects; change a server’s own scope from its Settings tab, as described in MCP Servers.
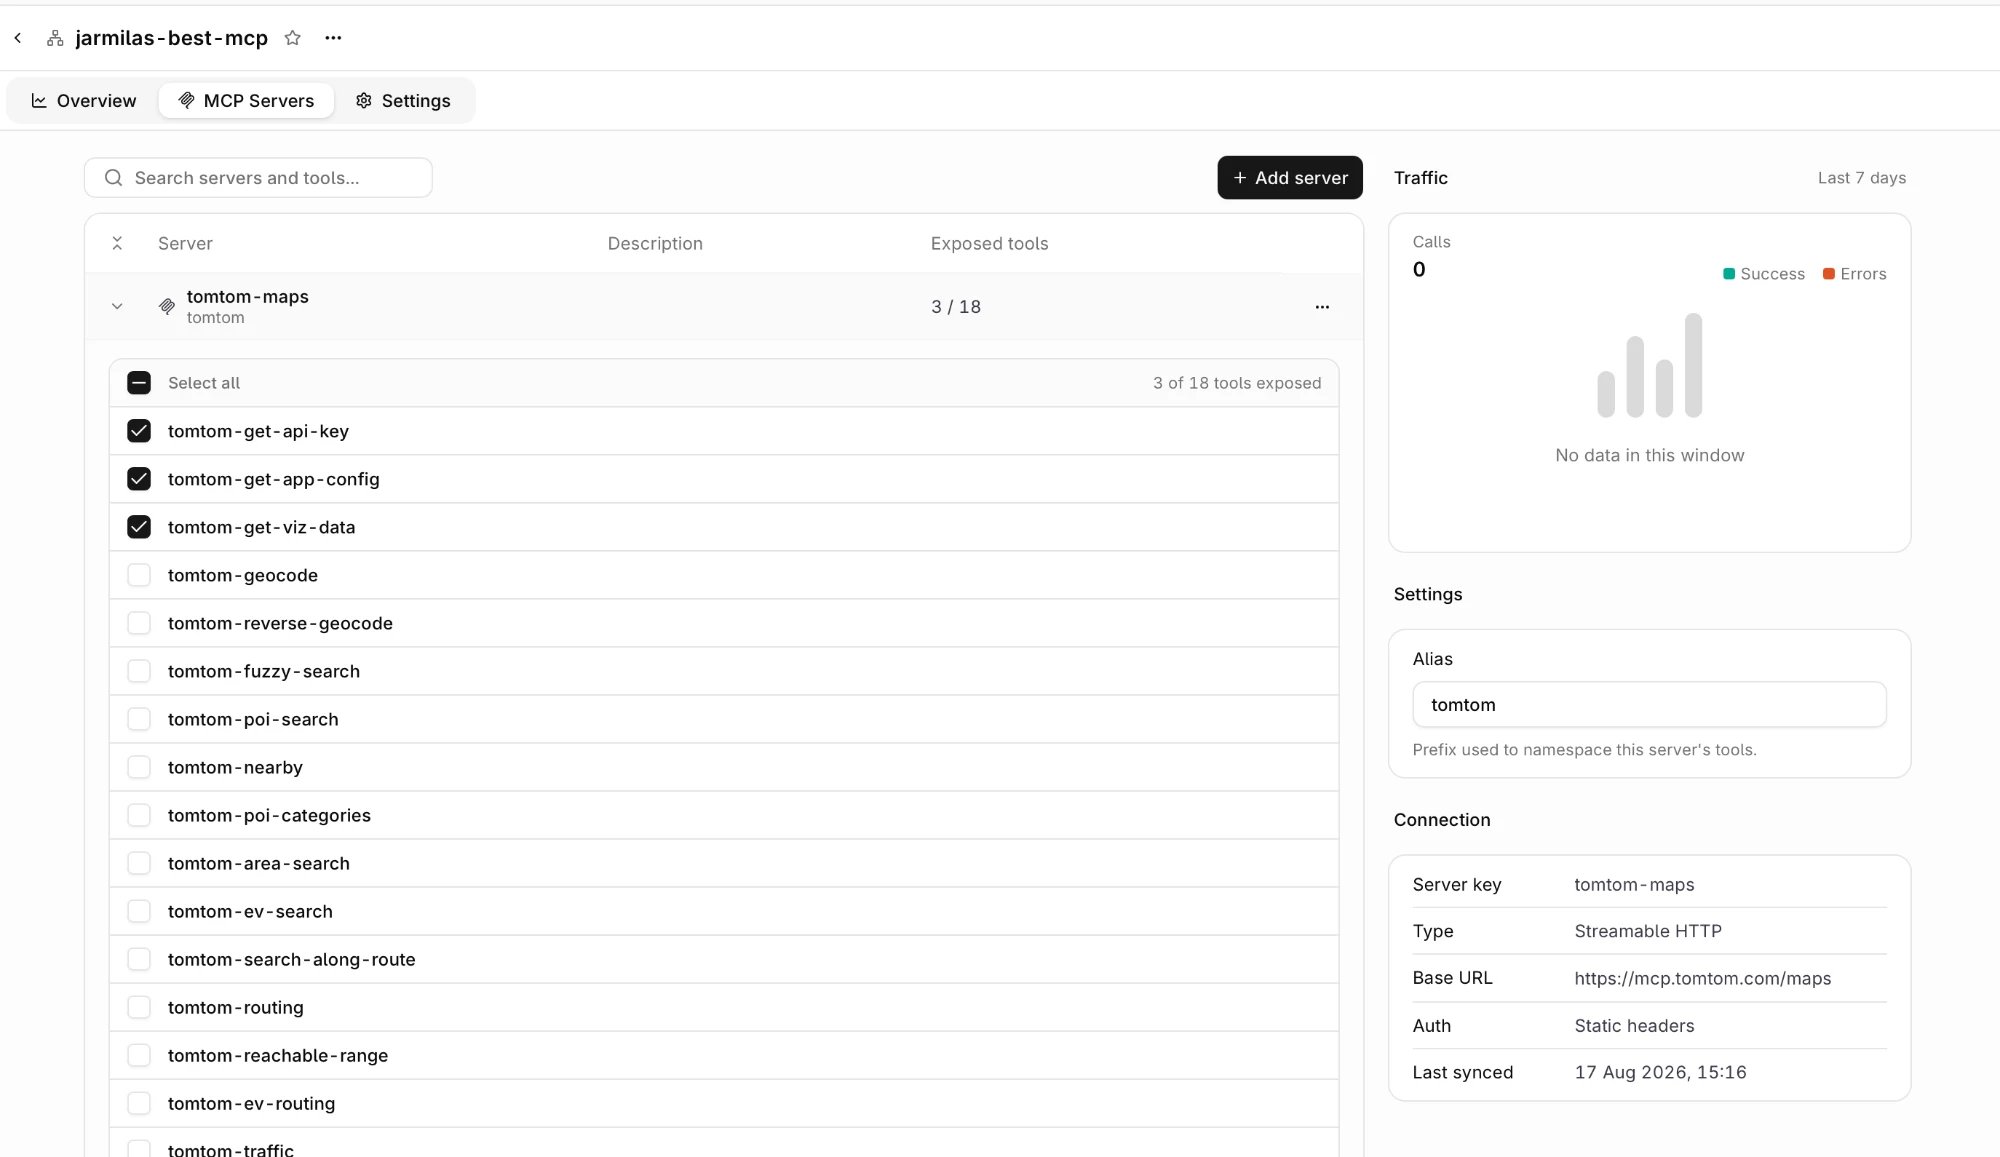
MCP Servers tab of an MCP Gateway with a linked server
The MCP Gateway detail page has four tabs:
Overview: traffic for the MCP Gateway and the Connect section with the command clients use to reach it.
MCP Servers: linked servers and the tools each one exposes. Select a tool checkbox to expose it through the MCP Gateway, or clear it to stop exposing it. Both take effect immediately, with no save action. The side panel shows Traffic for the selected server, its Alias (the prefix that namespaces the server’s tools), and its Connection details: server key, type, base URL, auth, and last sync time.
Clients: MCP clients authorized through OAuth, with the option to revoke their access.
Workspace roles decide who can view and manage the MCP Portal. MCP permissions follow the role and are not configurable per team or per gateway.
Developer and Researcher are Enterprise plan roles. On the Growth plan every member is an Admin, so every action below is permitted. See Members and teams.
Action
Admin
Developer
Researcher
View MCP Gateways and MCP Servers
✓
✓
✓
View authorized clients
✓
✓
✓
View sessions and tool-call traffic
✓
✓
Create and edit MCP Servers
✓
✓
Delete MCP Servers
✓
Create, edit, and delete MCP Gateways
✓
Link servers and choose which tools a gateway exposes
✓
Set gateway sharing, egress policy, plugins, and runtime limits
✓
Revoke a session
✓
✓
Revoke an authorized client
✓
Authorizing a client is self-service: the person signing in approves it in the browser and holds the resulting token. Revoking an authorized client requires Admin; revoking a session also allows Developer.Role permissions apply to people. API keys are authorized separately, by the access granted to the key itself.
An MCP Gateway is visible to the projects that may use it. The Access column of the gateway list shows the current scope: All Projects, No projects, or the shared project names. A new gateway is shared with every project.Change the scope on the Settings tab. Under Access control, pick All projects to share the gateway with the whole workspace, or Custom and set each project to Enabled or Disabled.
The sharing block on create or update replaces the scope. Send all_projects to share the gateway with every project, or selected.project_ids to list the projects that may use it. A Disabled project stops reaching the gateway.
Send all_projects instead of selected to share the gateway with every project.
Project scope sets which projects may reach the gateway. An API key reaches the gateways of the projects it is scoped to; a key minted for an Agent session also reaches only the gateways attached to that Agent.
status is MCP_GATEWAY_STATUS_ACTIVE (default) or MCP_GATEWAY_STATUS_DISABLED. A disabled gateway keeps its configuration and rejects every request, so a gateway that is serving the wrong tool surface can be switched off without deleting it. Clients receive a JSON-RPC error with code -32000 and the message gateway disabled. Set status back to MCP_GATEWAY_STATUS_ACTIVE to resume traffic.
Delete a gateway from the Delete item in the gateway list row menu, the Delete item in the detail page overflow menu, or the Delete gateway button on the Settings tab. Each asks for confirmation.
The Settings tab holds three sections that govern what the MCP Gateway forwards, how much it forwards, and where it may connect. The same egress policy and runtime limits fields appear on the Create MCP Gateway form.
Plugins attached to an MCP Gateway run on every tool call it serves. Guardrail Rules do not run on tool calls, so plugins are the control for MCP tool traffic.
Plugins section on the MCP Gateway Settings tab
Click Add Plugin to attach one. Each listed plugin has a icon to configure it and a icon to remove it.
Plugin
Behavior on the MCP Gateway
PII Redaction
Replaces personally identifiable information in free-text tool arguments with placeholders before the call reaches the upstream MCP Server, then restores the original values in the tool result. Arguments whose schema pins the value (enum, const, pattern, format) are forwarded unchanged. Configure the entities to mask, the detection threshold, and the failure behavior. See PII Redaction.
Trace Scrubbing
Masks the selected fields (system, input, output, metadata, variables, or all) in the traces the MCP Gateway stores for each tool call. See Trace Scrubbing.
Plugins enforced at workspace level apply as a floor: an MCP Gateway can add plugins or tighten their settings, but cannot remove or weaken an enforced one.
Controls which upstream addresses the MCP Gateway may reach when it calls linked MCP Servers.
Egress policy section on the MCP Gateway Settings tab
Setting
Description
Allow private network
Permit outbound requests to private IP ranges, loopback and link-local addresses. Off by default, which blocks server-side request forgery. The target address is checked again when the connection is opened, so a DNS record that later resolves to a private address is still rejected.
Allow public internet
Permit outbound requests to the public internet. Disable to restrict the MCP Gateway to the allowed domains only.
Allowed domains
One domain per line. When set, only these domains are permitted.
Blocked domains
One domain per line. Takes precedence over allowed domains.
A call to a server that the policy rejects fails with the error code EGRESS_DENIED.
A gateway exposes one tool surface to every project it is shared with. Which tools a caller then reaches depends on the gateway’s exposure and on what the caller is bound to.
Layer
What it controls
Where to set it
Gateway tool exposure
Which tools the gateway serves, from each linked MCP Server.
Whether the key may call the gateway, per permission domain, and which projects it reaches. A key minted for an Agent session is bound to that Agent’s gateways.
A project either reaches the whole exposed tool surface or none of it. Browser sign-ins, and keys not bound to an Agent session, reach the full exposed surface.
Two teams reaching the same gateway see the same tools, so give a team its own tools with a gateway of its own: create an MCP Gateway for the team’s project, expose only the tools the team may call, and share it with that project alone. Other projects cannot reach it.Assign projects to teams in Settings → Organization → Teams; team and project assignment requires the Growth plan or above. See Members and teams.
Scoping tools to an individual user is not available. Individual tools cannot be granted to or withheld from a named user. Reach follows the gateway’s exposure and the projects the caller reaches.An OAuth sign-in token is granted the mcp:tools and mcp:resources scopes on one MCP Gateway, so it authorizes the gateway as a whole rather than individual tools.For enterprise-managed servers, the identity provider also decides whether the user can access the upstream app. A tool can appear in the gateway’s catalog even when that provider denies the user’s call.
Any MCP-compatible client can reach the MCP Gateway, most often a coding agent such as Claude Code, Cursor, or Codex. See Coding Agents for the full list.Transports
Clients: Streamable HTTP. POST https://my.orq.ai/v3/mcp/<gateway-key> with JSON-RPC bodies and JSON responses, the --transport http option in the examples below.
Upstream servers: HTTP or SSE.
The examples below use https://my.orq.ai as the default host. For self-hosted or on-premise deployments, replace this with the base URL configured for your deployment. The API’s public_url field returns the full connect endpoint (which may be relative when no public base URL is configured).
Clients authenticate in one of two ways:
OAuth (default): browser sign-in. Use this for interactive clients.
API key: a bearer token in the client configuration. Use this for headless or non-interactive clients.
When calling an enterprise-managed server, use gateway OAuth or a user-owned API key whose owner has signed in through SSO. Service-account keys and federation-minted keys cannot supply the required user identity. Sign in again after an admin enables Cross App Access, or when a call returns ENTERPRISE_AUTH_REAUTH_REQUIRED.
OAuth is the default. The client signs in through the browser and receives a token scoped to this MCP Gateway and to the person who signed in, so no workspace API key is stored in the client configuration.
This flow authenticates MCP clients to the MCP Gateway. The credentials the gateway uses to reach each upstream MCP Server are configured on the server itself. See MCP Servers.
1
Set up the client
The Connect section on the Overview tab shows the gateway key and this command. Copy it from there, or run it with <gateway-key> replaced:
Run codex mcp login <gateway-key> to complete the browser approval.
Add the MCP Gateway with the MCP: Add Server command, select HTTP (HTTP or Server-Sent Events), and enter https://my.orq.ai/v3/mcp/<gateway-key> as the server URL. VS Code writes a .vscode/mcp.json:
VS Code opens the browser for approval on first connect.
2
Approve access
On first use the client opens the browser. The approval page names the client and the MCP Gateway it is requesting access to. Click Approve to issue the token, or Deny to reject the request.
Approval page for an MCP client requesting access to a gateway
Manage authorized clientsEvery authorized client appears on the Clients tab with the client name, when it authenticated, and who created it. Choose Revoke access from a client’s menu to stop the client refreshing its token; the access token it already holds stays valid until it expires, up to 30 minutes.
Clients tab on an MCP Gateway listing authorized MCP clients
How sign-in worksThe MCP Gateway implements the MCP authorization specification on top of OAuth 2.0:
Discovery: an unauthenticated request to the gateway returns 401 with a WWW-Authenticate header pointing at the gateway’s metadata documents. The protected-resource document at /.well-known/oauth-protected-resource/v3/mcp/<gateway-key> names the authorization server; the authorization-server document at /.well-known/oauth-authorization-server/v2/auth/mcp, which serves every gateway, lists its endpoints.
Dynamic client registration: the client registers at the authorization server’s registration endpoint, so no client ID or secret needs provisioning in advance.
Authorization code with PKCE: sign-in uses the authorization code flow with Proof Key for Code Exchange (PKCE) and the S256 challenge method, which binds the authorization code to the client that requested it.
The token grants the mcp:tools and mcp:resources scopes on this MCP Gateway only, and the client refreshes it without another sign-in until access is revoked.
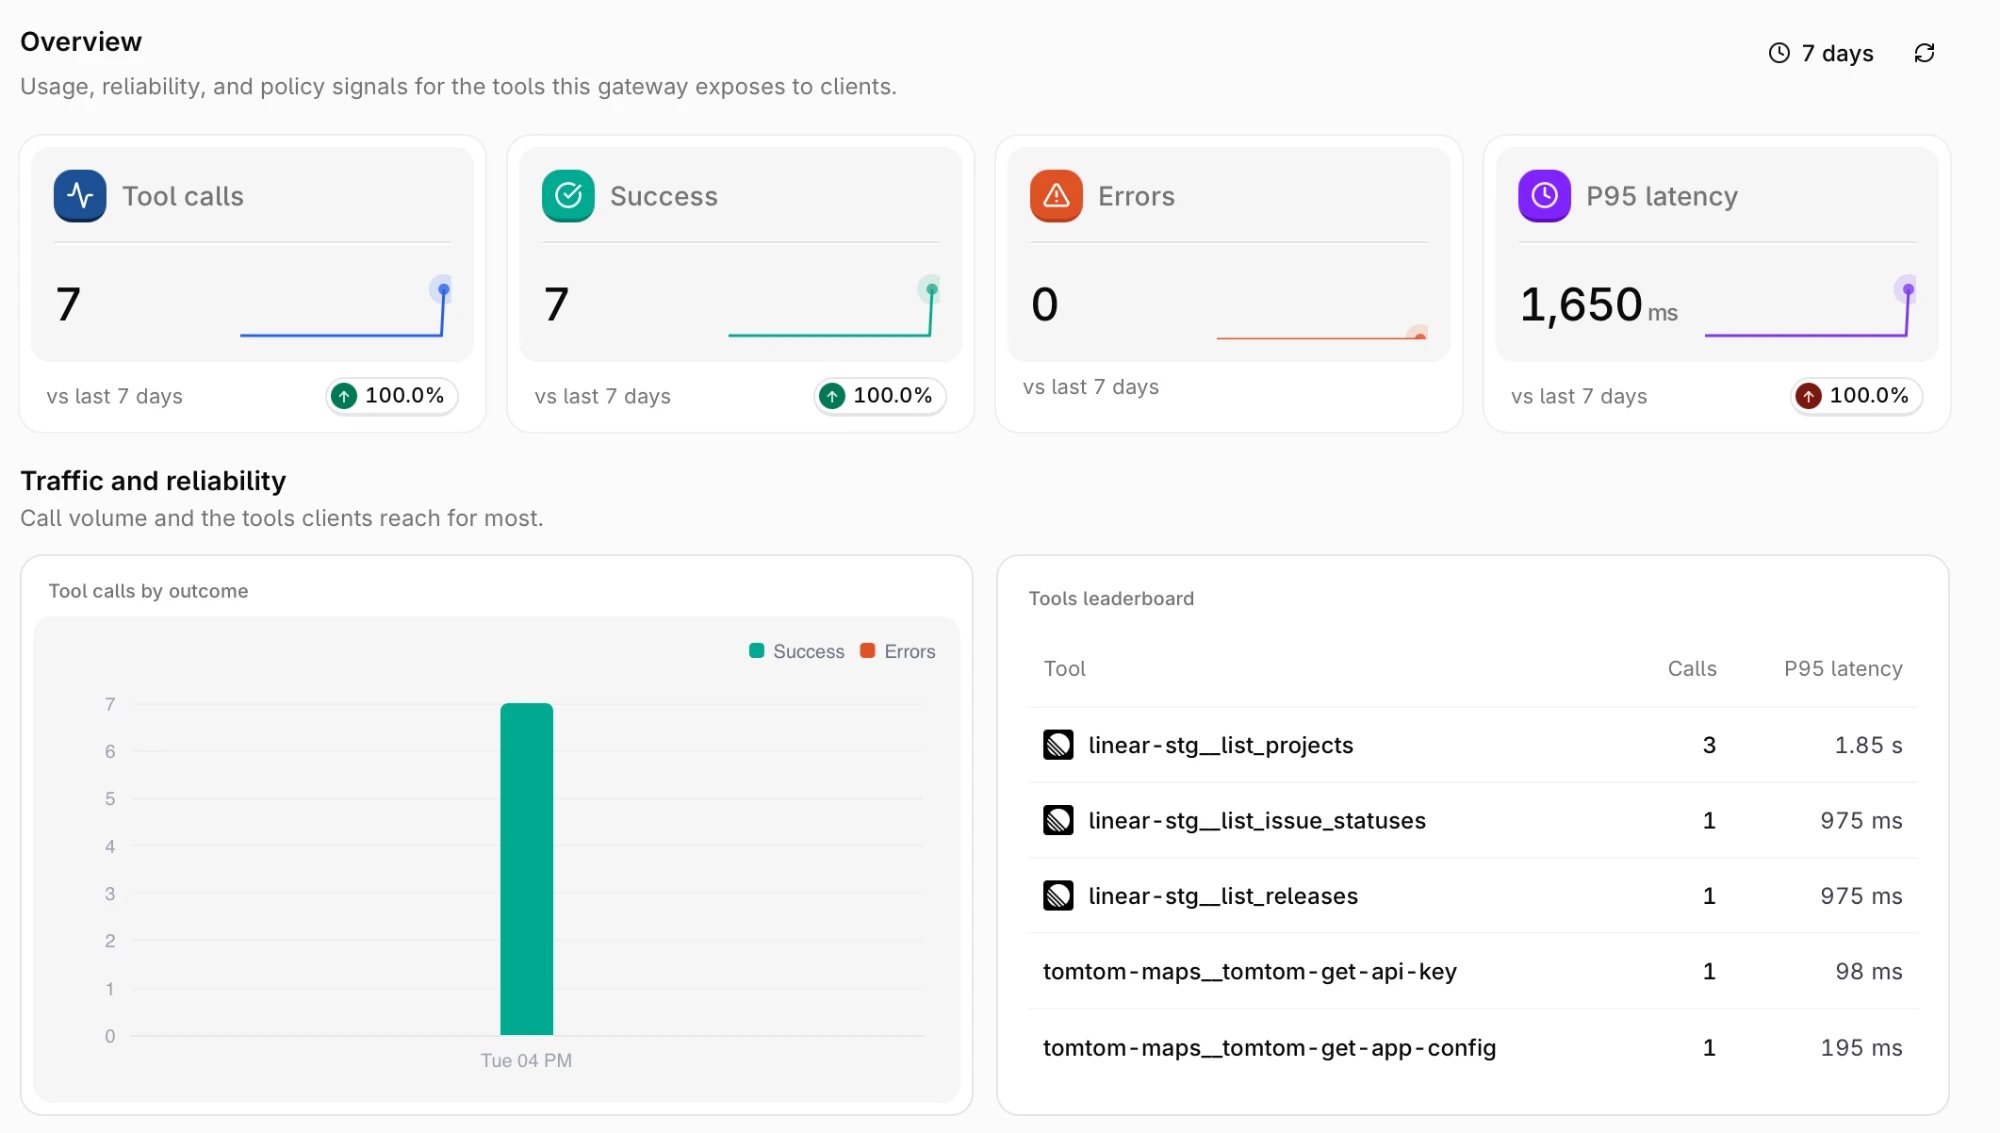
The Overview tab reports how clients use the MCP Gateway. It opens on the last 7 days, and every card compares that window against the one before it. Change the window with the time range picker in the top right.
MCP Gateway Overview tab over the last 7 days
Card
Description
Tool calls
Tool invocations routed through the MCP Gateway.
Success
Invocations that completed successfully.
Errors
Invocations that returned an error.
P95 latency
95th percentile duration of successful invocations.
Traffic and reliability breaks the same window down further:
Tool calls by outcome: call volume over time, split into successes and errors.
Tools leaderboard: the most called tools with their call count and P95 latency, listed under their namespaced names.
Changes to the MCP Gateway are recorded in Audit Logs, so a change to the exposed tool surface can be traced back to whoever made it.Entries are written under two entity types:
Entity type
Recorded when
MCP Gateway
A gateway is created, updated, or deleted, including changes to its linked servers.
MCP Server
A server is created, updated, or deleted.
Filter by either entity type on the Audit Logs page to see only MCP Portal activity.
Was this page helpful?
Assistant
Responses are generated using AI and may contain mistakes.


 AI Studio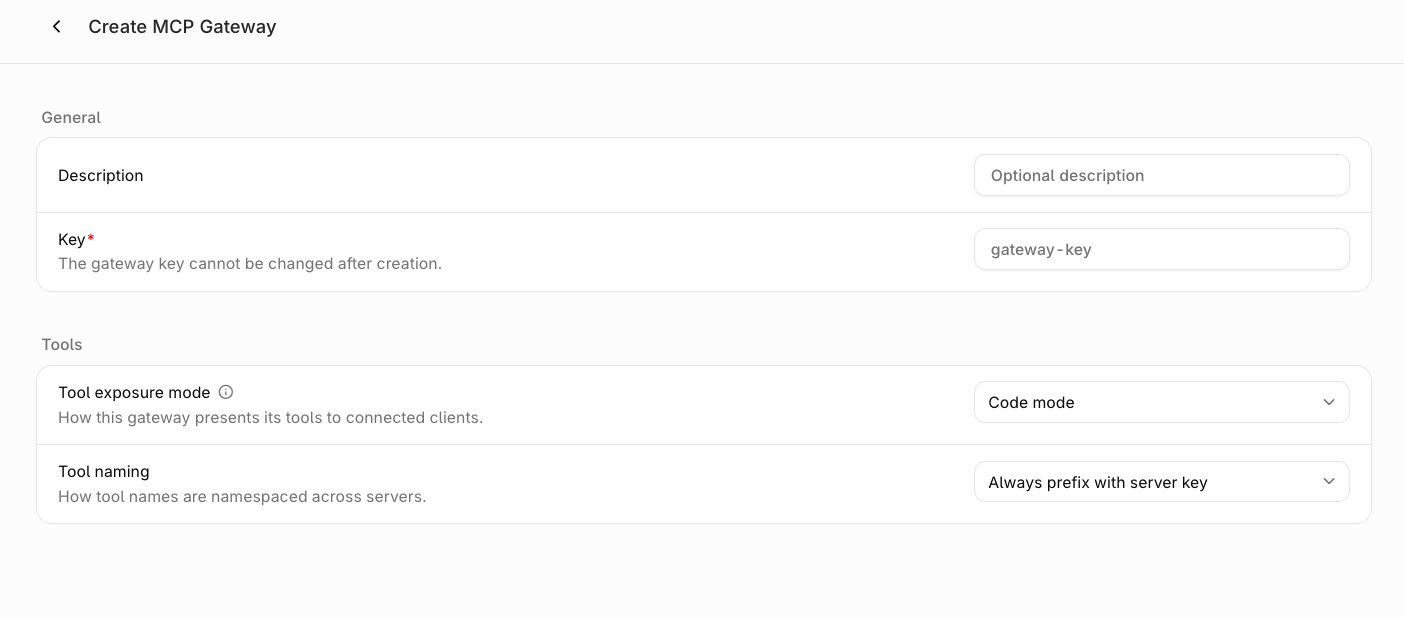


 Claude Code
 Cursor
 Codex
Codex VS Code