


Once you have a Deployment with model configurations ready to be exposed to your users, you can start the integration process which involves invoking your deployments from within your environments. In this document, we will see how to fetch prepared code snippets for your deployment and use them to integrate orq.ai in your systems.Documentation Index
Fetch the complete documentation index at: https://docs.orq.ai/llms.txt
Use this file to discover all available pages before exploring further.
If you don’t have Deployments ready to be integrated, see Creating a Deployment.
Getting Code Snippets
The first step for integration is fetching the code related to the chosen Deployment. Each Deployment can contain several variants.Variant exposition is configured through Routing, to learn more see Deployment Routing.
Via the Routing Page
- Open a Deployment and go to the Routing Page.

- Right-Click on the Variant you want to integrate.
- Select Generate Code Snippet
Via the Variant Page
- Open a Deployment and go to the Variant Page.

- Press the Code Snippet icon at the top-right of the Studio.

In this panel, all context attributes will be filled correctly so that your Routing rules are respected. To learn more about context attributes and routing, see Deployment Routing.
Using Code Snippet
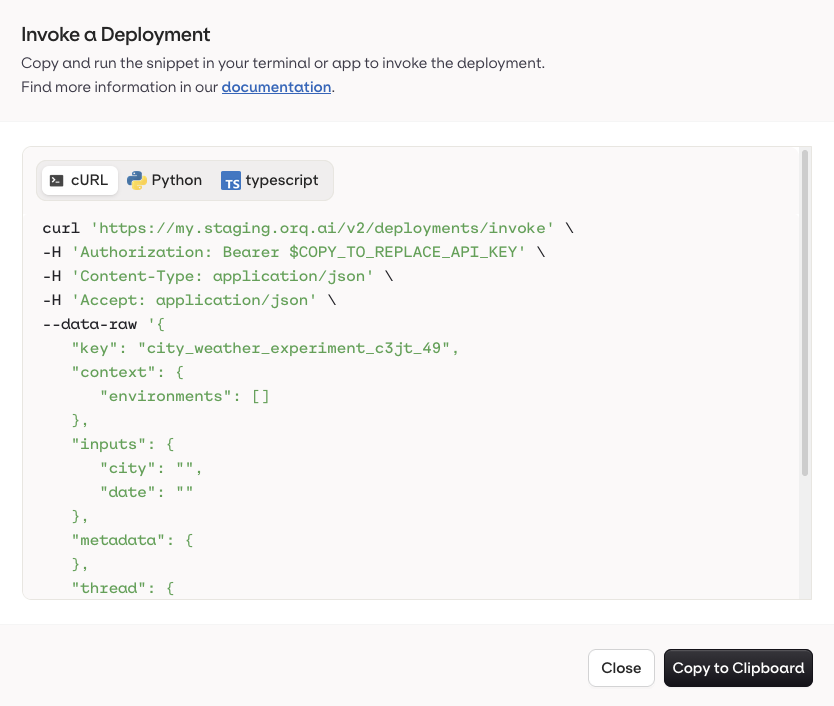
You have multiple integration languages available to integrate your Deployment. Currently we support Python, Javascript (node) and shell (cURL).Getting Credentials
The first step for an integration is to have an API key ready to be used.Initializing a client
Depending on the chosen programming language, you will have different methods to initialize your client. All methods require the previously acquired API Key.To learn more about client initialization, see our authentication tutorial using our Client Libraries
Invoking a deployment
Once your authentication layer is ready, you can Invoke your Deployment. Invoking means sending a query to the underlying model, which can include your user’s request; orq.ai takes care of operations to reach the correct language model with all prepared configurations and returns the model’s response immediately.To learn more about Deployment Invocation, see our tutorial using our Client Libraries
Passing Input Variables
Use{{variable_name}} placeholders in your prompt and pass the corresponding values in the inputs field at invoke time. orq.ai substitutes each key before sending the prompt to the model.
To learn how to configure variables in your deployment prompt, see Variables and Prompt Templating.
Retry and Fallback Behavior
When you invoke a Deployment, Orq automatically handles retries and fallbacks based on the configuration you set at the deployment level. Understanding this behavior helps you design robust integrations and anticipate response latency. When you call a Deployment via the API:- Success (First Try): Response returned immediately
- Retry Scenario: Response may be delayed by up to
base_latency × (retry_count + 1)to account for initial attempt plus all configured retries - Fallback Invoked: Additional latency as Fallback Model processes the request
- All Retries & Fallback Failed: Error returned to your application
See retry logic and fallback routing in a real application. Read our cookbook Customer Support Chat.
Extra Parameters
This is a powerful tool to access parameters not directly exposed by the Orq.ai panel, or to modify preexisting setting depending on a particular scenario.Usage Tracking
Track token consumption for every deployment call by including usage metrics in your API responses. This helps you monitor and optimize your LLM costs in real-time. To enable usage tracking, setinclude_usage: true in the invoke_options parameter when calling your deployment.
Response includes:
prompt_tokens- Number of tokens in the inputcompletion_tokens- Number of tokens in the generated outputtotal_tokens- Combined token count (prompt + completion)
Identity
Associate an identity with your deployment invocations for tracking and personalization. The identity parameter allows you to link API calls to specific users in your system. Identity fields:id- Unique identifier for the identity (required)display_name- Display name of the identityemail- Email address of the identitylogo_url- URL to the identity’s avatar or logotags- List of tags associated with the identity
Unsupported Parameters
Not all parameters offered by model providers are natively supported by Orq.ai when using Invoke. Our API offers a way to provide parameters that are not supported, using theextra_param field.
Example:
Here we are injecting the presence_penalty parameter on our model generation. This parameter is available with our provider but not natively exposed through the orq API.
Overwriting Existing Parameters
Using theextra_params field can also be used to overwrite the Model Configuration defined within the Deployment.
At runtime, you can dynamically override previously defined parameters within Orq.ai.
Example: Overwriting temperature
Here we are using extra_params to override the temperature parameter that can be also defined within your Prompt Configuration
All parameters can be overwritten including complex ones, in this example, we’re overwriting response_format to dynamically set the response format for the generation to a predefined JSON object.
Attaching Files to Deployment
The
file_ids / fileIds parameter on deployment invocations is deprecated and will be removed in a future release. We recommend using native file attachment for all models and providers that support it. See the guides for Deployments, Agents, and Router.- Attaching PDFs directly to the model in a Deployment.
- Attaching a Knowledge Base to a Deployment.
Sending PDFs directly to the model
For compatible models, files can be embedded directly within the Invoke payload by adding a Message type file. The message should hold data for the file as a standard data URI scheme:data:content/type;base64followed by the base64 encoded file data.
See below how to use the new message type:
See PDF inputs used to extract structured data end-to-end. Read our cookbook PDF Extraction.
Attaching a Knowledge Base to a Deployment.
Read here how to set up a Knowledge Base, or how to Use a Knowledge Base in a Prompt
When to use Knowledge Base vs Attaching files
The need for full context understanding
Knowledge Bases and RAG (Retrieval Augmented Generation) retrieve relevant chunks, which works for focused queries but falls short for tasks like summarization that require full-document understanding. Attaching files gives the LLM access to the entire document, ensuring it has the complete context. For example, when summarizing reports, legal cases, or research papers, the LLM needs to process the full document to capture key details and connections that partial text retrieval can’t provide. Full context access leads to better comprehension and more accurate outputs, particularly for tasks requiring a holistic view, such as summarization and detailed analysis.Dynamic document context
Unlike a static knowledge base, attached files can provide ad-hoc, context-specific documents for one-time or immediate use without the need for integration into a broader knowledge repository. When a user is dealing with unique documents—such as one-off reports, meeting notes, or specific contracts—they can attach these files directly to a deployment. The LLM can instantly use these documents to provide answers or insights. This feature is especially useful for situations where time-sensitive or project-specific documents need to be used on the fly, giving flexibility to quickly incorporate new, temporary knowledge without modifying or updating the knowledge base.Private or sensitive data
Due to privacy concerns, confidential or sensitive files (e.g., contracts and medical records) may not be suitable for a general knowledge base. Attaching files directly allows secure, temporary interaction with this data.Knowledge Base Retrievals
When querying a Deployment using a Knowledge Base, it is possible to fetch the details of the knowledge base retrievals during generation.Invoking with retrieval
When using Invoke a Deployment, use the optional fieldinclude_retrievals to embed the retrieval chunks within the response payload.
Here are examples on how to use the include_retrievals field in the invoke_options object in your queries payload.
retrievals as follow

Retrievals will contain an array of chunks Each chunk holds the source details and scores (search and re-ranking).
See knowledge base retrievals wired into a complete application. Read our cookbook Multilingual FAQ Bot.