Orq MCP is live: Use natural language to interrogate traces, spot regressions, and experiment your way to optimal AI configurations. Available in Claude Desktop, Claude Code, Cursor, and more. Start now →
For Python and Node.js client libraries, see Orq SDKs.
Send a message to an agent using the Responses API:
API & SDK
MCP
curl -X POST https://api.orq.ai/v3/router/responses \ -H "Authorization: Bearer $ORQ_API_KEY" \ -H "Content-Type: application/json" \ -d '{ "model": "agent/my-agent", "input": "Help me plan a microservices architecture for our e-commerce platform."}'
from orq_ai_sdk import Orqimport oswith Orq(api_key=os.getenv("ORQ_API_KEY", "")) as orq: response = orq.responses.create( model="agent/my-agent", input="Help me plan a microservices architecture for our e-commerce platform.", ) print(response)
import { Orq } from '@orq-ai/node';const orq = new Orq({ apiKey: process.env['ORQ_API_KEY'] ?? '' });const response = await orq.responses.create({ model: 'agent/my-agent', input: 'Help me plan a microservices architecture for our e-commerce platform.',});console.log(response);
Invoke "my-agent" with: Help me plan a microservices architecture for our e-commerce platform.
The assistant uses invoke_agent with model: "agent/my-agent" and returns the completed response.
The call waits for the agent to finish and returns a completed response object:
Set stream: true to receive incremental output as server-sent events. The response arrives in chunks as the Agent produces it.
curl -N -X POST https://api.orq.ai/v3/router/responses \
  -H "Authorization: Bearer $ORQ_API_KEY" \
  -H "Content-Type: application/json" \
  -d '{
    "model": "agent/my-agent",
    "input": "Help me plan a microservices architecture.",
    "stream": true
  }'
from orq_ai_sdk import Orqimport oswith Orq(api_key=os.getenv("ORQ_API_KEY", "")) as orq: res = orq.responses.create( model="agent/my-agent", input="Help me plan a microservices architecture.", stream=True, ) with res as event_stream: for item in event_stream: event = item.data if event and event.type == "response.output_text.delta": print(event.delta, end="", flush=True)
import { Orq } from '@orq-ai/node';const orq = new Orq({ apiKey: process.env['ORQ_API_KEY'] ?? '' });const stream = await orq.responses.create({ model: 'agent/my-agent', input: 'Help me plan a microservices architecture.', stream: true,});for await (const chunk of stream) { const event = chunk.data; if (event?.type === 'response.output_text.delta') { process.stdout.write(event.delta); } else if (event?.type === 'response.failed') { console.error('Stream failed:', event.response.error); }}
The stream emits server-sent events as the agent produces output:
Event
When
Key field
Notes
response.created
Stream opens
id
Pass as previous_response_id to continue the conversation
After receiving a response, continue the conversation by passing the previously received response id as previous_response_id in the next request. The agent maintains full context from previous exchanges.
curl -X POST https://api.orq.ai/v3/router/responses \ -H "Authorization: Bearer $ORQ_API_KEY" \ -H "Content-Type: application/json" \ -d '{ "model": "agent/my-agent", "previous_response_id": "resp_01K6D8QESESZ6SAXQPJPFQXPFT", "input": "Can you expand on the challenges section?"}'
from orq_ai_sdk import Orqimport oswith Orq(api_key=os.getenv("ORQ_API_KEY", "")) as orq: response = orq.responses.create( model="agent/my-agent", previous_response_id="resp_01K6D8QESESZ6SAXQPJPFQXPFT", input="Can you expand on the challenges section?", ) print(response)
import { Orq } from '@orq-ai/node';const orq = new Orq({ apiKey: process.env['ORQ_API_KEY'] ?? '' });const response = await orq.responses.create({ model: 'agent/my-agent', previousResponseId: 'resp_01K6D8QESESZ6SAXQPJPFQXPFT', input: 'Can you expand on the challenges section?',});console.log(response);
The continuation returns a new response id for the extended conversation. The agent retains full context from all prior turns.
To call the Agent with a memory store, we’ll use the Responses API with an Embedded message and Linked memory.
curl -X POST https://api.orq.ai/v3/router/responses \ -H "Authorization: Bearer $ORQ_API_KEY" \ -H "Content-Type: application/json" \ -d '{ "model": "agent/agent-memories", "memory": { "entity_id": "customer_456" }, "input": "Do you remember what is my name?"}'
from orq_ai_sdk import Orqimport oswith Orq(api_key=os.getenv("ORQ_API_KEY", "")) as orq: response = orq.responses.create( model="agent/agent-memories", memory={ "entity_id": "customer_456" }, input="Do you remember what is my name?", ) print(response)
import { Orq } from '@orq-ai/node';const orq = new Orq({ apiKey: process.env['ORQ_API_KEY'] ?? '' });const response = await orq.responses.create({ model: 'agent/agent-memories', memory: { entityId: 'customer_456', }, input: 'Do you remember what is my name?',});console.log(response);
Multiple memory stores per call are supported. Ensure the entity_id sent during the calls maps the same way to all previously declared memory stores during agent creation.
Attach arbitrary key-value pairs to a response using the metadata field. Metadata is stored on the response and visible in traces. Use it to tag runs by session, user, environment, or any other dimension useful for filtering in Observability. Values must be strings.
Pass tools in the tools array of any Responses API call. Multiple tools of different types can appear in the same request.
Tool type
What it does
Function
Define a custom schema. The model decides when to call it; the application executes and returns the result.
MCP Server
Connect to an MCP-compatible server. Orq.ai fetches the tool catalog and routes calls to the server.
HTTP
Call an external REST endpoint. Orq.ai executes the request; no application-side logic needed.
Built-ins
Platform-managed tools (orq:google_search, orq:web_scraper, orq:current_date) with no setup or execution logic.
Each tool type supports Inline (definition embedded in the request) or Pre-saved (created once in Studio, referenced by ID). HTTP and Built-ins are pre-saved or platform-managed only.
Function
Define a custom function schema. The model decides when to call it, fills the parameters, and returns a function_call output item. Choose Inline to embed the schema in the request, or Pre-saved to reuse a schema stored in Studio.
Inline
Pre-saved
Define a function schema inline. The model decides when to call it, fills the parameters, and returns a function_call output item. The application executes the function and sends the result back.Step 1: Send the request with a function tool:
curl -X POST https://api.orq.ai/v3/router/responses \
  -H "Authorization: Bearer $ORQ_API_KEY" \
  -H "Content-Type: application/json" \
  -d '{
    "model": "agent/my-agent",
    "input": "What is the weather in Paris?",
    "tools": [{
      "type": "function",
      "name": "get_weather",
      "description": "Returns the current weather for a city.",
      "parameters": {
        "type": "object",
        "properties": {
          "city": { "type": "string", "description": "City name" }
        },
        "required": ["city"]
      }
    }]
  }'
from orq_ai_sdk import Orqimport osorq = Orq(api_key=os.environ["ORQ_API_KEY"])response = orq.responses.create( model="agent/my-agent", input="What is the weather in Paris?", tools=[{ "type": "function", "name": "get_weather", "description": "Returns the current weather for a city.", "parameters": { "type": "object", "properties": { "city": {"type": "string", "description": "City name"}, }, "required": ["city"], }, }],)
import { Orq } from "@orq-ai/node";const orq = new Orq({ apiKey: process.env.ORQ_API_KEY });const response = await orq.responses.create({ model: "agent/my-agent", input: "What is the weather in Paris?", tools: [{ type: "function", name: "get_weather", description: "Returns the current weather for a city.", parameters: { type: "object", properties: { city: { type: "string", description: "City name" }, }, required: ["city"], }, }],});
The response contains a function_call output item when the model decides to use the tool:
The model only emits a function_call item when it decides to use the tool. Check output[0].type === "function_call" before proceeding to Step 2; if the model answered directly, read the text from response.output[0].content[0].text instead. Pass tool_choice: "required" to force a tool call.
Step 2: Execute the function and return the result:Pass previous_response_id and a function_call_output input item with the matching call_id. Include the same tools array so the model can make additional calls if needed.
import json# Execute the function locallyresult = {"temperature": 22, "unit": "celsius", "condition": "sunny"}final = orq.responses.create( model="agent/my-agent", previous_response_id=response.id, input=[{ "type": "function_call_output", "call_id": response.output[0]["call_id"], "output": json.dumps(result), }], tools=[{ "type": "function", "name": "get_weather", "description": "Returns the current weather for a city.", "parameters": { "type": "object", "properties": { "city": {"type": "string", "description": "City name"}, }, "required": ["city"], }, }],)print(final.output[0]["content"][0]["text"])
// Execute the function locallyconst result = { temperature: 22, unit: "celsius", condition: "sunny" };const final = await orq.responses.create({ model: "agent/my-agent", previousResponseId: response.id, input: [{ type: "function_call_output", callId: (response.output[0] as any).call_id, output: JSON.stringify(result), }], tools: [{ type: "function", name: "get_weather", description: "Returns the current weather for a city.", parameters: { type: "object", properties: { city: { type: "string", description: "City name" }, }, required: ["city"], }, }],});console.log(final.output?.[0]?.content?.[0]?.text);
Function tool fields:
Field
Type
Required
Description
type
string
yes
"function"
name
string
yes
Function name. Returned in the function_call output item so the application knows which function to run.
description
string
no
What the function does. Helps the model decide when to call it.
parameters
object
no
JSON Schema object describing the function’s parameters.
strict
boolean
no
Enforce strict parameter validation against the schema.
Reference a function tool saved in Studio using orq:function and its tool_id. The schema is retrieved from the platform at call time, but the application is still responsible for executing the function and sending back the result via function_call_output, identical to the Inline tab two-step cycle above. The only difference is the schema lives in Studio instead of in the request.
curl -X POST https://api.orq.ai/v3/router/responses \
  -H "Authorization: Bearer $ORQ_API_KEY" \
  -H "Content-Type: application/json" \
  -d '{
    "model": "agent/my-agent",
    "input": "What is the weather in Paris?",
    "tools": [{
      "type": "orq:function",
      "tool_id": "tool_01ABC..."
    }]
  }'
from orq_ai_sdk import Orqimport osorq = Orq(api_key=os.environ["ORQ_API_KEY"])response = orq.responses.create( model="agent/my-agent", input="What is the weather in Paris?", tools=[{"type": "orq:function", "tool_id": "tool_01ABC..."}],)# output[0]["type"] == "function_call"; execute locally and send function_call_output as in the Inline tab above
import { Orq } from "@orq-ai/node";const orq = new Orq({ apiKey: process.env.ORQ_API_KEY });const response = await orq.responses.create({ model: "agent/my-agent", input: "What is the weather in Paris?", tools: [{ type: "orq:function", toolId: "tool_01ABC..." }],});// output[0].type === "function_call"; execute locally and send function_call_output as in the Inline tab above
To create and manage function tools, see Create Tools.
MCP Server
Connect to any MCP-compatible server. This lets the agent read from and write to external services like Linear, Slack, or GitHub without writing any integration code. Choose Inline to supply the server URL per-request, or Pre-saved to reference a saved server by key with credentials stored on the platform.
Inline
Pre-saved
Supply the MCP server URL directly in the request. The tool catalog is fetched from the server on each call. Use for one-off calls or when the server has not yet been saved under Tools. Provide server_url (inline) or key (pre-saved), not both.
from orq_ai_sdk import Orqimport osorq = Orq(api_key=os.environ["ORQ_API_KEY"])response = orq.responses.create( model="agent/my-agent", input="List the teams in Linear", tools=[{ "type": "mcp", "server_url": "https://mcp.linear.app/mcp", "server_description": "Linear issue tracker", "headers": {"Authorization": "Bearer lin_api_..."}, }],)print(response.output[0]["content"][0]["text"])
import { Orq } from "@orq-ai/node";const orq = new Orq({ apiKey: process.env.ORQ_API_KEY });const response = await orq.responses.create({ model: "agent/my-agent", input: "List the teams in Linear", tools: [{ type: "mcp", serverUrl: "https://mcp.linear.app/mcp", serverDescription: "Linear issue tracker", headers: { Authorization: "Bearer lin_api_..." }, }],});console.log(response.output?.[0]?.content?.[0]?.text);
Per-request credentialsUse {{variable}} placeholders in headers and supply values at call time. The secret: true wrapper keeps token values out of traces and logs:
server_url must use http or https and be reachable from Orq.ai. URLs whose host resolves to a loopback, link-local, private (RFC 1918), unspecified, or cloud-metadata address are rejected.
Save the MCP server once in Studio or via the Create Tool API, then reference it by key. The tool catalog is cached at save time: no round-trip to the server on each call.
Replace my-agent with the agent key and linear_mcp with the key of the MCP tool saved in Studio. If either key does not exist in the workspace, the request returns 400.
curl -X POST https://api.orq.ai/v3/router/responses \
  -H "Authorization: Bearer $ORQ_API_KEY" \
  -H "Content-Type: application/json" \
  -d '{
    "model": "agent/my-agent",
    "input": "List the teams in Linear",
    "tools": [{ "type": "mcp", "key": "linear_mcp" }]
  }'
from orq_ai_sdk import Orqimport osorq = Orq(api_key=os.environ["ORQ_API_KEY"])response = orq.responses.create( model="agent/my-agent", input="List the teams in Linear", tools=[{"type": "mcp", "key": "linear_mcp"}],)print(response.output[0]["content"][0]["text"])
import { Orq } from "@orq-ai/node";const orq = new Orq({ apiKey: process.env.ORQ_API_KEY });const response = await orq.responses.create({ model: "agent/my-agent", input: "List the teams in Linear", tools: [{ type: "mcp", key: "linear_mcp" }],});console.log(response.output?.[0]?.content?.[0]?.text);
Encrypted headersMark sensitive headers as encrypted: true when creating the tool in Studio. Values are stored with workspace-scoped encryption, decrypted on each call, and redacted from traces:
Per-request credentialsStore a {{variable}} placeholder in the tool’s headers, then supply the value per call. Use secret: true to keep the token out of traces:
response = orq.responses.create( model="agent/my-agent", input="List the teams in Linear", tools=[{"type": "mcp", "key": "linear_mcp"}], variables={"linear_token": {"secret": True, "value": "lin_api_..."}},)print(response.output[0]["content"][0]["text"])
const response = await orq.responses.create({ model: "agent/my-agent", input: "List the teams in Linear", tools: [{ type: "mcp", key: "linear_mcp" }], variables: { linear_token: { secret: true, value: "lin_api_..." } },});console.log(response.output?.[0]?.content?.[0]?.text);
Multiple servers in one callEach entry in tools is independent. Mix server keys and types freely:
curl -X POST https://api.orq.ai/v3/router/responses \
  -H "Authorization: Bearer $ORQ_API_KEY" \
  -H "Content-Type: application/json" \
  -d '{
    "model": "agent/my-agent",
    "input": "Find tickets from yesterday in Linear and the related Slack threads.",
    "tools": [
      { "type": "mcp", "key": "linear_mcp" },
      { "type": "mcp", "key": "slack_mcp" }
    ]
  }'
response = orq.responses.create( model="agent/my-agent", input="Find tickets from yesterday in Linear and the related Slack threads.", tools=[ {"type": "mcp", "key": "linear_mcp"}, {"type": "mcp", "key": "slack_mcp"}, ],)print(response.output[0]["content"][0]["text"])
const response = await orq.responses.create({ model: "agent/my-agent", input: "Find tickets from yesterday in Linear and the related Slack threads.", tools: [ { type: "mcp", key: "linear_mcp" }, { type: "mcp", key: "slack_mcp" }, ],});console.log(response.output?.[0]?.content?.[0]?.text);
If the remote server adds new tools, refresh the saved tool in Studio to update the cached catalog.
HTTP
Reference an HTTP tool saved in Studio using orq:http and its tool_id. Orq.ai executes the HTTP request against the configured endpoint and returns the result to the model. No execution logic needed in the application.
curl -X POST https://api.orq.ai/v3/router/responses \
  -H "Authorization: Bearer $ORQ_API_KEY" \
  -H "Content-Type: application/json" \
  -d '{
    "model": "agent/my-agent",
    "input": "Get the latest order status for customer 42.",
    "tools": [{
      "type": "orq:http",
      "tool_id": "tool_01XYZ..."
    }]
  }'
from orq_ai_sdk import Orqimport osorq = Orq(api_key=os.environ["ORQ_API_KEY"])response = orq.responses.create( model="agent/my-agent", input="Get the latest order status for customer 42.", tools=[{"type": "orq:http", "tool_id": "tool_01XYZ..."}],)print(response.output[0]["content"][0]["text"])
import { Orq } from "@orq-ai/node";const orq = new Orq({ apiKey: process.env.ORQ_API_KEY });const response = await orq.responses.create({ model: "agent/my-agent", input: "Get the latest order status for customer 42.", tools: [{ type: "orq:http", toolId: "tool_01XYZ..." }],});console.log(response.output?.[0]?.content?.[0]?.text);
To create and manage HTTP tools, see Create Tools.
Built-ins
Orq.ai includes platform-managed tools that require no configuration. Reference them by type alone. No credentials or execution logic needed in the application.
type
Description
orq:current_date
Returns the current UTC date and time.
orq:google_search
Performs a Google search and returns top results.
orq:web_scraper
Fetches and extracts text content from a URL.
curl -X POST https://api.orq.ai/v3/router/responses \
  -H "Authorization: Bearer $ORQ_API_KEY" \
  -H "Content-Type: application/json" \
  -d '{
    "model": "agent/my-agent",
    "input": "What are the top AI news stories right now?",
    "tools": [
      { "type": "orq:current_date" },
      { "type": "orq:google_search" }
    ]
  }'
from orq_ai_sdk import Orqimport osorq = Orq(api_key=os.environ["ORQ_API_KEY"])response = orq.responses.create( model="agent/my-agent", input="What are the top AI news stories right now?", tools=[ {"type": "orq:current_date"}, {"type": "orq:google_search"}, ],)print(response.output[0]["content"][0]["text"])
import { Orq } from "@orq-ai/node";const orq = new Orq({ apiKey: process.env.ORQ_API_KEY });const response = await orq.responses.create({ model: "agent/my-agent", input: "What are the top AI news stories right now?", tools: [ { type: "orq:current_date" }, { type: "orq:google_search" }, ],});console.log(response.output?.[0]?.content?.[0]?.text);
Built-in tools execute automatically on Orq.ai infrastructure. Results are fed back to the model within the same request; no function_call_output round-trip needed.
Controls whether and which tool the model calls. Applies to all tool types.
Auto: Model Decides
Default when tools are present. The model decides on each turn whether to call a tool or answer directly. Use this for conversational agents where tool use is situational.
curl -X POST https://api.orq.ai/v3/router/responses \
  -H "Authorization: Bearer $ORQ_API_KEY" \
  -H "Content-Type: application/json" \
  -d '{
    "model": "agent/my-agent",
    "input": "What is the weather in Paris?",
    "tools": [{
      "type": "function",
      "name": "get_weather",
      "description": "Returns the current weather for a city.",
      "parameters": {
        "type": "object",
        "properties": { "city": { "type": "string" } },
        "required": ["city"]
      }
    }],
    "tool_choice": "auto"
  }'
response = orq.responses.create( model="agent/my-agent", input="What is the weather in Paris?", tools=[{ "type": "function", "name": "get_weather", "description": "Returns the current weather for a city.", "parameters": { "type": "object", "properties": {"city": {"type": "string"}}, "required": ["city"], }, }], tool_choice="auto",)
const response = await orq.responses.create({ model: "agent/my-agent", input: "What is the weather in Paris?", tools: [{ type: "function", name: "get_weather", description: "Returns the current weather for a city.", parameters: { type: "object", properties: { city: { type: "string" } }, required: ["city"], }, }], toolChoice: "auto",});
Required: Always Call a Tool
The model must call at least one tool before producing a final response. Use when a tool call is always necessary: for example, a retrieval step before every answer.
curl -X POST https://api.orq.ai/v3/router/responses \
  -H "Authorization: Bearer $ORQ_API_KEY" \
  -H "Content-Type: application/json" \
  -d '{
    "model": "agent/my-agent",
    "input": "What is the weather in Paris?",
    "tools": [{
      "type": "function",
      "name": "get_weather",
      "description": "Returns the current weather for a city.",
      "parameters": {
        "type": "object",
        "properties": { "city": { "type": "string" } },
        "required": ["city"]
      }
    }],
    "tool_choice": "required"
  }'
response = orq.responses.create( model="agent/my-agent", input="What is the weather in Paris?", tools=[{ "type": "function", "name": "get_weather", "description": "Returns the current weather for a city.", "parameters": { "type": "object", "properties": {"city": {"type": "string"}}, "required": ["city"], }, }], tool_choice="required",)
const response = await orq.responses.create({ model: "agent/my-agent", input: "What is the weather in Paris?", tools: [{ type: "function", name: "get_weather", description: "Returns the current weather for a city.", parameters: { type: "object", properties: { city: { type: "string" } }, required: ["city"], }, }], toolChoice: "required",});
None: Disable Tools
The model must not call any tool. Tools remain present in the request (the model can see their schemas) but cannot invoke them. Use to temporarily disable tools without removing them from the request.
curl -X POST https://api.orq.ai/v3/router/responses \
  -H "Authorization: Bearer $ORQ_API_KEY" \
  -H "Content-Type: application/json" \
  -d '{
    "model": "agent/my-agent",
    "input": "What is the weather in Paris?",
    "tools": [{
      "type": "function",
      "name": "get_weather",
      "description": "Returns the current weather for a city.",
      "parameters": {
        "type": "object",
        "properties": { "city": { "type": "string" } },
        "required": ["city"]
      }
    }],
    "tool_choice": "none"
  }'
response = orq.responses.create( model="agent/my-agent", input="What is the weather in Paris?", tools=[{ "type": "function", "name": "get_weather", "description": "Returns the current weather for a city.", "parameters": { "type": "object", "properties": {"city": {"type": "string"}}, "required": ["city"], }, }], tool_choice="none",)
const response = await orq.responses.create({ model: "agent/my-agent", input: "What is the weather in Paris?", tools: [{ type: "function", name: "get_weather", description: "Returns the current weather for a city.", parameters: { type: "object", properties: { city: { type: "string" } }, required: ["city"], }, }], toolChoice: "none",});
Specific Function: Force One Tool
Force the model to call one named function. Pass { "type": "function", "name": "<function name>" }, replacing <function name> with the exact name from the tool definition. Use when the application must extract structured data from a known function schema.
curl -X POST https://api.orq.ai/v3/router/responses \
  -H "Authorization: Bearer $ORQ_API_KEY" \
  -H "Content-Type: application/json" \
  -d '{
    "model": "agent/my-agent",
    "input": "What is the weather in Paris?",
    "tools": [{
      "type": "function",
      "name": "get_weather",
      "description": "Returns the current weather for a city.",
      "parameters": {
        "type": "object",
        "properties": { "city": { "type": "string" } },
        "required": ["city"]
      }
    }],
    "tool_choice": { "type": "function", "name": "get_weather" }
  }'
response = orq.responses.create( model="agent/my-agent", input="What is the weather in Paris?", tools=[{ "type": "function", "name": "get_weather", "description": "Returns the current weather for a city.", "parameters": { "type": "object", "properties": {"city": {"type": "string"}}, "required": ["city"], }, }], tool_choice={"type": "function", "name": "get_weather"},)
const response = await orq.responses.create({ model: "agent/my-agent", input: "What is the weather in Paris?", tools: [{ type: "function", name: "get_weather", description: "Returns the current weather for a city.", parameters: { type: "object", properties: { city: { type: "string" } }, required: ["city"], }, }], toolChoice: { type: "function", name: "get_weather" },});
MCP servers can expose dozens of tools. Use allowed_tools on any MCP entry (inline or pre-saved) to narrow what the model sees. Tools outside the filter are invisible to the model and cannot be invoked. allowed_tools applies only to MCP tools; it has no effect on function, HTTP, or built-in tools.
tool_names: Expose Named Tools Only
Expose only the listed tools by name. The model cannot see or call any tool not in the list.
Expose only tools the server marks as readOnlyHint: true. Use to prevent the model from calling any mutating operations. The server must annotate tools with readOnlyHint for this filter to have effect.
curl -X POST https://api.orq.ai/v3/router/responses \
  -H "Authorization: Bearer $ORQ_API_KEY" \
  -H "Content-Type: application/json" \
  -d '{
    "model": "agent/my-agent",
    "input": "Summarise the open issues in the Engineering team.",
    "tools": [{
      "type": "mcp",
      "key": "linear_mcp",
      "allowed_tools": { "read_only": true }
    }]
  }'
response = orq.responses.create( model="agent/my-agent", input="Summarise the open issues in the Engineering team.", tools=[{ "type": "mcp", "key": "linear_mcp", "allowed_tools": {"read_only": True}, }],)print(response.output[0]["content"][0]["text"])
const response = await orq.responses.create({ model: "agent/my-agent", input: "Summarise the open issues in the Engineering team.", tools: [{ type: "mcp", key: "linear_mcp", allowedTools: { readOnly: true }, }],});console.log(response.output?.[0]?.content?.[0]?.text);
Combined: Name and Read-only Filter
Intersection filter: expose only tools that are both read-only AND in the named list.
Set stream: true on any request with tools. See Streaming for setup and base event shapes. For function tools, act on response.output_item.done: it carries the complete function_call item with arguments and call_id ready for Step 2. MCP server calls also emit three additional events:
Event
When
response.mcp_call.in_progress
MCP tool starts executing.
response.mcp_call.completed
MCP tool returned a result.
response.mcp_call.failed
MCP tool raised an error or the connection failed.
MCP output items use type: "mcp_call". Function tool output items use type: "function_call". Match on type when processing output on the client.
HTTP 400, type: "invalid_request"The server_url uses a bad scheme or resolves to a disallowed address (loopback, link-local, private RFC 1918, unspecified, or cloud-metadata).
MCP server URL must not point to loopback, link-local, private, or unspecified addresses
Pre-saved Key Not Found
HTTP 400, type: "invalid_request"The key passed in the request does not match any tool saved in the workspace.
failed to resolve MCP server "foo": tool not found
Server Refused the Handshake
HTTP 400, type: "invalid_request"The MCP server rejected the connection during the initialization handshake.
mcp connect to "foo" failed: ...
Server Unreachable or Bad Response
HTTP 400, type: "invalid_request"The MCP server was not reachable or returned a malformed response during tool discovery.
mcp list tools from "foo" failed: ...
Server-side Failure
HTTP 500, type: "internal_error"An unexpected error occurred on the Orq.ai side. Retry with exponential backoff.
Tool-call Execution Failure
HTTP 200, output item with status: "failed"The tool call was routed successfully but the tool itself raised an error. The overall HTTP response is 200 because the request succeeded; inspect output[n].output for the error detail.
Run an agent on a recurring cadence without holding open an HTTP connection. Each scheduled run follows the same execution path, tracing, and billing as a direct API call.
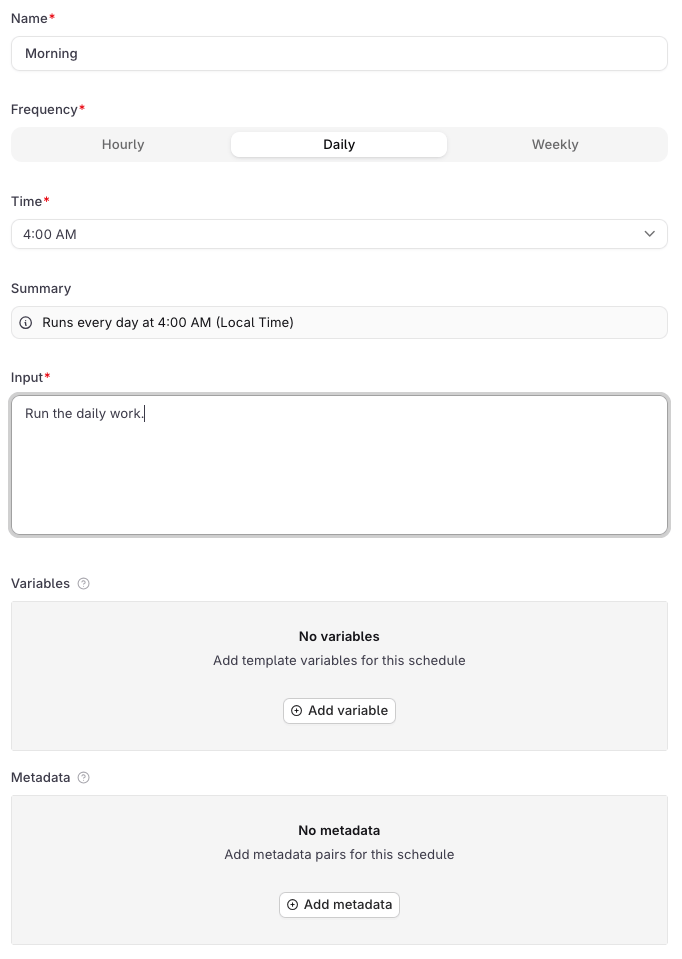
Open the agent and go to the Schedules tab. Click New schedule to open the form.
Field
Description
Name
A display label for the schedule in the UI. Required. Not sent to the agent.
Frequency
Hourly, Daily, or Weekly.
Time
The hour the schedule fires, in local time. Shown for Daily and Weekly.
Pick the day
Day of the week to fire. Shown for Weekly only.
Summary
Auto-generated human-readable description of the schedule.
Input
The user message sent to the agent on each firing. Required, since every agent invocation needs a user message.
Variables
Key-value pairs passed to the agent on each run. See below.
Metadata
Key-value pairs attached to every response this schedule generates. See below.
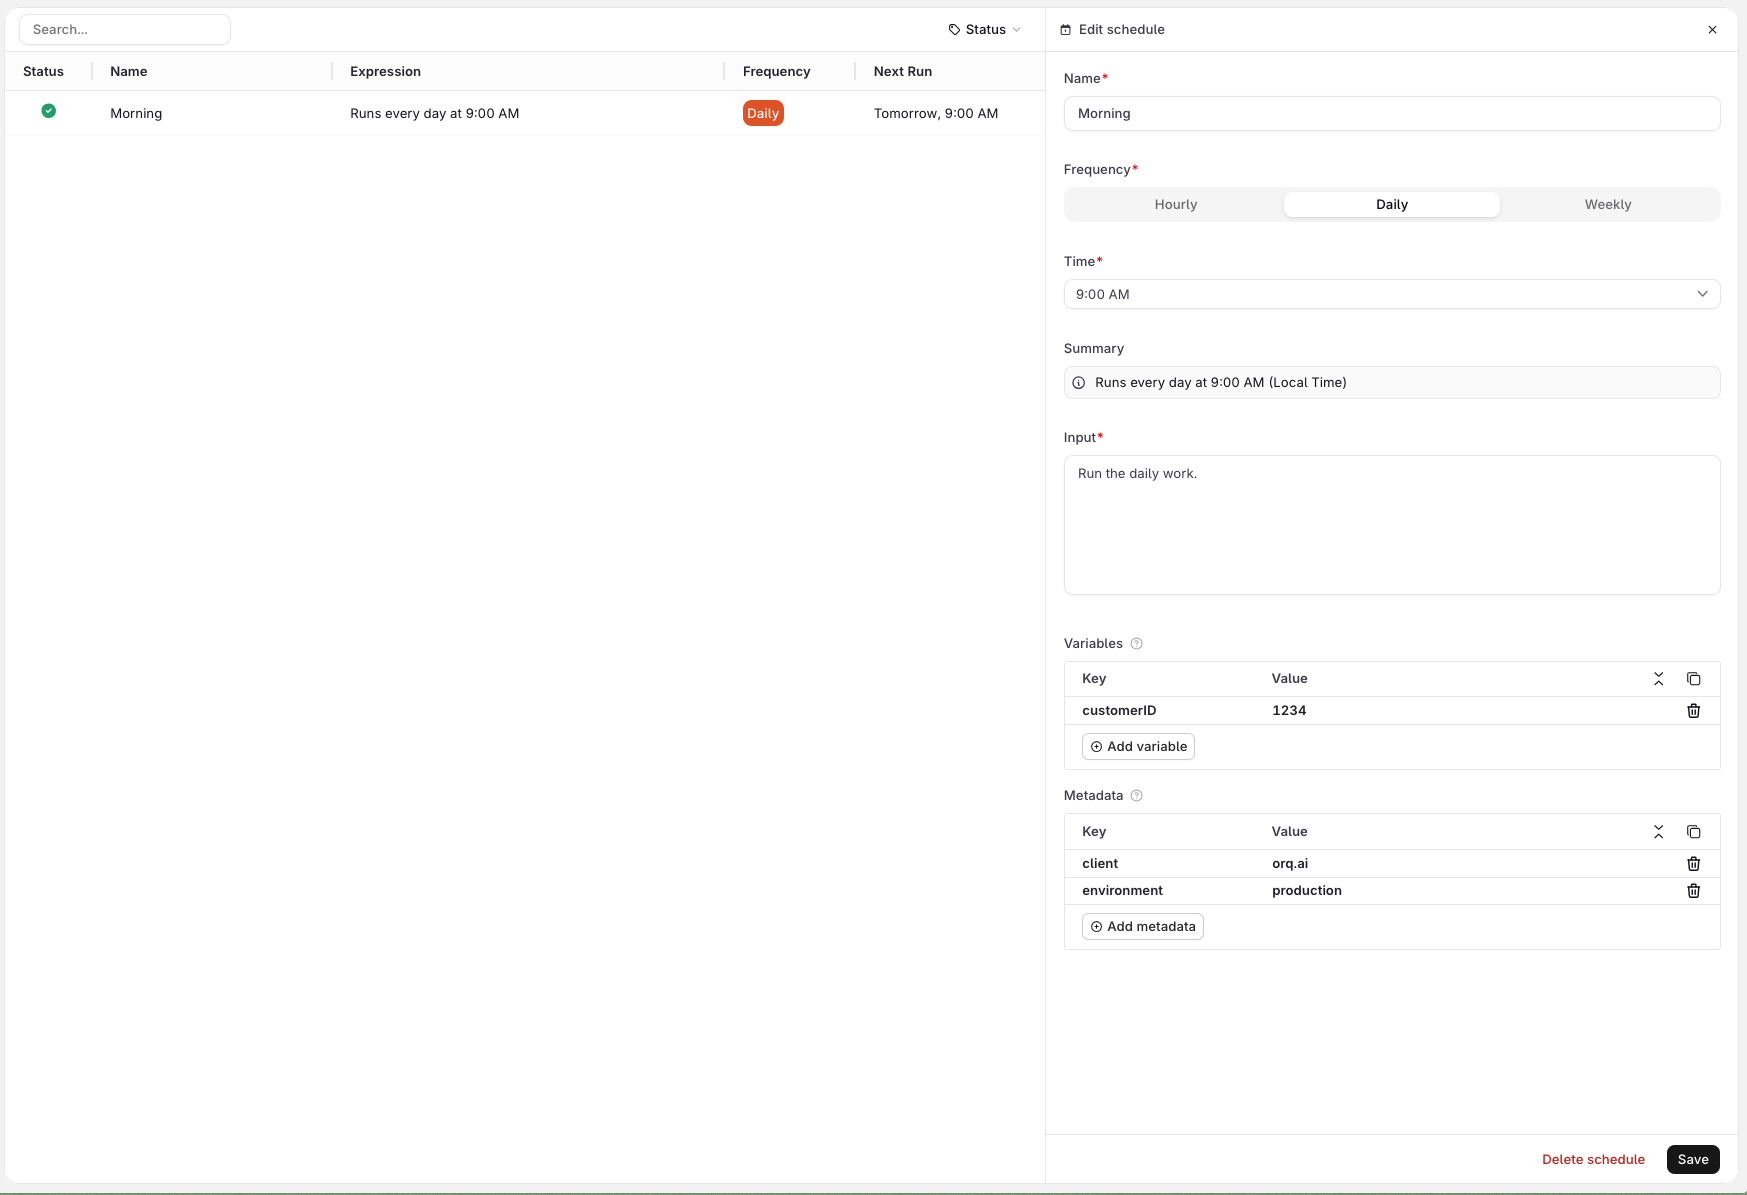
VariablesUse the Variables section to define values that the agent needs on each run. Variables are sent alongside the input as a distinct payload field, and can be consumed by the agent’s instructions, any configured tool, or a subagent wherever the variable is wired up.
For example, a support agent with an HTTP tool that looks up a customer in an external system can receive customer_id=1234 from the schedule and use it to query the right record on every run. See the screenshot below.
Variables cannot be referenced inside the Input field itself. Wire them into the agent’s instructions, a tool, or a subagent instead.MetadataUse the Metadata section to attach arbitrary key-value pairs to every response generated by this schedule. Metadata is not passed to the agent: it is stored on the trace and can be used to filter traces in Observability, identify which schedule triggered a run, or tag responses for downstream processing.Click Create to activate the schedule. It starts firing at the next matching time.
Only cron schedules are supported. Expressions use the 6-field format: sec min hour dom month dow. Three patterns are accepted:
Pattern
Expression
Example
Hourly
0 0 * * * *
Fires every hour
Daily
0 0 <hour> * * *
0 0 9 * * * (9:00 AM UTC daily)
Weekly
0 0 <hour> * * <day>
0 0 9 * * 1 (9:00 AM UTC every Monday)
<day> is 0 (Sunday) through 6 (Saturday). All times are stored in UTC; the UI displays them in user’s local timezone.
Only cron is accepted. Seconds and minutes must be 0, dom and month must be *, and the weekday field must be a single integer 0-6 or * (names like mon and ranges like 1-5 are rejected). To run an agent in response to an event rather than a clock, invoke it directly via the Run API.Expressions that do not match a supported pattern return 400 with "code": "invalid_expression". The message field describes the specific violation, for example invalid schedule expression: day-of-month and month fields must be '*'
The TypeScript SDK uses camelCase keys (agentKey, requestBody) and nests the request body under requestBody, while the Python SDK uses flat keyword arguments. Both map to the same wire format.
payload is required. Response (schedule records use _id rather than id):
6-field cron expression matching one of the three supported patterns.
agent_tag
string
Pin the schedule to a specific agent version. Omit to always run the active version.
Payload fields:
Field
Type
Description
input
string or array
The instruction the agent runs on each firing. Same shape as the input field in the Run API. Supports template variables via {{variable}}.
variables
object
Template variable substitution. Use {"secret": true, "value": "..."} for secret values.
memory_entity_id
string
Memory store entity to attach on each run.
metadata
object
Opaque key/value pairs attached to every response this schedule generates.
generation increments each time type or expression changes and resets trigger_count to 0. Use it to distinguish firings before and after a cadence change.Use agent_tag (string) to pin the schedule to a specific agent version. Omit it to always use the active version:
All schedules for the agent are listed in the Schedules tab. Click a schedule row to open its details, including trigger count and last fired time.
# List all schedulescurl https://api.orq.ai/v3/agents/ops_digest/schedules \ -H "Authorization: Bearer $ORQ_API_KEY"# Get a single schedulecurl https://api.orq.ai/v3/agents/ops_digest/schedules/{schedule_id} \ -H "Authorization: Bearer $ORQ_API_KEY"
from orq_ai_sdk import Orqimport oswith Orq(api_key=os.getenv("ORQ_API_KEY", "")) as orq: # List all schedules result = orq.schedules.list(agent_key="ops_digest") print(result.schedules) # Get a single schedule schedule = orq.schedules.retrieve( agent_key="ops_digest", schedule_id="{schedule_id}", ) print(schedule)
import { Orq } from '@orq-ai/node';const orq = new Orq({ apiKey: process.env['ORQ_API_KEY'] ?? '' });// List all schedulesconst result = await orq.schedules.list({ agentKey: 'ops_digest' });console.log(result.schedules);// Get a single scheduleconst schedule = await orq.schedules.retrieve({ agentKey: 'ops_digest', scheduleId: '{schedule_id}',});console.log(schedule);
List returns { "schedules": [...] }, most recent first. The single-schedule response includes trigger_count, last_triggered_at (UTC timestamp string; null before the first firing), and generation.
Payload-only and agent_tag-only changes do not reset the firing cadence and apply to the next regular run. Changing type or expression shifts the cadence from the PATCH time and resets trigger_count to 0.Lifecycle notes:
Missed firings: Not replayed. If the service is unavailable when a schedule fires, that firing is lost. The schedule resumes on its next scheduled time once service is restored.
Runs the schedule’s payload immediately without affecting its regular cadence. Useful for smoke-testing a new schedule or manually re-running a missed execution.
curl -X POST https://api.orq.ai/v3/agents/ops_digest/schedules/{schedule_id}/execution \
  -H "Authorization: Bearer $ORQ_API_KEY"
from orq_ai_sdk import Orqimport oswith Orq(api_key=os.getenv("ORQ_API_KEY", "")) as orq: orq.schedules.trigger( agent_key="ops_digest", schedule_id="{schedule_id}", )
import { Orq } from '@orq-ai/node';const orq = new Orq({ apiKey: process.env['ORQ_API_KEY'] ?? '' });await orq.schedules.trigger({ agentKey: 'ops_digest', scheduleId: '{schedule_id}',});
The run appears in traces as a schedule.<agent_key> leading span roughly 10 seconds later, carrying orq.schedule_id and the full agent execution chain. Schedule-driven cost and token usage appear in usage reports alongside HTTP-invoked runs. Inactive schedules return 400 schedule_inactive.
memory_entity_id attaches a Memory Store entity to every run. The agent can read from and write to the store on each firing, accumulating context across executions.
The status field is returned on every response object from POST /v3/router/responses. See the Create Response API reference for the full response shape.
Inspect task states through traces:
Show me the last 10 traces for "support-bot" and summarize their completion states
The assistant uses list_traces filtered to the agent and surfaces the state distribution.
Multi-agent workflows are configured at the agent level. Each agent in a team is created individually, then the orchestrator references sub-agents through its team_of_agents configuration.The Description field on each sub-agent is critical: orchestrators use it to decide when to delegate.
To configure multi-agent setups, see Build Agents: Instructions for how to write descriptions that enable effective delegation.
Multi-agent workflows use a hierarchical system:
Orchestrator: Main agent that delegates tasks using call_sub_agent.
Sub-agents: Specialized agents for specific functions.
Delegation: Automatic routing based on sub-agent descriptions and capabilities.
Step 1: Create sub-agents.Create each specialized agent individually. The description field drives orchestrator delegation decisions.Step 2: Create the orchestrator.Reference sub-agents in the team_of_agents array. Include retrieve_agents and call_sub_agent tools.
curl -X POST https://api.orq.ai/v2/agents \ -H "Authorization: Bearer $ORQ_API_KEY" \ -H "Content-Type: application/json" \ -d '{ "key": "orchestrator", "role": "Task Coordinator", "description": "Coordinates specialized agents to handle diverse user requests", "instructions": "Answer the user using your sub-agents. Use retrieve_agents to discover available agents, then call_sub_agent to delegate tasks based on their capabilities.", "settings": { "max_iterations": 15, "max_execution_time": 600, "tools": [ { "type": "retrieve_agents" }, { "type": "call_sub_agent" } ] }, "model": "openai/gpt-4o", "path": "Default/agents", "team_of_agents": [ { "key": "specialist-a", "role": "Handles domain A" }, { "key": "specialist-b", "role": "Handles domain B" } ]}'
from orq_ai_sdk import Orqimport oswith Orq(api_key=os.getenv("ORQ_API_KEY", "")) as orq: orchestrator = orq.agents.create( key="orchestrator", role="Task Coordinator", description="Coordinates specialized agents to handle diverse user requests", instructions="Answer the user using your sub-agents. Use retrieve_agents to discover available agents, then call_sub_agent to delegate tasks based on their capabilities.", path="Default/agents", model="openai/gpt-4o", settings={ "max_iterations": 15, "max_execution_time": 600, "tools": [ {"type": "retrieve_agents"}, {"type": "call_sub_agent"} ] }, team_of_agents=[ {"key": "specialist-a", "role": "Handles domain A"}, {"key": "specialist-b", "role": "Handles domain B"} ] )
import { Orq } from '@orq-ai/node';const orq = new Orq({ apiKey: process.env['ORQ_API_KEY'] ?? '' });const orchestrator = await orq.agents.create({ key: 'orchestrator', role: 'Task Coordinator', description: 'Coordinates specialized agents to handle diverse user requests', instructions: 'Answer the user using your sub-agents. Use retrieve_agents to discover available agents, then call_sub_agent to delegate tasks based on their capabilities.', path: 'Default/agents', model: 'openai/gpt-4o', settings: { maxIterations: 15, maxExecutionTime: 600, tools: [ { type: 'retrieve_agents' }, { type: 'call_sub_agent' } ] }, teamOfAgents: [ { key: 'specialist-a', role: 'Handles domain A' }, { key: 'specialist-b', role: 'Handles domain B' } ]});
Step 3: Invoke the orchestrator.Invoke the orchestrator the same way as any other agent. It handles delegation internally.
Orchestrator agents must include retrieve_agents to discover sub-agents before delegating. Add explicit instructions: “Use retrieve_agents to see what specialized agents are available, then call_sub_agent to delegate.”
Update the orchestrator at any time with PATCH /v2/agents/{key} to add or remove sub-agents from team_of_agents.
Find all agents available as sub-agents:
Search for all agents in the Default/agents project
The assistant uses search_entities with type: "agent" to list available agents.Set up an orchestrator:
Create an orchestrator agent that coordinates "youth-agent" and "formal-agent" for tone-matched responses
The assistant uses create_agent with the team_of_agents array and retrieve_agents / call_sub_agent tools.
The Traces tab in the agent page shows execution logs filtered to the agent automatically.
Trace data includes:
Execution history with timestamps
Input and output for each call
Token usage and cost per execution
Execution duration and performance metrics
Errors and debugging information
Tool calls executed (function, HTTP, code, or MCP calls)
Knowledge retrieval results and RAG context
Memory store interactions
All agent executions are automatically traced. Access traces in the AI Studio or via the Traces API.For programmatic trace access, see the Observability documentation.
List recent traces for an agent:
Show me the last 20 traces for "support-bot" sorted by most recent
The assistant uses list_traces with a filter on the agent key.Inspect a specific trace:
Show me the full span details for trace ID 01K6D8QESESZ6SAXQPJPFQXPFT
The assistant uses list_spans to retrieve the full execution tree for that trace.Debug errors:
Find all failed traces for "support-bot" from the last 24 hours and summarize the errors
The assistant uses list_traces filtered by status:=ERROR and time range, then get_span on relevant spans to surface root causes.
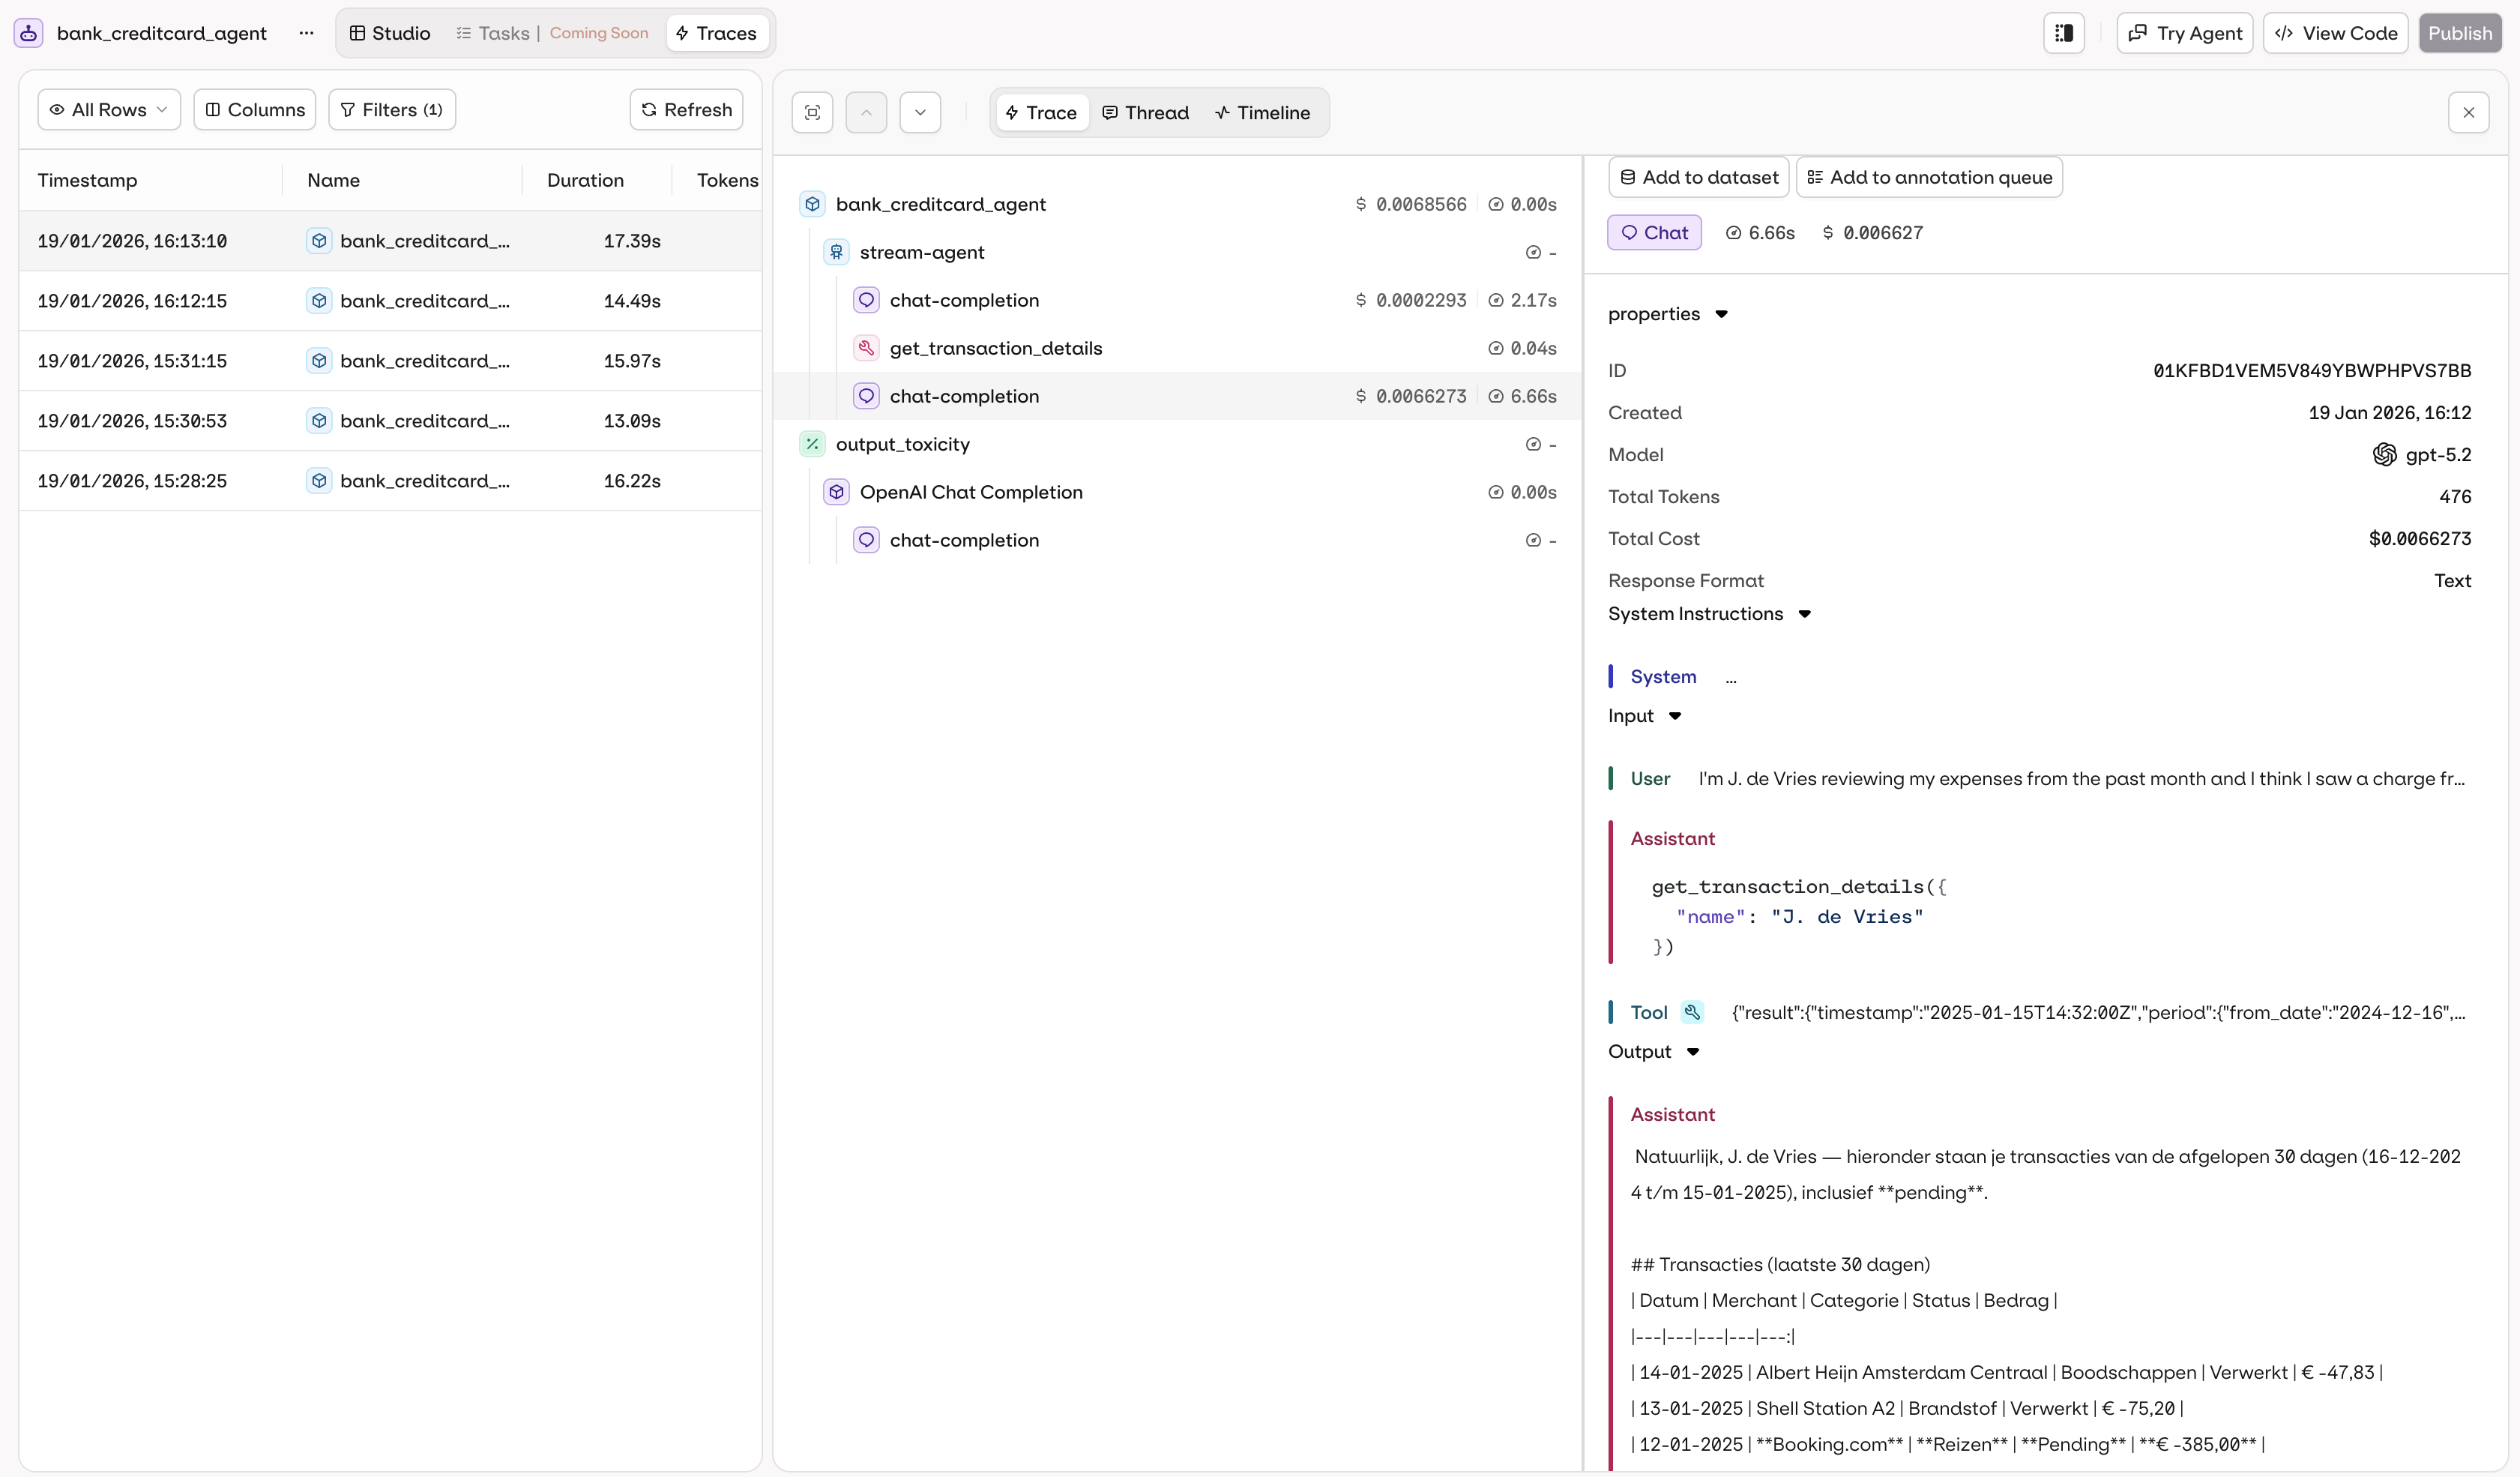
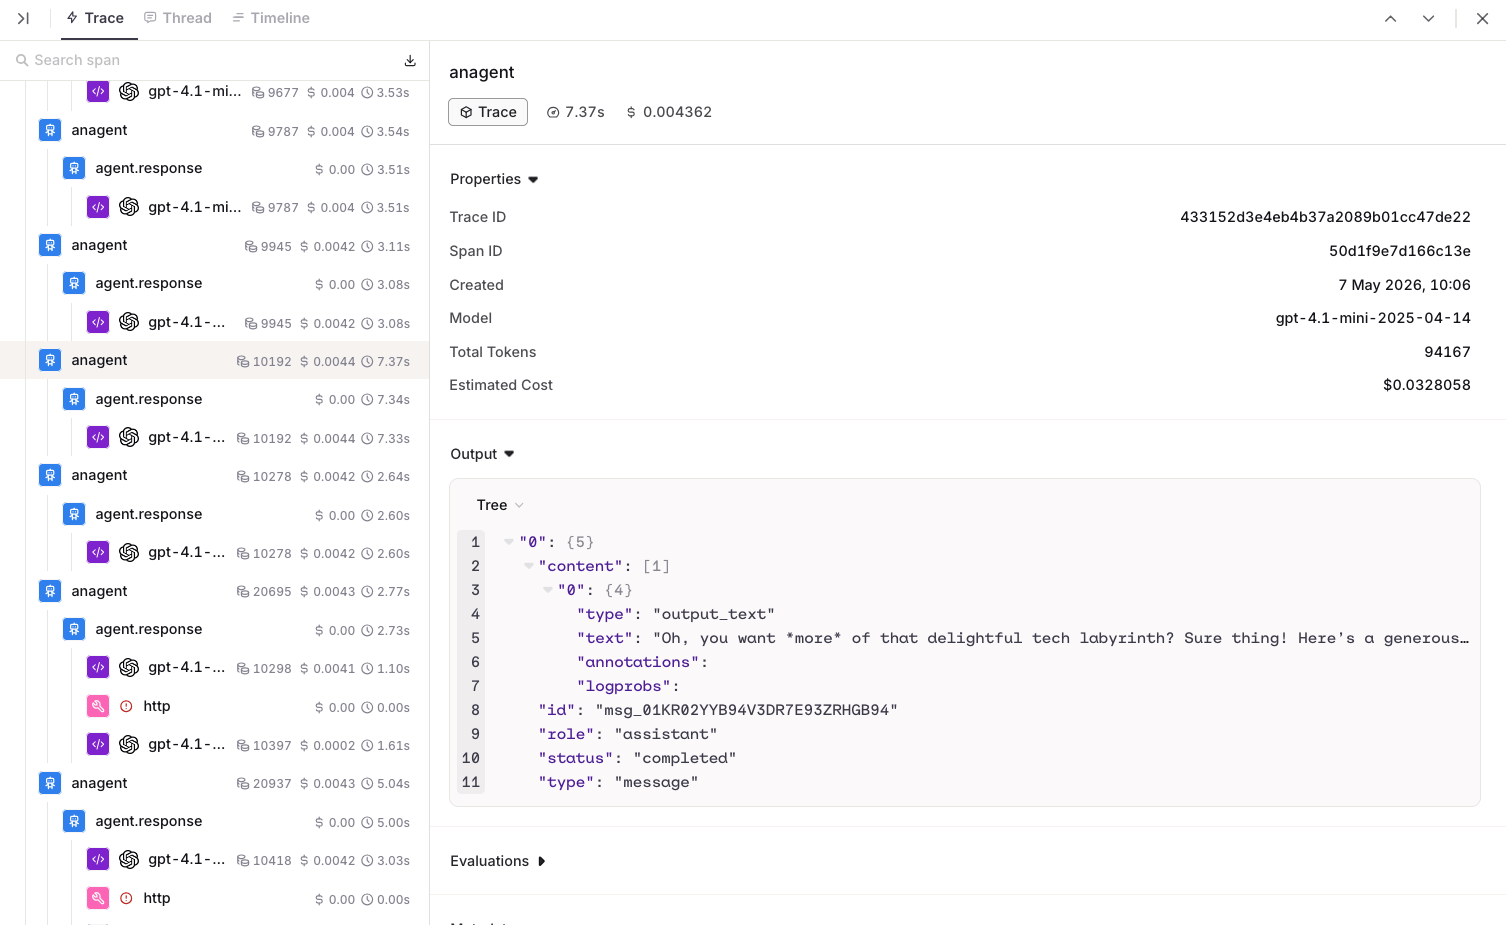
The Trace view shows the full execution tree for a single agent run. Each step is displayed hierarchically, including LLM calls, tool invocations, knowledge retrievals, and memory interactions.
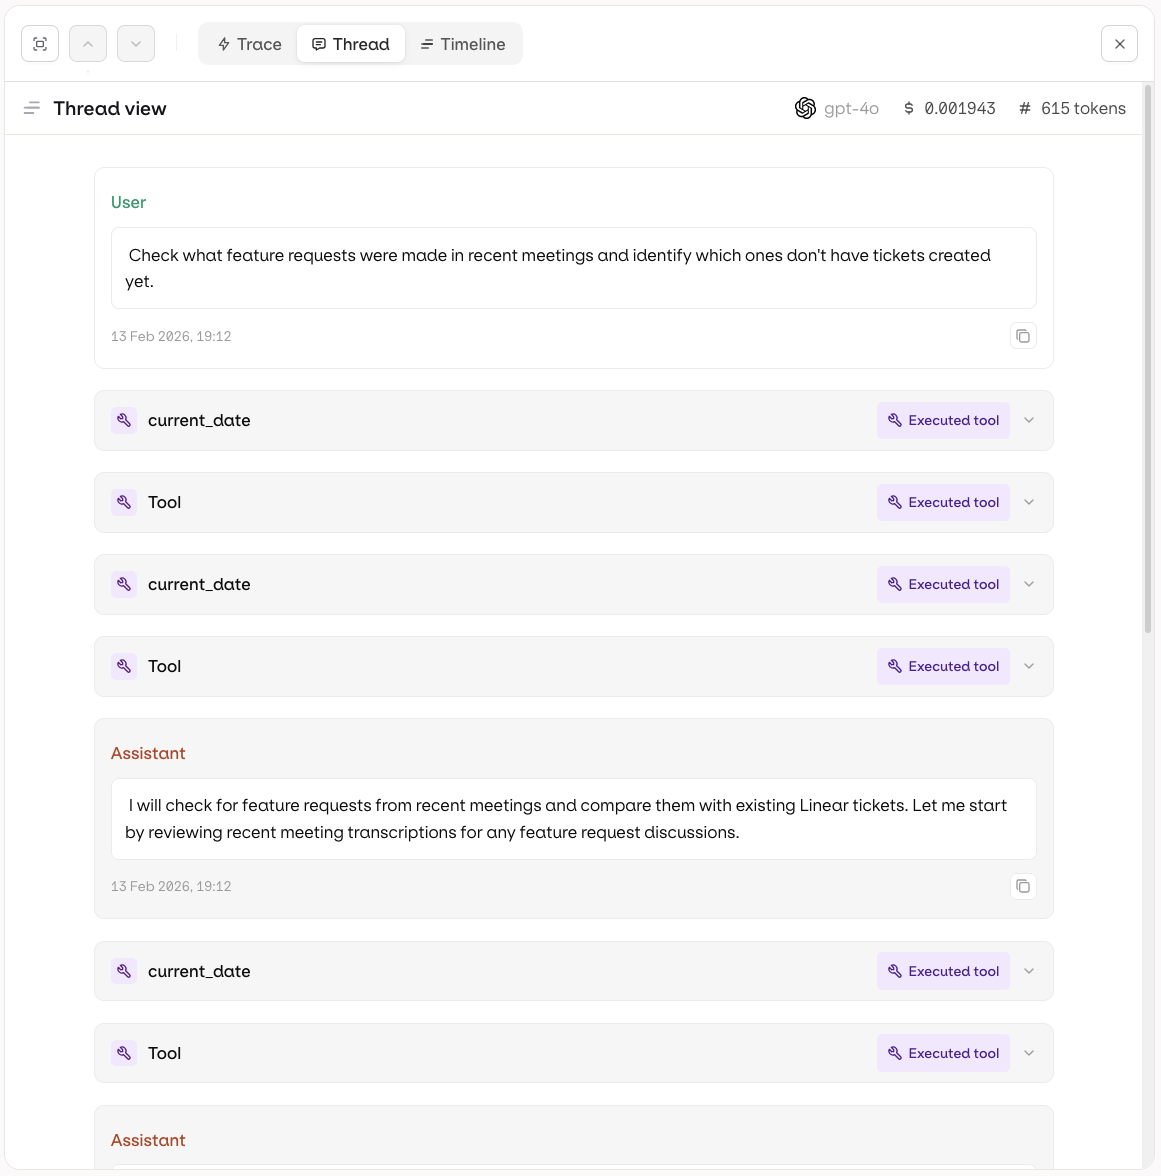
The Thread view presents the execution as a conversation thread, showing the sequence of messages exchanged between the user, the agent, and any tools.
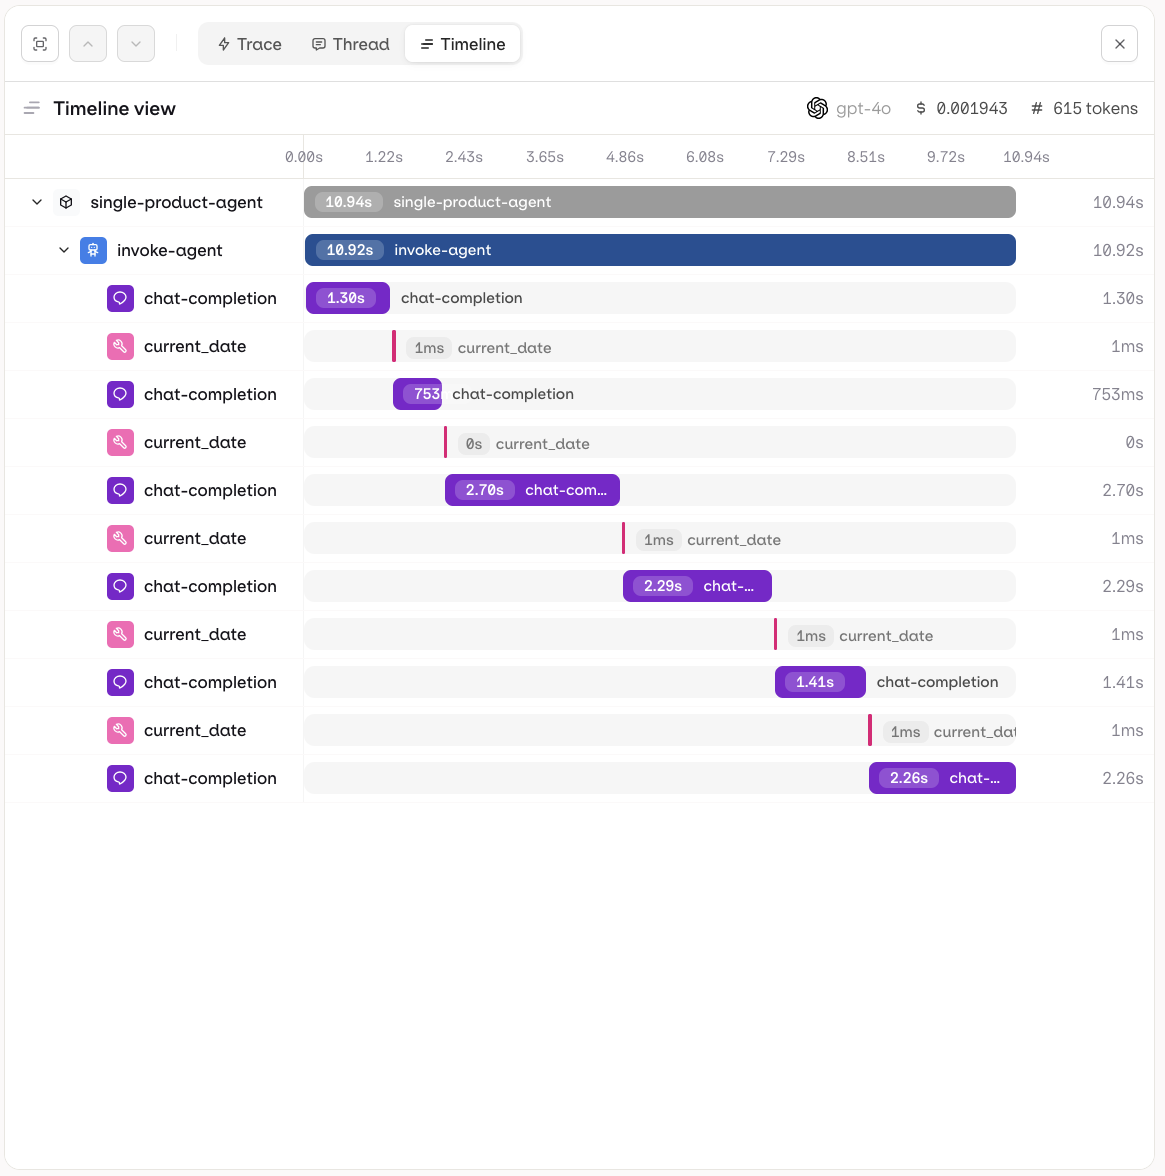
The Timeline view shows execution steps plotted against time, making it easy to identify bottlenecks and understand parallel vs sequential operations.


 MCP
MCP AI Studio