

Step 1: Install Dependencies
Before starting, ensure you have an Orq account. If not, sign up first. Additionally, we’ve prepared a Google Colab file that you can copy and run immediately, simplifying the setup process. Just replace the API key, and you’re ready to go For more advanced topics, check out the Orq documentation. Start by installing the required packages to use the Orq SDK and manage your knowledge baseStep 2: Identity Tracking (Optional)
Identities in Orq.ai help track user interactions and API usage across your application. They can represent users, teams, or projects and enable better analytics and budget management. Create an Identity through the AI Studio:- Go to Identity Analytics in your workspace
- Click Create an Identity
- Add the user details (name, email, external ID)
- Set optional metadata and budget limits
Learn more about creating identities, see Creating an Identity.
Step 3: Set Up the Orq Client
Next, set up the Orq client using your API key. Replace the placeholder with your actual API key.Step 4: Setting Up a Knowledge Base in Orq.ai
To power the FAQ bot, you’ll need a knowledge base containing relevant documents. In Orq.ai, knowledge bases are built using vector embeddings, enabling the bot to retrieve the most relevant information for any query. For this setup, we scraped our technical documentation and uploaded it to the knowledge base via the Orq platform. Keep in mind that this approach does not ensure continuous updates — any changes to your documentation will need to be manually re-uploaded. To upload a knowledge base in Orq.ai:- Create a New Knowledge Base in the Orq workspace.
- Upload Documents by dragging files.
- Process the Files to generate vector embeddings, making your content searchable by the bot.
Step 5: Orq FAQ Chat Prompt
This prompt defines the behavior of Orq.ai’s FAQ bot, ensuring responses are accurate, context-driven, and based only on the provided knowledge base. The assistant acts as a customer service agent, delivering factual answers while avoiding speculation. The prompt includes clear instructions to maintain professionalism: ✅ Use only the knowledge base for answers ✅ Express uncertainty when information is unclear ✅ Avoid opinions or assumptions ✅ Break down complex topics into simple explanations ✅ Use objective, neutral language This ensures reliable and well-supported answers for users across various contexts. Example prompt in Orq.ai:Step 6: Setting Up a Routing Engine
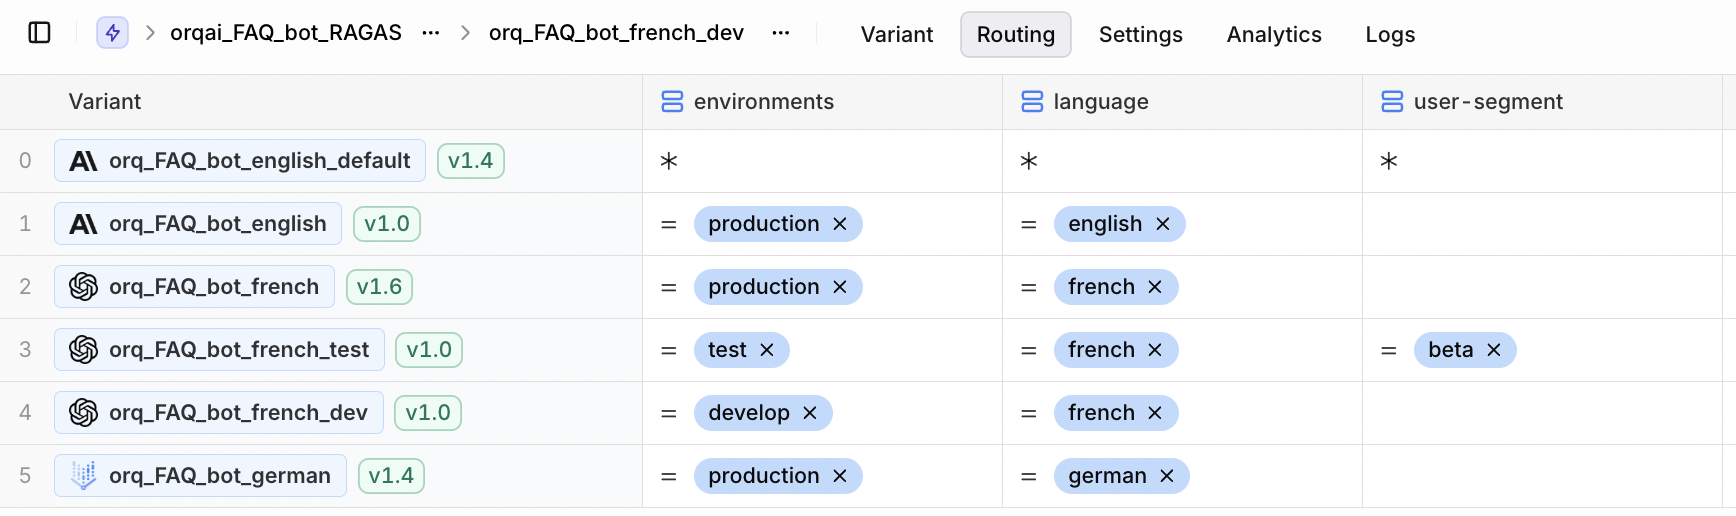
The Routing Engine in Orq.ai lets you direct user queries to different bot variants based on inputs like locale or person. Each variant can have unique configurations, prompts, or parameters. To set it up:- Create Variants in the Routing panel (e.g., orq_FAQ_bot_english).
- Define Rules to map input fields (like language) to the right variant.
- No more endless if-else statements—easily route different prompts to different models for specific use cases without cluttering your code.
- Flexible decision-making—define an unlimited number of routing parameters (e.g., user segments, environments, languages, or even custom metadata) to fit your use case.
- Controlled rollouts—test and iterate AI variants safely before pushing them to production. This setup keeps your bot scalable, adaptable, and easy to manage.
Step 7: Define the Interaction Function
The bot will need a function to handle user input, manage conversation memory, and invoke the RAG deployment. Here’s a sample function:Keeping memory of the conversation
Here we use the variableconv_memory as a way to keep track of previous conversations.
This array of messages is appended with all new user messages and sent as context within the messages variable within the payload to invoke.
Step 8: Customize the FAQ Bot for Multilingual Support
To ensure the bot responds in different languages, you’ll need to prompt users for their language preference:Step 9: Run Your FAQ Bot
Now you’re ready to run the FAQ bot! Use the following interaction loop to start chatting with the deployment:Feedback Collection (Optional)
Feedback in Orq.ai helps track response quality and identify areas for improvement. You can collect user ratings, defect classifications, and corrections to continuously enhance your application. Provide feedback through the AI Studio:- Go to Logs in your workspace
- Find the specific deployment invocation
- Use the feedback interface to rate responses
- Add defect classifications or corrections as needed
You can also collect feedback programmatically via the API if needed.
Next Steps
Great job! You’ve set up a multilingual FAQ bot using Orq.ai, powered by RAG and managed centrally with the Routing Engine. To further enhance your bot:- Add more knowledge base variants to support additional use cases or languages.
- Refine your prompts and routing rules to improve bot accuracy and personalization.