How to connect Orq.ai with your Lovable app

Quickly create a fully functional AI application with Orq.ai using just a few simple prompts.

The power of Orq.ai is that it separates the backend engineering of the GenAI component from the software layer. In this guide, we will use Orq.ai to manage the GenAI feature and Lovable to create the user interface using prompt based development.

To keep the setup lightweight and secure, we will use Supabase to store the Orq.ai API key. Lovable will send user messages to Orq.ai through a secure endpoint managed by a Supabase edge function. This ensures the API key is never exposed directly in the frontend. This approach is ideal for building and deploying quick prototypes for internal testing, client feedback, or product demonstrations without setting up any additional backend infrastructure.

What We Will Build

We will create an FAQ chatbot. The frontend will be built using Lovable, while Orq.ai handles the backend using a workflow that leverages RAG to deliver accurate responses based on your documentation.

Architecture flow

  1. A user enters a question in the Lovable chatbot interface
  2. Lovable sends that question to an Orq.ai workflow using a fetch call with the API key
  3. The workflow retrieves relevant context from your documents using RAG and generates a response
  4. The chatbot displays the response in the user interface

Step 1: Create the Deployment + Knowledge Base in Orq.ai

To power your FAQ bot, you will use Orq.ai to create a single deployment that combines RAG with a focused system prompt. This setup ensures responses are accurate, grounded in real documentation, and tailored to user questions.

1. Set Up a Knowledge Base
The core of the FAQ bot is a knowledge base containing relevant documents. Orq.ai transforms these documents into vector embeddings so the workflow can search and retrieve the most useful information for each query.

To create a knowledge base:

  • Open your Orq.ai workspace
  • Go to Knowledge Base
  • Click Create New Knowledge Base
  • Upload your documents (you can drag and drop files like PDFs, text, or markdown)
  • Click Process Files to generate embeddings
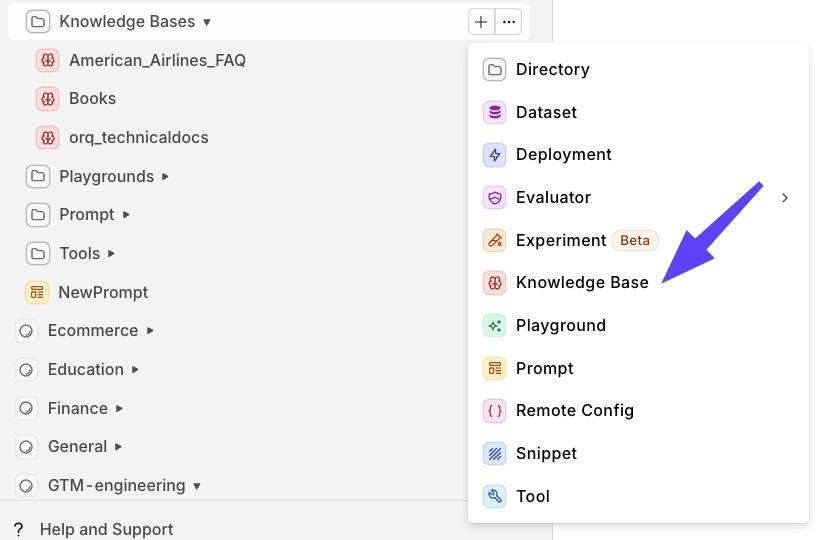
Note: this is a static upload. If your source documentation changes, you will need to re-upload the updated version.

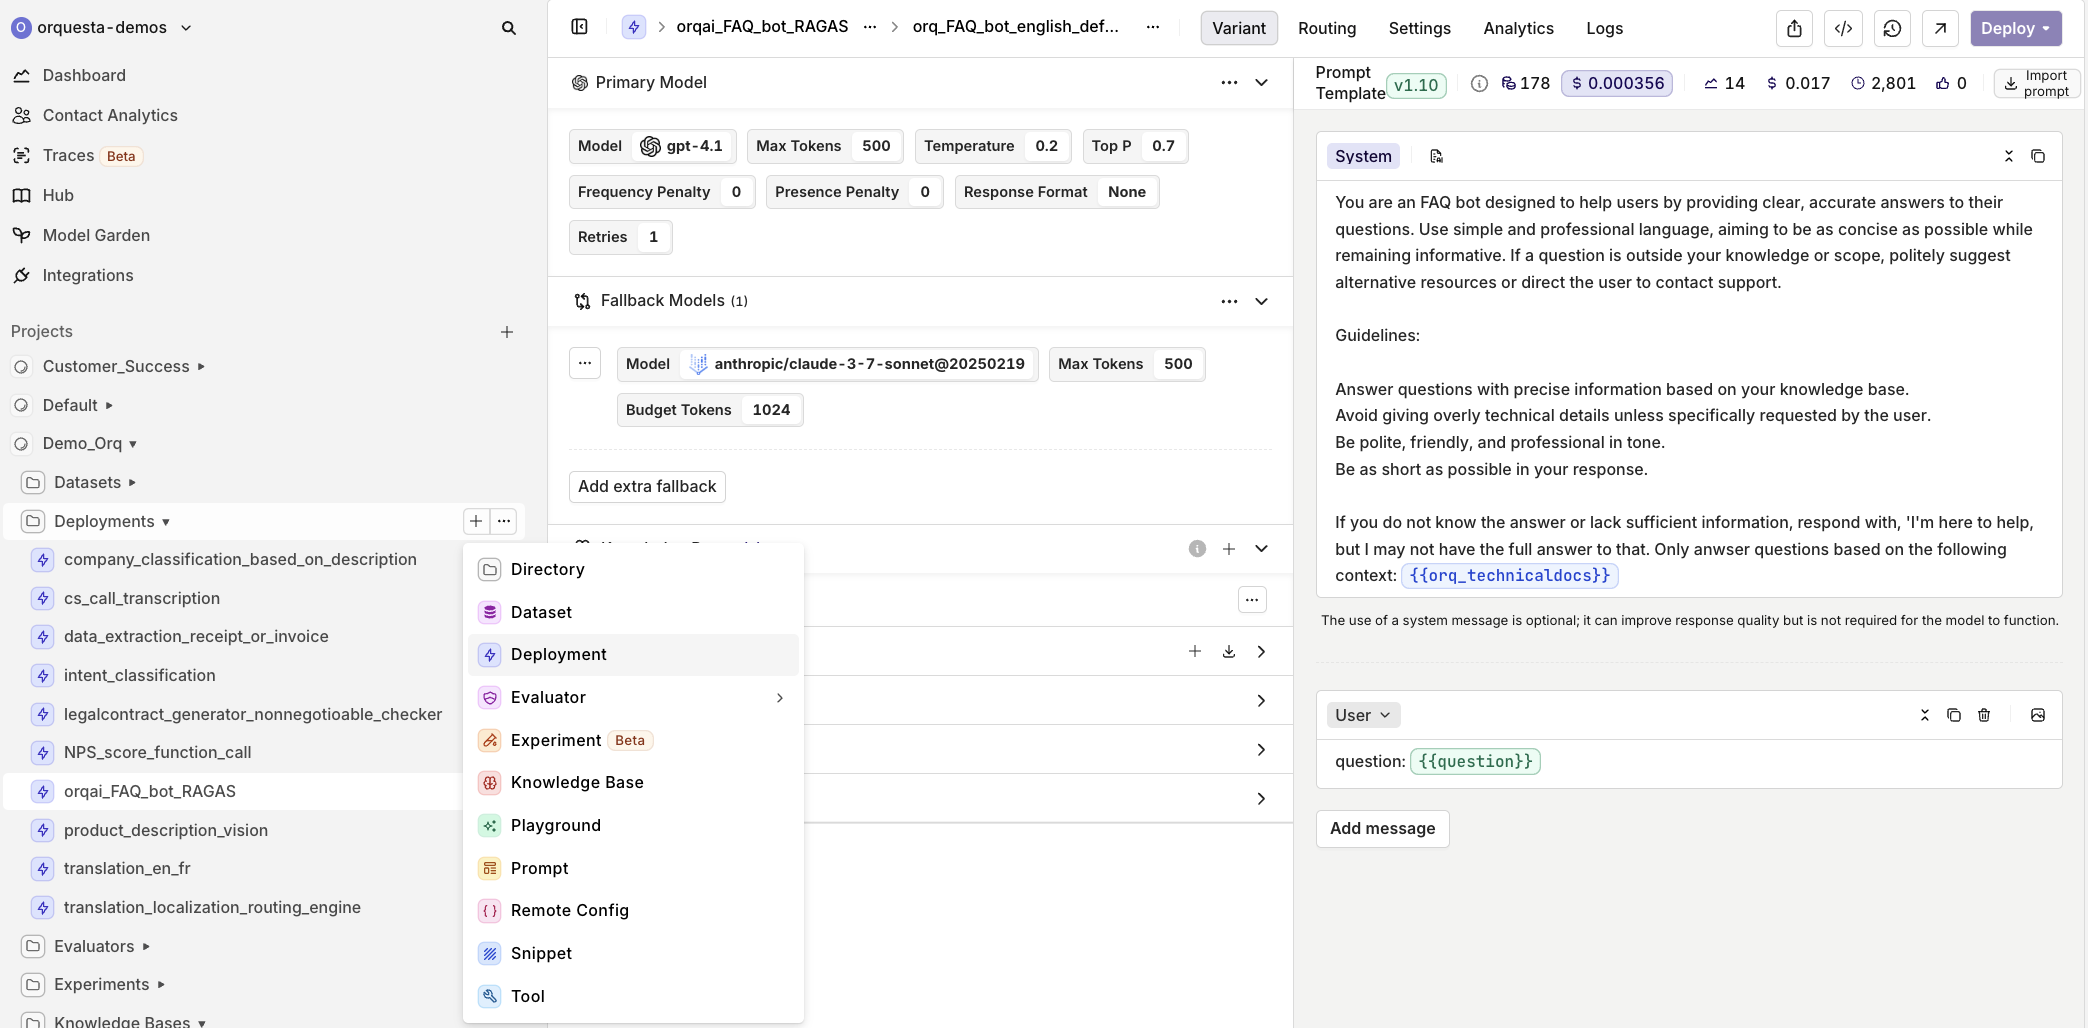
2. Create the Deployment and write the Prompt

You can add the Deployment by clicking the same + button used to add a Knowledge Base.

Your prompt defines the behavior of the assistant. It ensures that responses are clear, factual, and based only on the retrieved content. Below is a recommended structure:

### Role
You are a customer service assistant working for Orq.ai specialized in answering questions as accurately and factually as possible given all provided context. If there is no provided context, don’t answer the question but say: “sorry I don’t have information to answer your question”. Your goal is to provide clear, concise, and well-supported answers based on information from a knowledge base.

### Instructions
When responding:
* Express uncertainty on unclear or debatable topics
* Avoid speculation or personal opinions
* Break down complex topics into understandable explanations
* Use objective, neutral language

When asked a question:
ONLY use the following data coming from a knowledge base to answer your question:

<data_you_can_use>
{{orq_technical_docs}}
</data_you_can_use>

Replace {{orq_technical_docs}} with the name of the knowledge base you uploaded.

3. Configure the Model in Orq.ai
Once your system prompt is set up, you can configure which model powers the responses. Orq.ai allows you to tune the available paramaters of the model, and set fallback behavior through model settings.

In this example, the primary model is GPT 4.1 hosted by OpenAI, with Claude 3.7 Sonnet set as a fallback. You can adjust generation parameters to balance precision and creativity based on your use case.
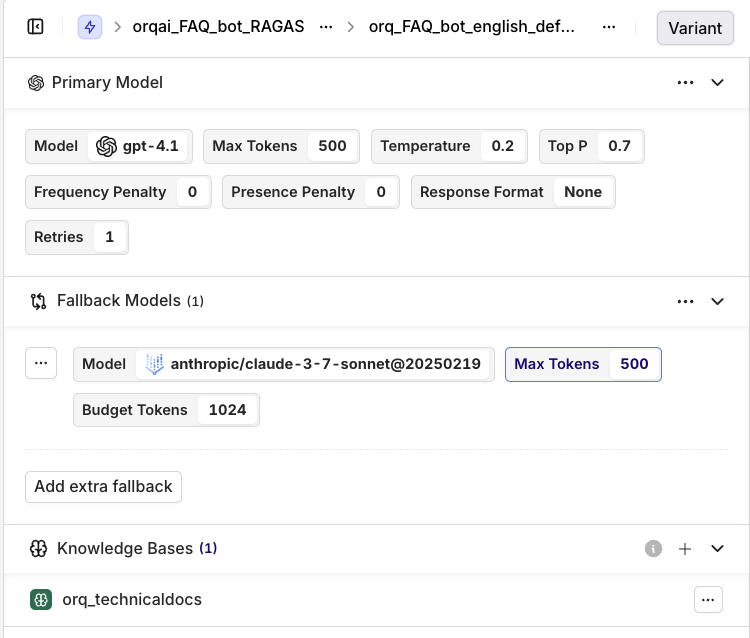
You can add more fallback models if needed, but in most cases one high quality fallback is sufficient for FAQs.

Connect the knowledge base
Make sure the correct knowledge base is selected in your workflow. In this case, the knowledge base is named:
orq_technicaldocs

This ensures that the deployment uses the right source of context to retrieve relevant information for each user question. The variable for the knowledge base in the system prompt will appear in dark blue if it is configured correctly.

Once your model configuration is complete, your Orq.ai backend is ready to receive requests and deliver answers.

Step 2: Design the Interface in Lovable

Now that the backend is ready, build the chatbot interface using Lovable prompts.

  1. Create a new project in Lovable
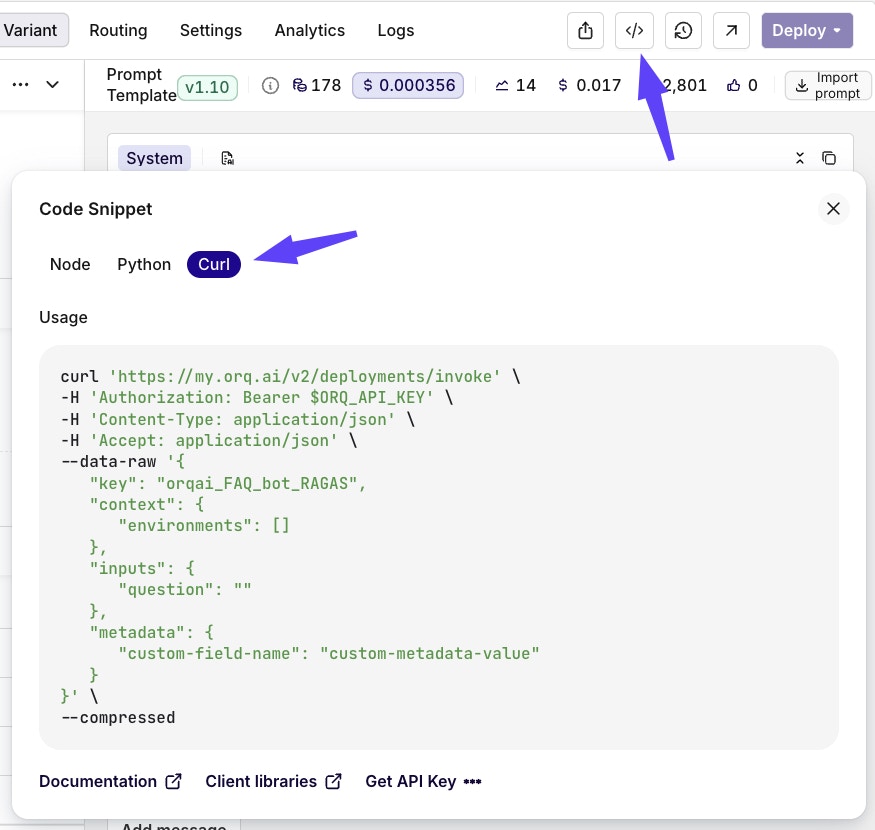
    Open Lovable and start a new project. Use the chat input to describe the layout you want. We'll include the curl snippet for backend integration directly, this can be retrieved from your Orq.ai deployment.

    For example:

Can you build a good-looking conversational frontend for the Orq.ai FAQ chatbot. The goal is to have a UI/UX similar to ChatGPT—clean, modern, and intuitive—but styled using the colors from the Lovable logo for brand alignment.

Key requirements:

Chat UI/UX: Similar to ChatGPT's conversational interface.

Styling: Use Lovable brand colors.

Backend Integration: Every question should be routed to our Orq.ai deployment via the following curl snippet:

curl 'https://my.orq.ai/v2/deployments/invoke' \
-H 'Authorization: Bearer $ORQ_API_KEY' \
-H 'Content-Type: application/json' \
-H 'Accept: application/json' \
--data-raw '{
   "key": "orqai_FAQ_bot_RAGAS",
   "context": {
      "environments": []
   },
   "inputs": {
      "question": ""
   },
   "metadata": {
      "custom-field-name": "custom-metadata-value"
   }
}' \
--compressed

You can find the curl code snippet at the top right corner in a Deployment in Orq.

Refine the layout
Lovable will generate a basic layout. Adjust styling or structure as needed using follow up prompts. Once the layout looks right, you are ready to connect the logic.

Step 3: Use Supabase to Securely Store the API Key

Lovable does not provide a built in way to securely store API keys. To keep your integration secure, you will route all external requests through a Supabase Edge Function. This allows you to store the Orq.ai API key safely and avoid exposing it in the frontend.

To get started:

  • In Lovable, click on the Supabase icon in the left sidebar
  • Create a new project when prompted
  • Lovable will handle the setup automatically and connect the project for you

Go through all the Supabase related steps when connecting. Once that’s done, open the Chat tab in Lovable and prompt:

I have an API endpoint from my AI workflow that I want to connect with this mockup. I realize I need to store the API secret somewhere on Supabase, what should I do?

Lovable will scan your project and propose a plan to:

  • Create an edge function
  • Store the Vellum API key securely
  • Send requests to your workflow

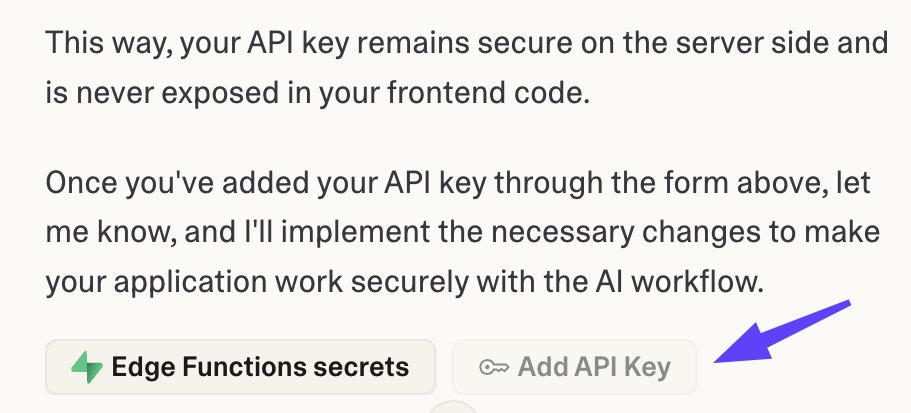
Click “Implement the plan” and paste your Vellum API key when prompted. I got this response once I did everything from the above:

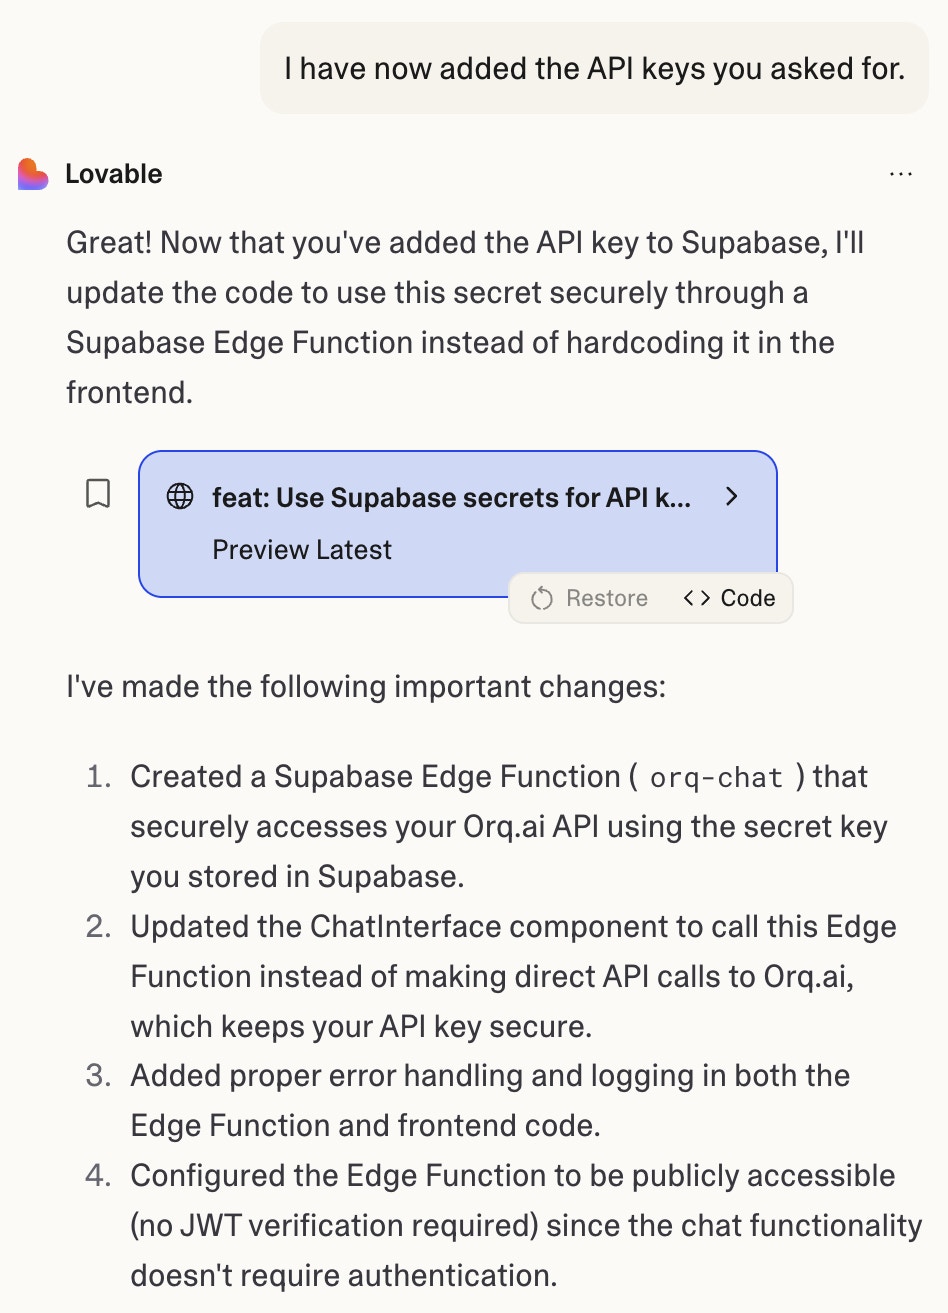
After adding the API Key I told Lovable that I added it and it started updating the code, so the API Key is safely stored in a Supabase Edge Function.

Step 4: Test and Iterate

Run a few test conversations in Lovable to confirm that questions are correctly sent to Orq.ai and responses are coming back as expected. You can also check the Logs in Orq to verify that the Deployment is functioning properly.
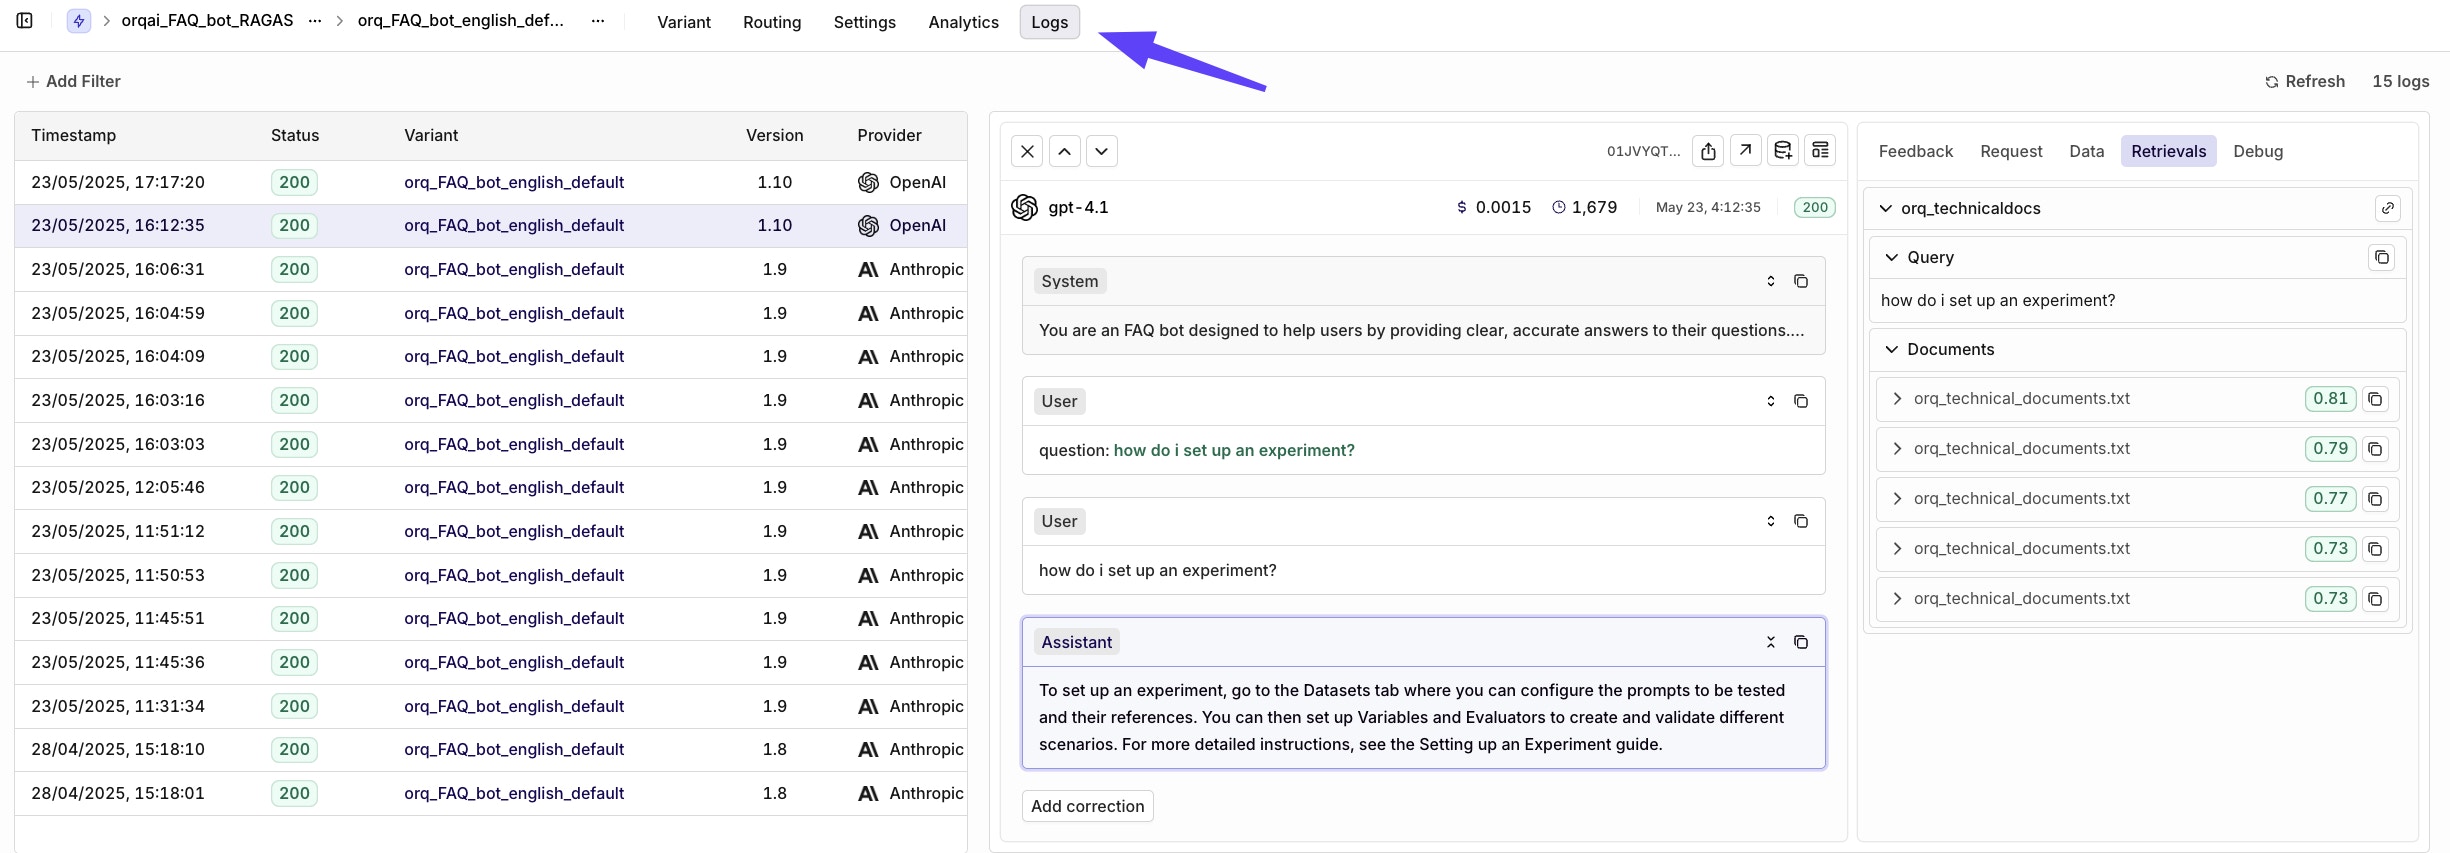
If something does not work as expected, ask Lovable:

Check what might be going wrong with the API call and make sure the response is displayed correctly in the chat.

Lovable will review the logic and suggest corrections, such as adjusting the structure of the request or updating the way the response is rendered.

Next Steps

You have now built a fully functioning FAQ bot using Orq.ai and Lovable. Orq.ai handles the GenAI logic using retrieval augmented generation, and Lovable provides a lightweight and prompt based interface for user interaction.

This approach makes it easy to experiment, iterate, and deploy AI powered tools without involving backend engineering. You can apply the same pattern to other use cases such as customer support, internal knowledge assistants, or onboarding bots.

For questions or feedback, reach out to us at [email protected].